Converting seconds to minutes in Microsoft Excel is a common task that can be accomplished with a simple formula. By utilizing Excel’s calculation capabilities, you can transform 1800 seconds to minutes format. This guide will assist you in performing this conversion efficiently, enhancing your data analysis and presentation skills.
Key Takeaways
- Mastering formulas and inbuilt functions in Excel facilitates swift and accurate conversion of seconds to minutes.
- Using division simplifies the process, allowing users to quickly translate seconds into minutes through straightforward arithmetic.
- Employing custom cell formatting enhances data presentation without altering the underlying values.
- TEXT function proves valuable for converting and displaying time data in specific text formats, ensuring a dual purpose of data manipulation and readability improvement.
Download the Excel Workbook and follow along with the tutorial on How to Convert 1800 Seconds to Minutes in Excel – Download excel workbookSeconds-to-Minutes.xlsx
Table of Contents
Introduction to Time Conversion in Excel
The Significance of Accurate Time Data
Accurate time data is indispensable in various business operations and analytical processes. From calculating employee hours to scheduling project timelines, precision in time tracking can greatly affect productivity and accountability. It enables organizations to gauge performance, forecast future undertakings, and manage resources effectively.
Overview of Excel’s Capabilities for Time Manipulation
Microsoft Excel’s toolbox for time manipulation is comprehensive, catering to the needs of users who manage schedules, and deadlines, or track time-based data. With functions designed to recognize time formats, calculate differences, and convert units, Excel is a powerful ally for professionals across fields. Additionally, the application’s seamless integration of these time-related functions with its vast array of analytical tools makes it a go-to choice for data analysis and time management tasks.
Mastering the Basic Time Conversion Formulas
Method 1 – The Role of Simple Arithmetic in Converting Seconds
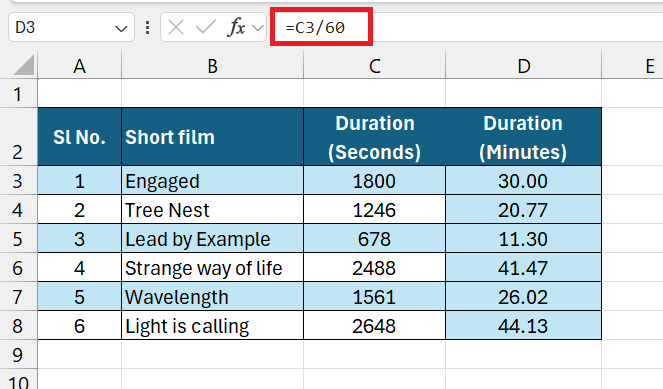
Converting seconds to minutes or other time units in Excel often begins with simple arithmetic, harnessing the inherent structure of the spreadsheet to perform quick calculations. By simply dividing the number of seconds by 60, Excel users can efficiently translate seconds to minutes. This straightforward division makes time conversions accessible to users at all skill levels, enabling them to manipulate and interpret time data with minimal complexity.
This method will easily convert 1800 seconds to minutes.
Method 2 – Utilizing Inbuilt Functions for Quick Conversions
Excel offers various inbuilt functions that streamline the conversion process, making it uncomplicated for users to switch between units of time. One such function is the CONVERT function, which can transform a multitude of measurement units, including time. The syntax is simple:
=CONVERT(number, "from_unit", "to_unit")
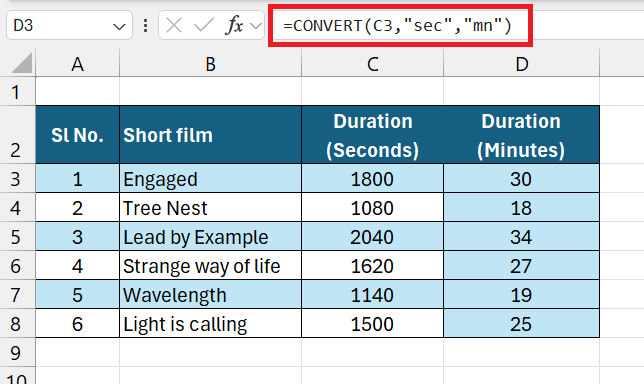
For example, to convert the seconds mentioned in cell C3 to minutes, the formula would be:
=CONVERT(C3, "sec", "mn")
The convert function can effortlessly convert 1800 seconds to minutes.
This inbuilt function not only standardizes the conversion process but also ensures accuracy and enhances productivity by saving users from manual calculations. It supports a broad range of units, encompassing mass, volume, temperature, and, crucially for our purposes, time.
Using these functions is a testament to Excel’s versatility and its ability to adapt to the user’s specific conversion needs.
Method 3 – Custom Cell Formatting for Displaying Minutes and Seconds
Custom cell formatting in Excel allows users to define how they want the data to appear, without altering the actual data. When it comes to displaying minutes and seconds, this feature can be particularly handy.
Here’s a step-by-step guide to apply a custom number format for minutes and seconds:
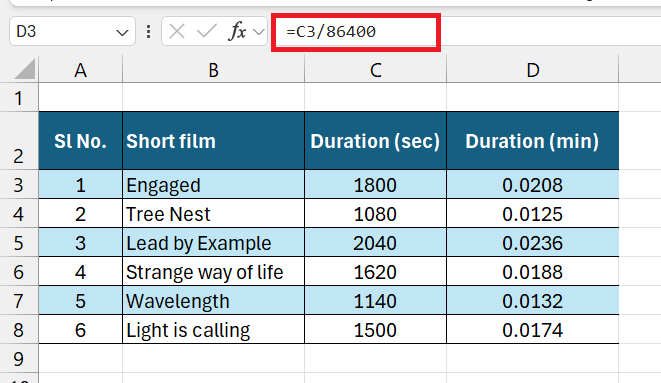
STEP 1: Suppose you have a list of times in seconds and you want to present them as minutes and seconds (mm:ss). First, convert the time in seconds into Excel’s serial number format by dividing by 86400, which is the total number of seconds in a day.
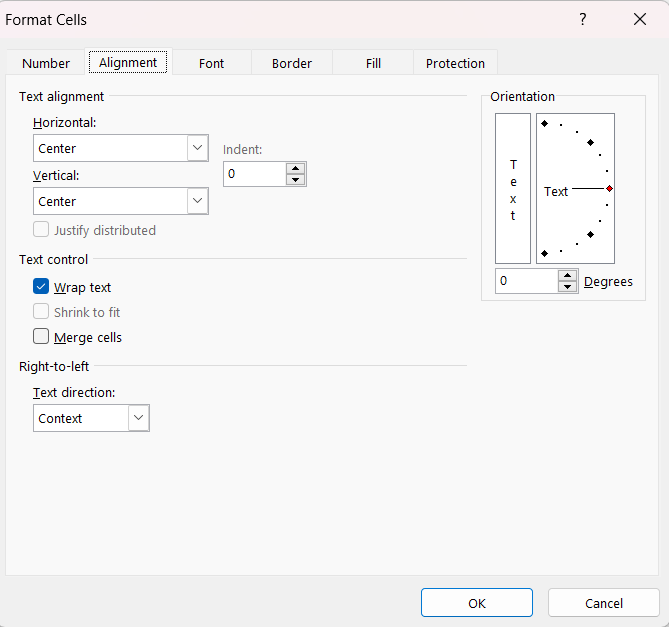
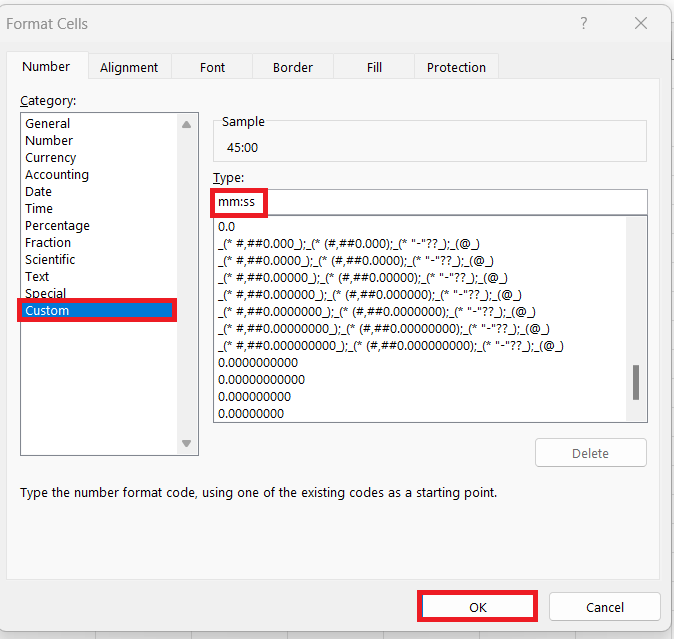
STEP 2: Press Ctrl + 1 or right-click and choose Format Cells from the context menu. This action opens the Format Cells dialog box.
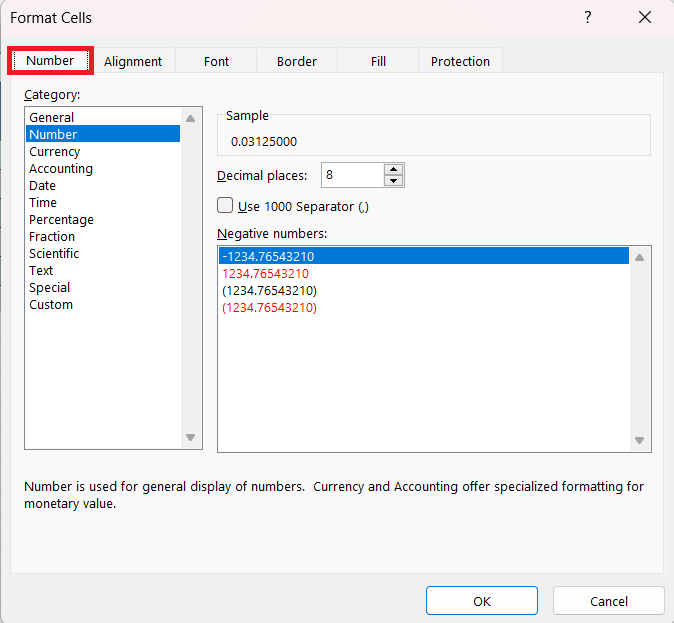
STEP 3: In the dialog box, switch to the Number tab.
STEP 4: Choose Custom from the category list on the left side. In the Type input box, type mm:ss to format the cell value as minutes and seconds and click OK to apply the formatting.
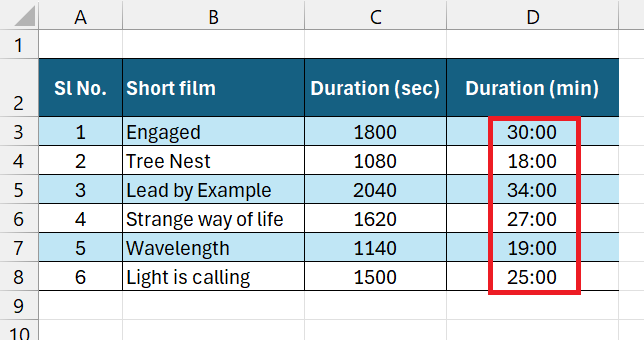
STEP 5: Check the result.
After applying this format, any numerical value will be displayed as minutes and seconds. A value of 123, for example, would appear as 02:03, representing 2 minutes and 3 seconds. This is because Excel interprets the numerical value as a fraction of the day when using custom time formatting.
Remember, the cell still contains the original number, which is essential for maintaining the accuracy of your data for subsequent calculations or analysis.
Custom formatting is an excellent way to present data in a human-readable form while keeping the integrity of the source data intact in Excel.
Method 4 – Using Text Functions to Present Converted Time
Excel’s TEXT function is incredibly useful when you want to convert and display time data in a specific text format. It allows you to create a text version of a number in a format of your choice, which can include date/time formatting. This can be particularly useful when you need to maintain a certain layout or when preparing data for reports and presentations where the appearance of the data is as crucial as the data itself.
Here’s how you can use the TEXT function to present converted time:
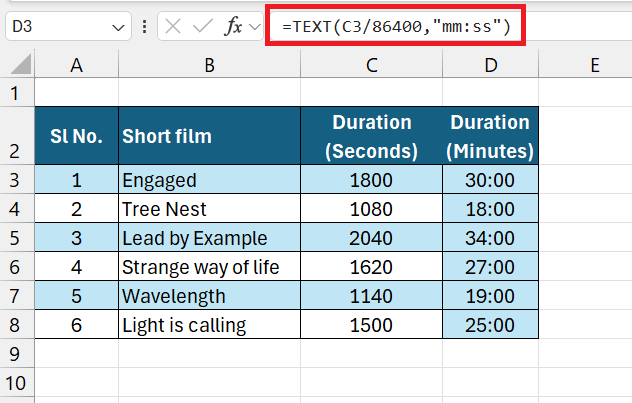
Once you have converted the time in seconds into Excel’s serial number, you can use the TEXT function to format it. For instance:
=TEXT(C3/86400,"mm:ss")
Where C3 contains the time in seconds.
The TEXT function takes this serial number and applies the specified text format, resulting in a mm:ss format. For instance, if C2 contains 1800, the formula outputs “30:00”, representing 30 minutes and 20 seconds.
By using the TEXT function, you’re not just converting data; you’re also ensuring that the visual presentation of the time information matches your reporting or data entry requirements. The function thus serves a dual purpose of both data manipulation and enhancement of readability.
Tips and Tricks from the Excel Practice Worksheet
Practice is essential for mastering Excel, and using a practice worksheet can be a valuable way to hone your skills with time conversions and other Excel functionalities. Here are some tips and tricks from the Excel practice worksheet that can elevate your proficiency:
- Experiment with Functions: Don’t just stick to one method of conversion. Experiment with different functions like
CONVERT,TEXT, and arithmetic operators, and observe how they affect the results and the presentation of the data. - Custom Formatting: Use the practice worksheet to experiment with various custom time formats. This helps you understand how Excel treats time data and the visual impact of different formats.
- Data Validation: Employ data validation on your practice worksheet. This prepares you to create robust spreadsheets that resist entry errors.
- Conditional Formatting for Errors: Apply conditional formatting to highlight errors in your practice data, helping you to quickly identify and correct mistakes.
- Use “Fill Handle” for Efficiency: Learn to use the fill handle to quickly copy formulas related to time conversion down a column or across a row – this is a great time-saver.
- Shortcuts and Quick Access: Customize your Quick Access Toolbar with tools you frequently use for time conversion tasks. Also, practice Excel keyboard shortcuts, like
Ctrl + Shift + @to apply time formatting, to enhance your workflow efficiency. - Real-World Scenarios: Use real-world time data scenarios in your practice worksheet to give context to your learning and understand how conversions can apply to actual tasks.
By incorporating these tips and tricks into your practice routine, you can significantly advance your Excel skills and develop akeen understanding of the most effective ways to manipulate and present time data, leading to more accurate analysis and professional-level spreadsheet management.
FAQ: Navigating Excel Time Conversion with Confidence
How do I convert seconds to a time format in Excel?
Use Excel’s TIME function: Enter the formula `=TIME(0,0,C3)` into a cell where `C3` contains the seconds you want to convert. After applying the TIME function, right-click the cell, choose “Format Cells,” then select “Custom” and type `mm:ss` to display minutes and seconds.
Can I convert a large list of seconds to minutes all at once in Excel?
Enter the conversion formula for the first item in the list, then click and drag the fill handle down to copy the formula to other cells.
Is there a direct function in Excel to convert seconds to minutes?
While there’s no direct “seconds to minutes” function, you can divide the value in seconds by 60 in a formula, such as `=C3/60`, where `C3` is the cell with seconds. After dividing, format the cell as a number with two decimal places to represent minutes and fractions of a minute.
What if I need to convert seconds to minutes in Excel?
Enter `=CONVERT(A1,”sec”,”mn”)` to convert seconds in cell `A1` to minutes. Apply this formula to a range of cells by dragging the corner of the cell where you first input the formula across other cells containing seconds.
John Michaloudis is a former accountant and finance analyst at General Electric, a Microsoft MVP since 2020, an Amazon #1 bestselling author of 4 Microsoft Excel books and teacher of Microsoft Excel & Office over at his flagship Academy Online Course.
