If you’re looking to project dates 9 months from now, Microsoft Excel offers a straightforward solution to help you visualize your timelines. By using simple date formulas, you can compute precisely what the calendar will read 9 months from now. In the following guide, we’ll show you the steps to harness Excel’s functionalities to calculate 9 months ahead with ease and accuracy.
Key Takeaways
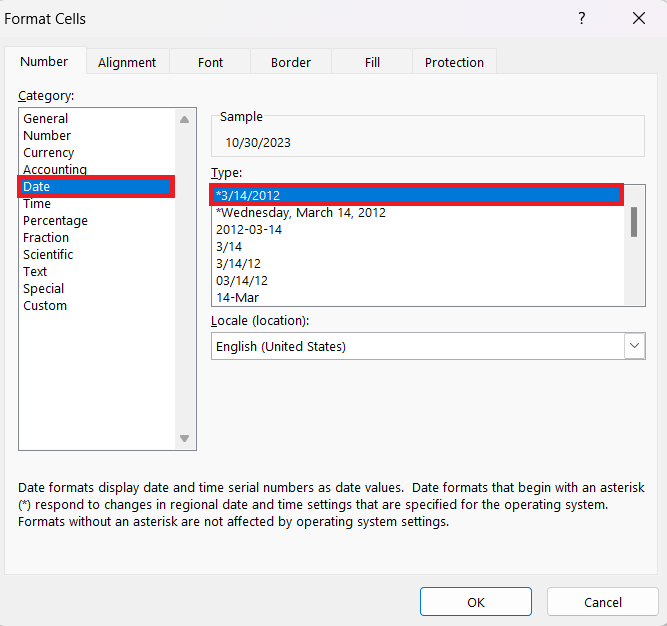
- Ensure your starting date is correctly formatted in Excel by pressing Ctrl + 1 and setting the cell to Date format.
- Use the formula =EDATE(C3,C5) to add months to a date, where cell C3 contains the original date and C5 specifies the number of months to add.
- Become more efficient by using keyboard shortcuts like Ctrl+; to insert today’s date and Ctrl+Shift+# to apply the default date format.
Download the workbook and follow along with the tutorial on How to calculate 9 months from now in Excel – Download excel workbook9-months-from-now-in-excel.xlsx
Table of Contents
Navigating Through Time with Excel
The Significance of Date Manipulation in Excel
Date manipulation in Microsoft Excel is an indispensable skill for professionals across various fields. The ability to project dates into the future or track records precisely plays a crucial role in financial forecasting, project management, and operations planning. Whether you’re pinpointing due dates, scheduling follow-ups, or assessing timelines, mastering Excel’s date functions will endow you with greater control over your datasets and analytics.
Key Functions for Working with Dates
Microsoft Excel includes a plethora of functions designed to work with dates, enabling users to perform a range of calculations with ease and accuracy. The following are some of the key functions that are essential for anyone looking to handle dates effectively within Excel:
- TODAY(): This function returns the current date, dynamically updating each day.
- EDATE(start_date, months): Adds a specified number of months to a date, returning the new date.
- DATE(year, month, day): Constructs a date from individual year, month, and day components.
- DATEDIF(start_date, end_date, “unit”): Calculates the difference between two dates based on the specified unit (days, months, years).
- NETWORKDAYS(start_date, end_date): Finds the number of workdays between two dates, excluding weekends.
- NETWORKDAYS.INTL(start_date, end_date, weekend, holidays): Similarly, it calculates workdays while allowing for custom weekend days and holidays.
- YEARFRAC(start_date, end_date, [basis]): Gives the fraction of the year represented by the number of whole days between two dates.
Each of these functions can be combined with others or used alone to manage dates efficiently in an Excel spreadsheet.
Getting Started with Adding Months to Dates
Understanding the EDATE Function
The EDATE function in Excel is a straightforward and powerful tool for computing dates that are a specific number of months away from a given starting point. Understanding this function is essential for carrying out monthly calculations such as setting deadlines, scheduling recurring events, or forecasting future dates based on a monthly cycle.
Simple Steps to Use the EDATE Function
Using the EDATE function is an approachable process. Here’s how you can apply it to calculate dates in Excel:
- Direct Input:
=EDATE("mm/dd/yyyy", months) - Using DATE:
=EDATE(TODAY(), months) - Cell Reference:
=EDATE(A2, months)where A1 is the cell with the today’s date.
Following these steps, you can effectively use the EDATE function to navigate through time within your Excel worksheets.
For example, to calculate a date that is 9 months from now i.e. for instance 2/24/2024 using direct input using this format =EDATE(start_date, number_of_months), where the start date will be 2/24/2024 and the number of months will be 9 months which we is to be added :
STEP 1: Identify the Original Date. Determine the date from which you’re starting. This date can be manually entered, as part of a DATE formula, or referenced from a cell that contains the date. For this instance, the date used will be 2/24/2024.
STEP 2: Specify the Month Delta. Calculate the date 9 months from now. For example, to go ahead 9 months, you would use 9.
STEP 3: After entering the formula, Excel will output the resulting date. in this instance:
Or if you put the formula “TODAY()” in place of the date in mm/dd/yyyy format like the earlier example, it will correspond to today’s date, and 9 for 9 months from now, helping in calculating 9 months from now:
Or if you have the start date in cell A2, where today’s date is mentioned:
This will yield the date 9 months after February 20, 2024, considering leap years and different month lengths automatically.
Specific Use Case: Adding Nine Months with Precision
Add or subtract a combination of days, months, and years to/from a date
For more complex date calculations that involve adding or subtracting a combination of days, months, and years to a given date, you can tailor Excel formulas to fit your specific needs. This is particularly useful when dealing with varying periods that can’t be addressed by a single function like EDATE. Here is a practical approach to handling such calculations:
- Use the DATE Function: The core function used for these calculations is the DATE function, which allows you to create a date from individual year, month, and day components. By adjusting each component, you can add or subtract the desired amount of time.
- Utilize Cell References: To maintain flexibility and readability, use cell references for the number of years, months, and days you’re adjusting. This way, you can easily change the values without rewriting the entire formula.
- Craft Your Formula: Combine the DATE function with YEAR, MONTH, and DAY functions to add or subtract the values. For example: To add 9 months, and add 15 days from today’s date in cell A2:
- For dynamic adjustments, consider having cells B2 (years), C2 (months), and D2 (days) hold the values you’re adjusting by:
Remember that once the formula is entered and the computation is done, format the cell to display a date to reinforce clarity and readability.
This approach gives you tremendous versatility in Excel to perform date calculations encompassing everything from simple arithmetic to complex scheduling scenarios.
Subtract months from a date
Subtracting months from a date in Excel can be accomplished with a similar level of ease as adding months. The EDATE function proves equally effective for this operation. Here’s how you can subtract months from a given date:
STEP 1: Identify the Original Date: Determine the date from which you’re starting. This date can be manually entered, as part of a DATE formula, or referenced from a cell that contains the date.
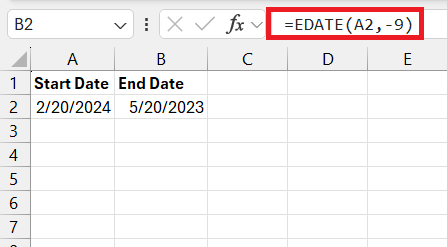
STEP 2: Specify the Month Delta: Calculate how many months you need to go back. This will be a negative number. For example, to go back 9 months, you would use -9.
STEP 3: Input the EDATE Formula: Input the EDATE function in a cell, including your start date and the negative month delta as parameters:
- For instance, if you’re subtracting 9 months from a date in cell A1:
After entering the formula, Excel will output the resulting date. Ensure the cell’s format is set to display a date so it’s understandable at a glance.
When subtracting months, Excel’s EDATE function continues to manage month lengths and leap years seamlessly. If subtracting the specified number of months pushes the resulting date into a month that has fewer days than the original day, EDATE will automatically adjust the output to reflect the last day of the resulting month.
By understanding and using the EDATE function, you can confidently manipulate dates in Excel, whether it’s adding to or subtracting from a specific date, with full awareness of how Excel’s internal date system deals with such variations in time.
Automating the Process
Keyboard Shortcuts to Speed Up Data Entry
Leveraging keyboard shortcuts in Excel can improve your efficiency significantly by reducing the time taken for repetitive tasks, such as entering dates or formatting cells. Here are some keyboard shortcuts that can expedite your work with dates:
- Insert Today’s Date: Press
Ctrl + ;to quickly enter the current date into the active cell. This is particularly useful for logging entries with today’s date without having to type it manually. - Apply Default Date Format: Use
Ctrl + Shift + #to format the selected cells with the default date format. This brings consistency and readability to your date entries. - Select a Range of Cells: To adjust multiple date cells at once, you can use
Ctrl + Shift + Arrow Keyto extend the selection from the current cell to the last non-empty cell in the direction of the arrow key pressed. - Open Format Cells Dialog: Press
Ctrl + 1to open the Format Cells dialog where you can set custom date formats among various other formatting options. - Quickly Fill a Date Series: After entering a date, you can use
Ctrlwhile dragging the fill handle (a small square at the corner of the cell selection) to automatically fill adjacent cells with a series of dates.
By mastering these shortcuts, you stand to gain a significant edge in managing and manipulating date data quickly and accurately within Excel.
FAQ: Frequently Asked Questions About Adding Months in Excel
Can I Add Months to a List of Dates at Once?
Yes, you can add months to a list of dates at once in Excel using the EDATE function in a formula. Simply apply the EDATE formula to the first date in your list—referencing the cell with the date and the number of months you want to add—and then drag the formula down to apply it to the rest of the dates in your list. This will uniformly add the specified number of months to each date in your series.
How Do I Ensure That the Added Date Reflects the Correct Day?
To ensure that the added date reflects the correct day when using Excel formulas, you must use a combination of the EDATE and DAY functions. The formula =DATE(YEAR(EDATE(A1, x)), MONTH(EDATE(A1, x)), DAY(A1)) replaces ‘x’ with the number of months you want to add to the original date in cell A1, and maintains the specific day of the month. This method takes into account the desired adjustment in months while preserving the day from the initial date.
How do I calculate 9 months from a date in Excel?
To calculate 9 months from a given date in Excel, first ensure that the starting date is correctly formatted as a Date (press Ctrl + 1 and select Date). Then, in the desired output cell, enter the formula =EDATE(start_date, 9), replacing “start_date” with the cell reference of the date you’re adding months to. Ensure that the output cell is also formatted as a Date to display the result correctly.
Why do my results appear as numbers instead of dates?
Your results appear as numbers instead of dates because Excel is formatting the cell contents as serial numbers, which is the default way Excel represents dates internally. To see the results as actual dates, you need to change the cell format to Date. You can do this by selecting the cells with the results, going to the Home tab, choosing Format Cells, and then selecting the Date format.
John Michaloudis is a former accountant and finance analyst at General Electric, a Microsoft MVP since 2020, an Amazon #1 bestselling author of 4 Microsoft Excel books and teacher of Microsoft Excel & Office over at his flagship Academy Online Course.


