Microsoft Teams is cloud-based team collaboration software that is a part of Microsoft 365. Its core capabilities include real-time communication, meeting people online, file sharing, and much more.
In this article, we will cover the following introduction to Microsoft Teams in detail –
- Learn Microsoft Teams in Under 10 Minutes
- 3 Secret Ways to Get Microsoft Teams for FREE
- How to Change Your Background Image in Microsoft Teams
- Track Employee Activity & Usage With Teams
- Share Your Screen in a Microsoft Teams Meeting
- How to Change Audio Settings in Microsoft Teams
- Project Management with Microsoft Teams
- Breakout Room in Microsoft Teams
- Using the Whiteboard in Microsoft Teams
Learn Microsoft Teams in Under 10 Minutes
Let’s get started with the basics:
- Introduction to Microsoft Teams
- Accessing Microsoft Teams
- What is Teams
- Chat Feature in Microsoft Teams
- Call Feature in Microsoft Teams
- Shared Files on Microsoft Teams
- Setting Up a Microsoft Teams Meeting
Watch this video on how to use Microsoft Teams on YouTube and give it a thumbs-up!
Introduction to Microsoft Teams
Microsoft Team is a comprehensive communication package that allows you to meet people virtually, keep track of conversations or chats with other users, and allow sharing of documents online.It is user-friendly and can facilitate a work environment for large businesses and people working remotely. It makes communication and decision-making much easier. The core features of Microsoft Teams are:
- Meet – Provide a virtual shared workspace to collaborate on ideas and work together
- Call – Make and receive calls, send voicemails, and make call transfers
- Collaborate – Create and share files online and on a real-time basis
- Chat – Share your thoughts one-to-one or in groups
You can open Microsoft Teams online by following the steps below –
- Open the link – https://teams.microsoft.com/
- Once the Microsoft Teams website opens,
- First-time users – Click on Create One to create a new Microsoft account
- Already have an account – Simply enter your Microsoft account name/email Id and password
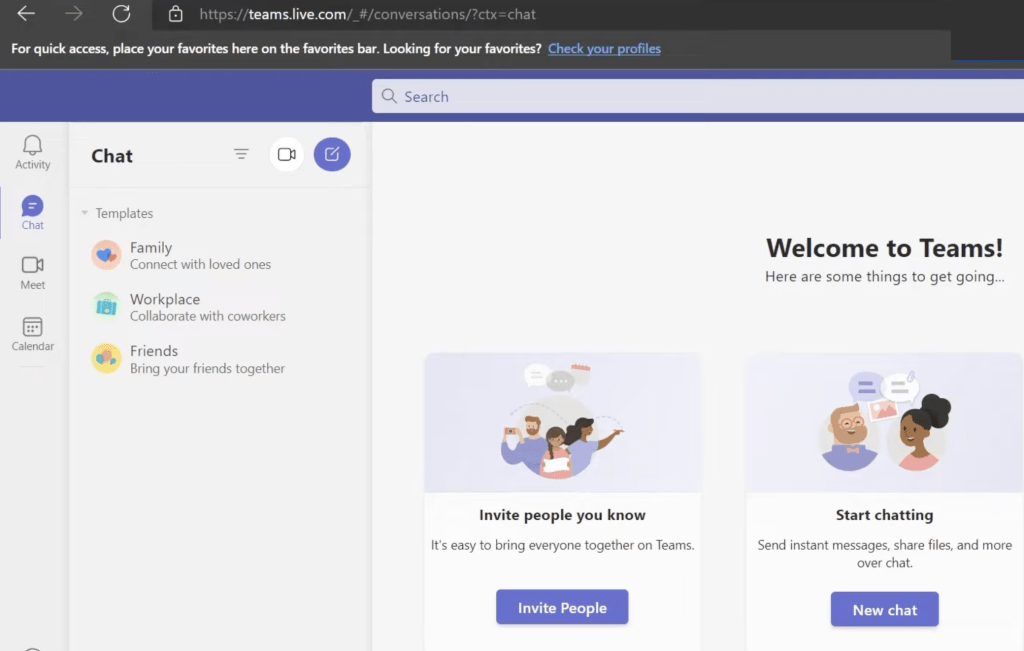
This is what the Microsoft Teams online version looks like –
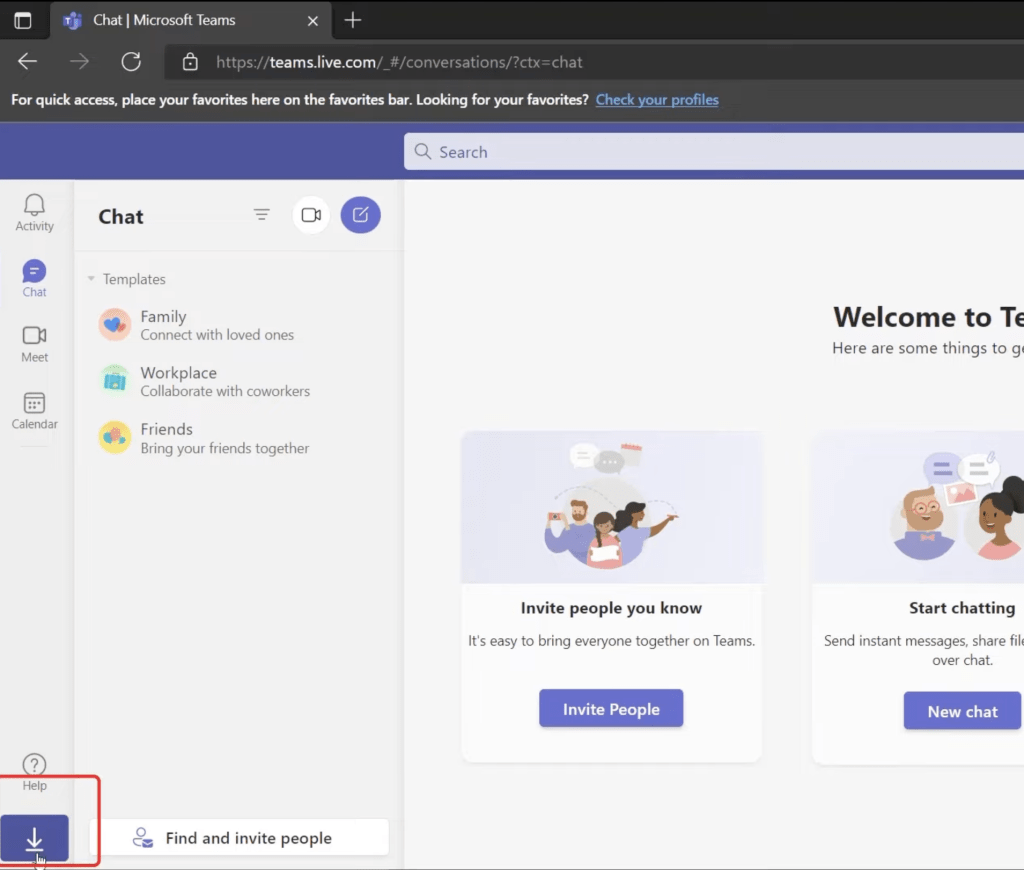
To get the Windows App for Microsoft Teams, follow the steps below:
- Open the Microsoft Teams website
- Click on the Download Desktop App button at the bottom left corner of the screen
- The application will get downloaded on your desktop.
- Install the Application
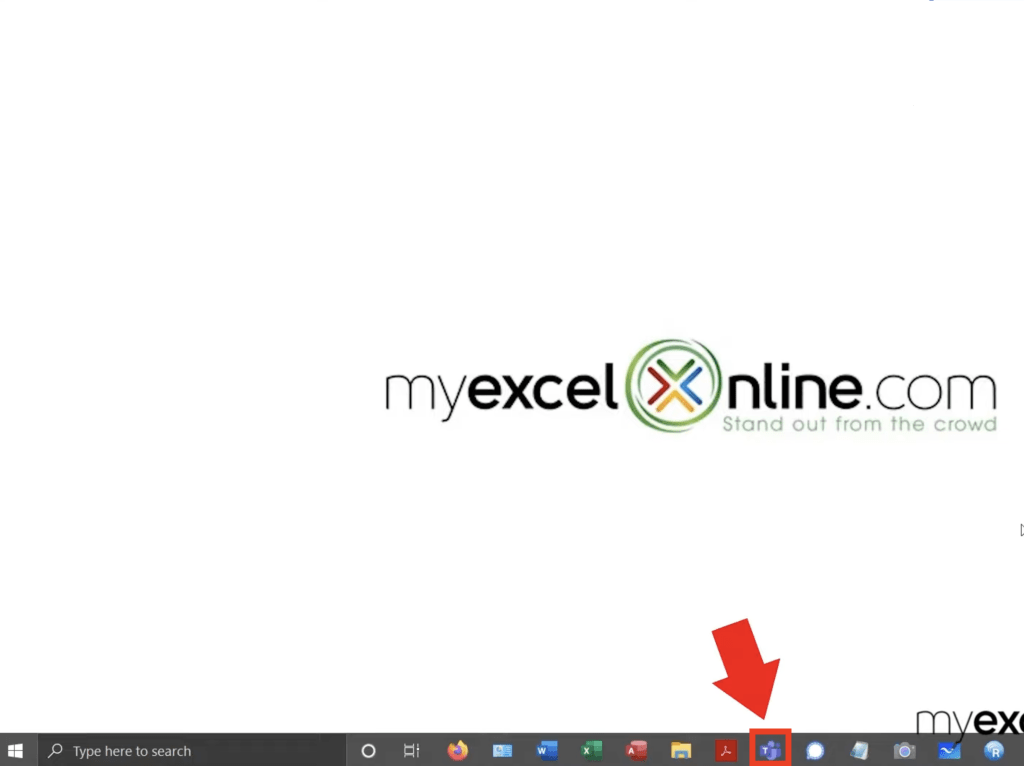
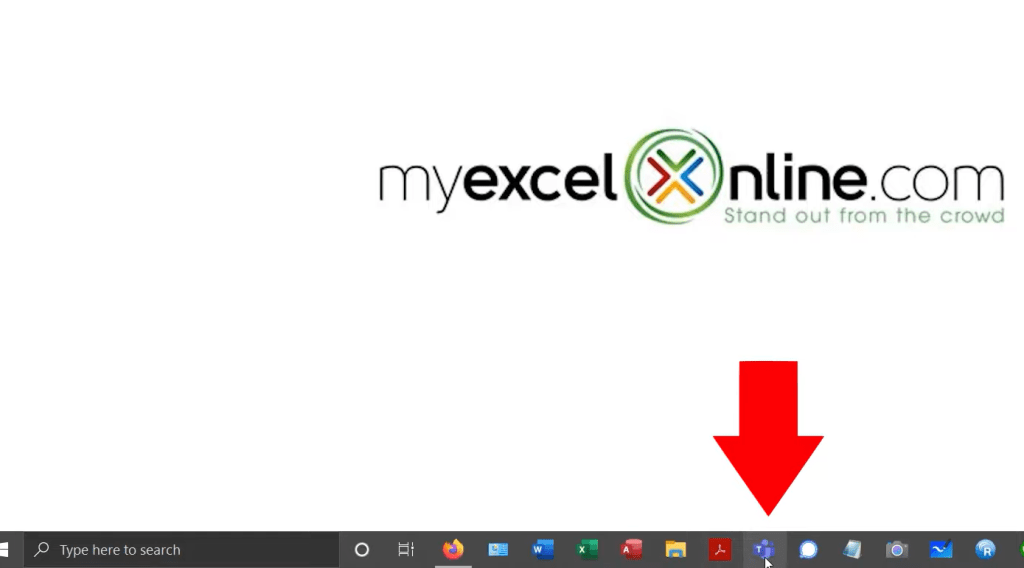
- Microsoft Teams icon will be placed on the desktop
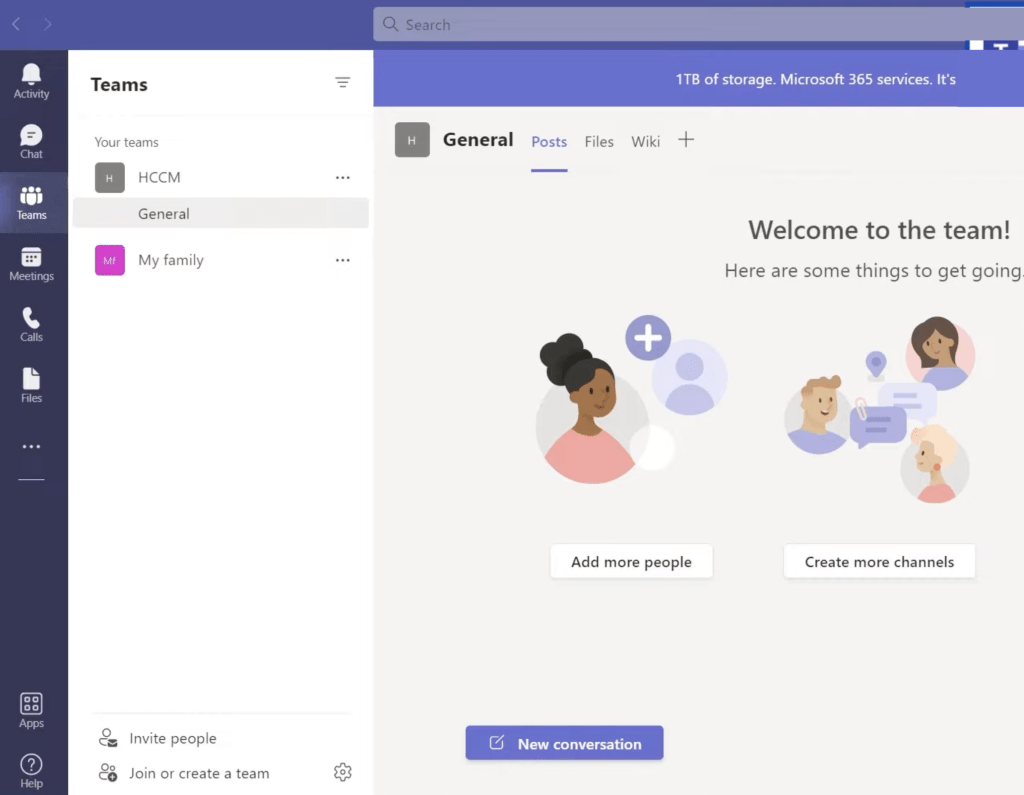
- Click on it to launch the desktop version of Microsoft Teams
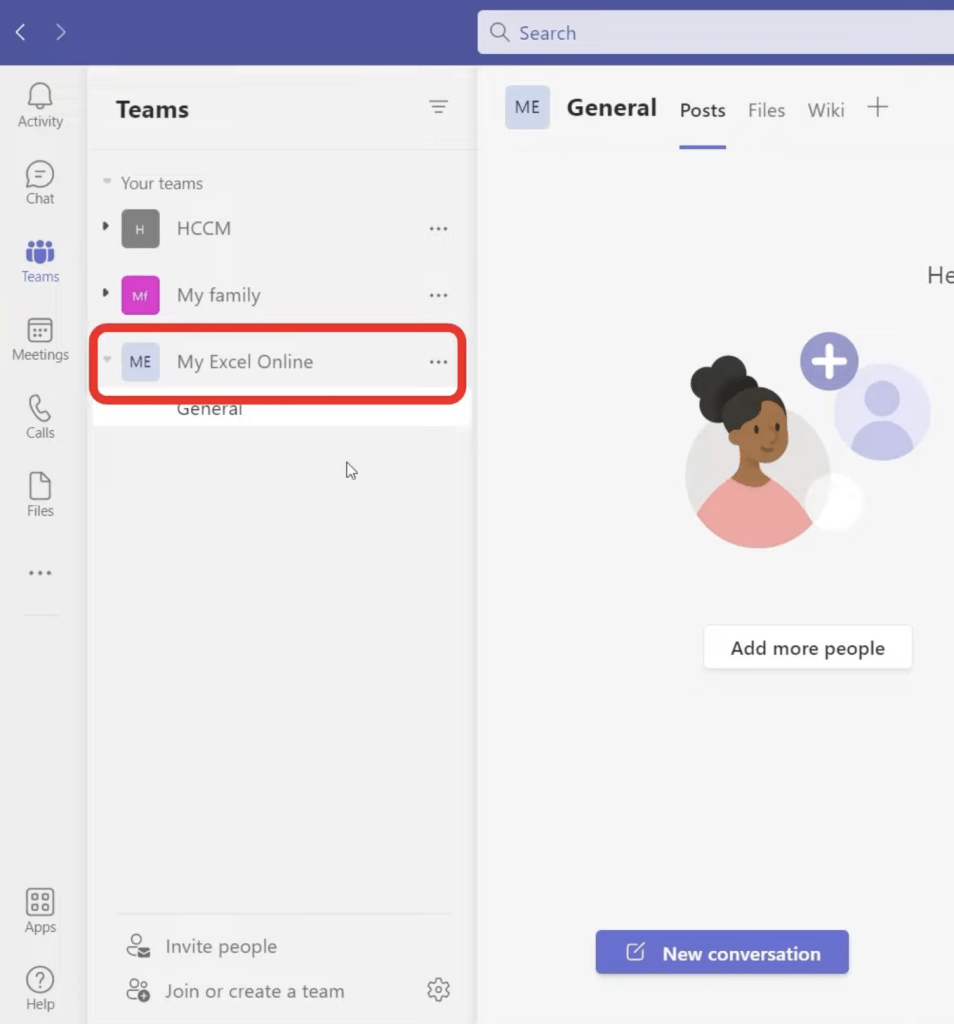
In Microsoft Teams, teams are groups of people brought together for work, projects, or common interests to regularly communicate with each other.
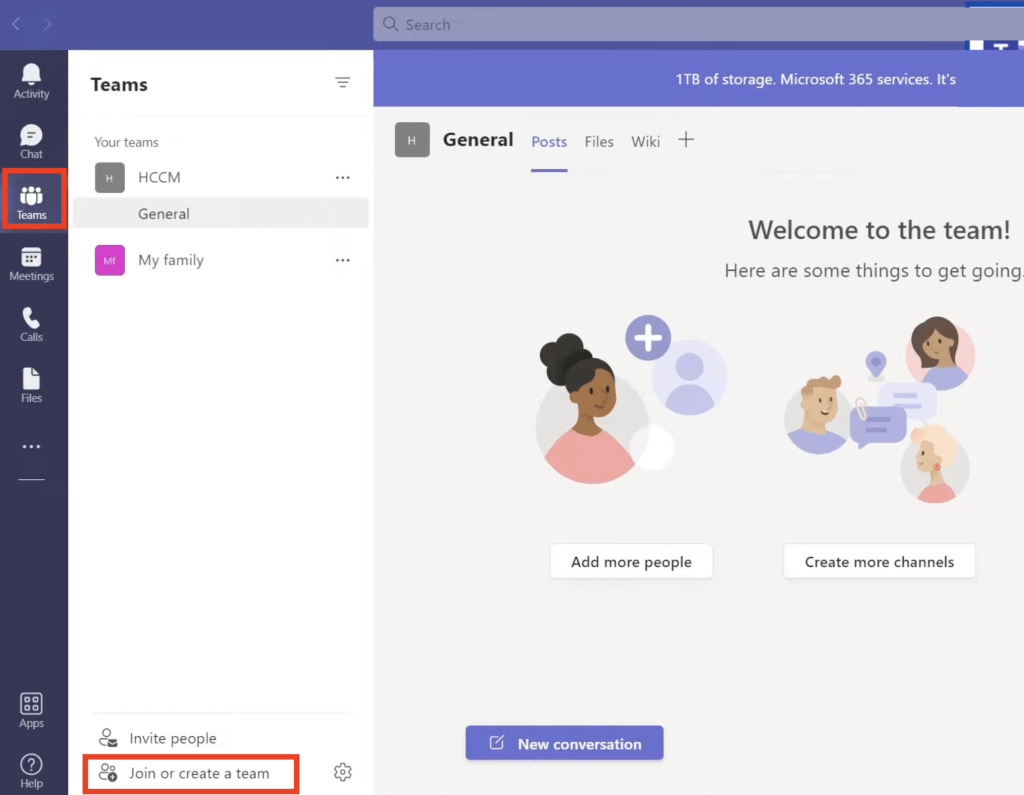
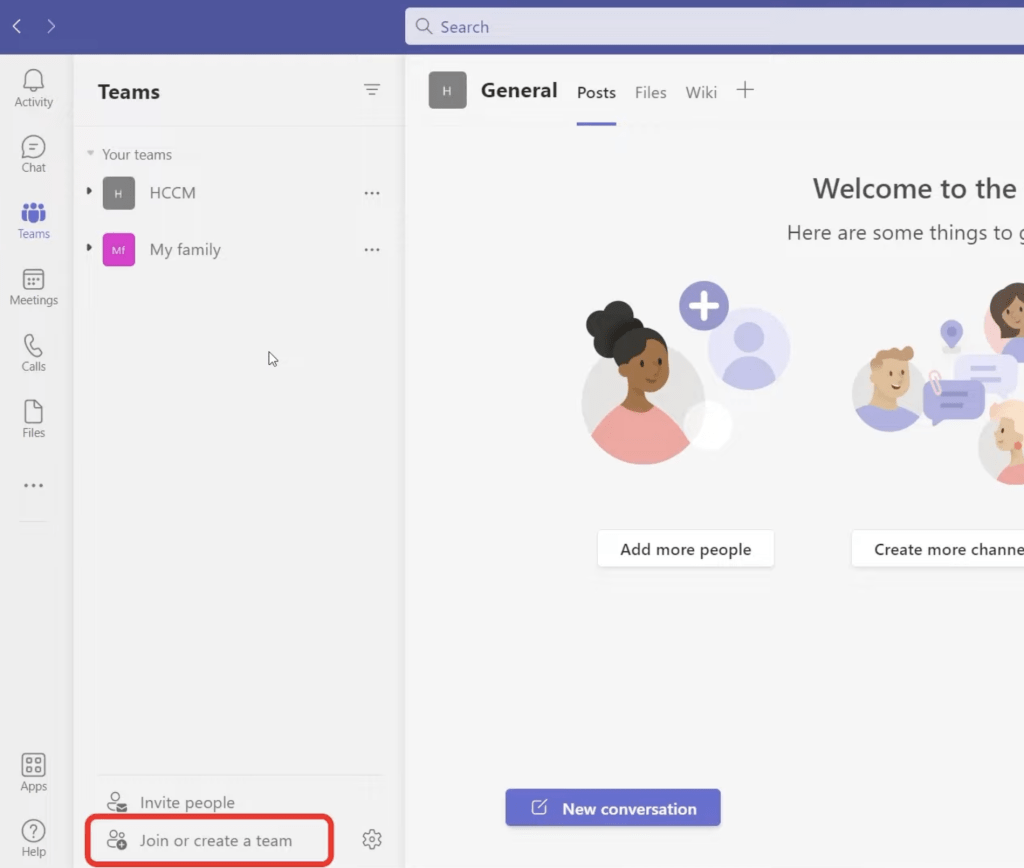
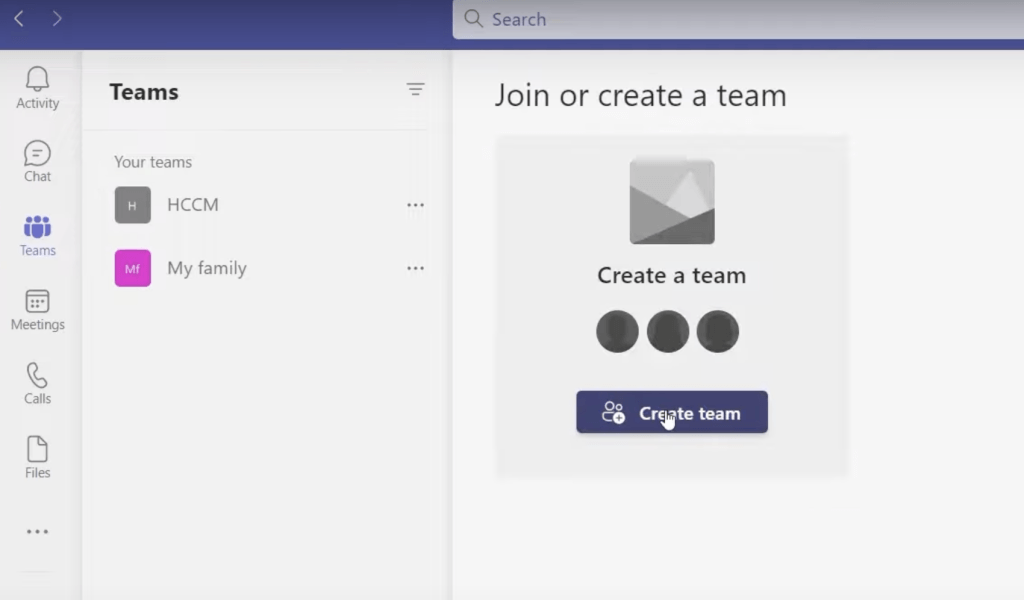
To create a new Team, simply click on the Teams icon on the left sidebar and select Join or create a team.
If you already have an existing team,
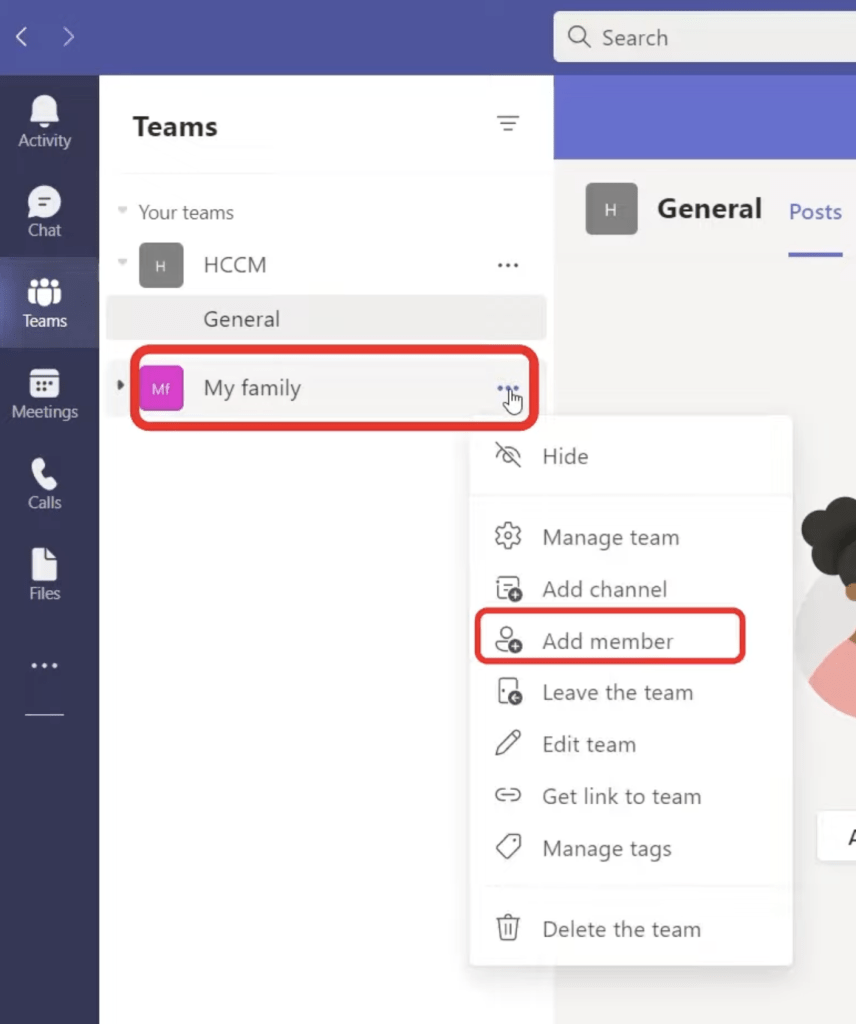
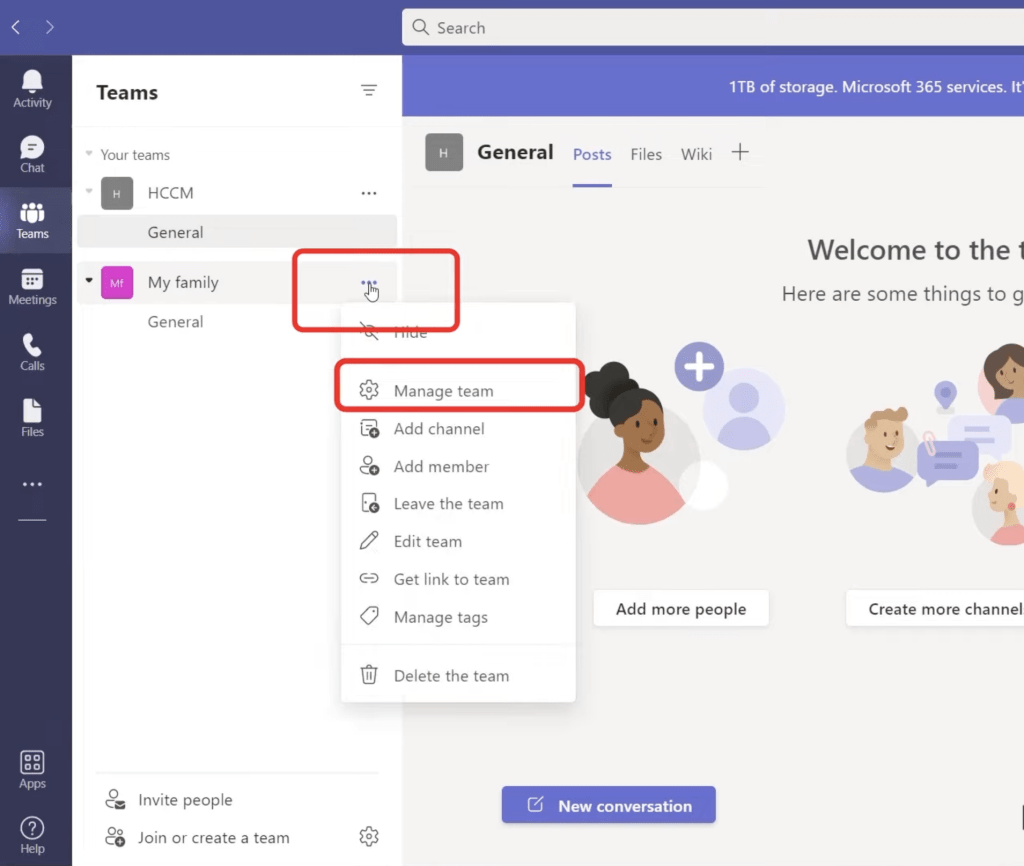
- Select the Team name you want to edit.
- Click the More Options button and then select Add member from the dropdown
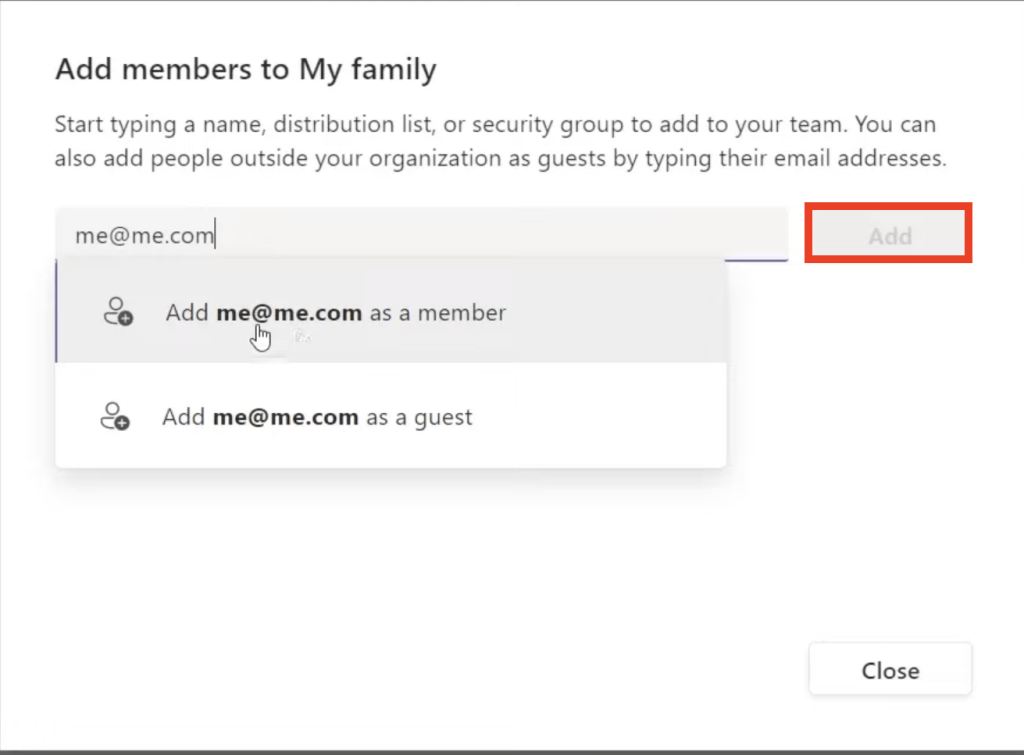
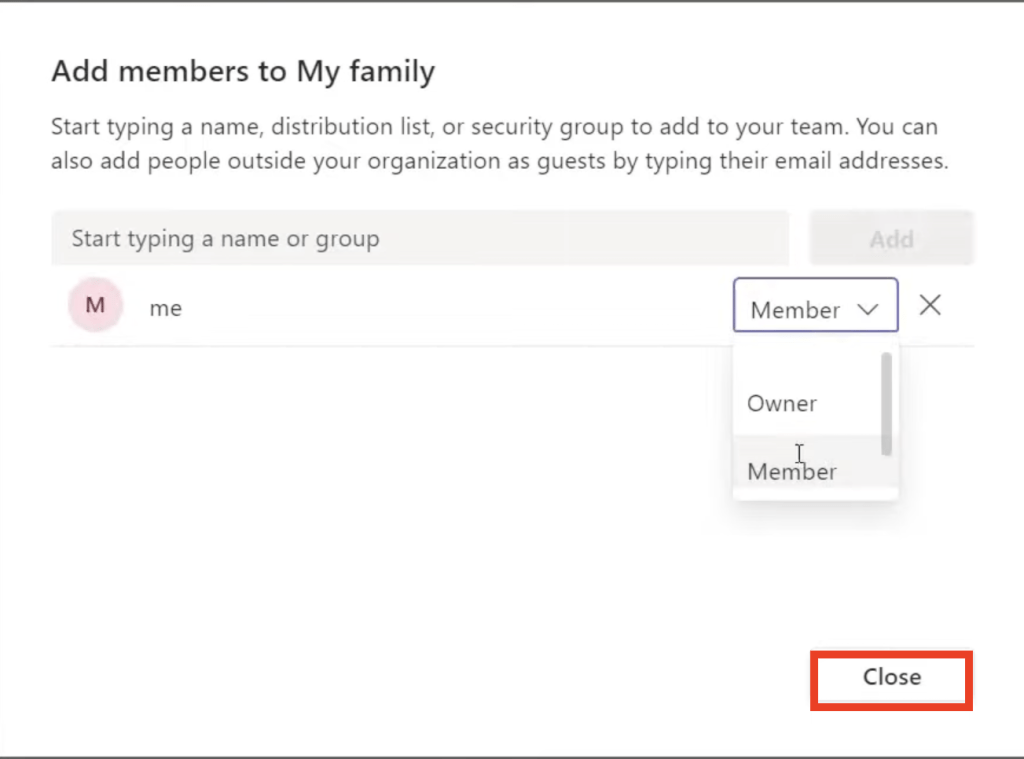
- Type the name of the person or a group and select Add
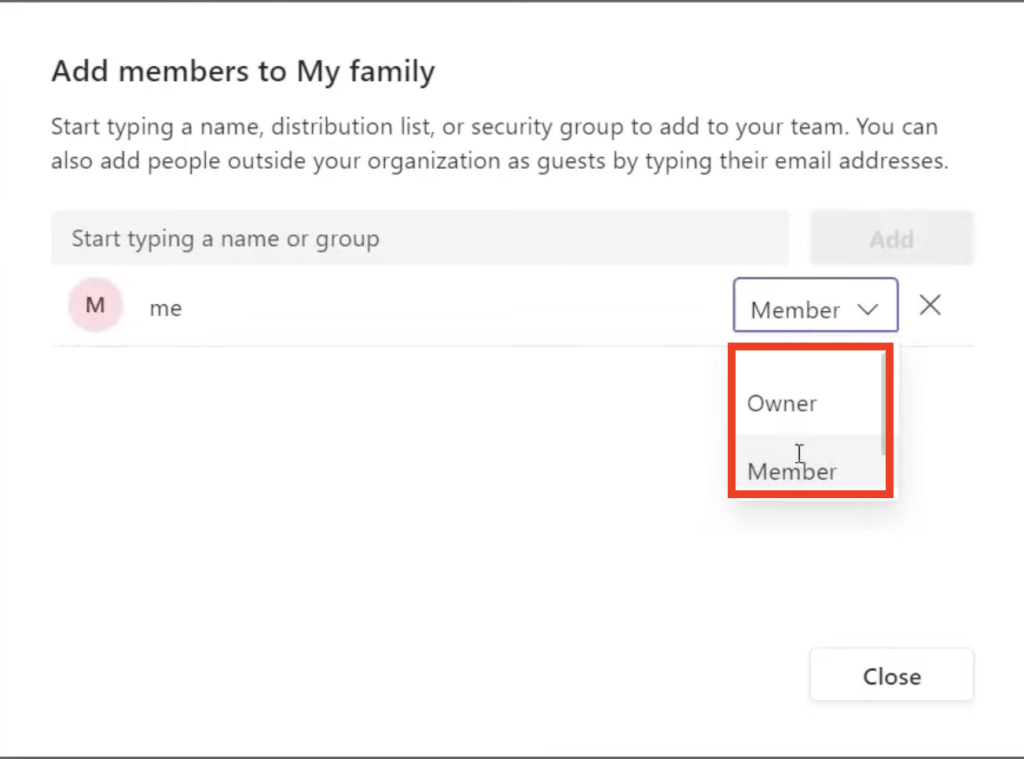
- Change the status of the person to an owner or a member as per your requirements
- Once you have made the change, click on Close
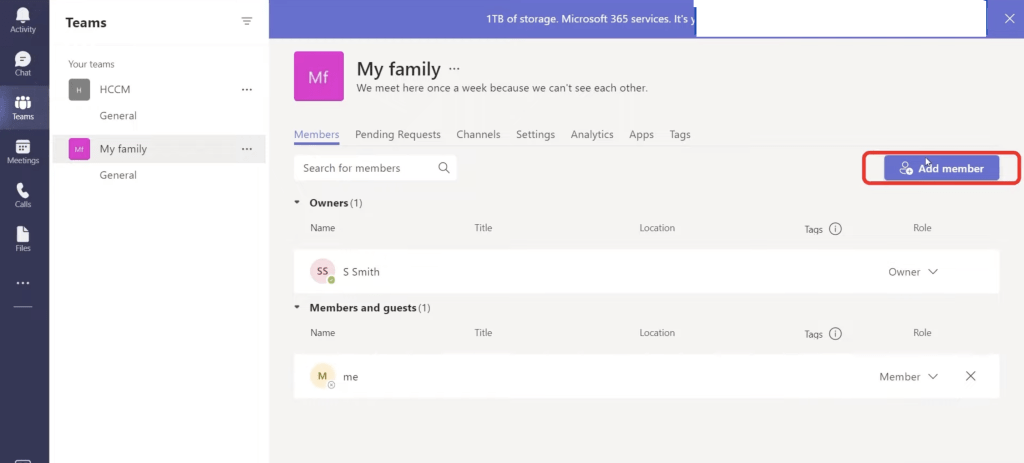
You can also see the owners, members, and guests of the team by clicking on the Manage Team option.
You can add more members to this team by selecting the Add members button.
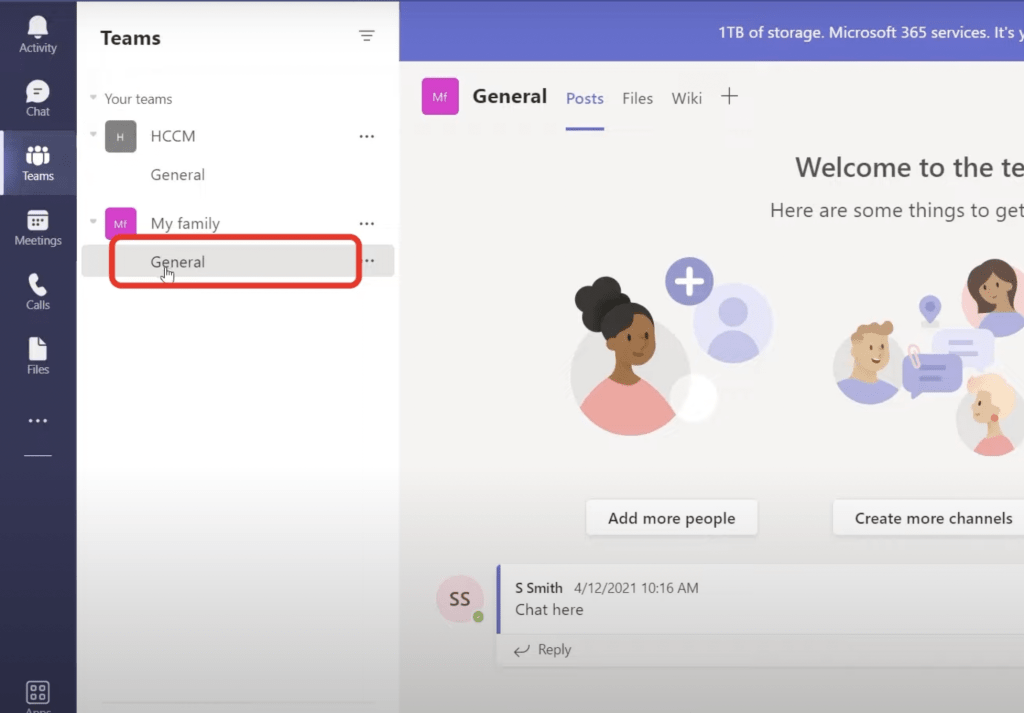
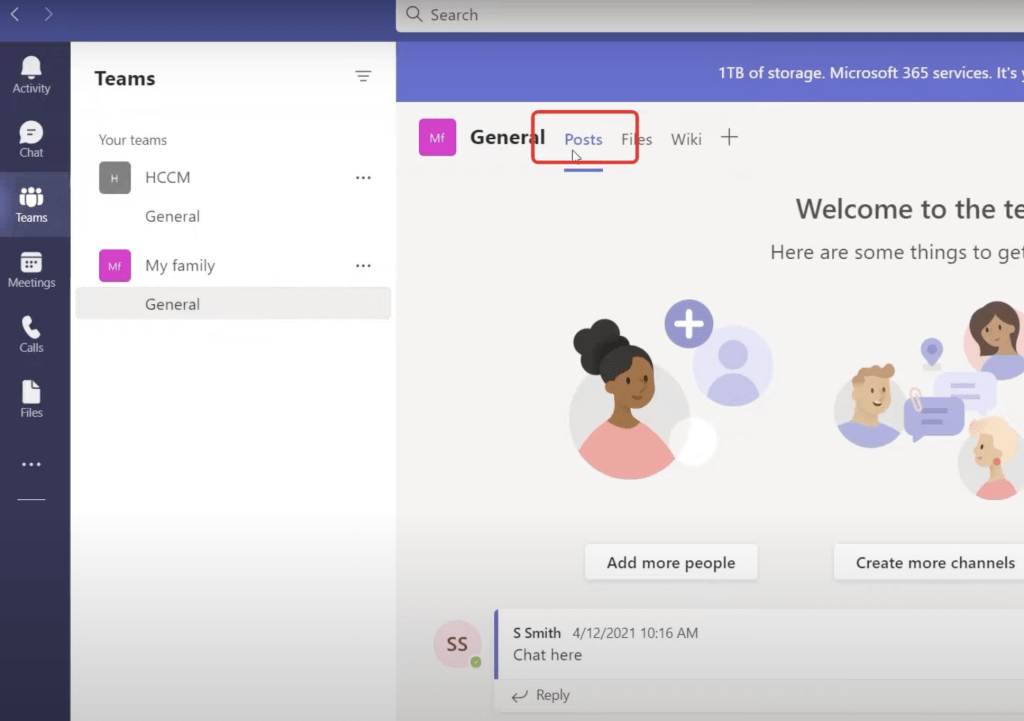
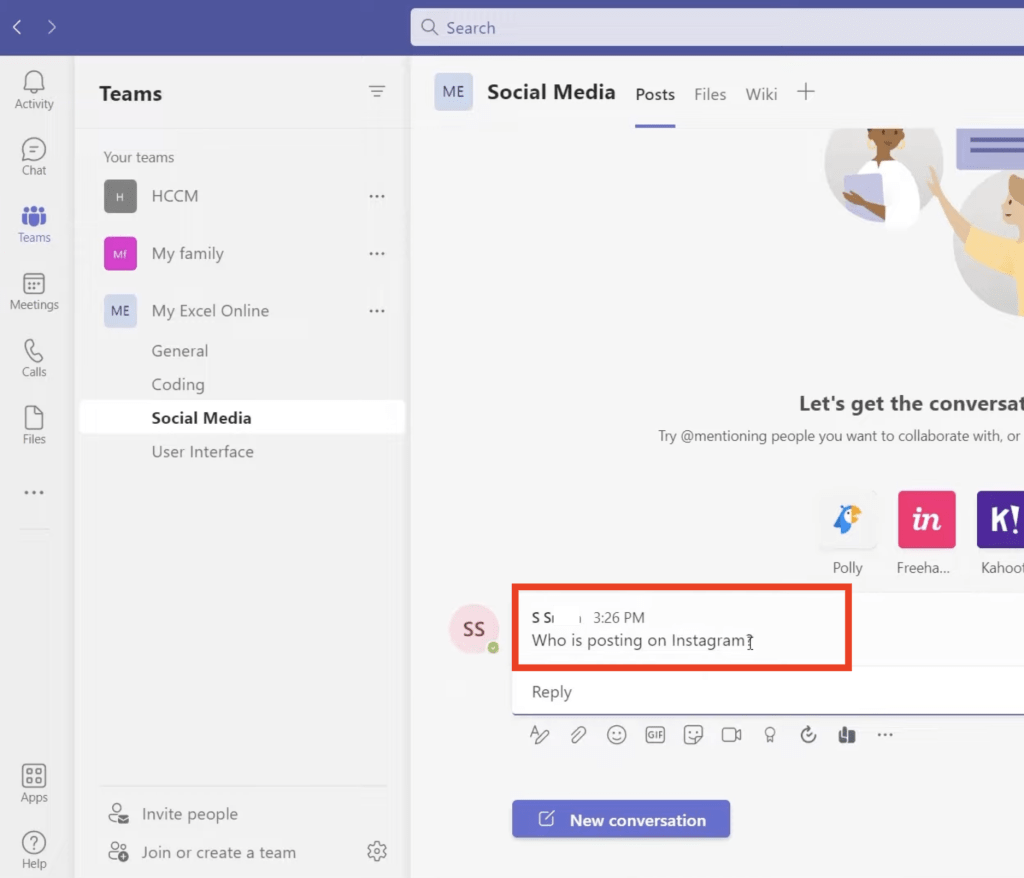
There is also a dedicated section in Teams called the Channels. Channels are where you hold meetings, have conversations or chats, and work on files together.
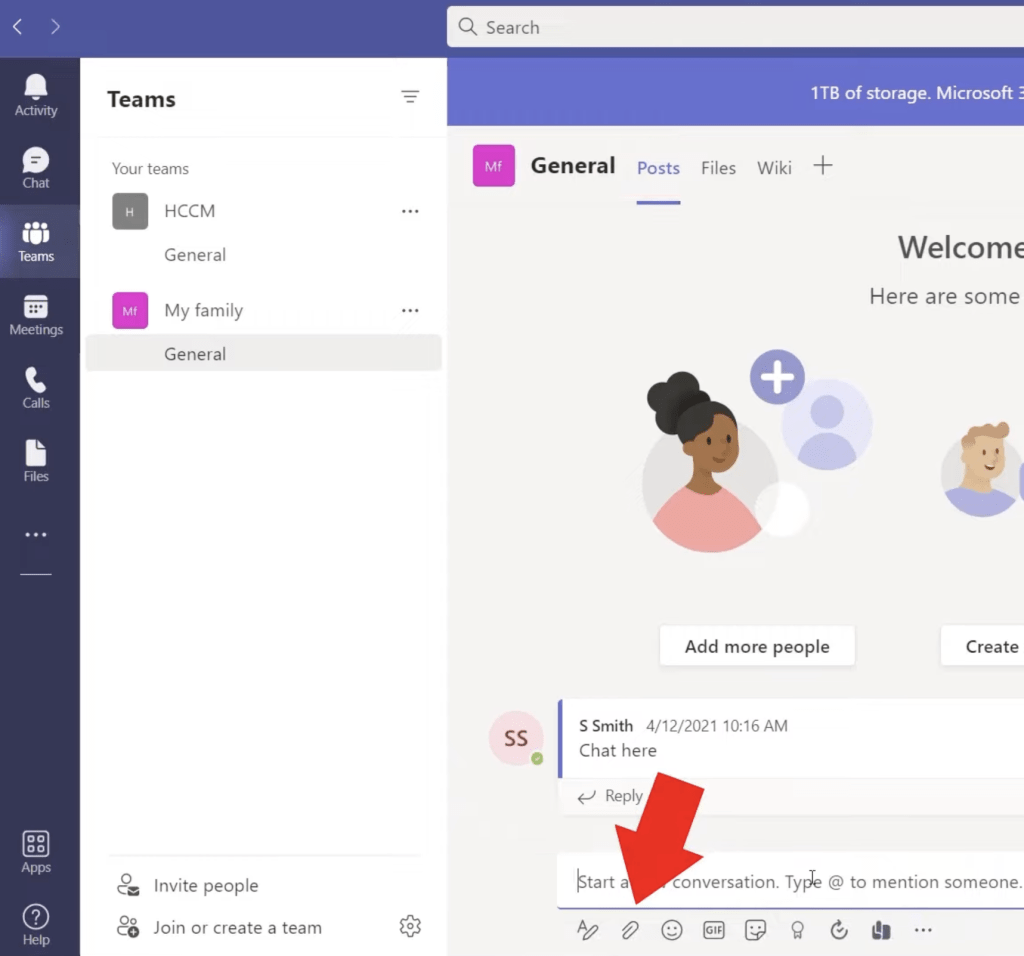
You can start a new conversation/chat with the people on this team by clicking on the Post tab.
You can also add any file here by clicking on the attachment icon and uploading it within this chat with the people of this channel.
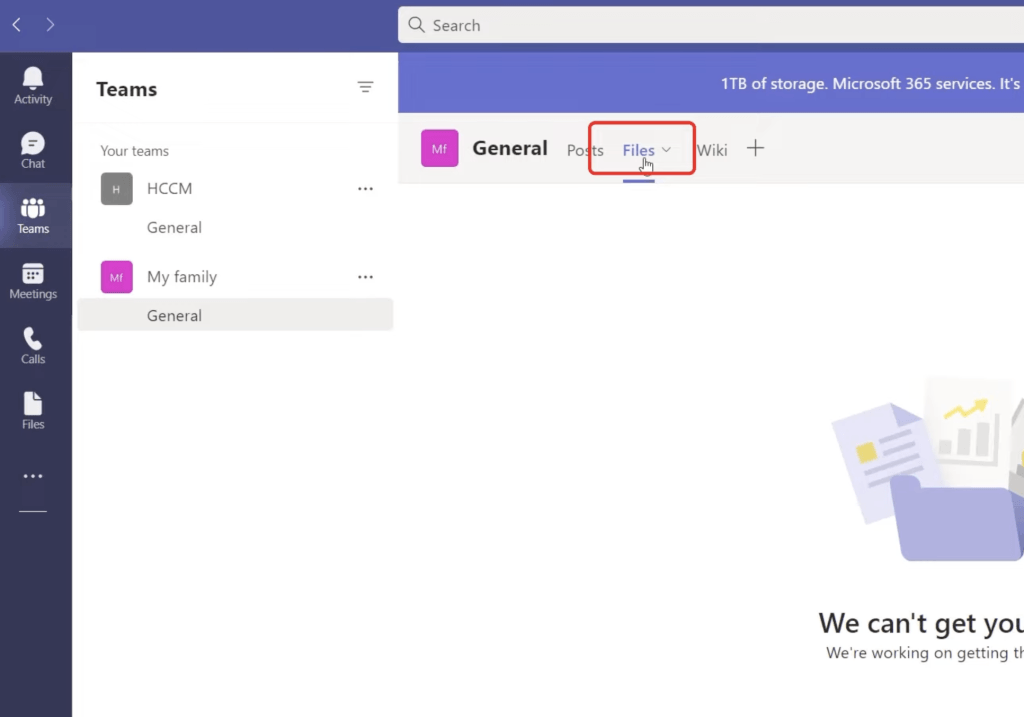
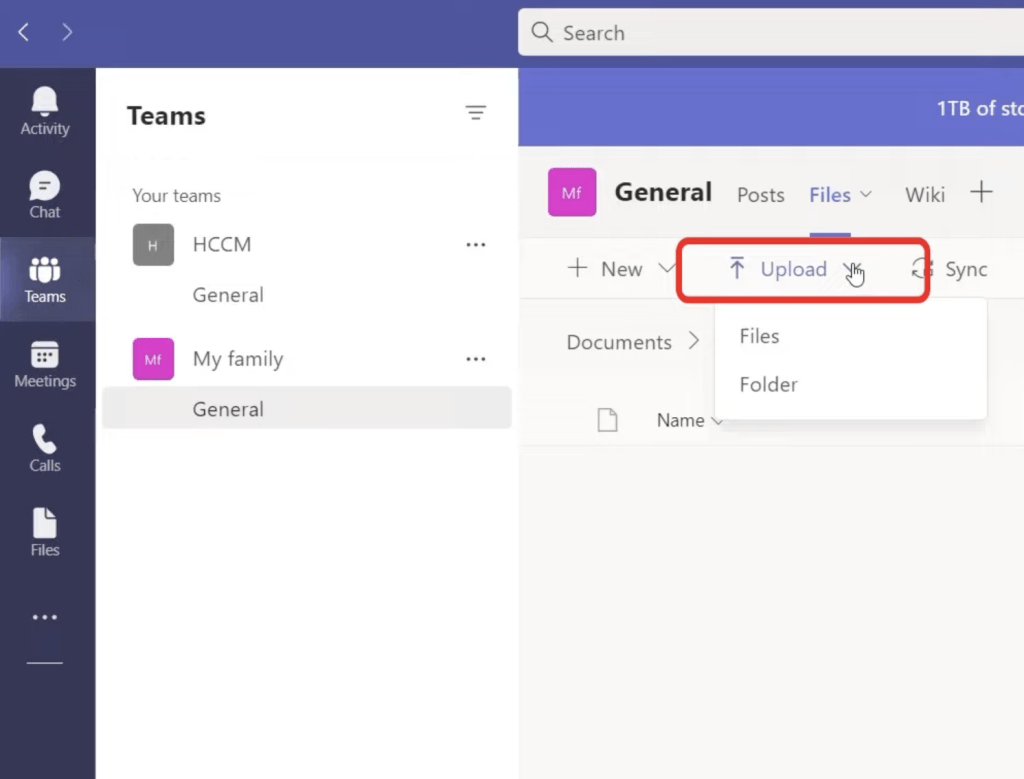
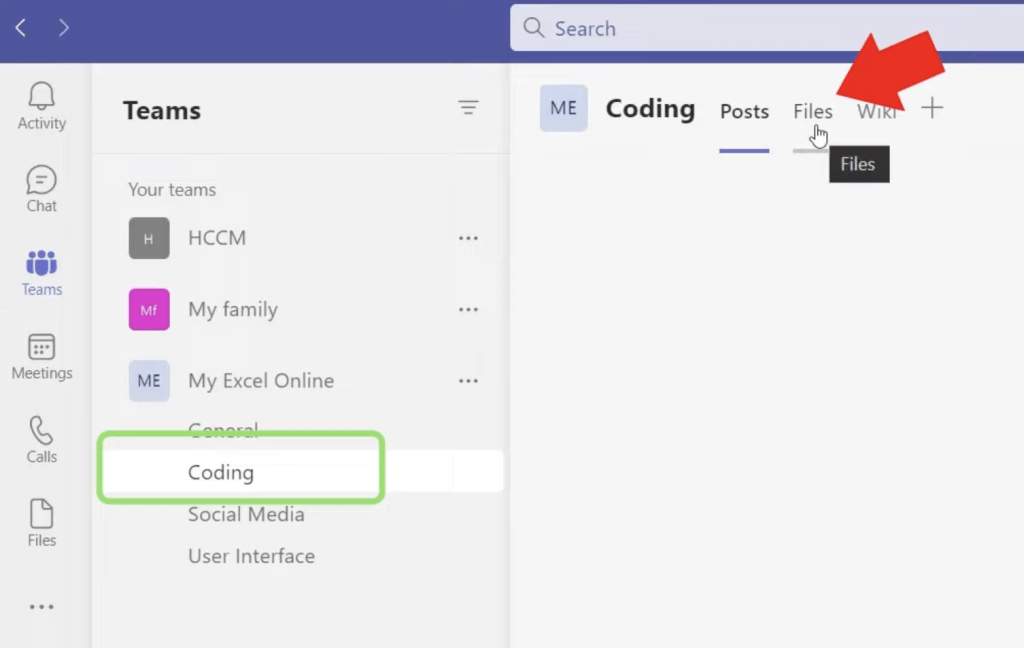
You can view all the files uploaded on this channel by clicking on the Files tab.
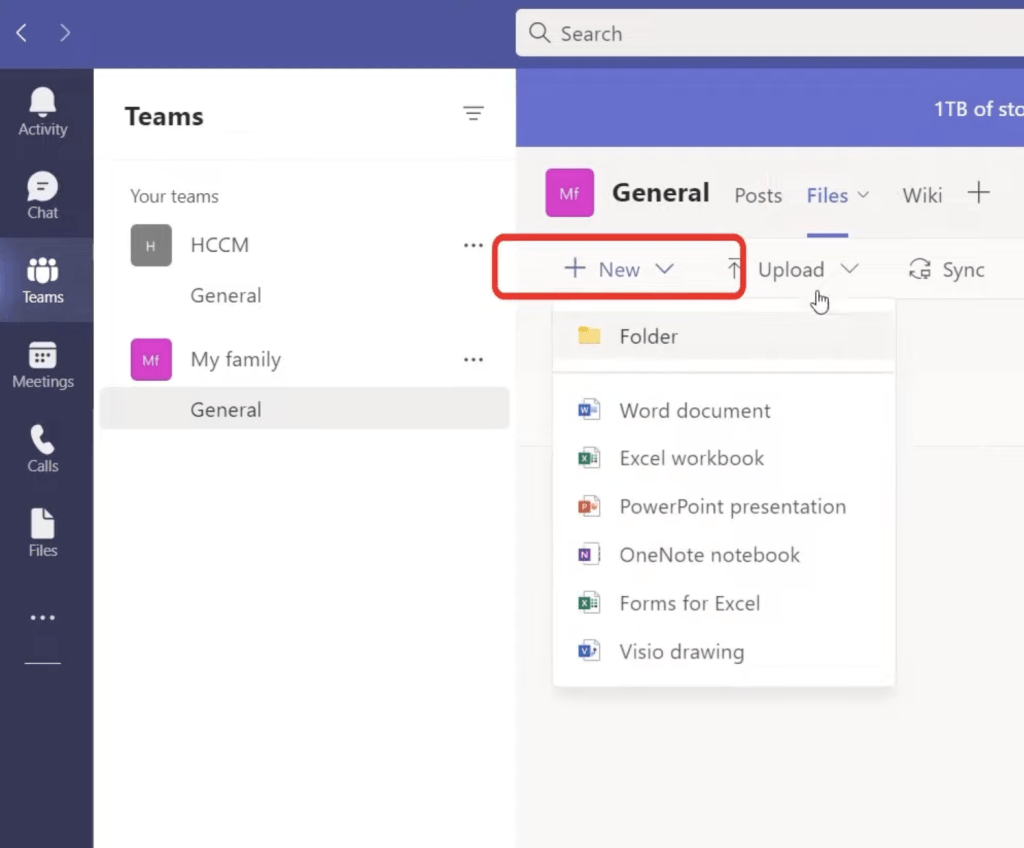
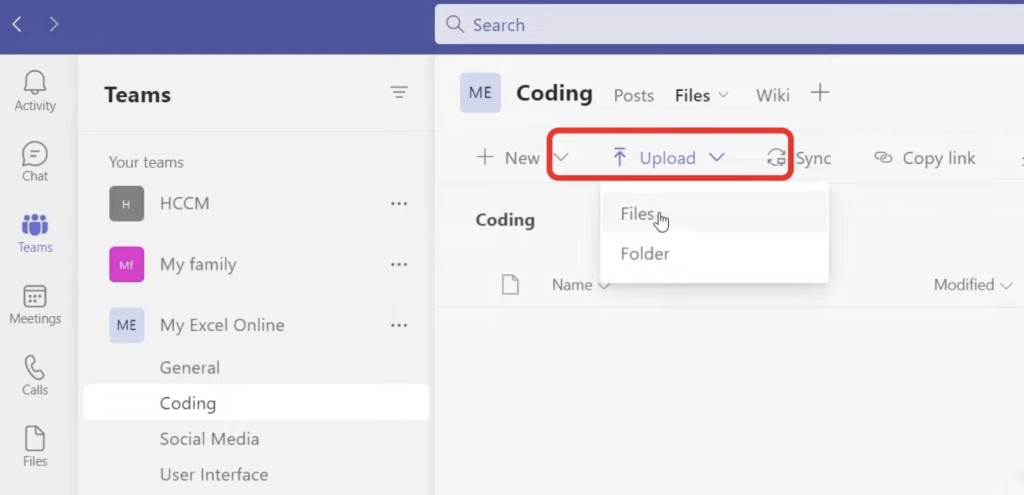
You can create new folders by clicking on the New option and selecting the type of file you want to add.
You can also upload any existing file to this channel by clicking the upload option.
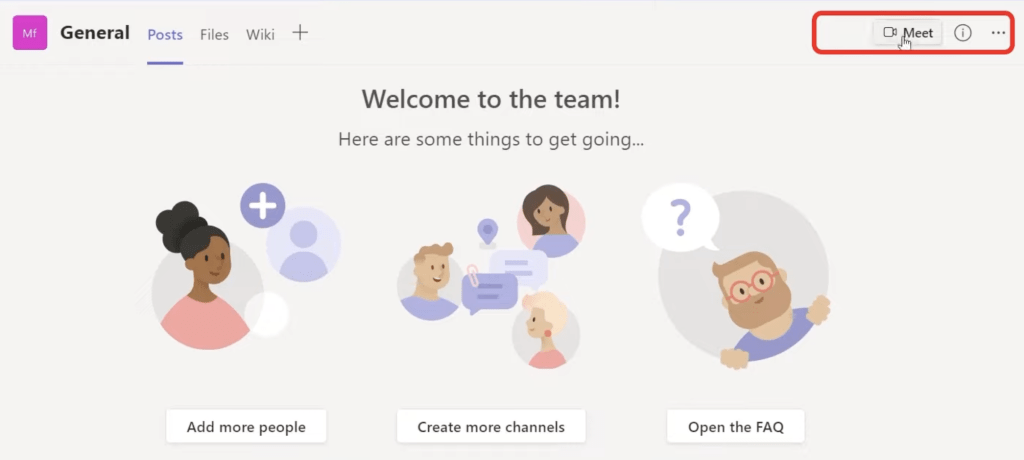
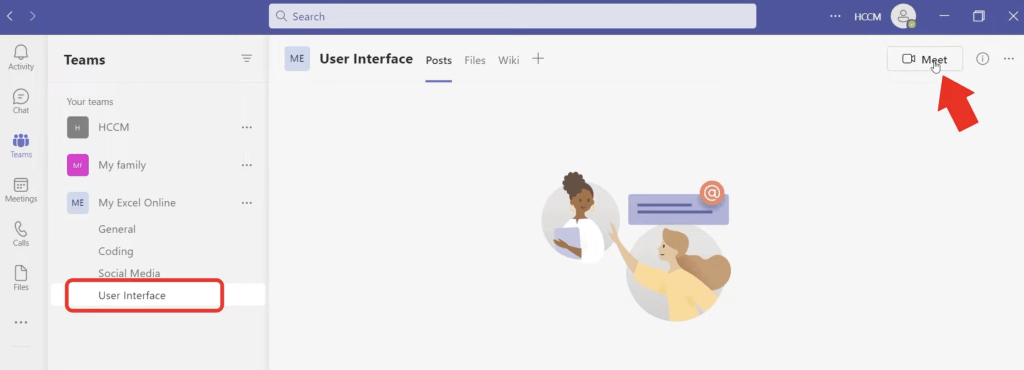
You can even schedule a meeting now by clicking the Meet option on this page.
Chat Feature in Microsoft Teams
Chat is one of the key features of Microsoft Teams. Whether it’s just with one person, or with a group, chat allows you to instantly message team members for quick discussions and feedback.
You can even start a chat with yourself whenever you want to draft a message or even send a file from one device to another.
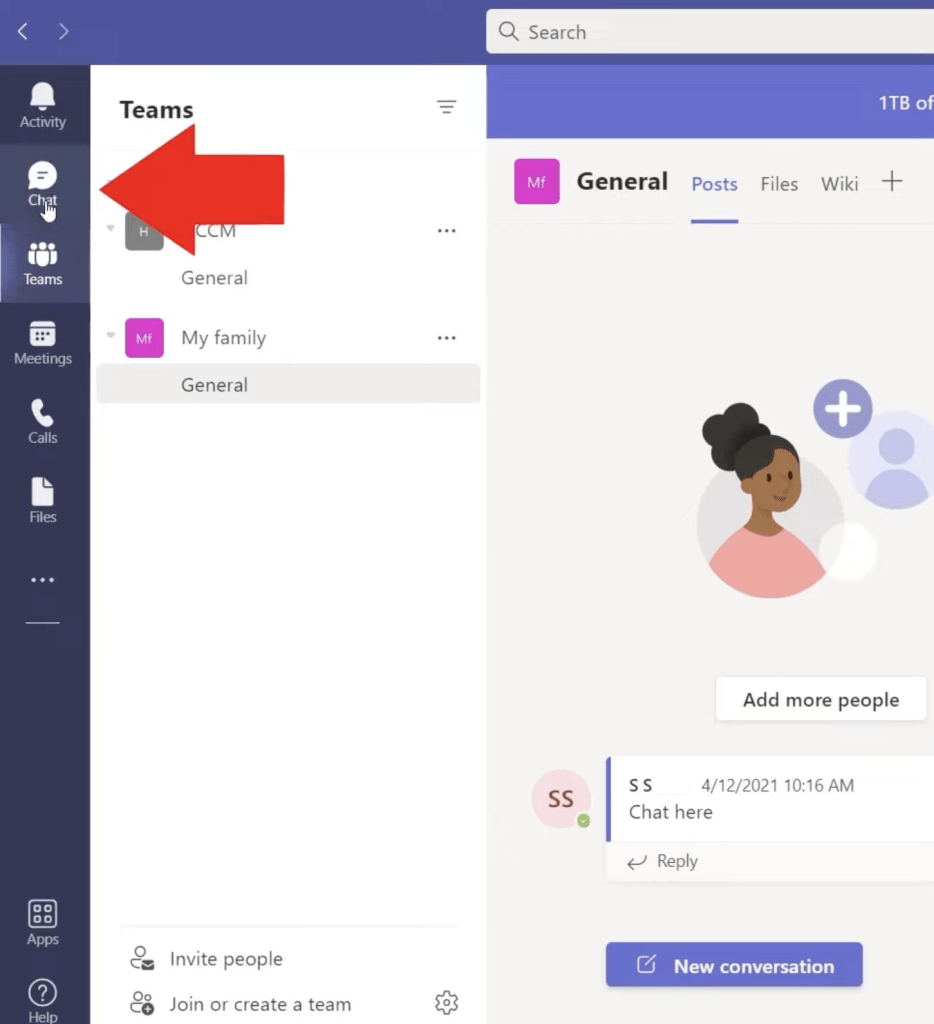
- Click on the Chat option on the left side menu bar.
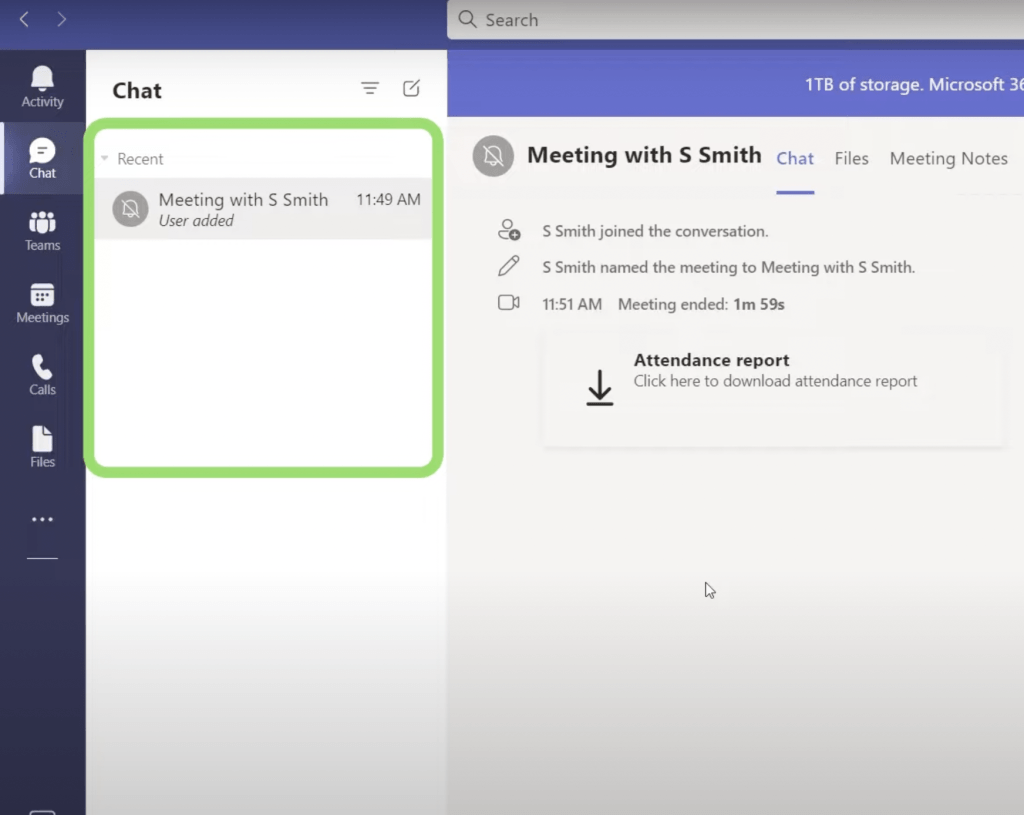
- Under chats, you can view all the conversations you had with everyone on Microsoft teams.
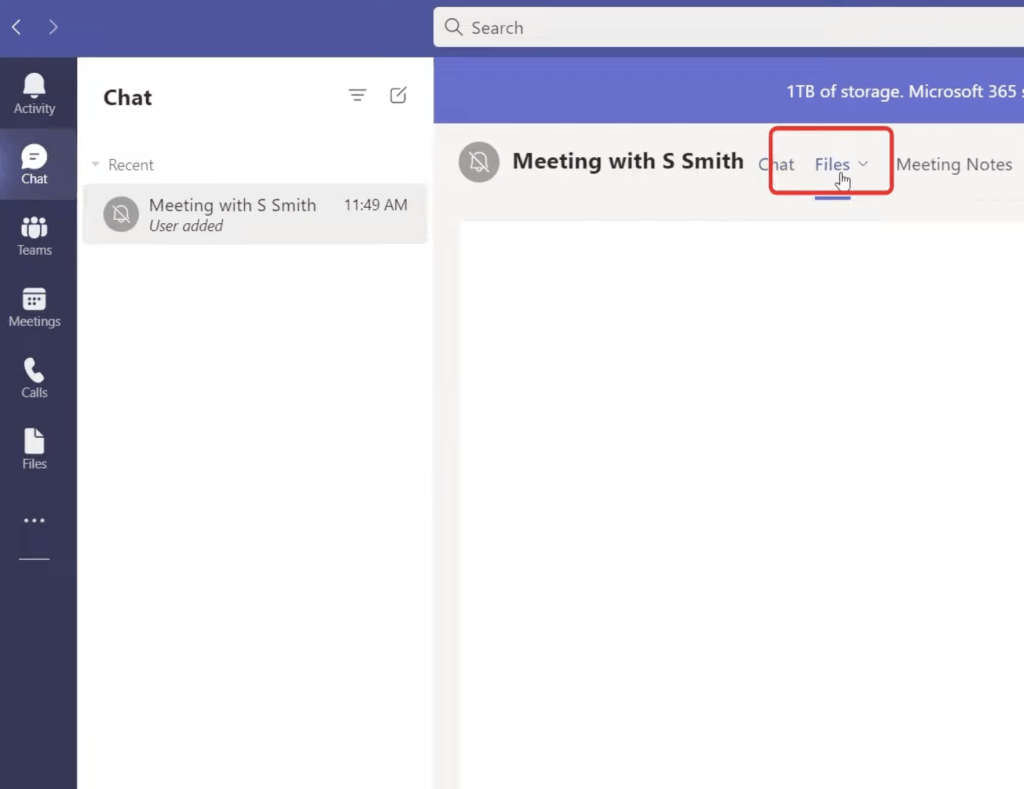
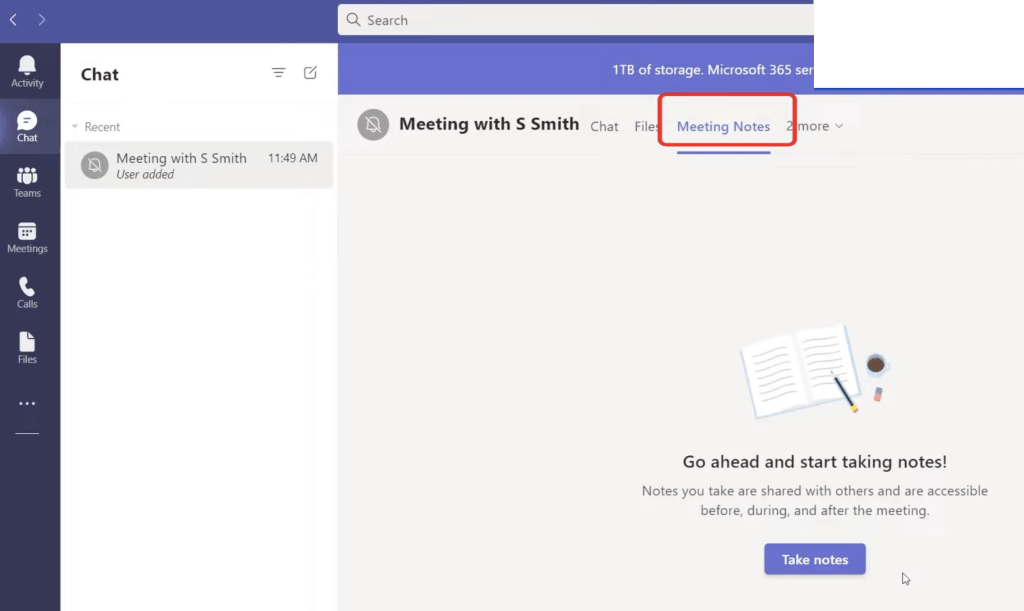
- Once you click on any chat, you can select the following options:
- Chat – By clicking the chat tab, you can read the entire conversation you had with a person or a group
- Files – By the selecting files tab, you can view and access any files uploaded within the chats and you can even share new files within this chat as well.
- Meeting Notes – You can make notes during a chat or a meeting by clicking this tab. Or, you can also view your previous notes which you have made during any meeting or chats for future reference.
- Chat – By clicking the chat tab, you can read the entire conversation you had with a person or a group
Call Feature in Microsoft Teams
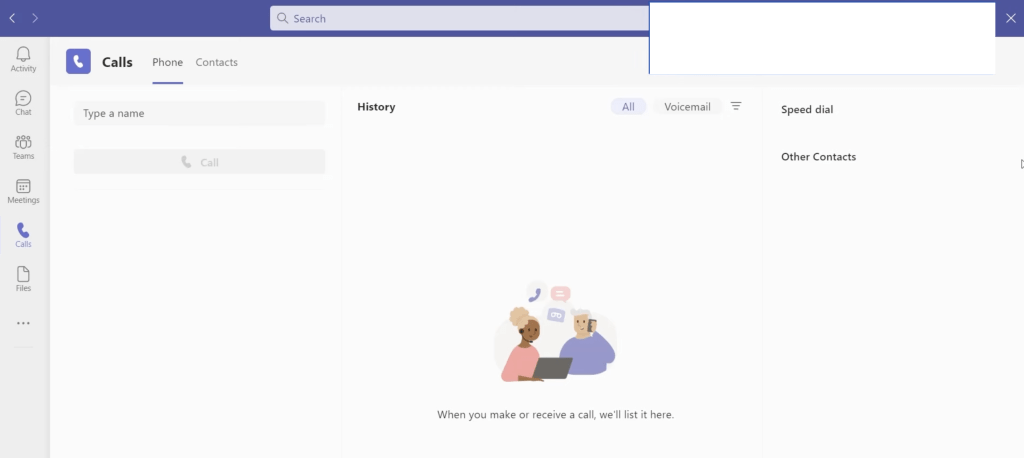
Microsoft Teams Calling allows users to make and receive calls. Employees can make work calls from wherever they are while using their work number.
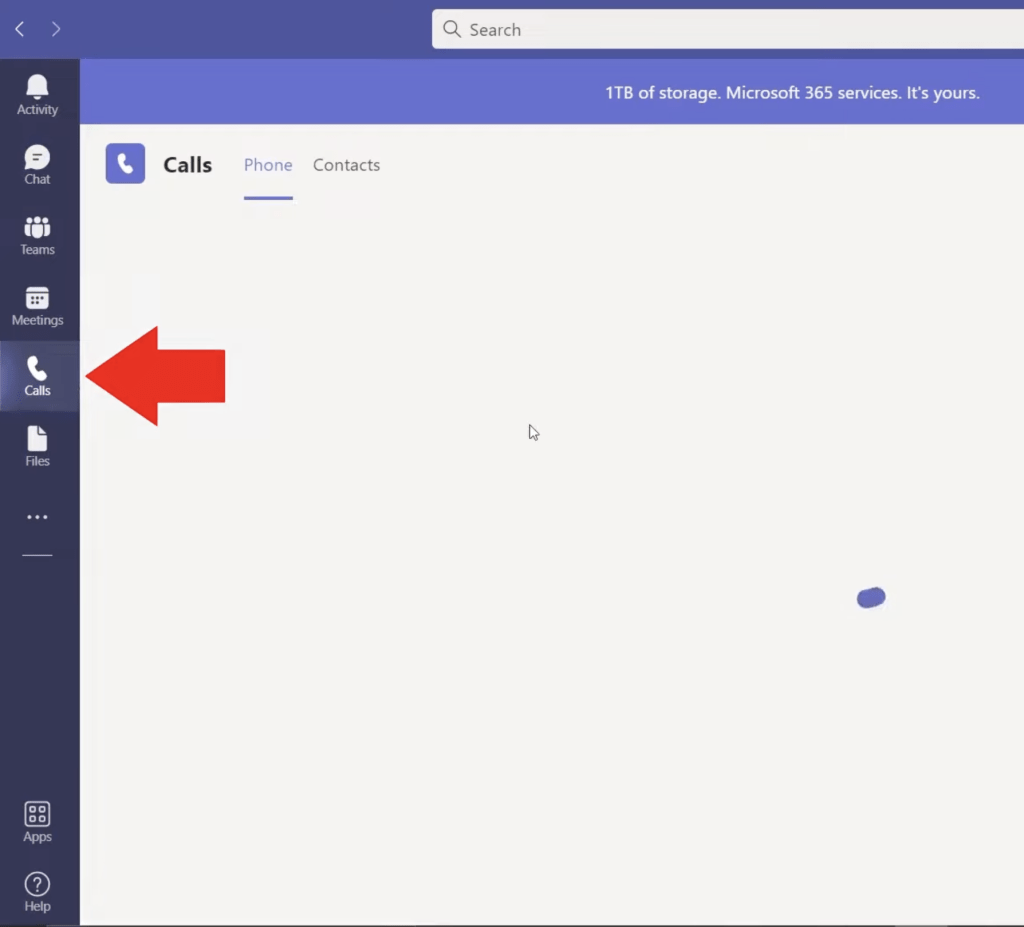
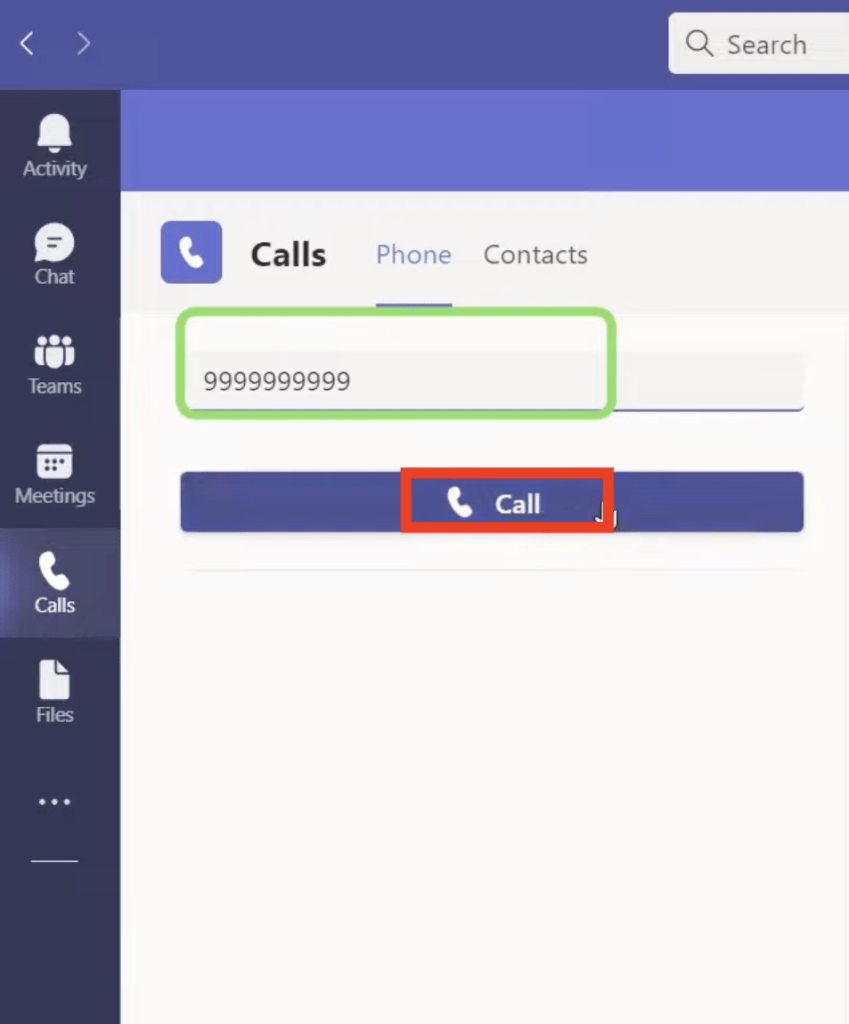
- Click on the call icon on the left side menu
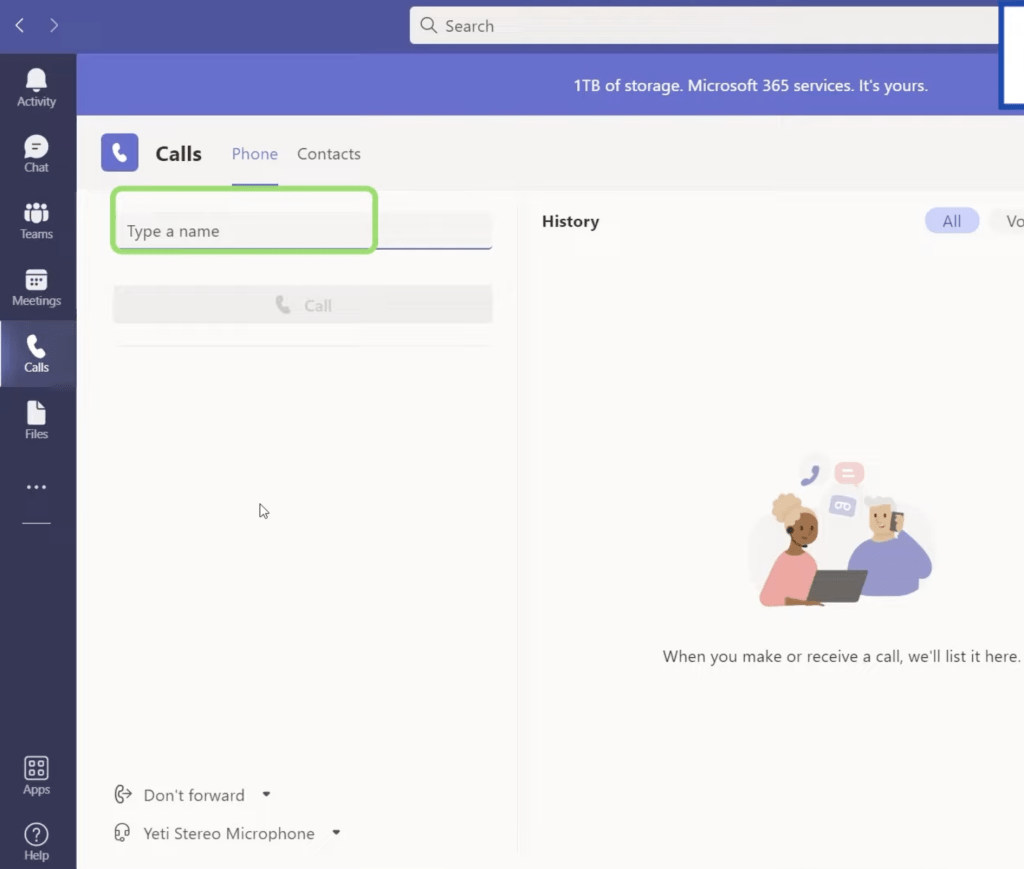
- You can type a name and press the call button to make an audio call from your desktop
- You can also type a phone number from the dial pad, and then press the call button to make a call
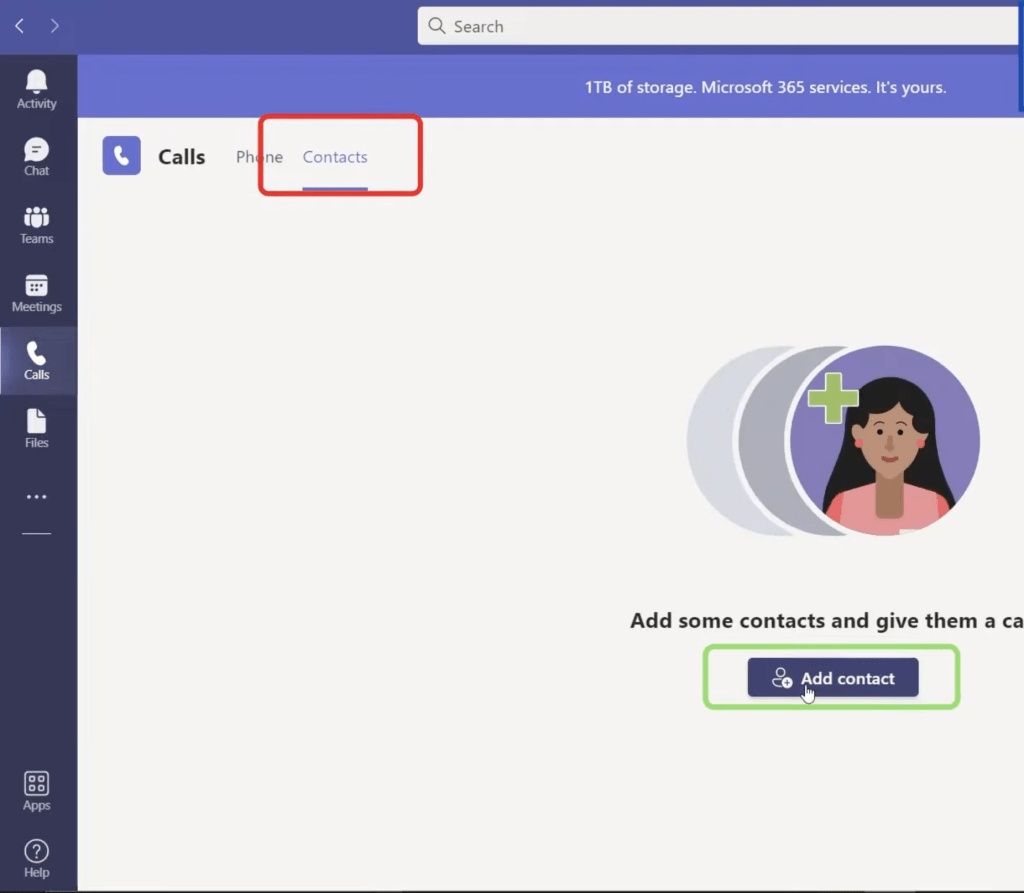
- Click the Add contact button to add a contact to your contact list
Shared Files on Microsoft Teams
One can easily share files in a one-on-one chat, a group chat, or a team channel in Microsoft teams. You can upload or access any files from your desktop or your cloud storage while working on Microsoft teams.
Follow the steps below to view files on Microsoft teams:
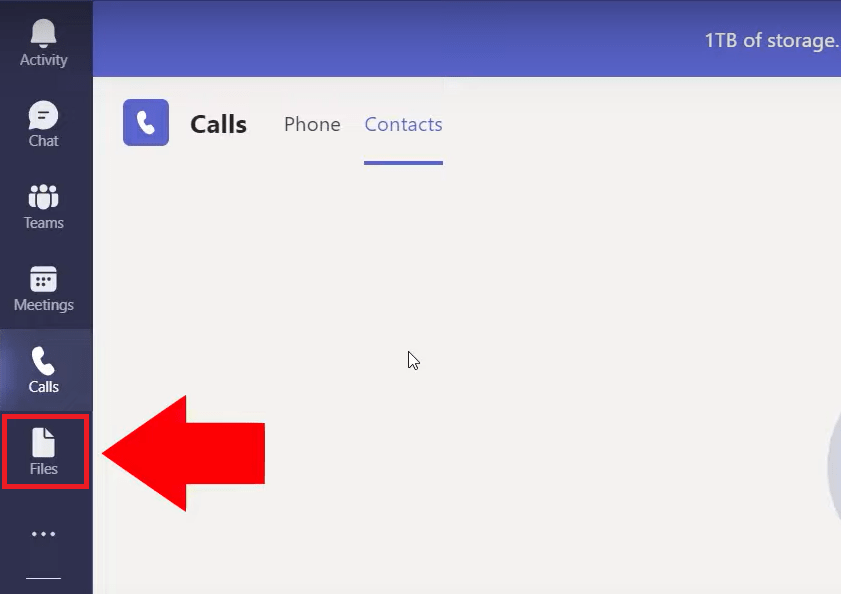
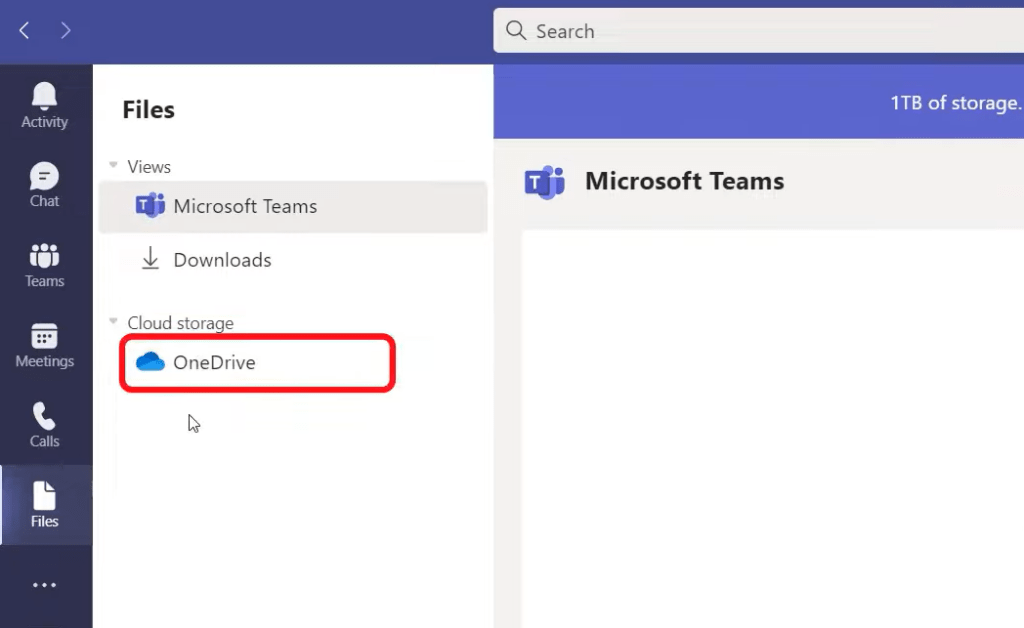
- Click the Files tab in the left column of the Teams Toolbar
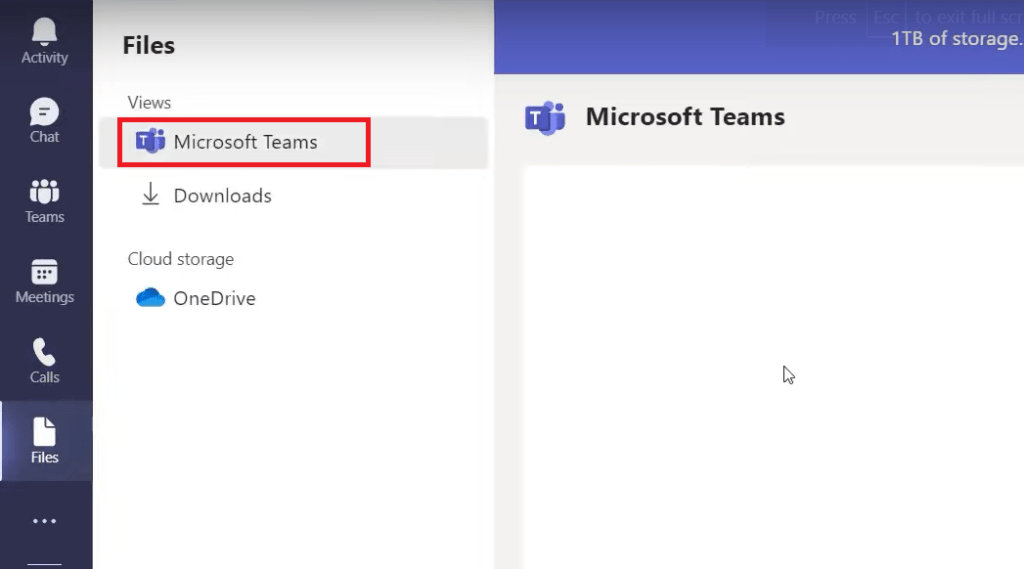
- Select Microsoft Teams under View – You can see all the files being uploaded in your Microsoft teams folder
- Select OneDrive – You can view all files you have uploaded on your cloud storage
Setting Up a Microsoft Teams Meeting
In Microsoft Teams, you can schedule online meetings with coworkers or external contacts. You can post your meeting to a channel, where anyone on the team can see or join. You can also schedule a private meeting, where only people you’ve invited can attend.
You can either schedule a meeting or create a meeting now as per your requirement.
Schedule a Meeting –
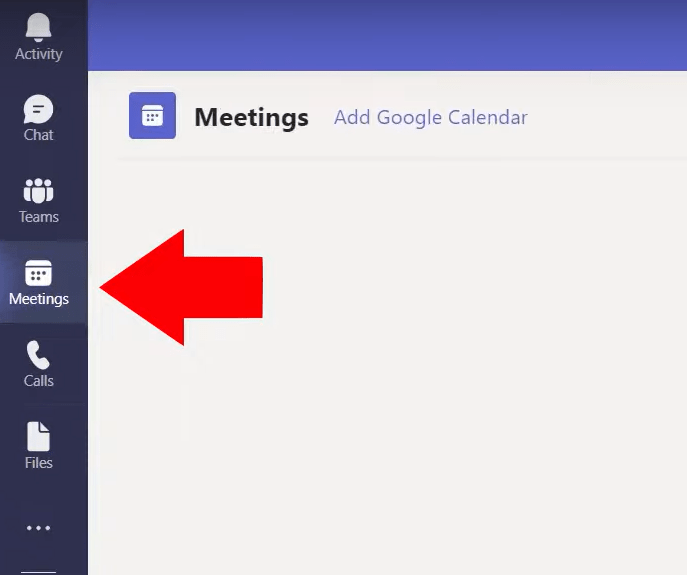
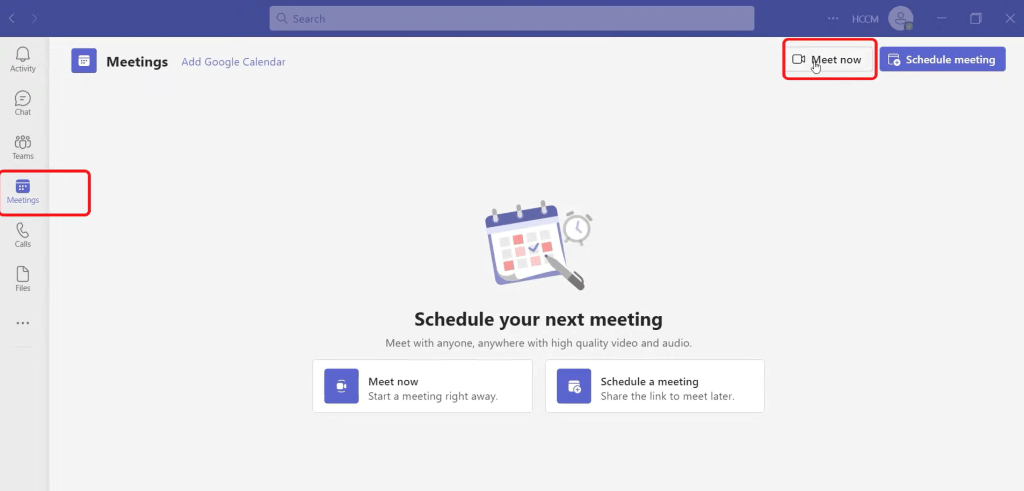
- Click on the Meeting icon on the menu
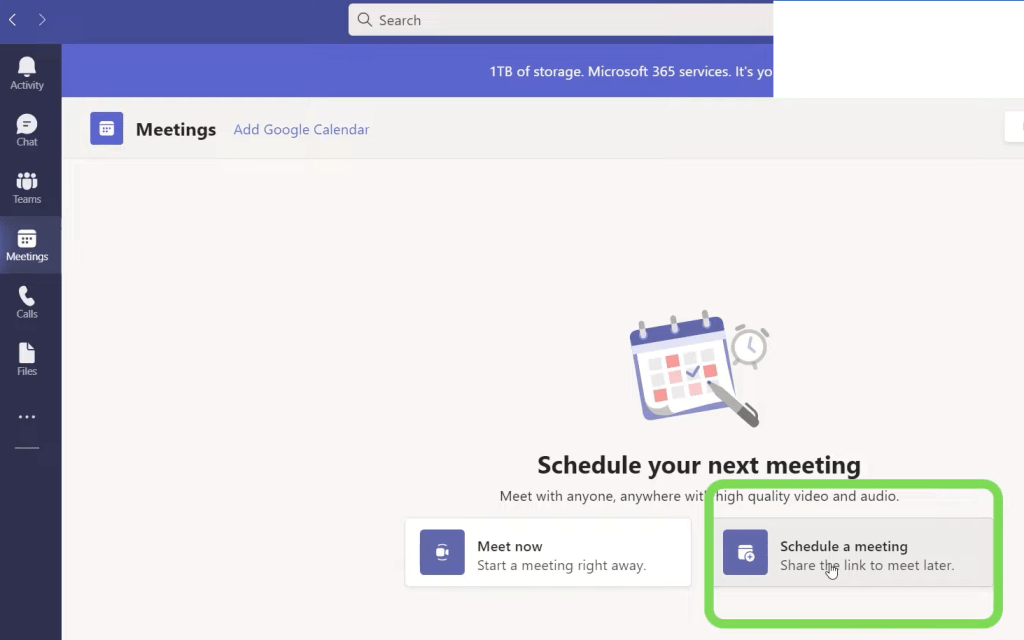
- Select Schedule a meeting
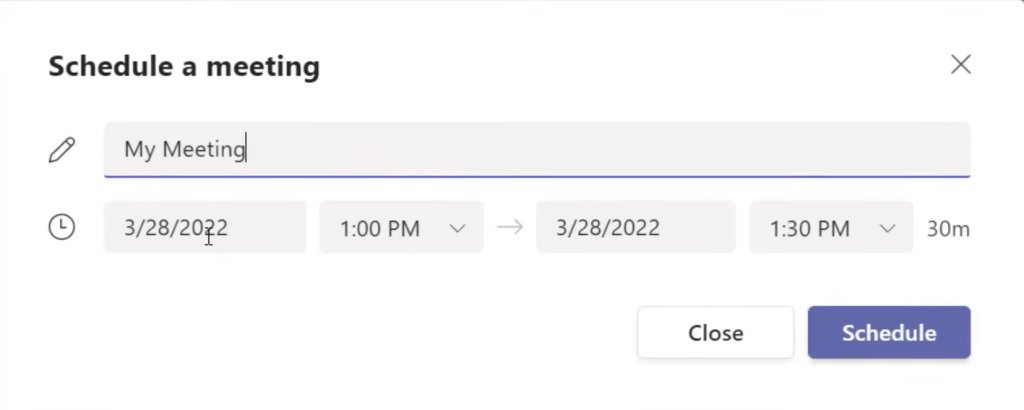
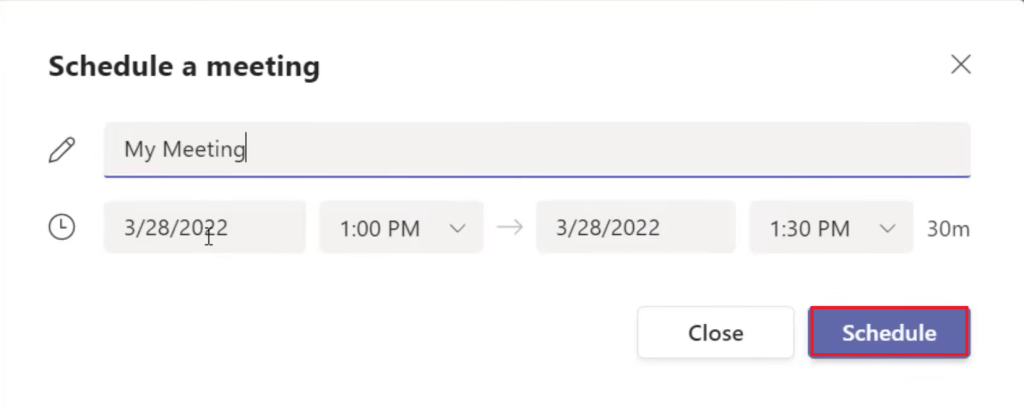
- You can give your meeting a title and select a date and time for the meeting
- Click Schedule
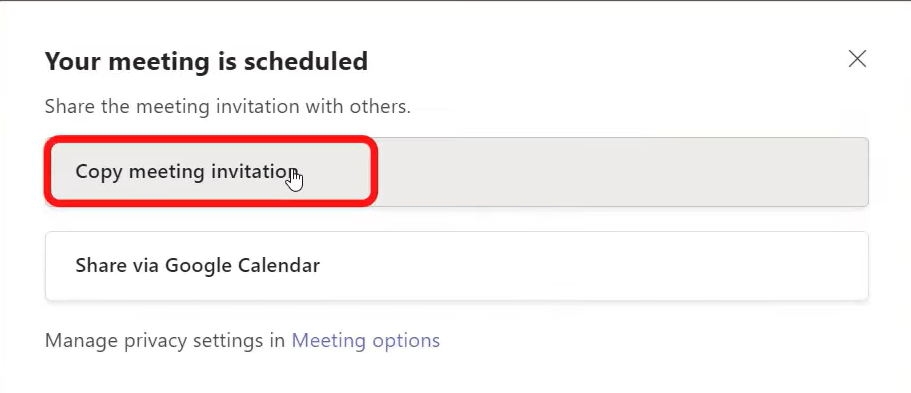
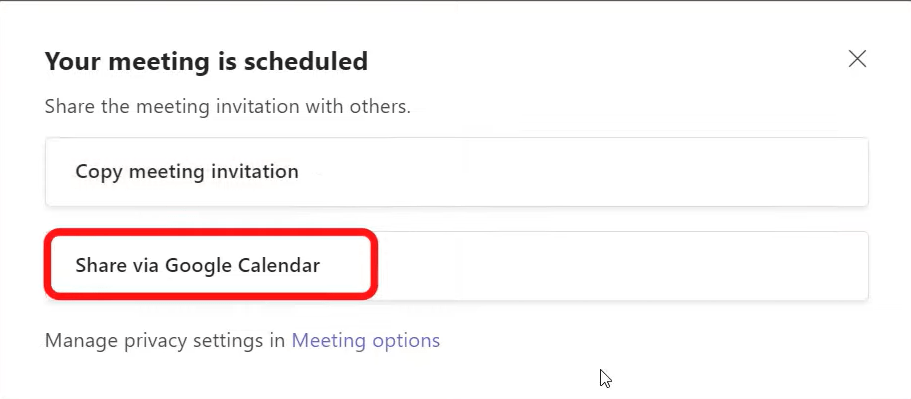
Your meeting will be successfully scheduled for the desired date and time. You can now share this meeting invitation –
- Copy the invitation link and paste the link into an email or any other messaging software
- Share the invitation link via google calendar
Now, go to the Meetings Tab in the Teams Menu, and you will see your scheduled meeting details in the list. You have an option to either join the meeting now or copy the invitation link.
By clicking on the more options, you can either delete the meeting or edit meeting details like name, time, or date.
Create a meeting now
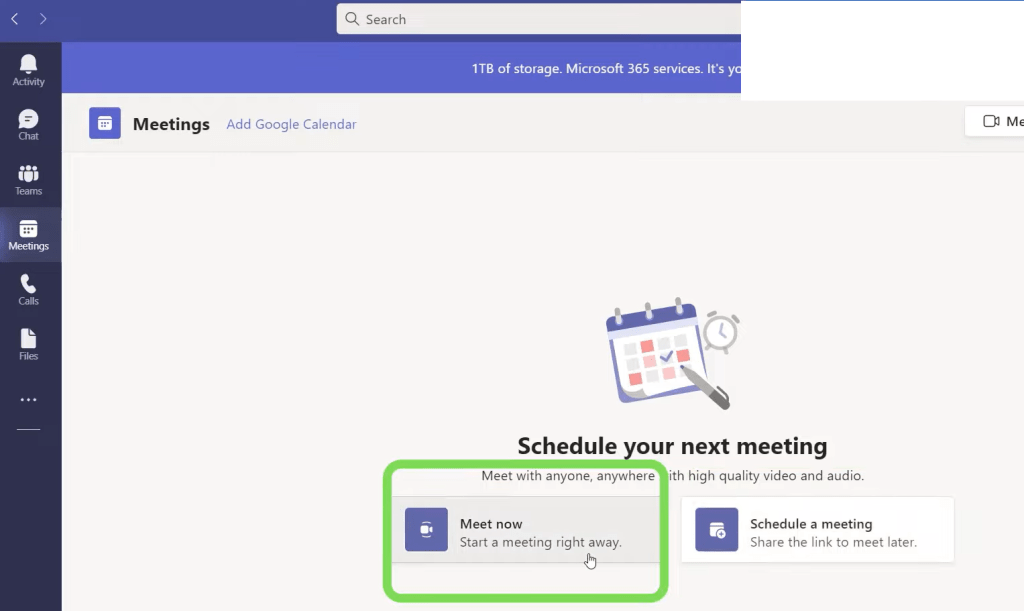
- Click on the Meeting icon
- Select Meet Now to start a meeting right away
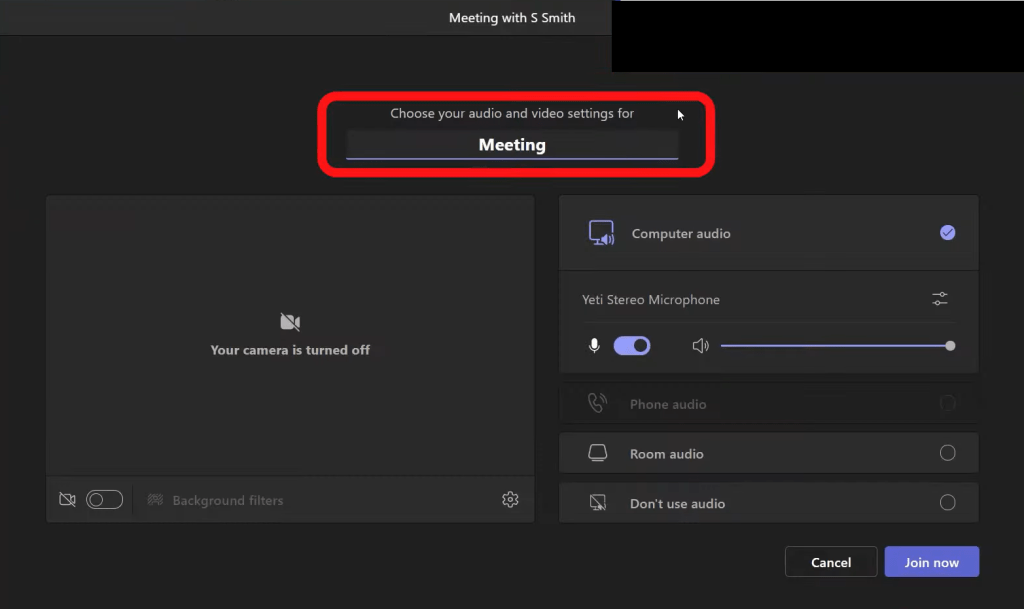
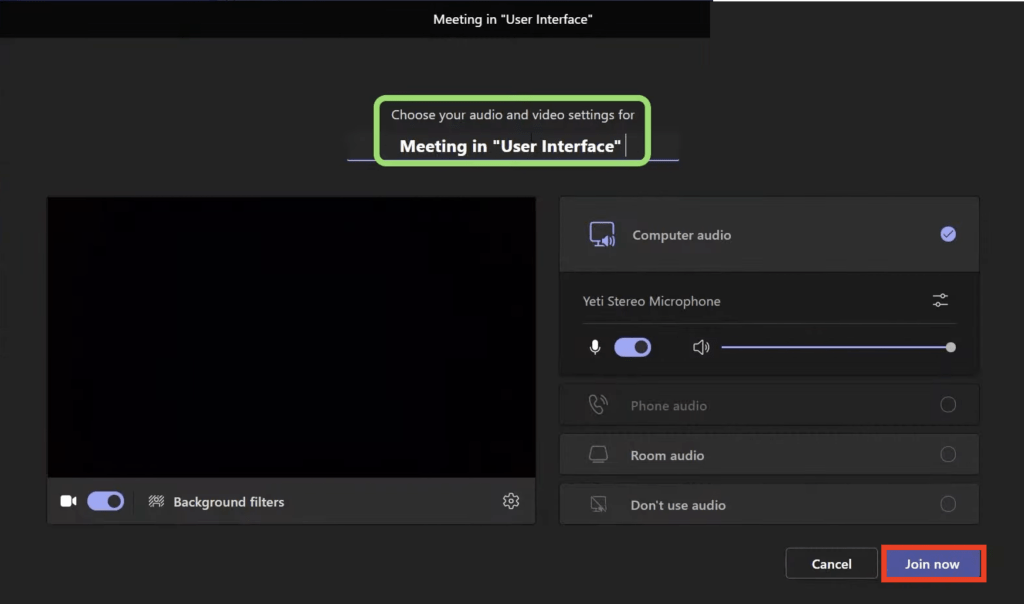
- Type a name for your meeting
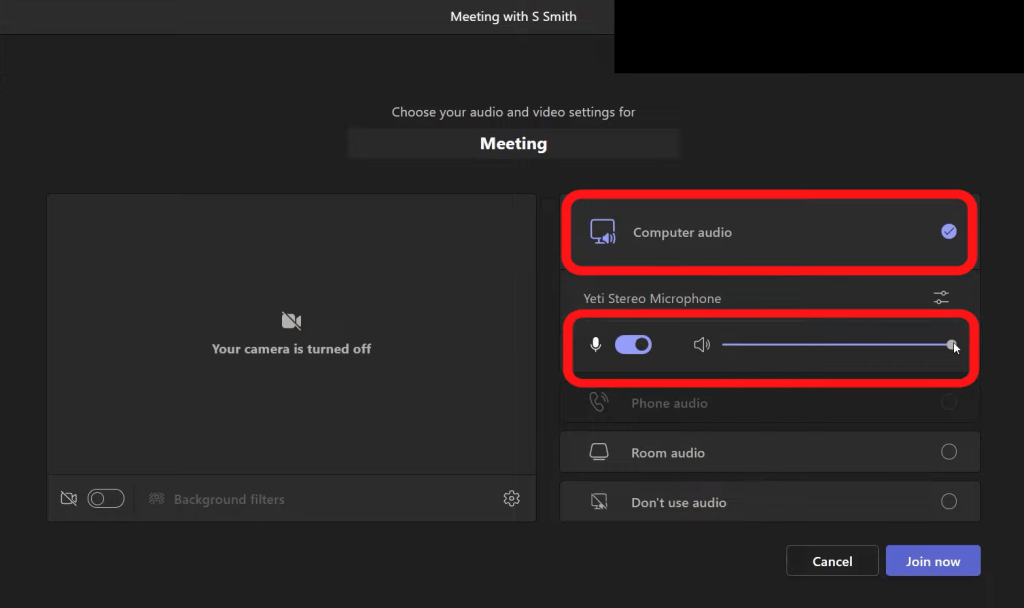
- Computer audio – Turn it on and adjust the volume
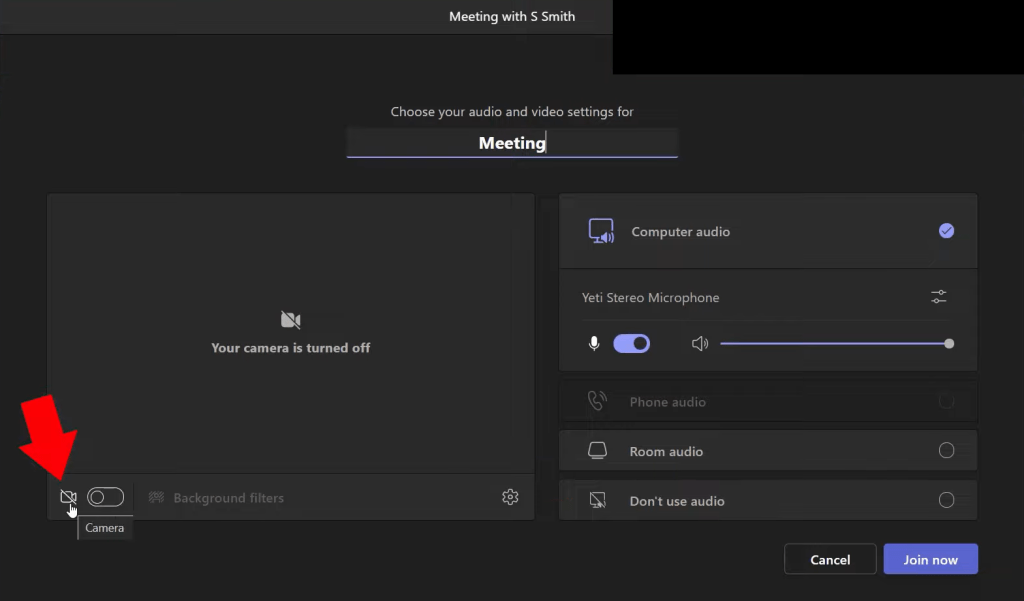
- Camera – You can turn on your camera and change your camera setting here as well
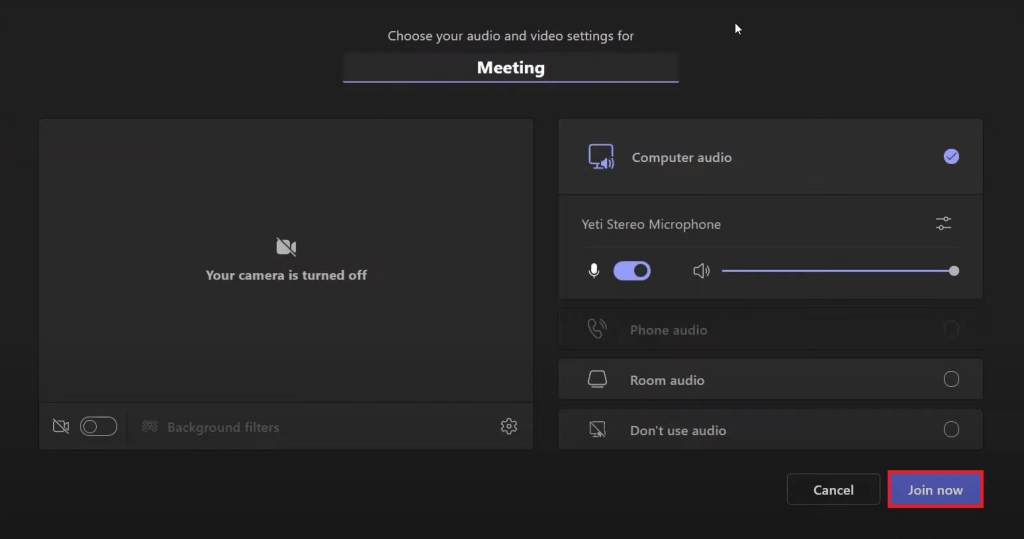
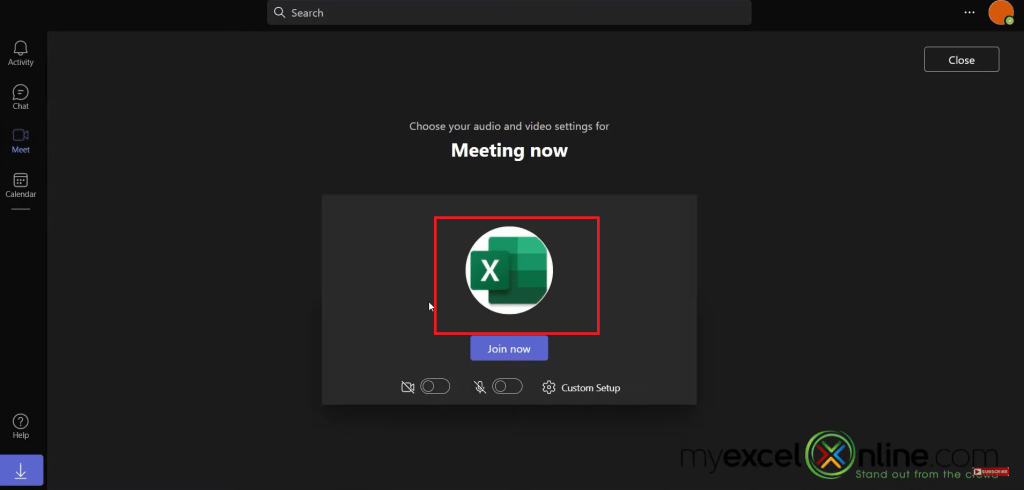
- Click on the Join now button to start a meeting now.
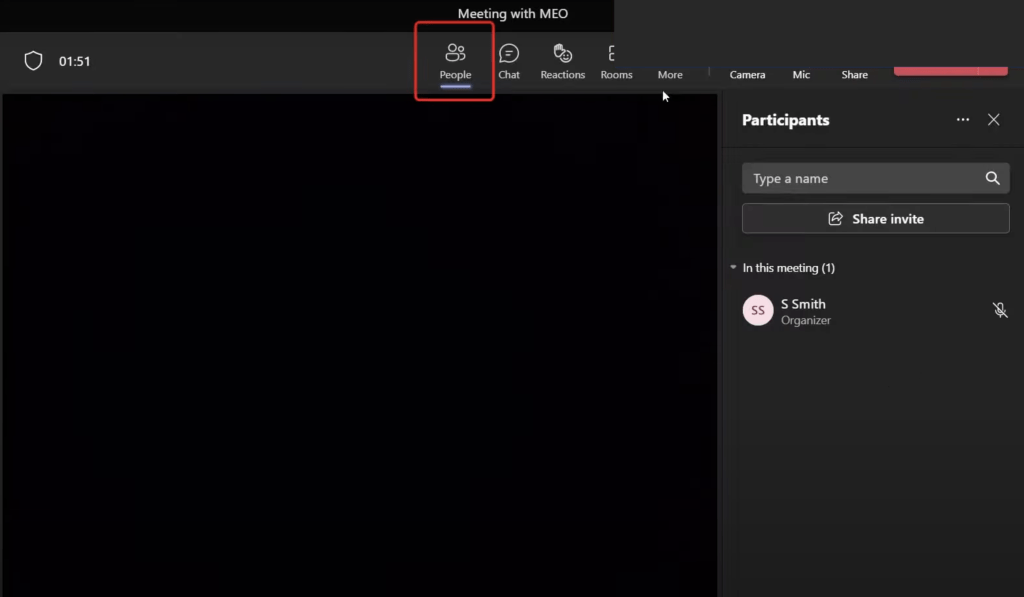
Once you have joined the meeting, you can click on –
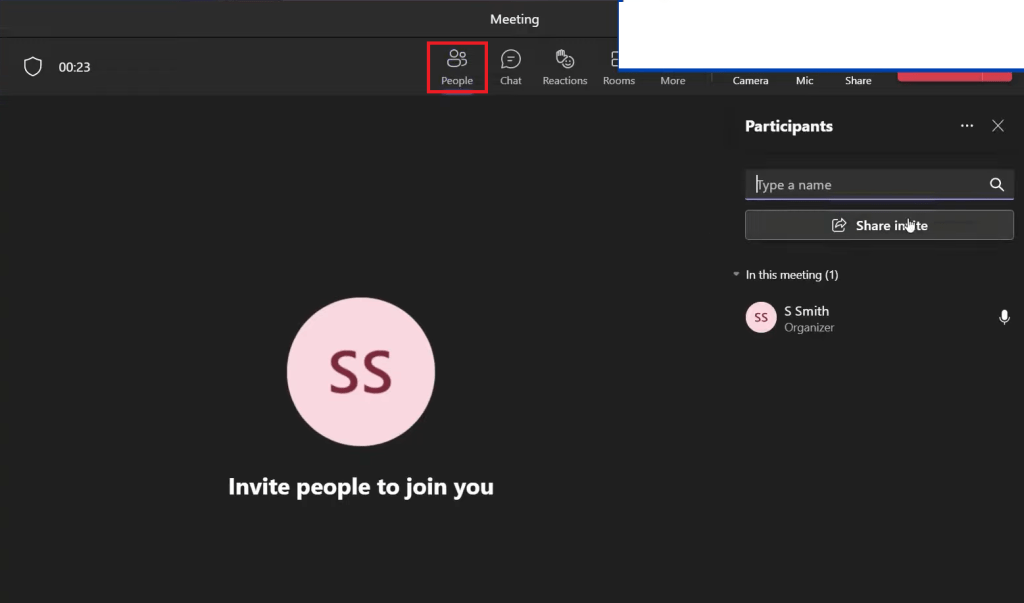
- People – To invite people to join your meeting. You can type the name of the person and click on Share Invite.
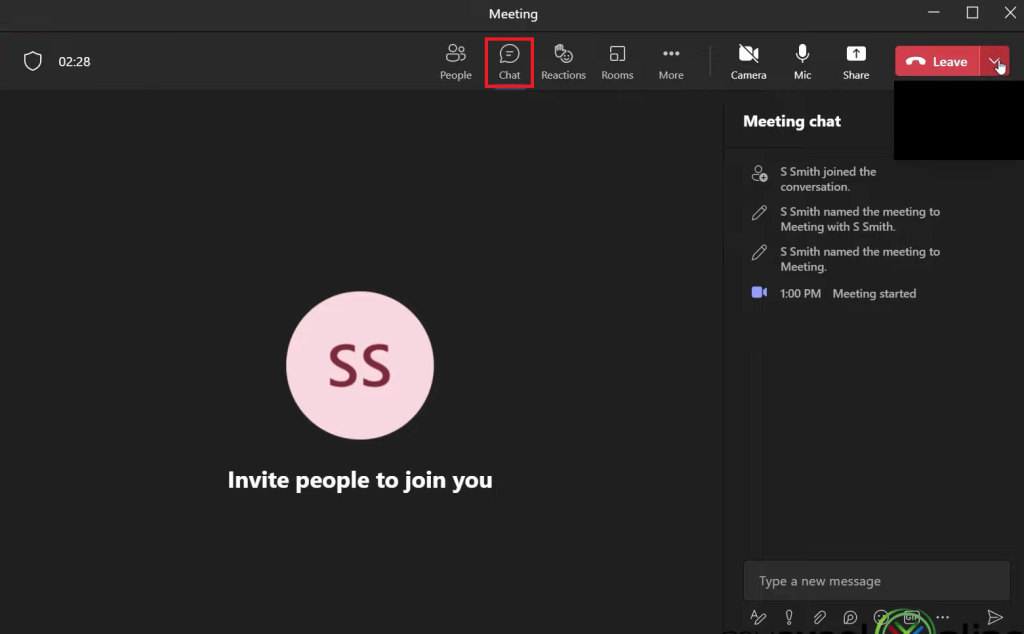
- Chat – You can open a chat room with all your teammates in the meeting.
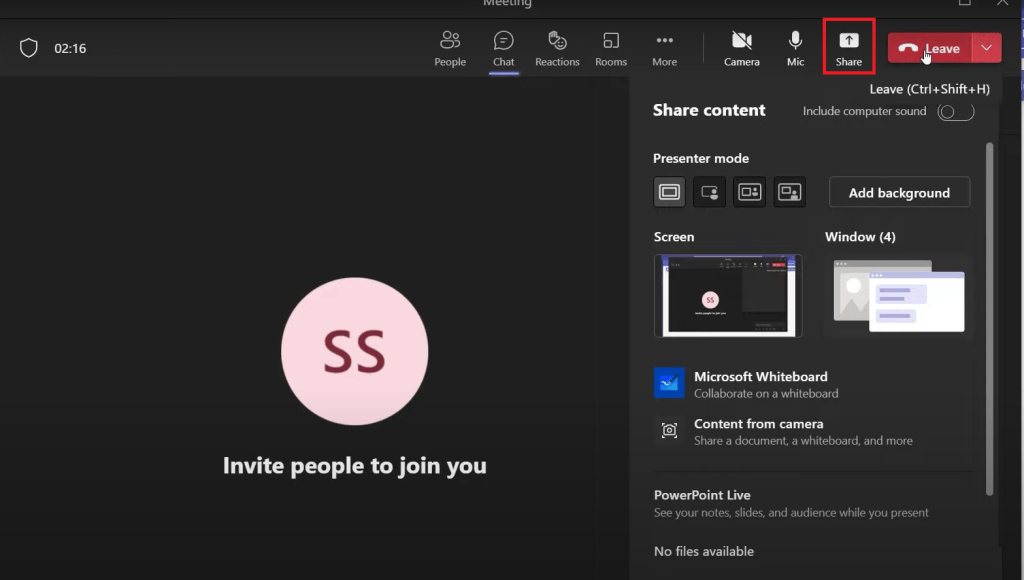
- Share – You can share your entire screen with your teammates in your meeting by selecting the screen option. Or you can share individual window as well by selecting the window option.
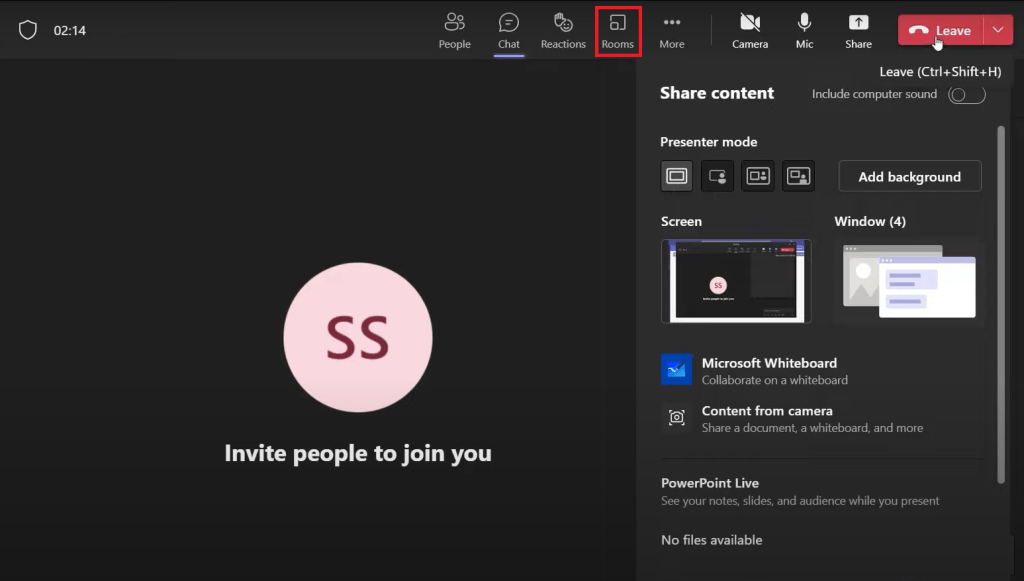
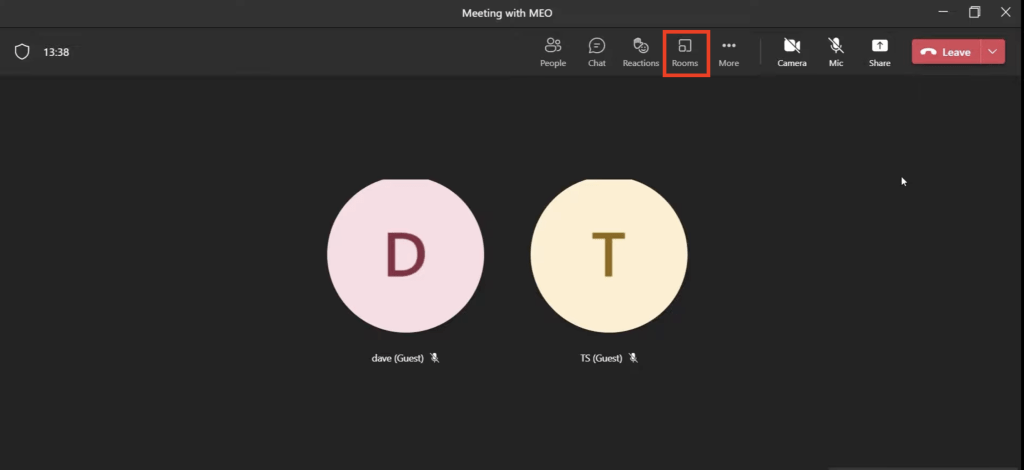
- Rooms – You can group people together and create different breakout rooms for them.
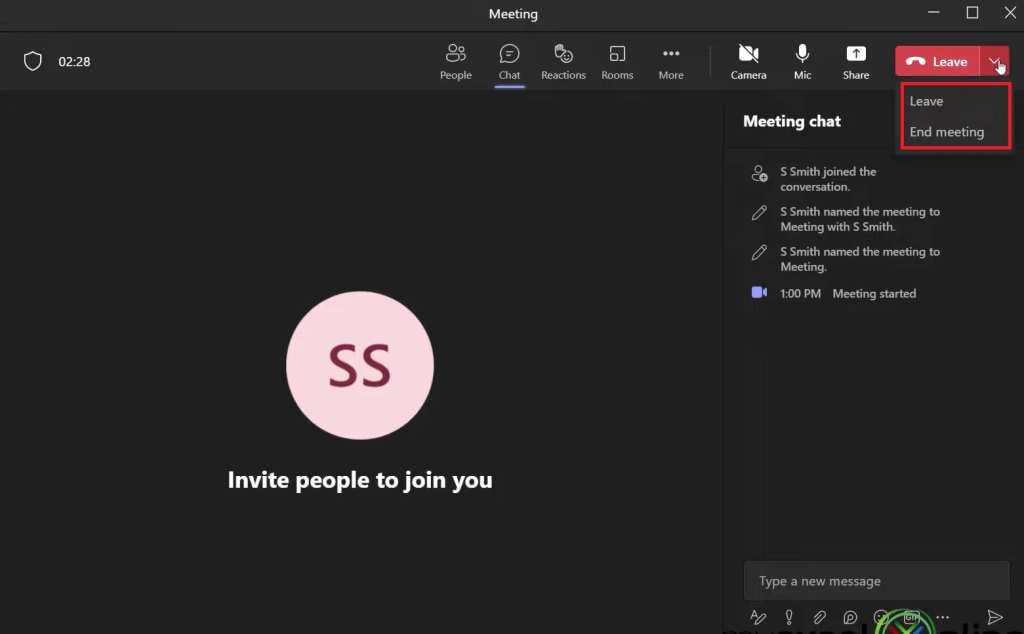
- Leave – You can click on leave and opt out of the meeting. You can either Leave the meeting personally or End the meeting for everyone.
This completes our tutorial on Introduction to Microsoft Teams. In this article, you have learned how to make a video call, how to create a team, how to chat, how to share files, how to call other people, and more!
3 Secret Ways to Get Microsoft Teams for FREE
Microsoft teams is a very useful communication platform for team collaboration integrating people, content, and various tools to collaborate. The free version of Microsoft Teams includes the following –
- Unlimited one-on-one meetings for up to 30 hours
- Unlimited group meetings for up to 60 minutes
- Up to 100 participants per meeting
- 5 GB of cloud storage per user
- Unlimited chat with coworkers and customers
- File sharing, tasks, and polling
- Data encryption for meetings, chats, calls, and files
There are 3 ways to get Microsoft Teams for FREE –
Let’s look at each of these ways thoroughly!
Watch this video on How to get Microsoft Teams for FREE on YouTube and give it a thumbs-up!
FREE Online Version of MS Teams
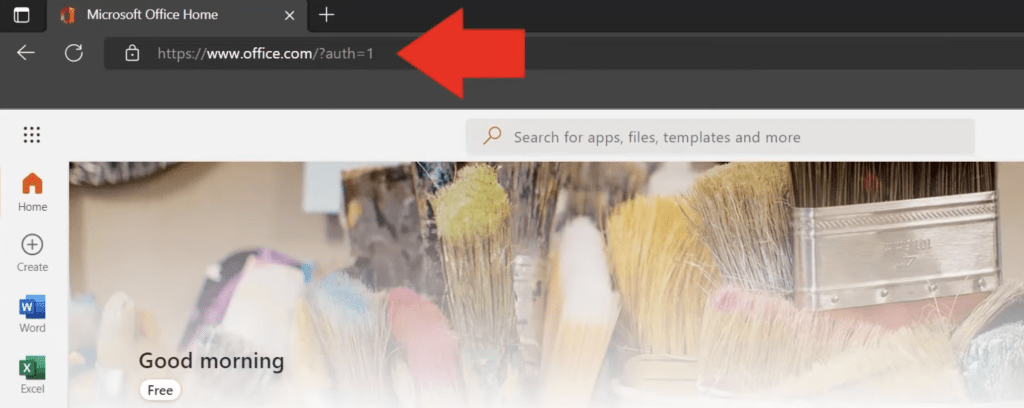
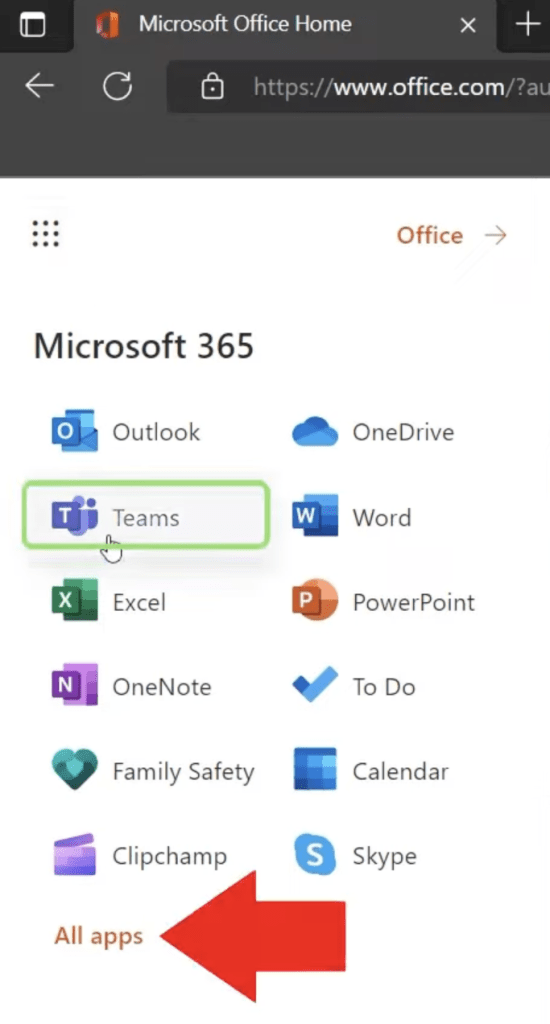
The first way to get Microsoft Teams for free is to go to www.office.com and log in to your Microsoft account. If you don’t have an account, you can create it for free as well.
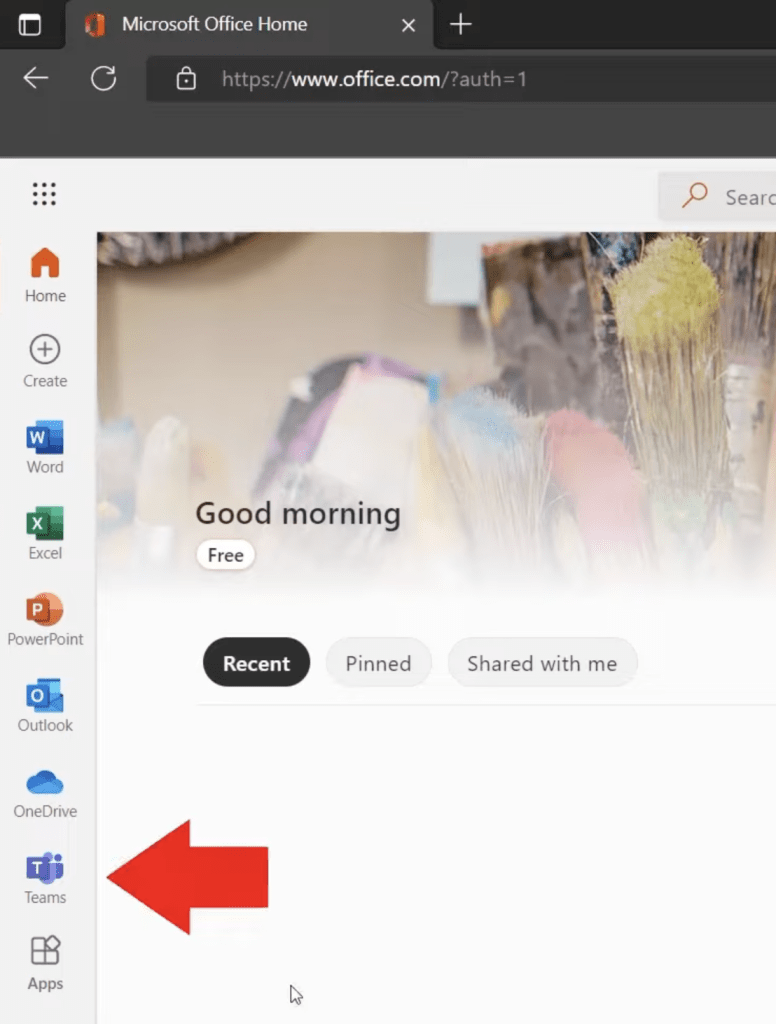
Go to the left-hand panel and select Teams.
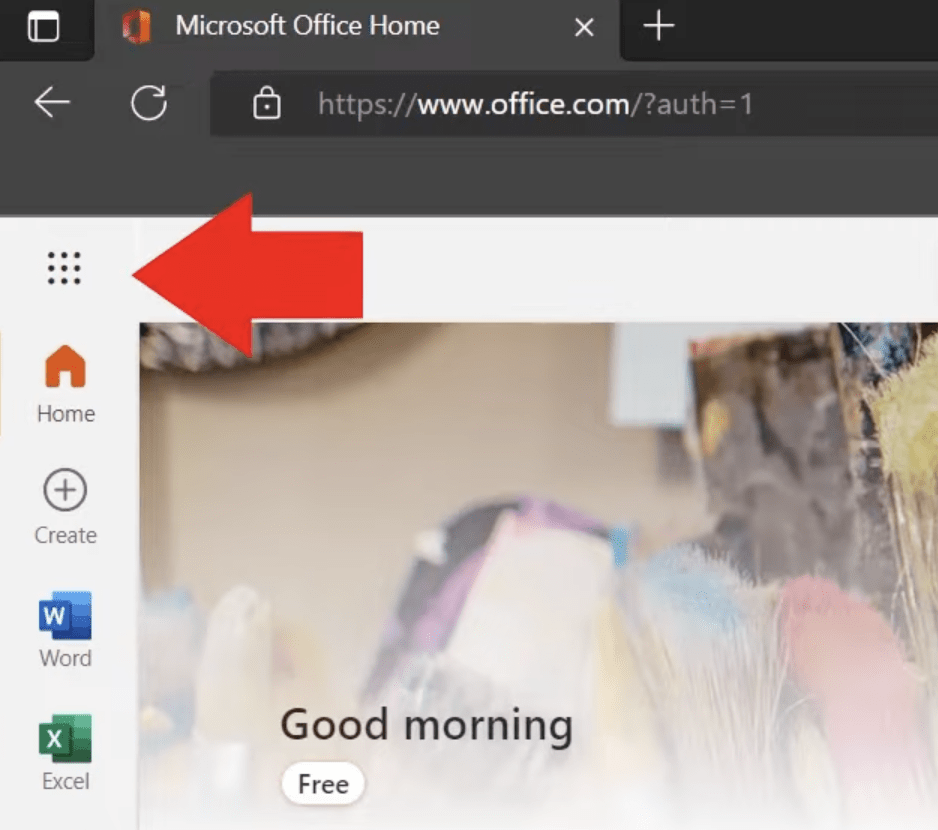
If you don’t see it there, you can go to the App launcher.
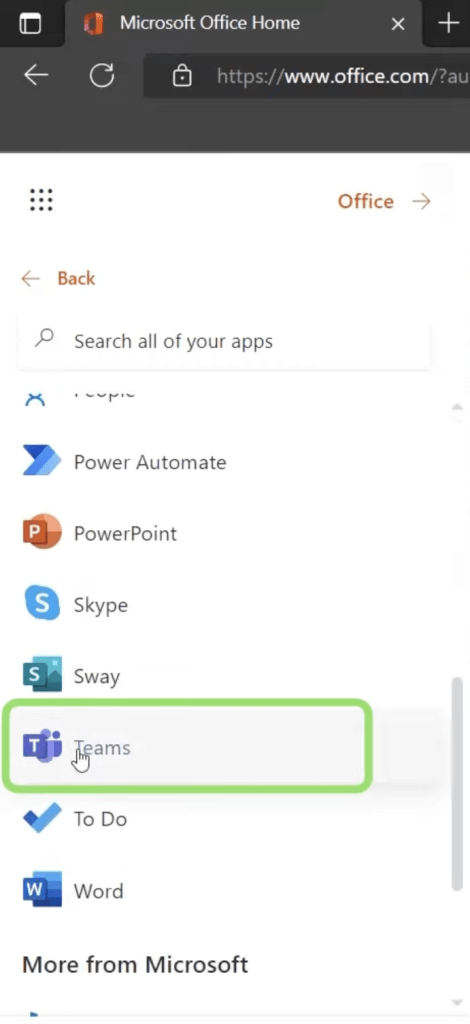
You will find Teams in the list. If it is not visible, click on All Apps.
Click on Teams.
FREE Desktop Version of MS Teams
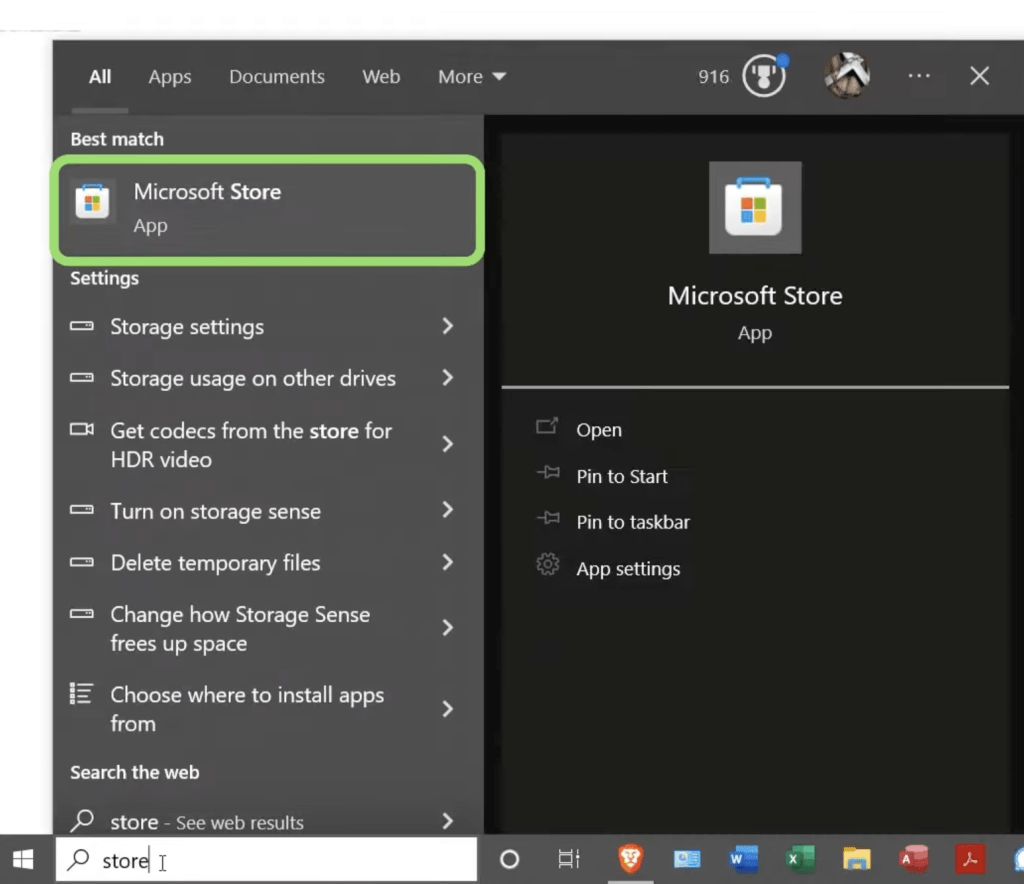
- Search Microsoft store on your desktop.
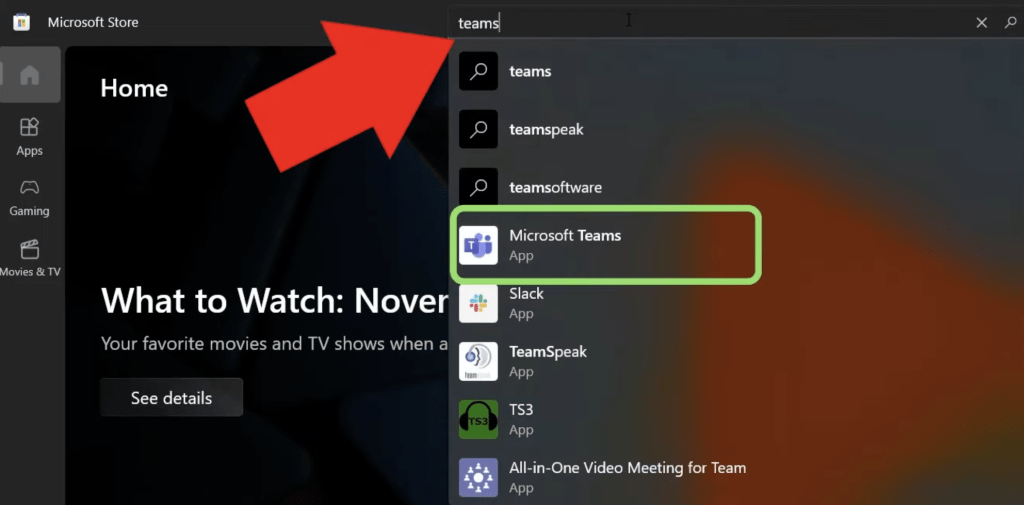
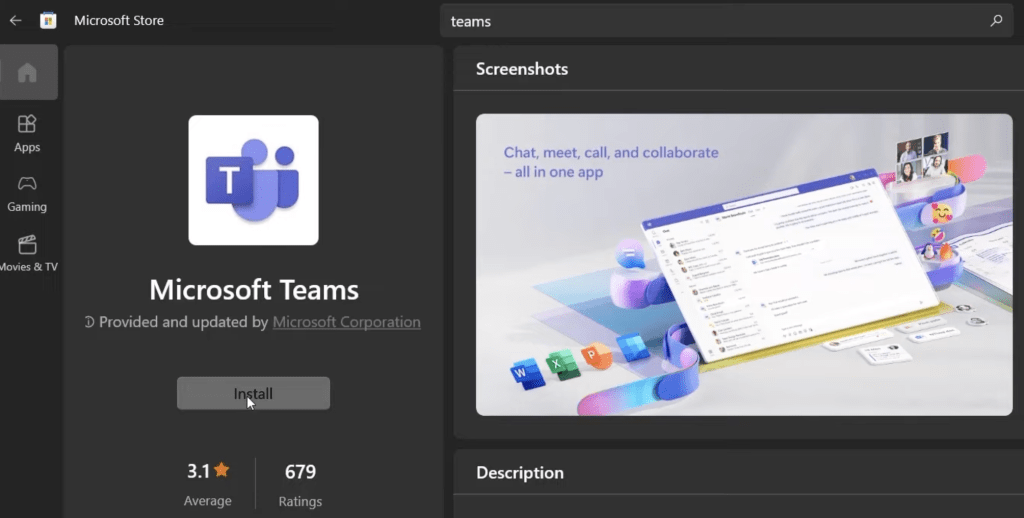
- Search Teams inside the Microsoft Store app and click on the MS Teams icon for instant search results.
- Click on the Install button to install it on your desktop. You can check that the author is Microsoft Corporation which means that the application is authentic.
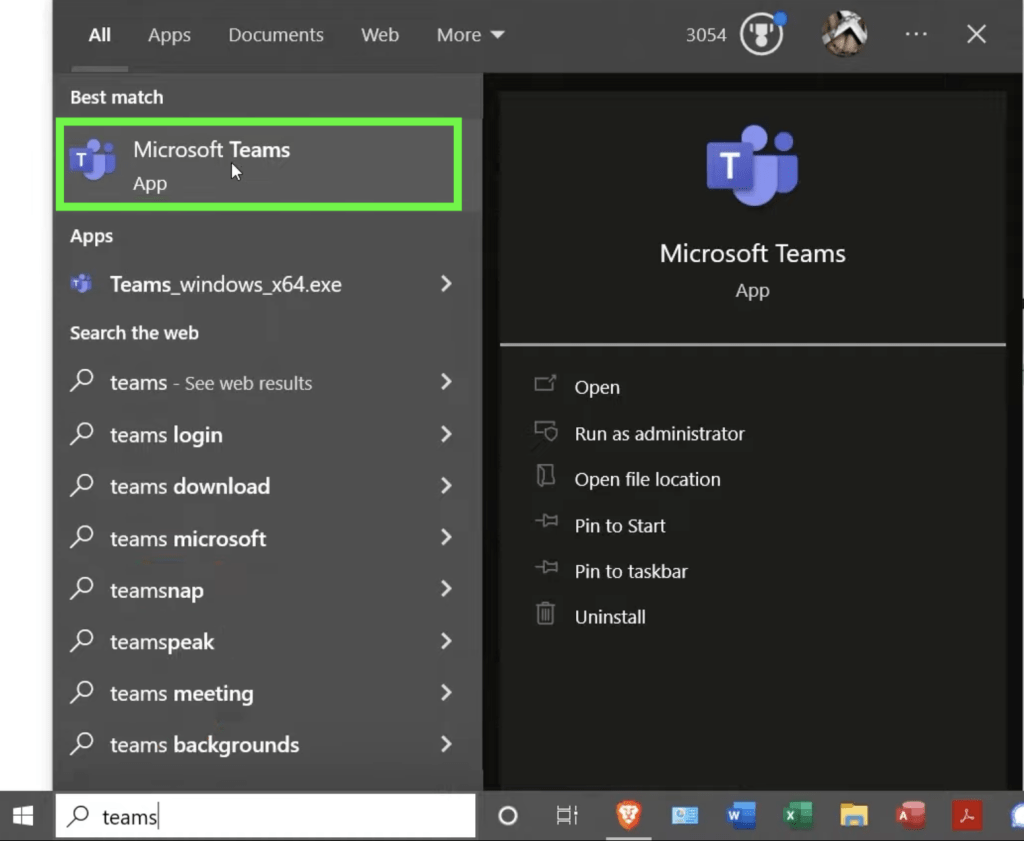
- Once installed, type Teams in the search of your windows desktop and click on the Teams icon to open it, or
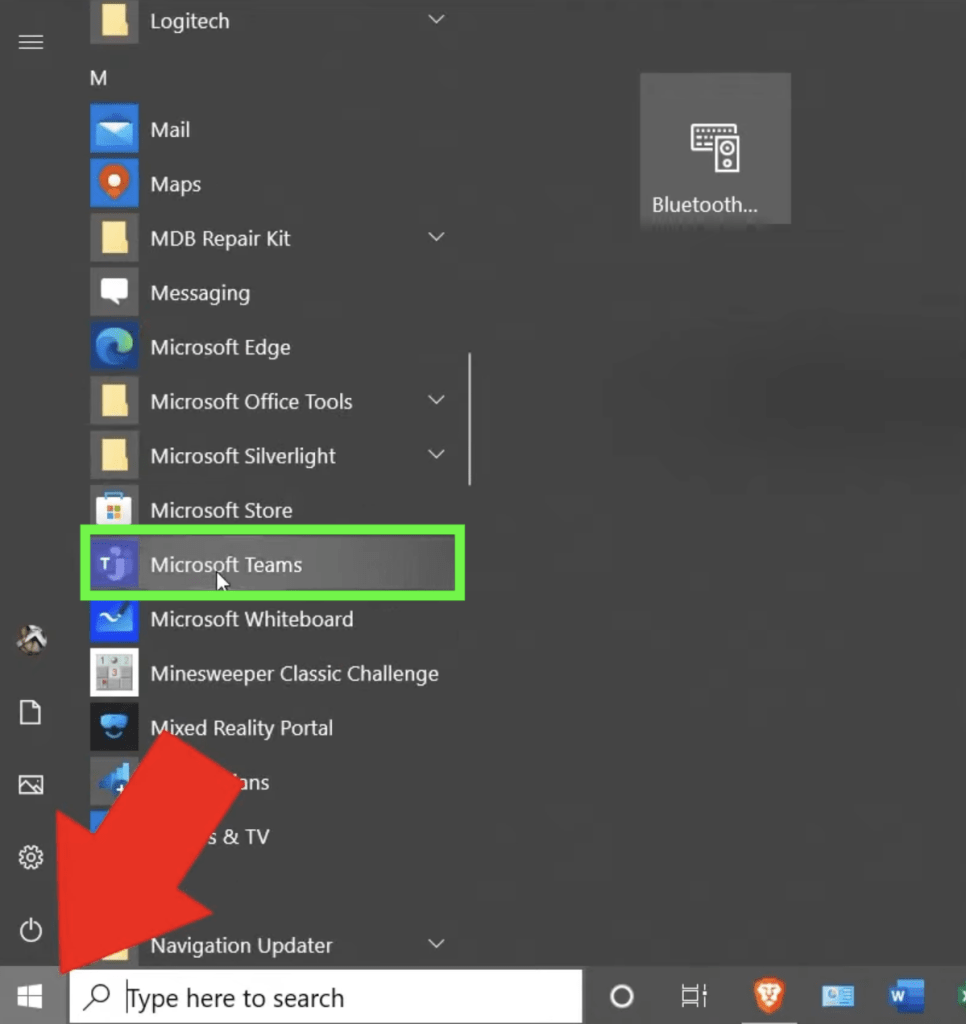
- Click on the start button and scroll down to find the Teams app and click on it to launch it on your desktop.
FREE Smartphone Version of MS Teams
Easily get Microsoft teams on your smartphone either on an iOS or android device.
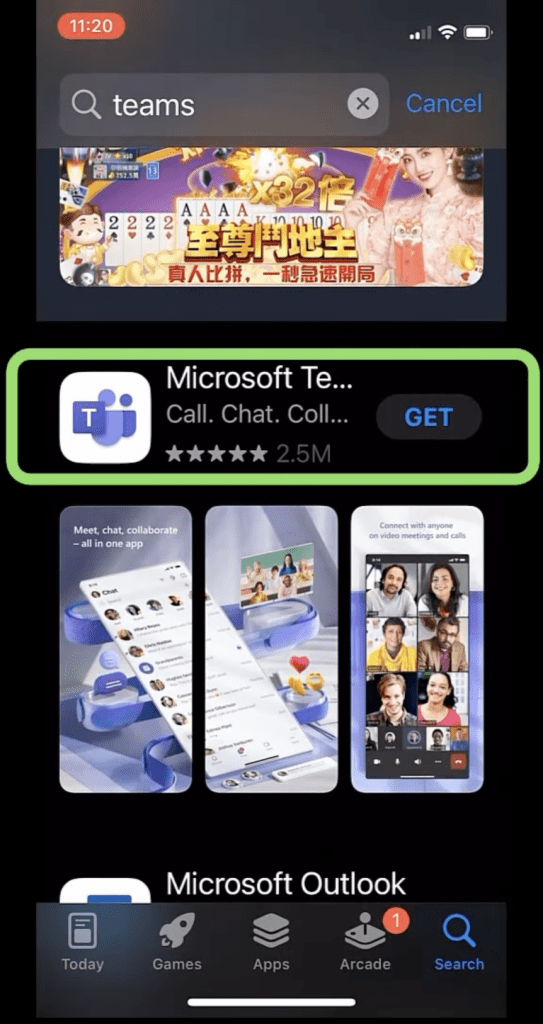
- Search MS Teams in your app store or android play store and download it on your phone.
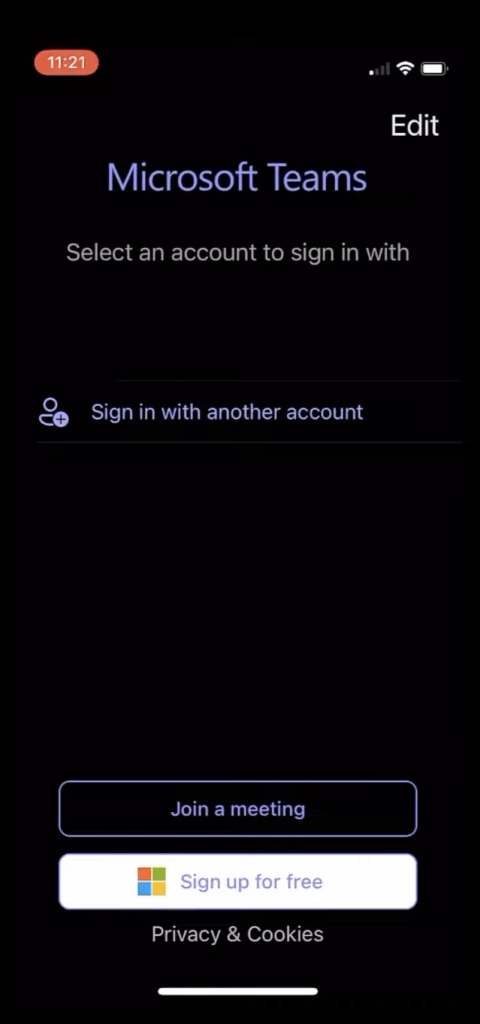
- Once downloaded open the app and find the option to log into your existing Microsoft account, create one for free or join a meeting for free.
These were the three simple ways to get teams for free. Please make sure that you’re logged into the same Microsoft account online, on your desktop, or on your phone so that you can see all past meetings are synced across devices.
How to Change Your Background Image in Microsoft Teams
You can tweak the background image in Teams if you wish to change what appears behind you in your video meeting or call, blur the background, or use a custom background.
This is one of the most used features in Microsoft Teams. It can be useful when you want to hide your messy room, use a pre-set image or want to attend a meeting with a beach in your background. It allows you to hide your actual surrounding hence reducing distractions and interruptions.
In this article, we will cover the following topics in detail –
- Changing the Background Image
- Before meeting starts
- During the meeting
- Finding Additional Backgrounds on Microsoft’s Website
- Changing Your Profile Image
Watch this video on How to Fix Outlook Errors on YouTube and give it a thumbs-up!
You can change background image in Teams before a meeting starts by following the steps below –
- Open Microsoft Teams
- Click on Meeting > Meet Now
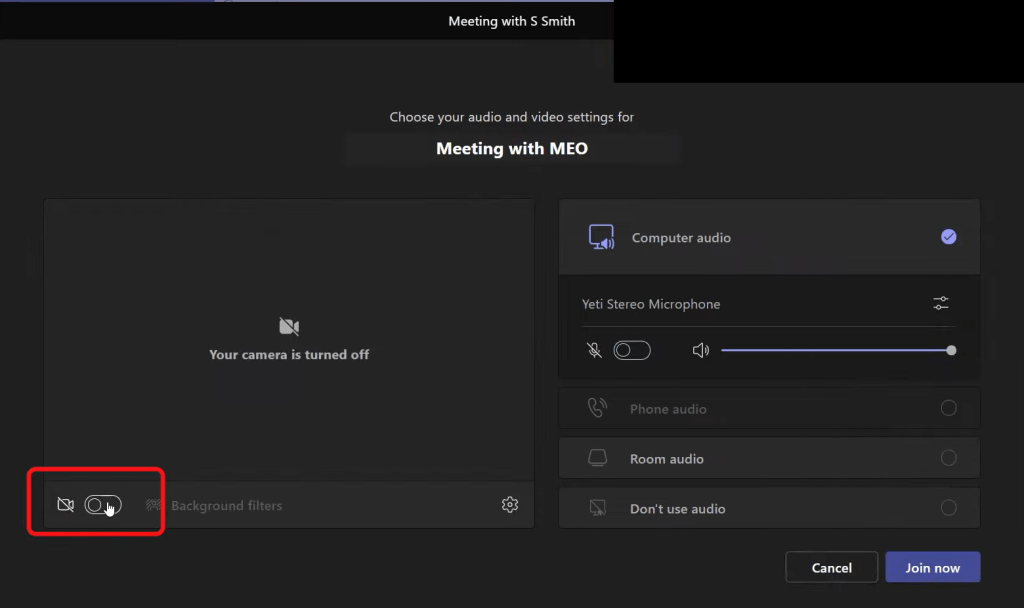
- In the setting window, turn on the toggle at the bottom of the screen to start the video
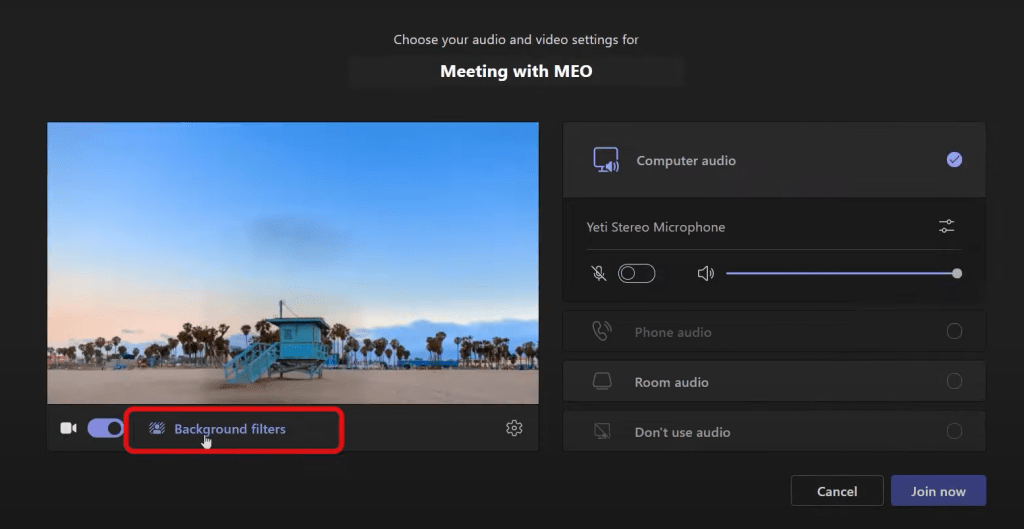
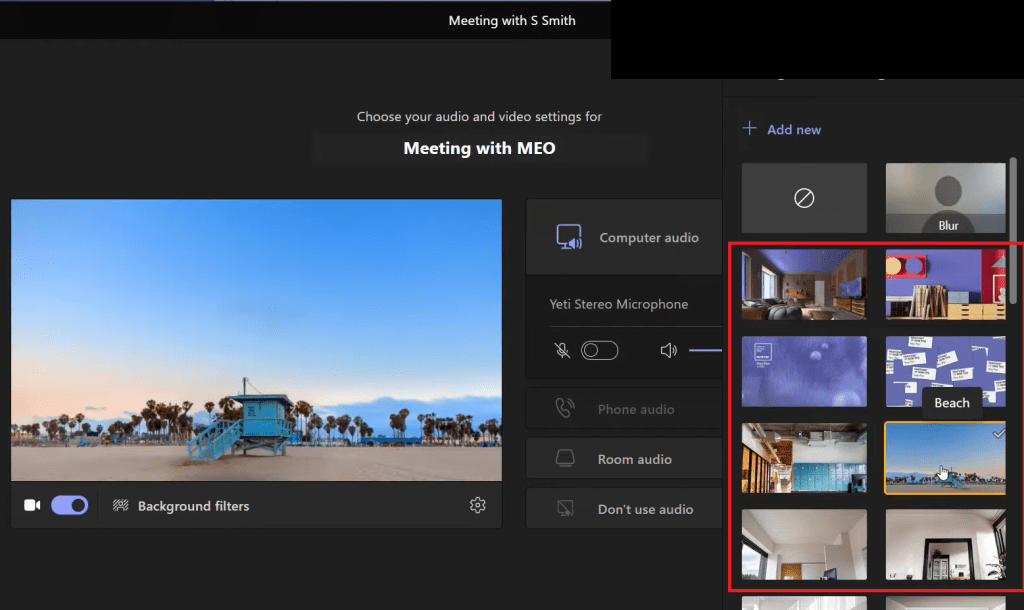
- Click on Background filters
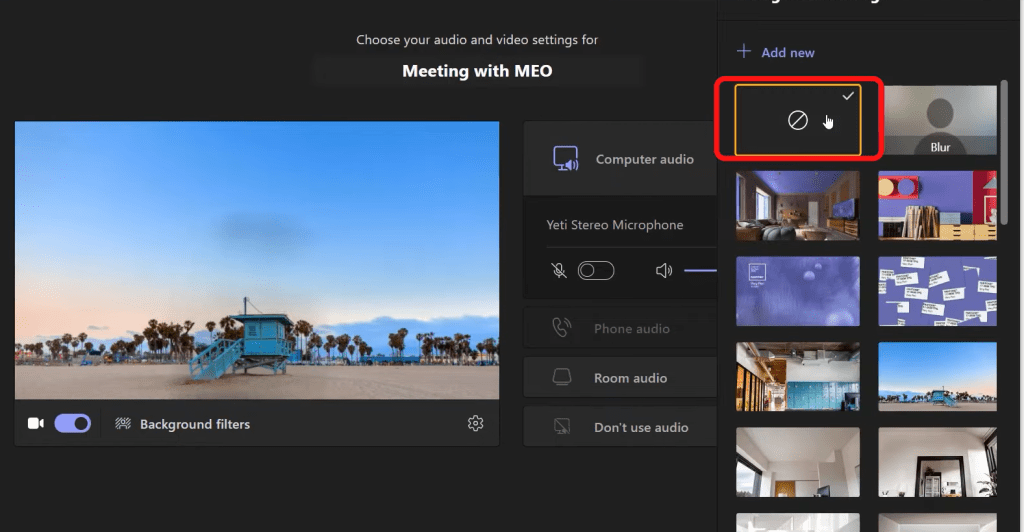
- Click on the first option to take off any filter already added
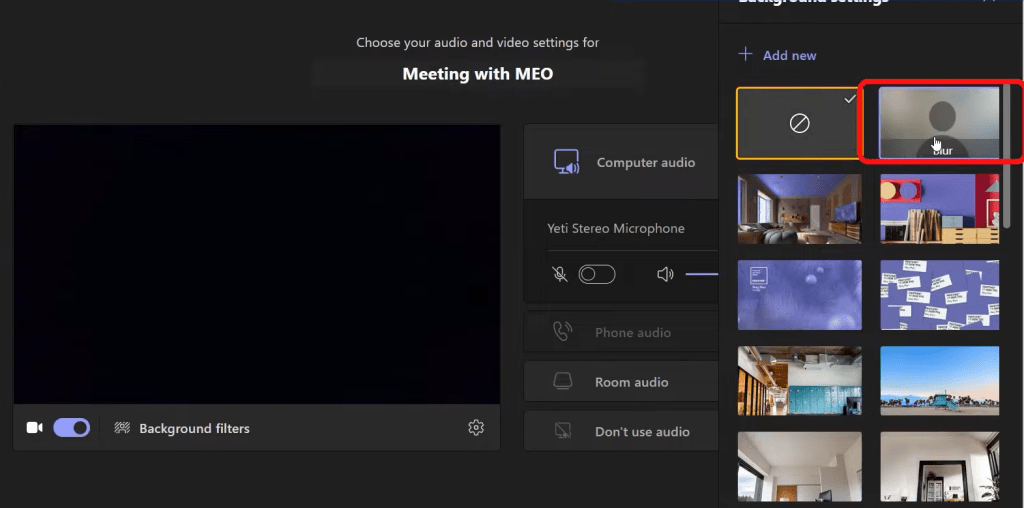
- If you are working from home and do not want people to see what’s in your background, click on blur
- You can even use images in the background like a room, abstract art, a beach, etc.
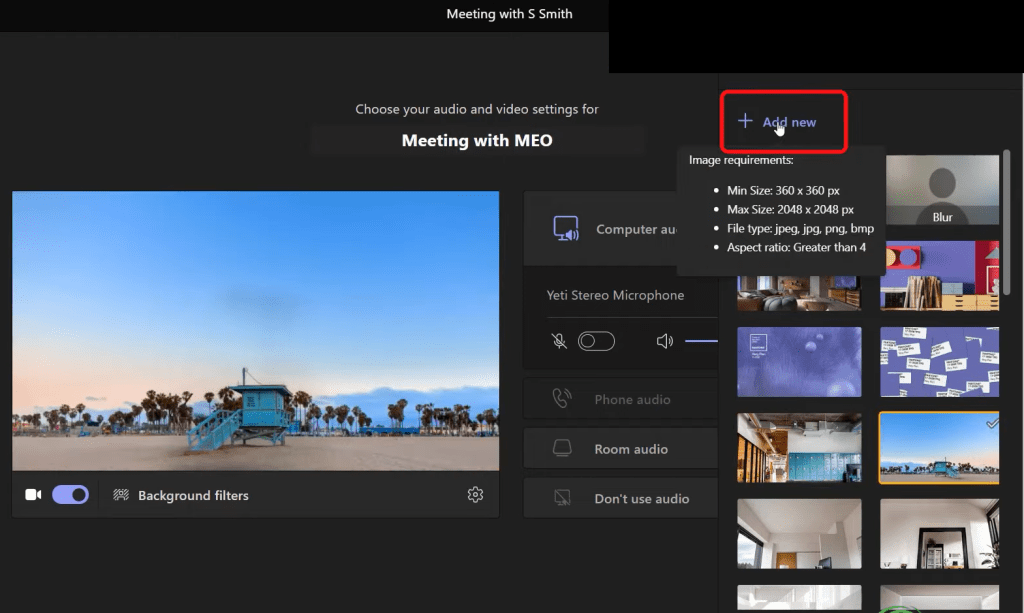
- Click on Add new to insert a custom image as a background
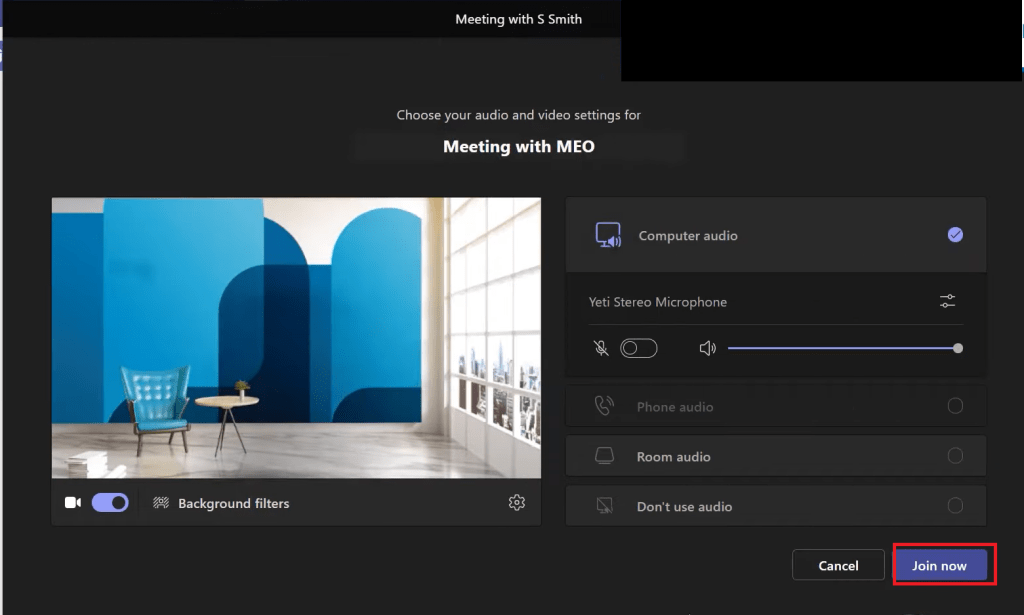
- Click on Join Now
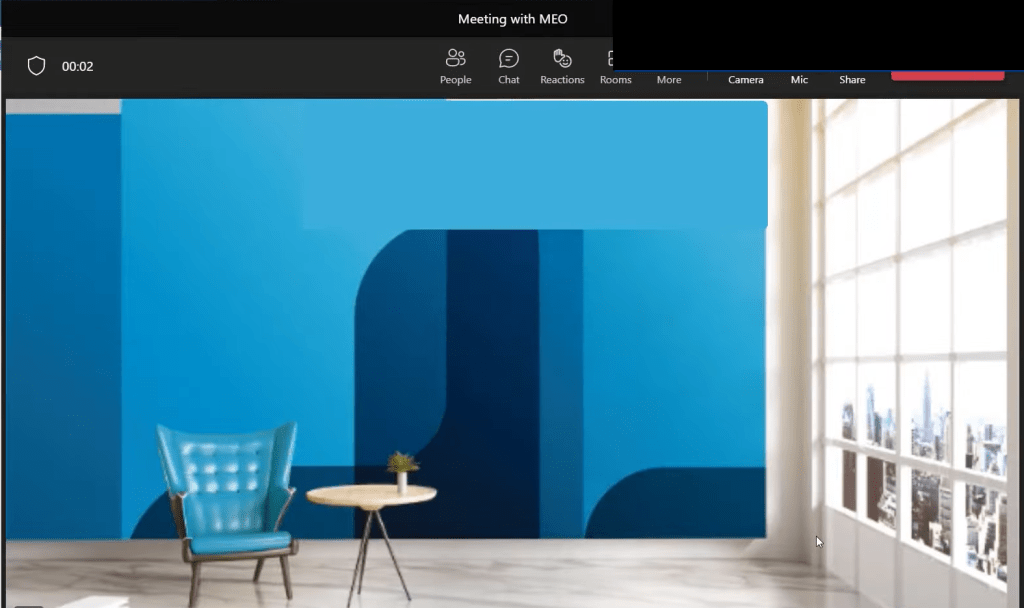
You will see the selected image as the background for your meeting.
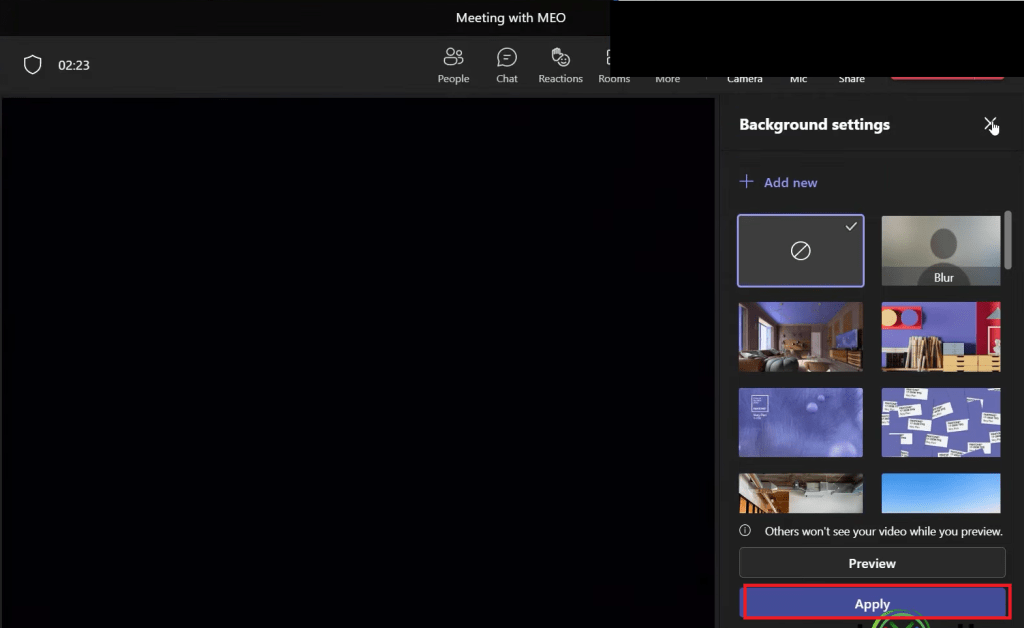
Once you are in the meeting, you can still change background image in Teams by following the steps below –
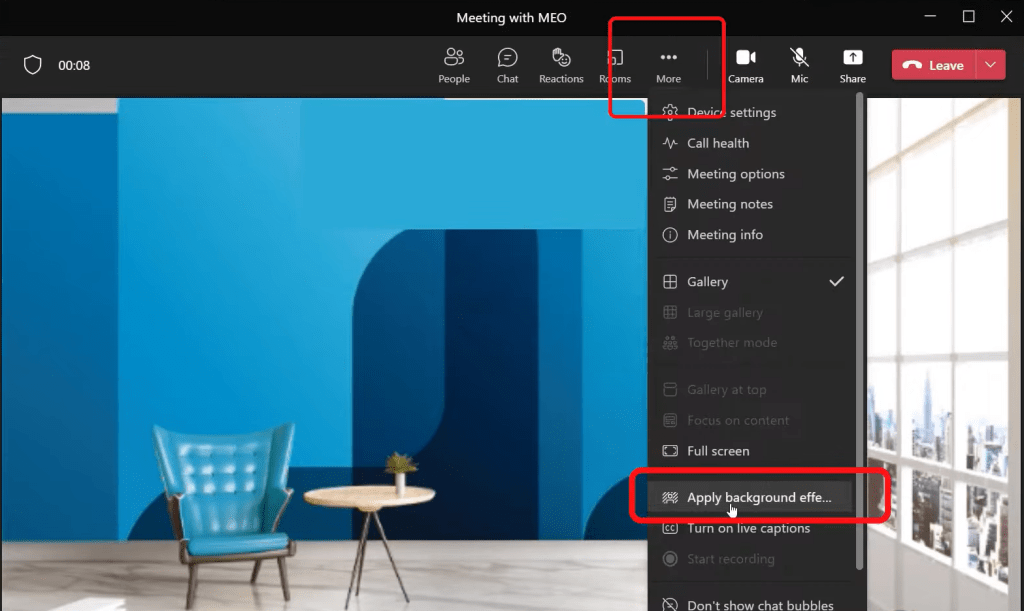
- Click on More > Apply Background effects
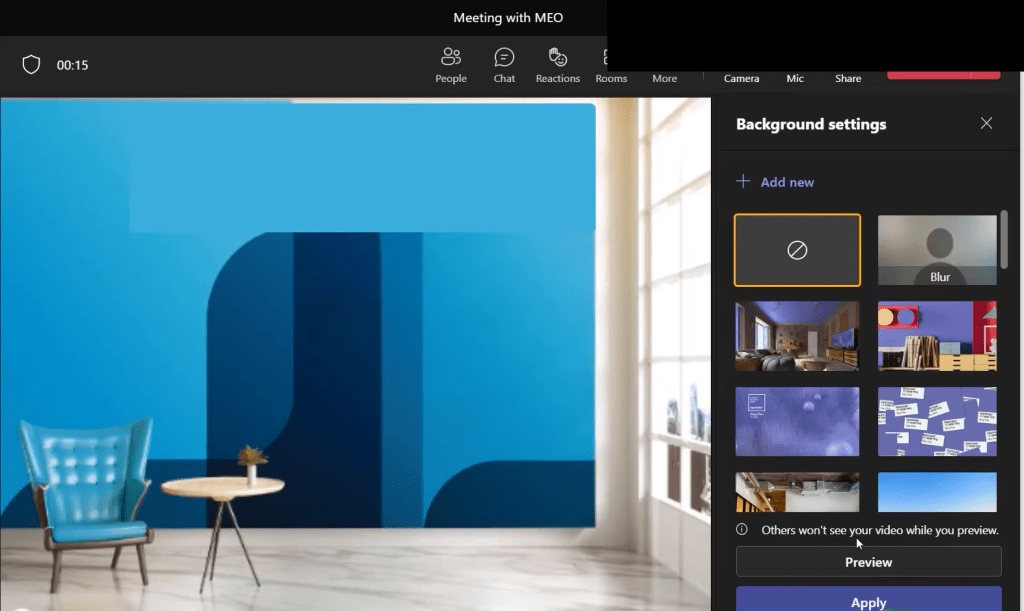
- You will find the same background filters
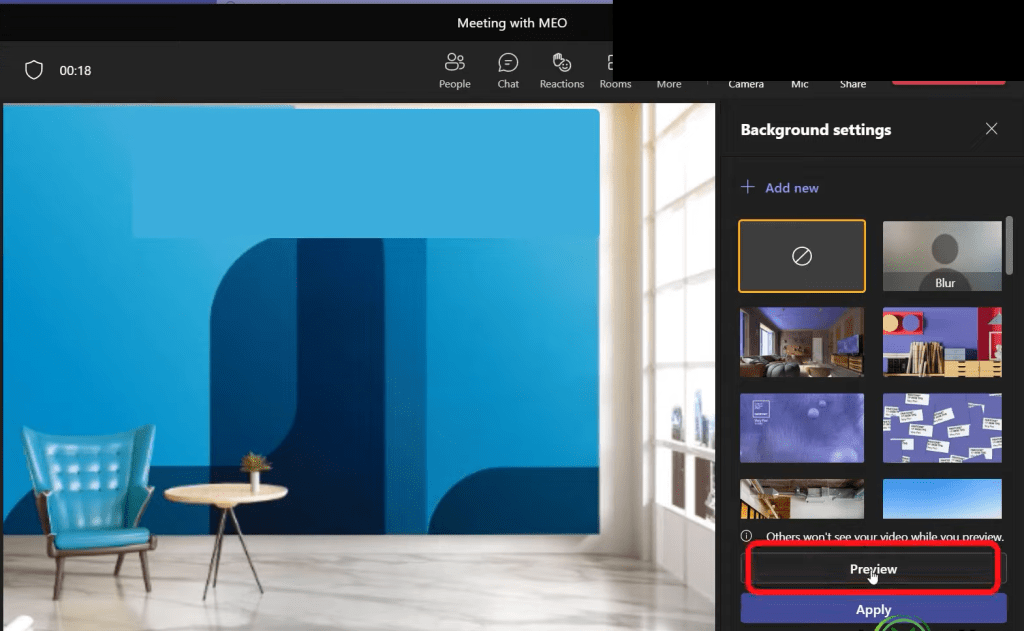
- Click on Preview to view how the background will look like
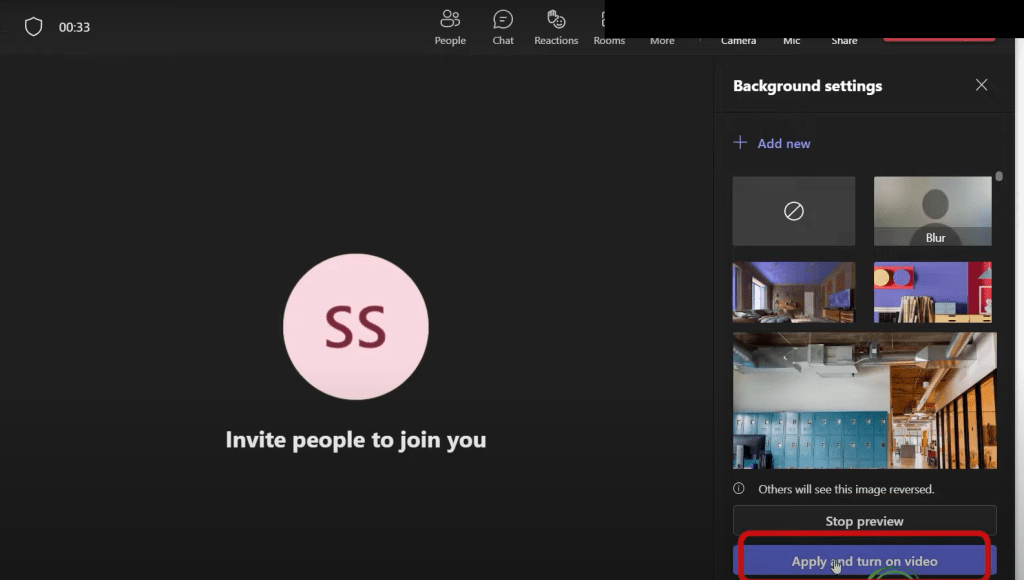
- Click on Apply and turn on video
Finding Additional Backgrounds on Microsoft’s Website
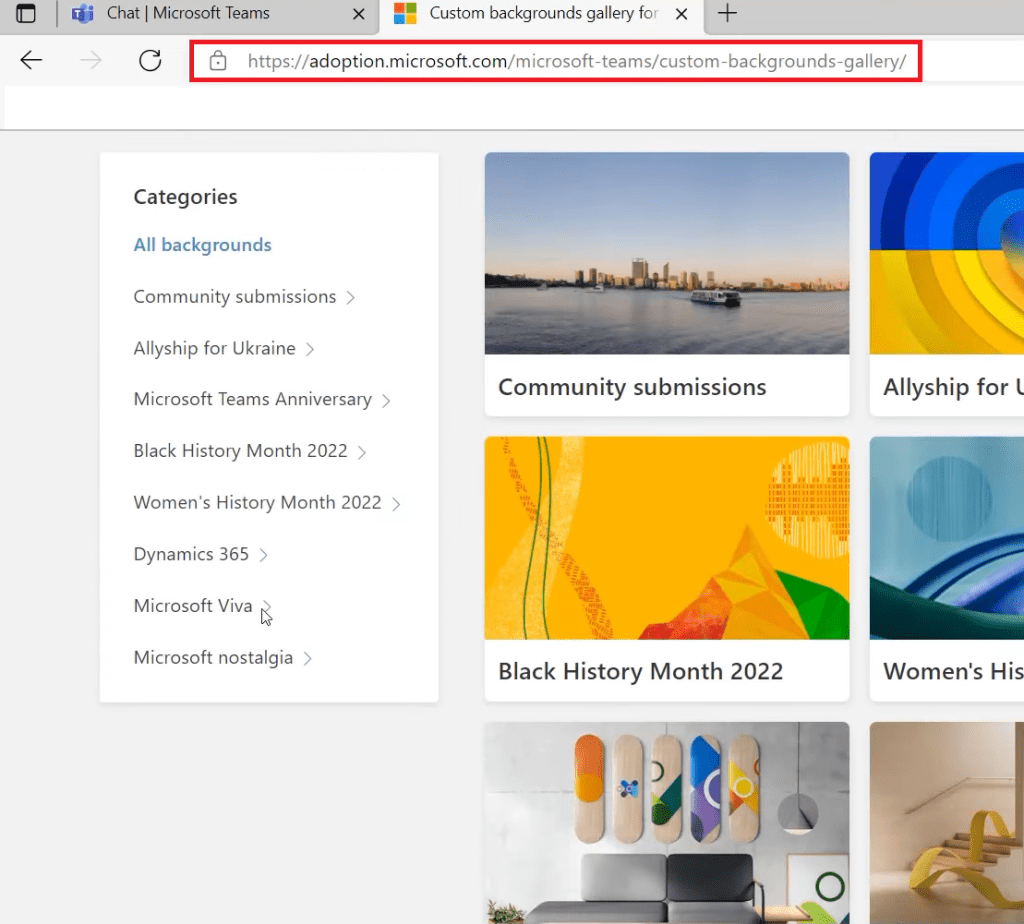
You can use backgrounds available on Microsoft’s website as well.
- Open Microsoft website
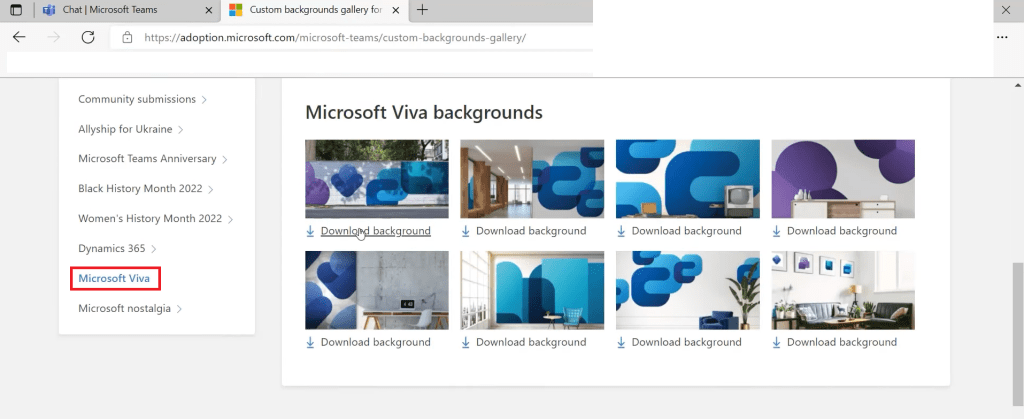
- Select a Category
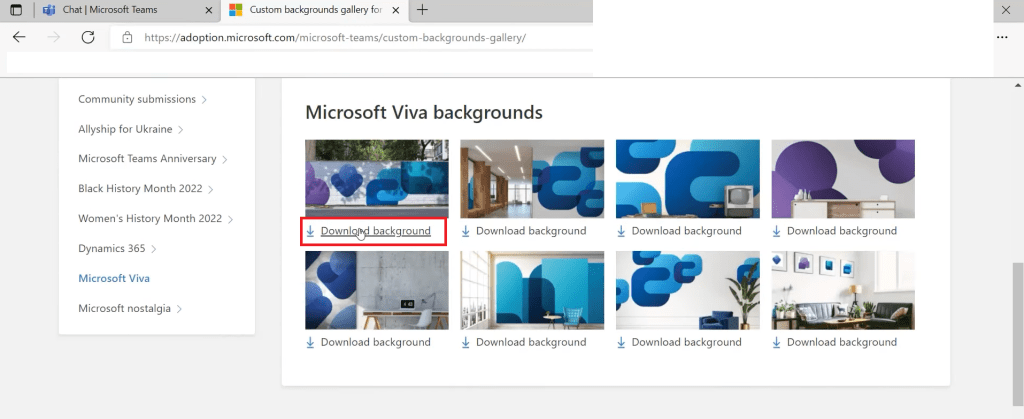
- Click on Download Background
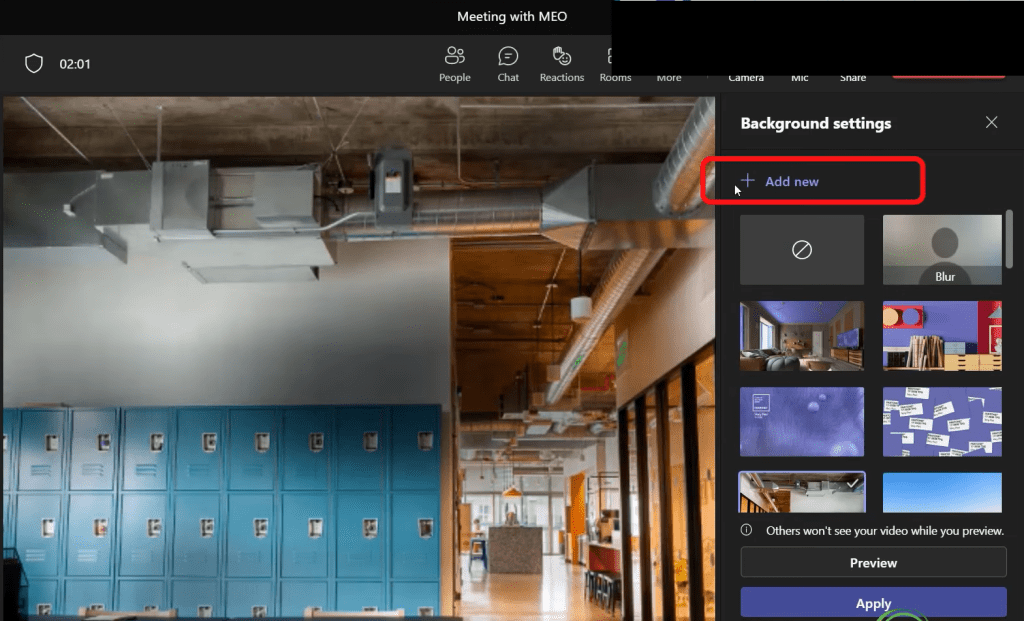
- Open Microsoft Teams > Background Filters
- Select Add New
- Select the image and click on Apply
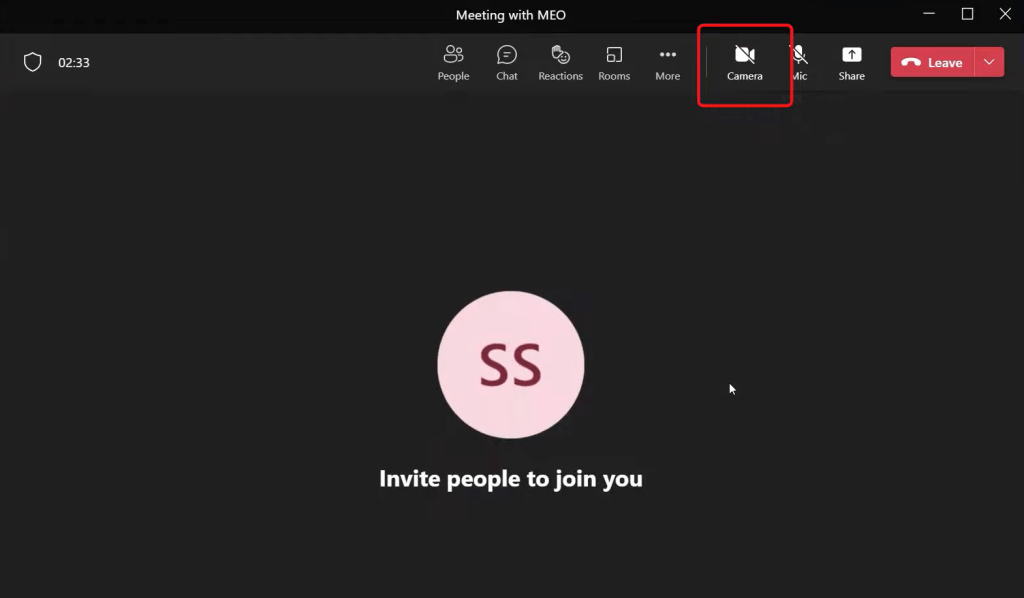
If you turn off your camera, the default image that is visible to everyone is your initial.
You can easily change that by following the steps below –
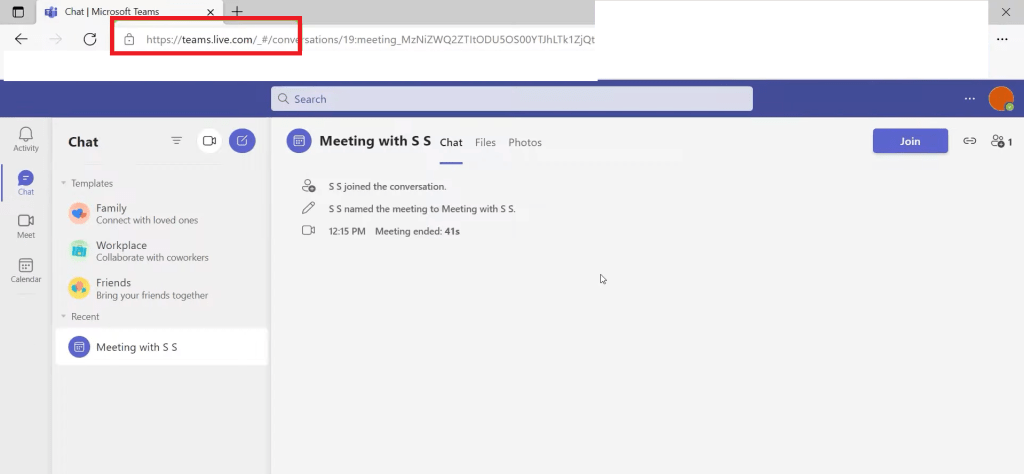
- Open Microsoft Teams website
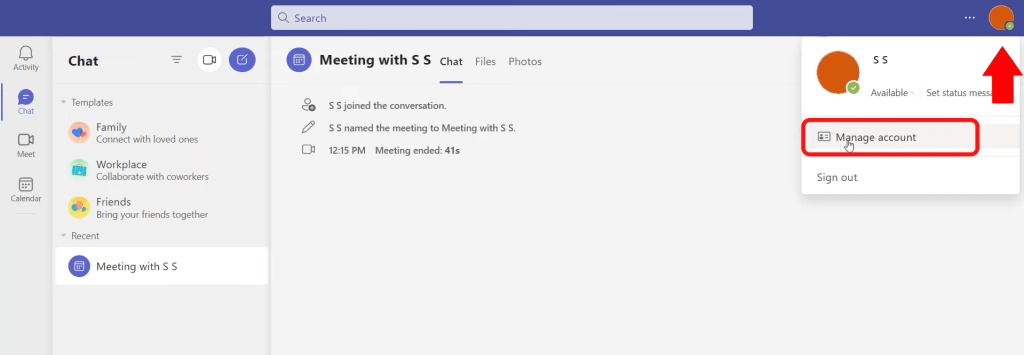
- Go to top right corner of the screen and click on the icon
- Click Manage account
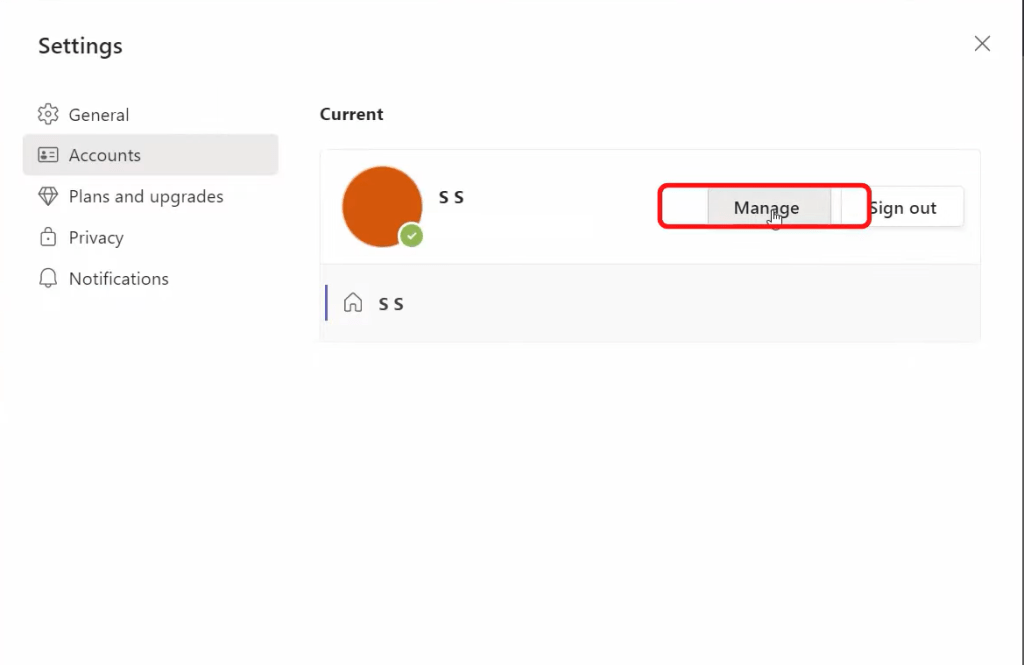
- Select Manage button
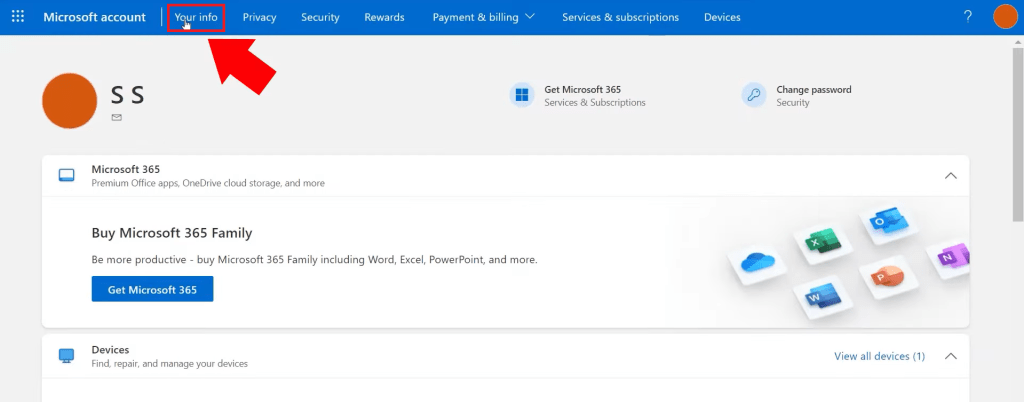
- Select Your info
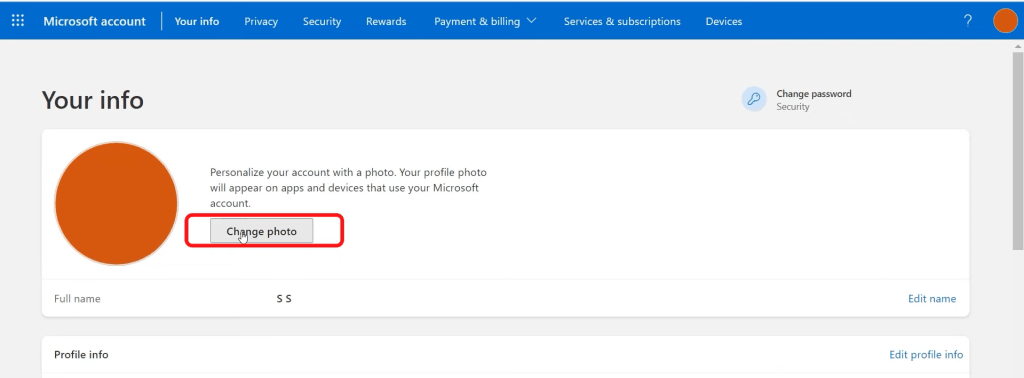
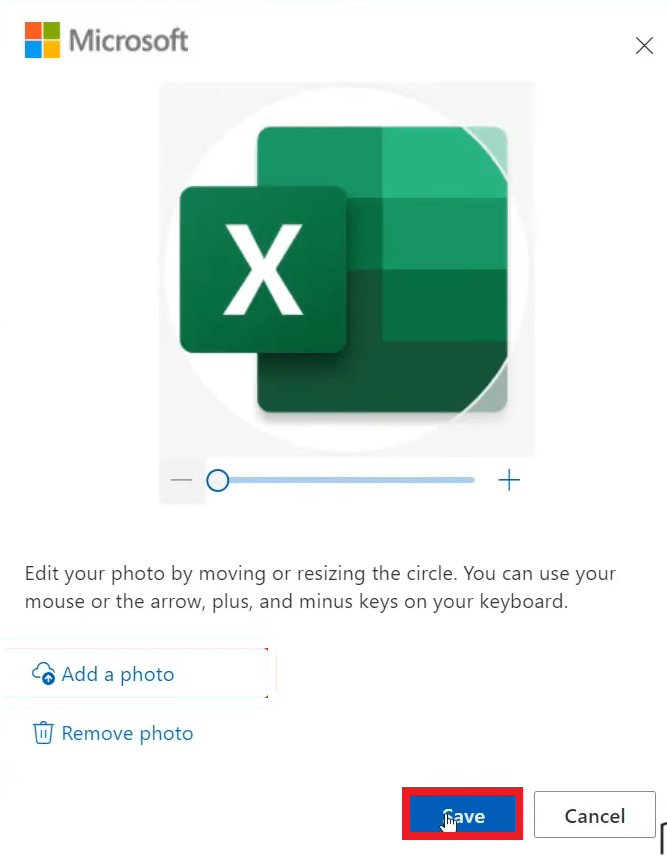
- Select Change photo
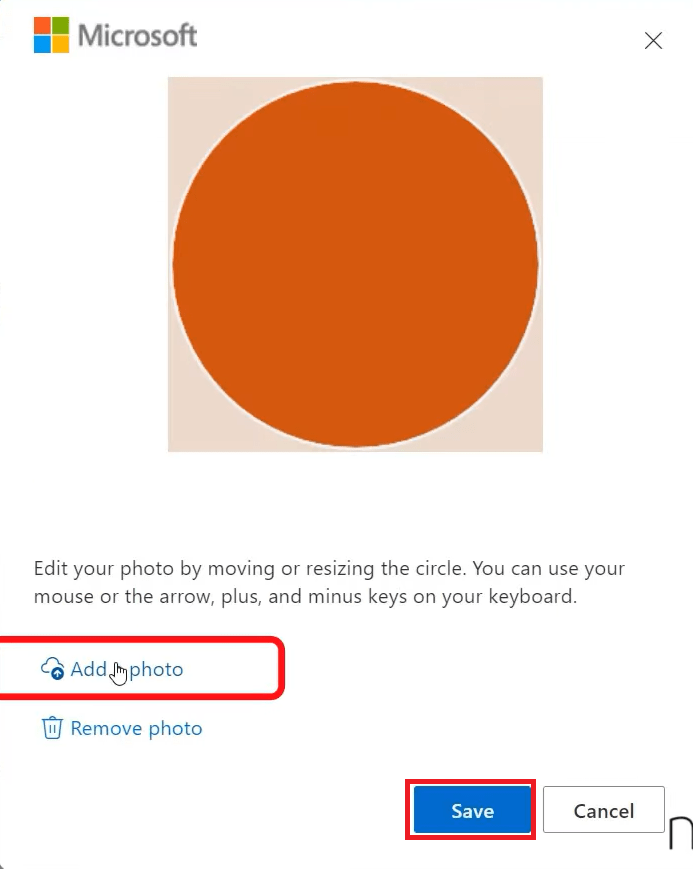
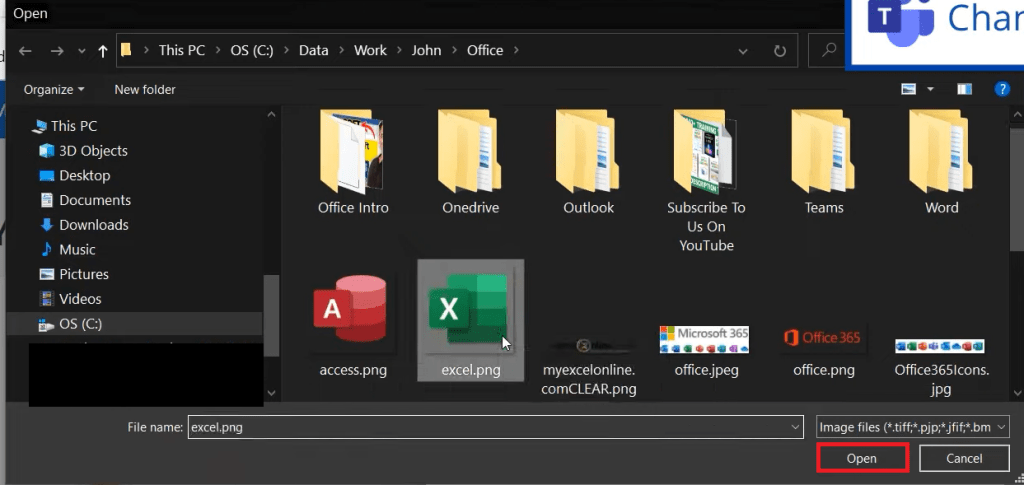
- Click on Add a photo
- Select a photo and then hit Open
- Hit Save
You will now see that the profile image has changed to the one you have selected before instead of your initials.
In this article, we have went through a various background options as well as changing your profile image for when your camera is not on. We have also seen how to get additional backgrounds on Microsoft’s website.
Track Employee Activity & Usage With Teams
Microsoft Teams assist businesses in monitoring their staff. Within Teams, you can track practically anything your employees do like text discussions, recorded calls, zoom meetings, and other features.
This raises further questions for you –
- Microsoft Teams Host Tracking Capabilities
- What activity in the Teams app can be tracked?
- What activity outside of Teams can be tracked?
Don’t be concerned. You don’t have to embark on an internet quest to find out.
Watch this video on How to Track Employee Activity in Teams on YouTube and give it a thumbs-up!
In this post, we’ll go over the employee monitoring tools in Microsoft Teams in depth.
Microsoft Teams Host Tracking Capabilities
Attendance List
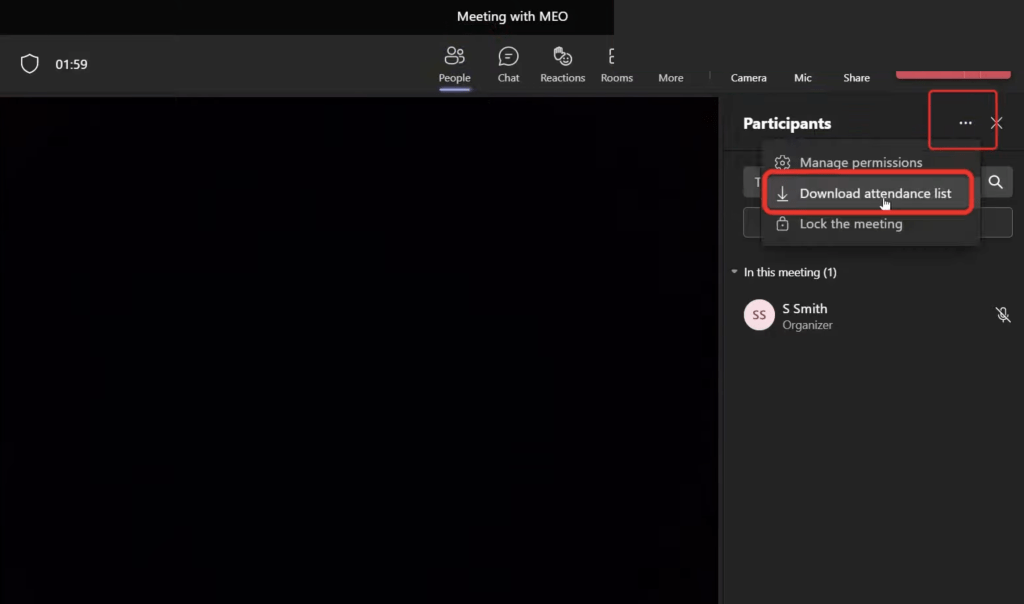
If you are the host of the Microsoft teams meeting, go to people and look up the participants of the meeting.
Then click on the three dots> Download attendance list.
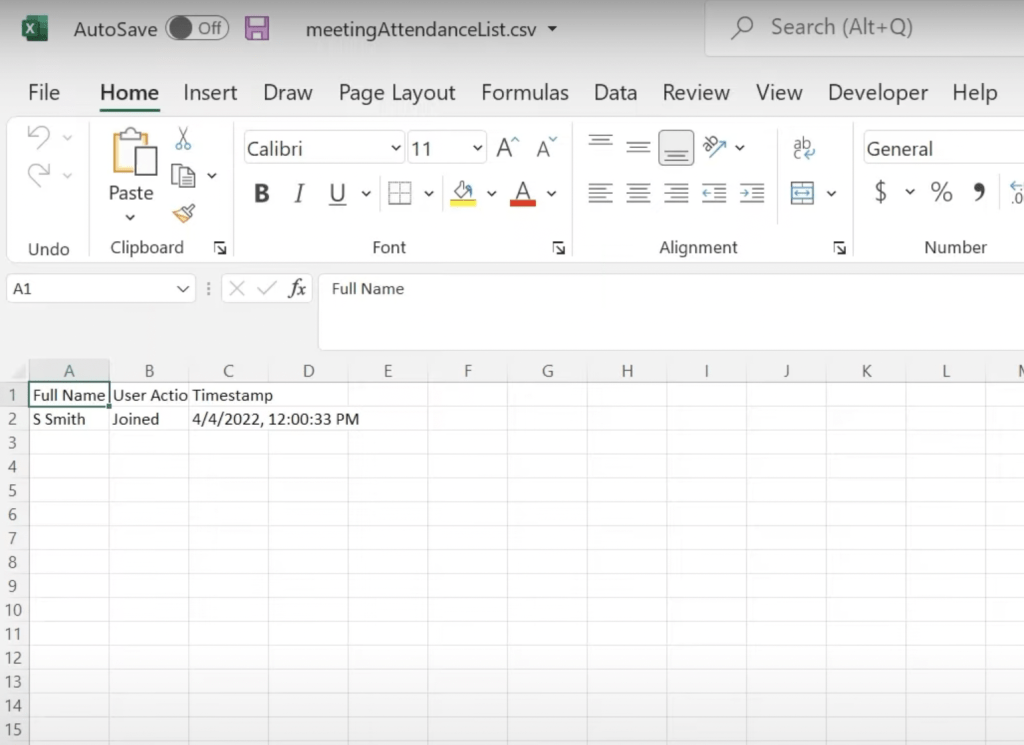
An attendance list is a CSV file that can be downloaded to your browser. Once you open the file you can find the following information:
- Who is in the meeting
- Whether they joined/left the meeting
- What time they joined or left the meeting
If you plan on attending a meeting in Teams and then leaving it really quickly, keep in mind that the host will have the information when you have joined and left the meeting.
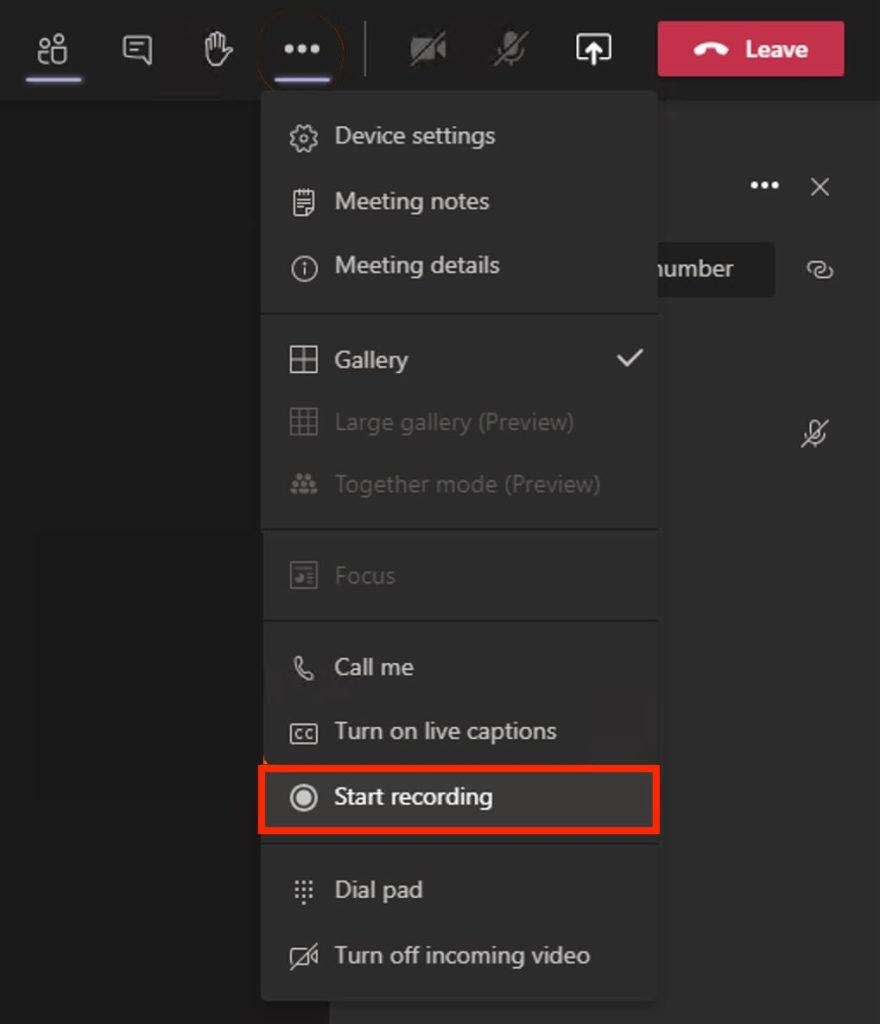
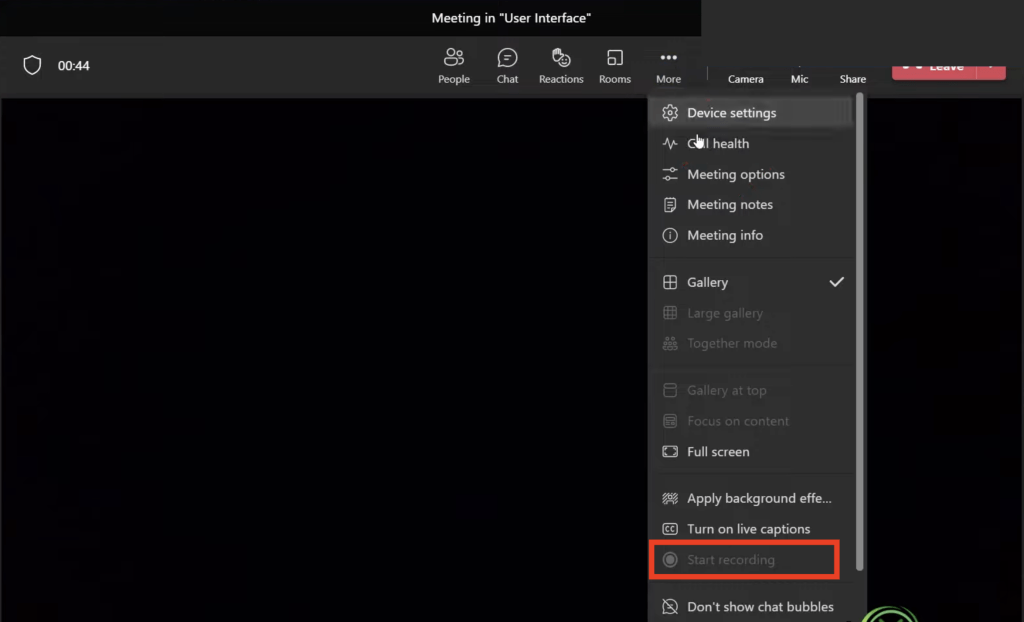
If you are attending a meeting with more than one person, you can click on more with three dots to start recording the meeting.
Also, when someone else is recording the meeting, you’ll find a banner across Microsoft Teams. You’ll be alerted about the privacy and the meeting won’t be secretly recorded.
What activity in the Teams app can be tracked?
Inside the Microsoft Teams application, you can track everything being clicked on – whether it’s creating a meeting or having a phone call, or sharing files using apps. All of this information are being recorded inside Microsoft Teams.
This information can only be viewed by someone with admin or user access to this information.
So, the admin has access to reports which can have details –
- Chats – access to all chats, replies, and the total number of messages
- Phone calls – Who you have called, length of phone calls, IP addresses, cost of calls
- Video calls – Time spent in meetings, screen sharing time, and video call participants.
- Overall Report – Last activity of the users in Microsoft teams
What activity outside of Teams can be tracked?
Admin access is not restricted to information inside of Teams, they can even get information outside of Teams.
Admin has access to search through all OneDrive files, SharePoint files, Microsoft exchange emails, calendars, and even the user’s skype activity.
Admin has the ability to run global reports and keep track of the overall activity of an employee.
If you ever wondered what Microsoft Teams can track about you, this article is for you. It covers what meeting hosts can track, and what activities can be tracked inside teams, as well as outside.
Share Your Screen in a Microsoft Teams Meeting
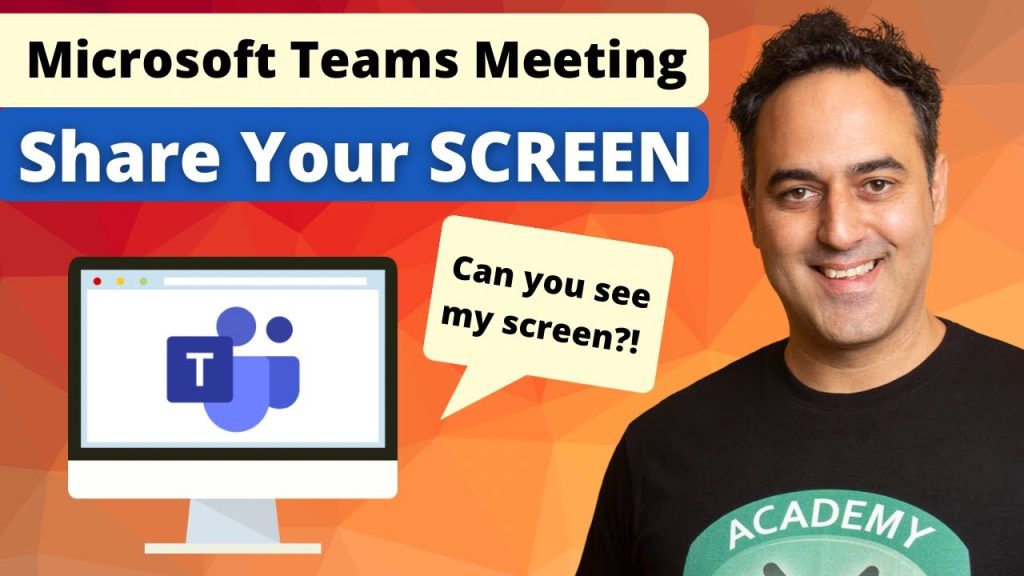
Most businesses have now started working remotely making Microsft Teams an integral part of their daily work life. Screen sharing can be used to make online meetings interactive, allow real-time collaboration with teammates, train employees remotely, demonstrate the use of software, and much more.
You can easily share screen in Teams meeting. You can choose to either share your entire screen or just a window as per your requirement.
In this article, we will be covering the following sub-topics –
- Share Screen in Teams Meeting
- Share All Screens
- Share Only a Window
- What May and May Not Be Shared
- Additional Tips
Watch this video on How to Share Screen in Teams on YouTube and give it a thumbs-up!
Following are the steps to share your screen within Microsoft Teams –
- Launch Microsoft Teams
- Start a new meeting or join an ongoing meeting.
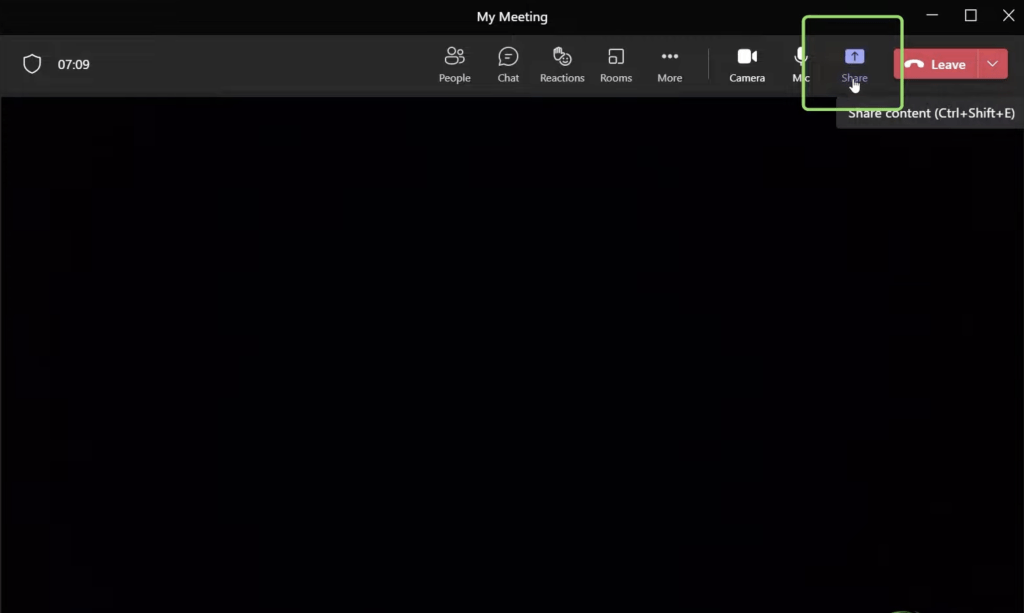
- Click on the Share button in the call menu to launch your screen-sharing options
- Select a Workspace to start sharing your screen
- Share your Screen – This will share your entire desktop with the attendees of the meeting. They will be able to see everything you are doing on your computer.
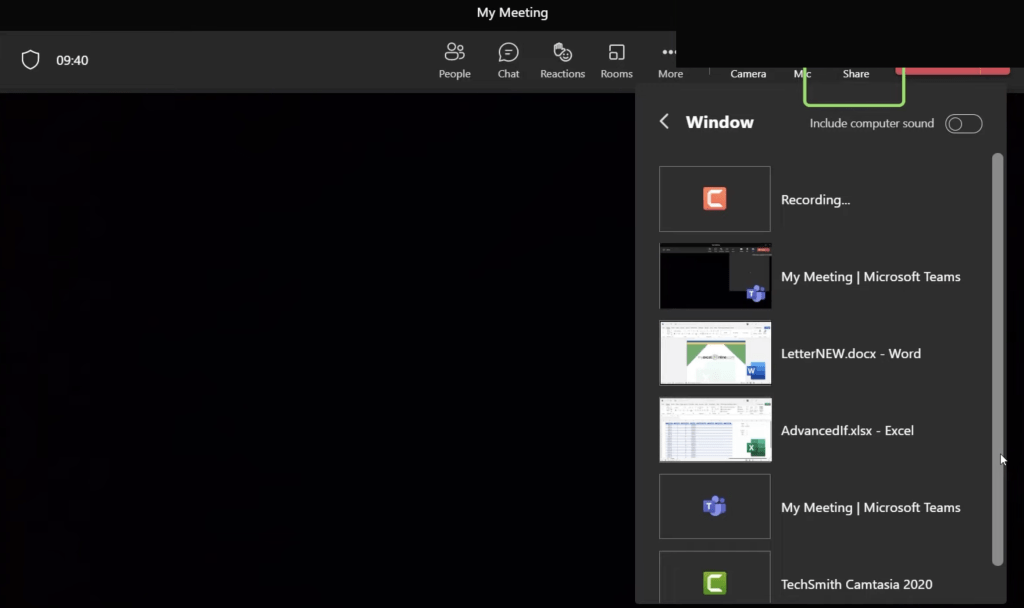
- Share your Window – This will share just that one window you select.
- After you select what you want to show to your team, a red border will appear around the screen which you’re sharing.
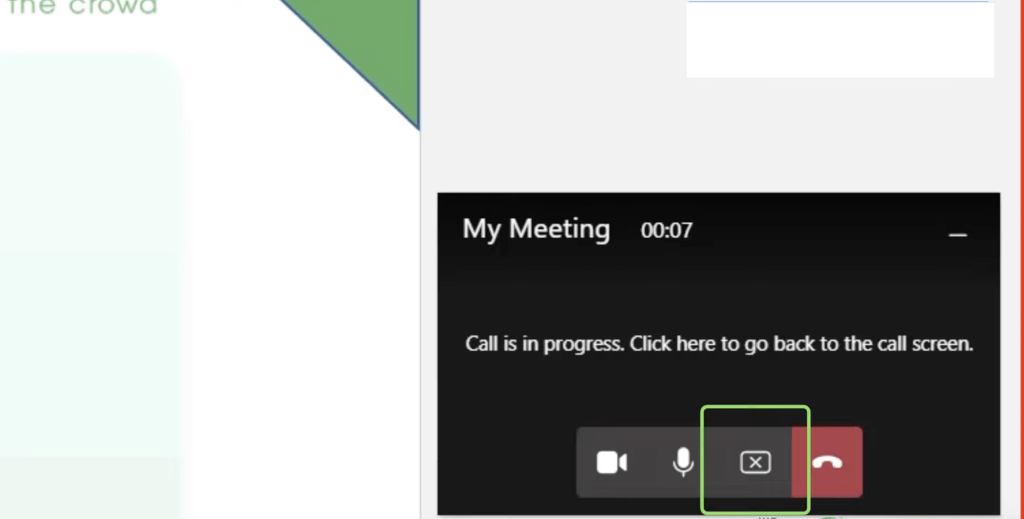
- To stop sharing, choose the Stop Sharing icon in the Call Options Window at the bottom of your screen
In this option, you will be sharing your entire desktop with everyone in the meeting.
Screen sharing means that whatever is visible to you on your screen is also visible to all other participants. Once you start sharing your screen, a red box will appear on your desktop screen, which shows that your screen is being shared.
So, if you switch from one window screen to another, the red box will still appear in each of the windows which means you are sharing all those screens with your team.
In this option, you will be only sharing a particular window with everyone in the meeting. You can open multiple windows in a meeting but only the one selected will be visible to other participants.
If you select to share a window option, then you will be asked to select any one window from the list of your open windows, which you want to share with your teammates. And only that window will be seen by everyone in the meeting.
A red box will appear only on that window screen that you want to share. So, if you switch from one window to another, the red border will disappear meaning this new window will not be seen by others in the meeting.
What May and May Not Be Shared
If you share a window in a Team meeting, some of the pop-up dialog boxes may or maybe not be shared with the attendees. This is because Microsoft Teams may consider a pop-up window as part of the Excel window or as a separate window altogether,
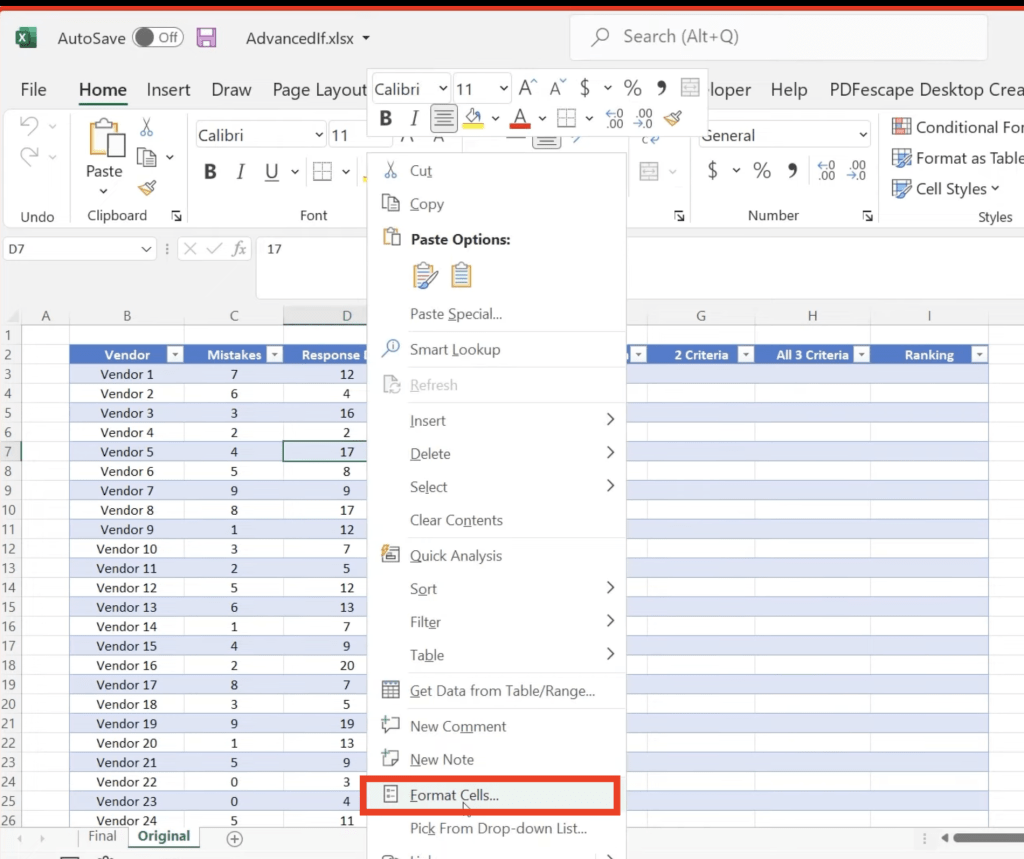
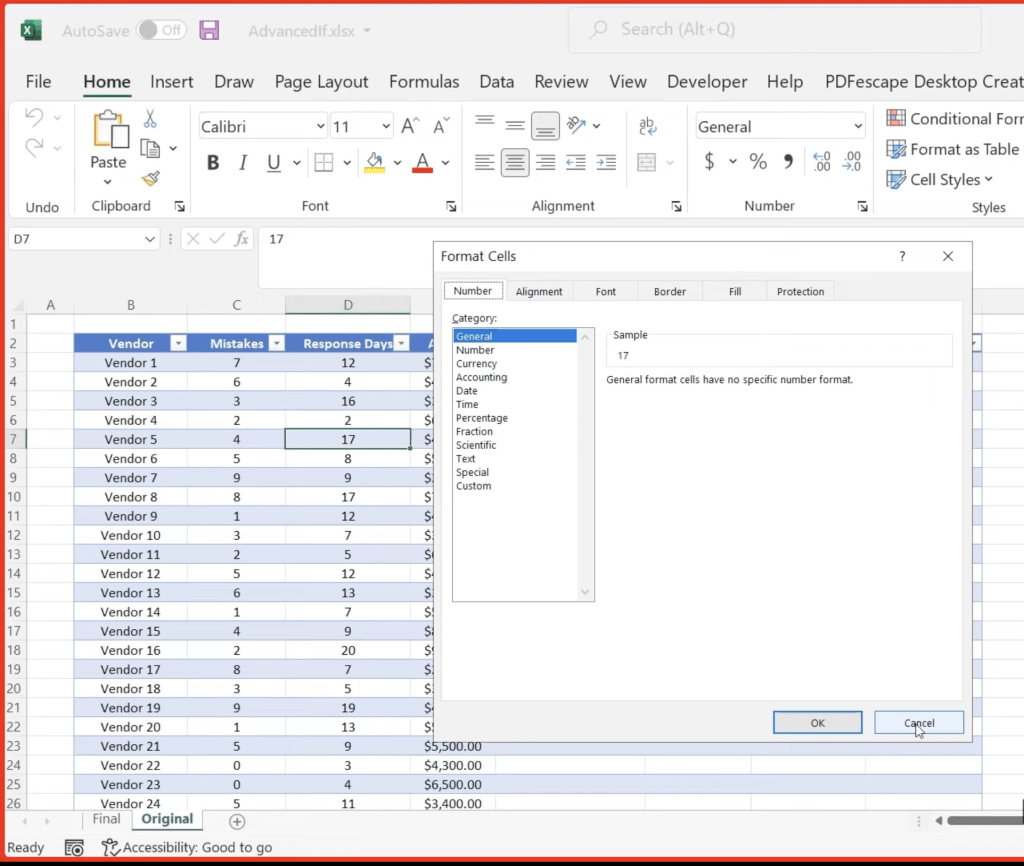
If you right-click on a cell and go to Format Cells,
A format cells dialog box will appear and all of the attendance will be able to see that dialog box.
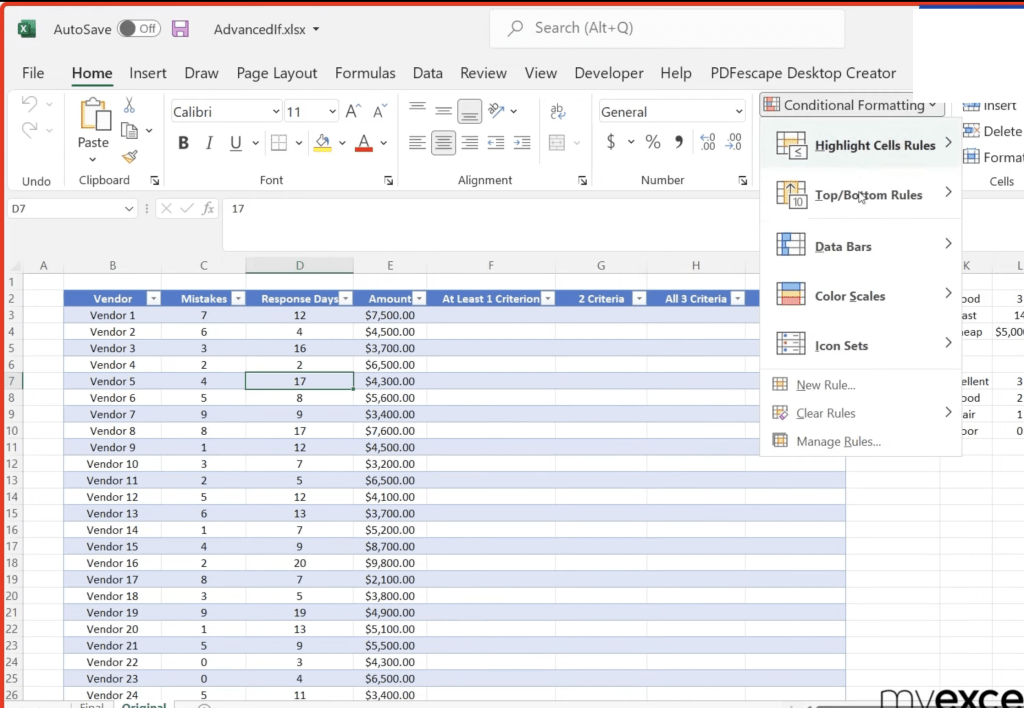
But, if you go to the Home tab and then click on Conditional Formatting.
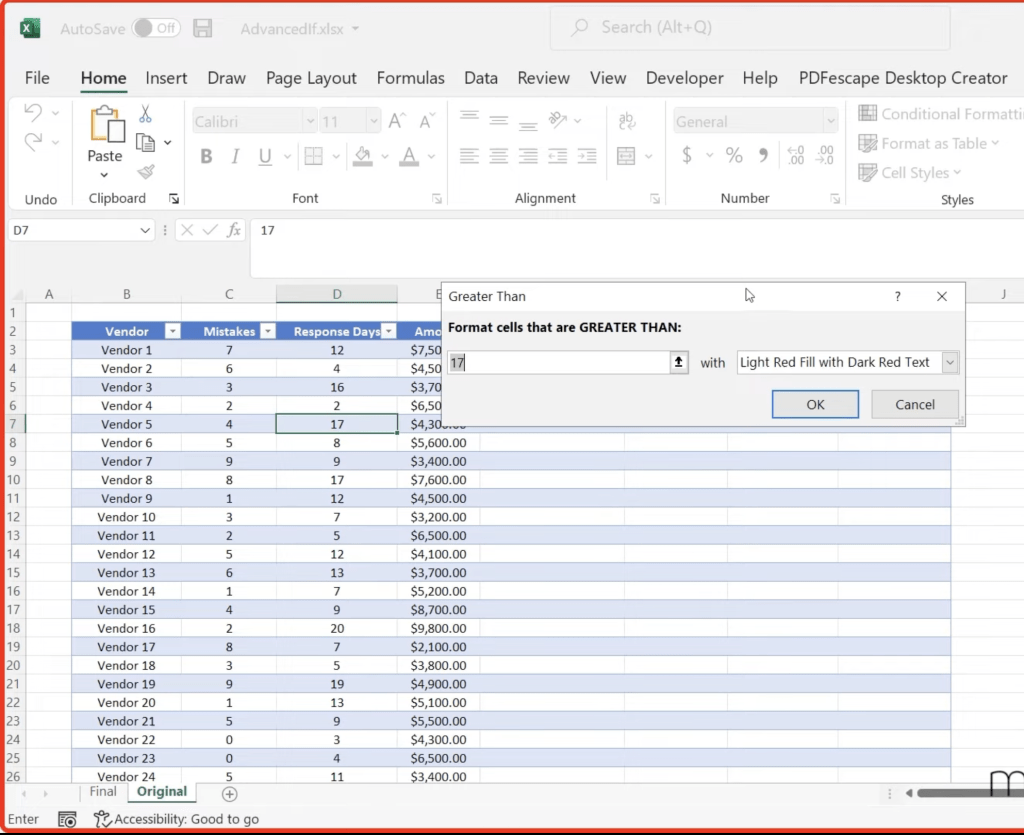
A conditional formatting dialog box will appear but this will not be visible to others.
So, if you plan on sharing your screen to conduct a training tutorial it would be best that you share the entire desktop and close all the unwanted windows before starting the meeting.
- When you share screen in Teams meeting, the screen may not be properly visible to your teammates because of the size of the screen.
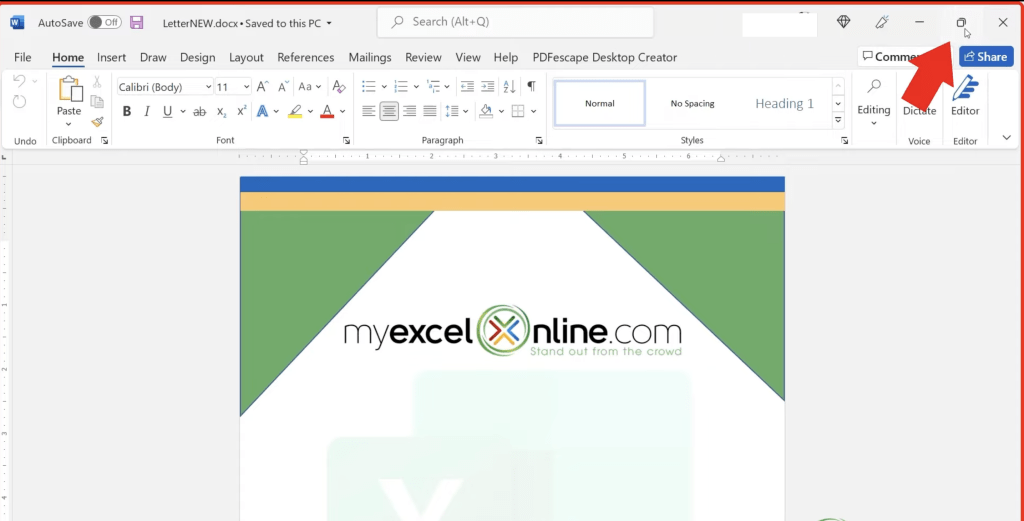
- Instead of minimizing or maximizing your screen, you should simply restore the screen to keep its size perfect for proper visibility to the others in the meeting.
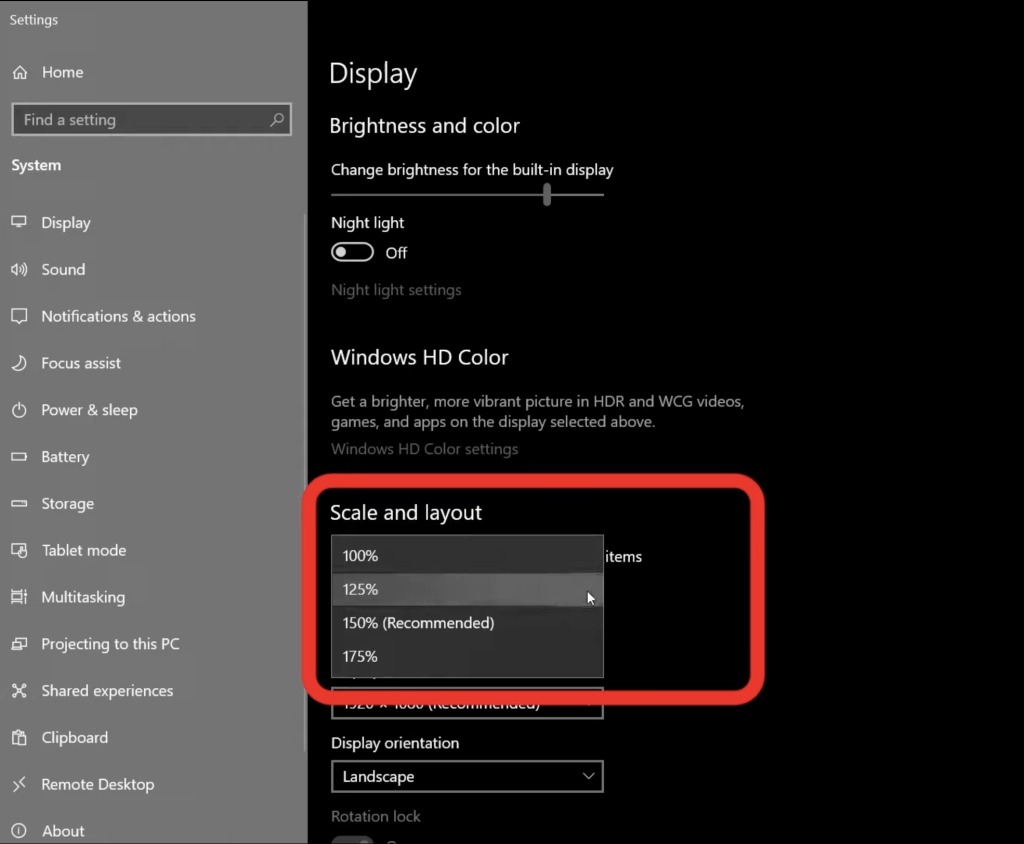
- You can also increase the size of the text from the desktop display setting so that your teammates will be able to clearly see the text on the screen you are sharing with them.
- Instead of minimizing or maximizing your screen, you should simply restore the screen to keep its size perfect for proper visibility to the others in the meeting.
- Before you share a window, you should first open the window that you want to share on your desktop. Only those windows which are open on your desktop will appear on the share window list.
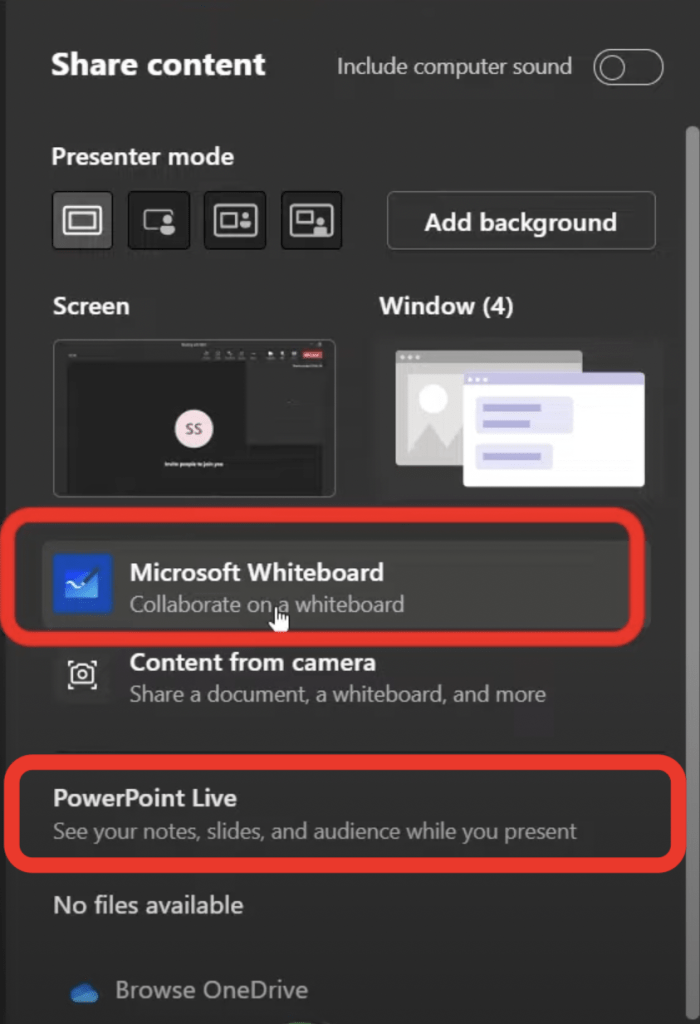
- You have two more sharing options available in a Teams meeting –
This article covers how to properly share your screen in a Microsoft Teams meeting. It shows you different options for screen sharing, including when to share just a window and when to share the whole desktop. It also includes additional tips for maximizing how well others in your Microsoft Teams meeting can better view your screen.
How to Change Audio Settings in Microsoft Teams
In this article, we will cover how to handle incoming calls, answer calls, change voicemail settings, change the duration of the ring, etc.
Watch this video on How to Change Audio Settings in Microsoft Teams on YouTube and give it a thumbs-up!
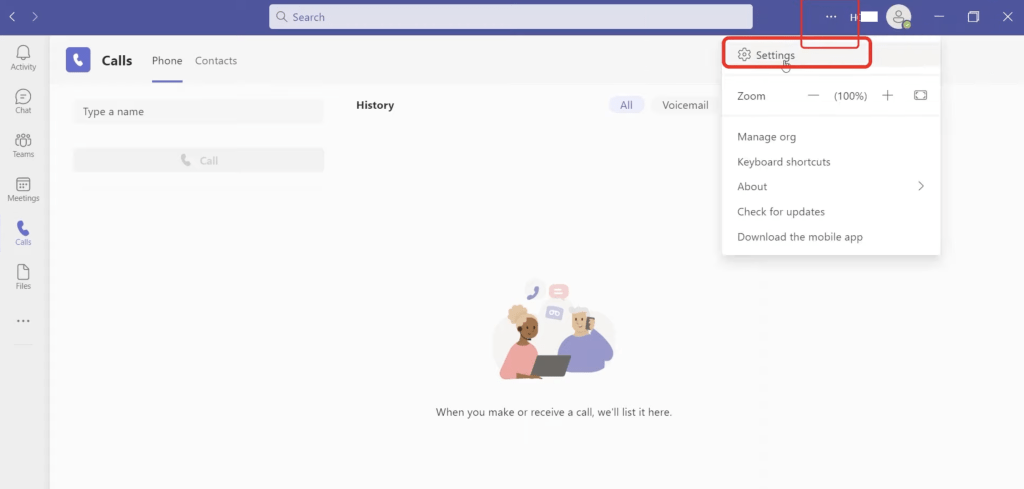
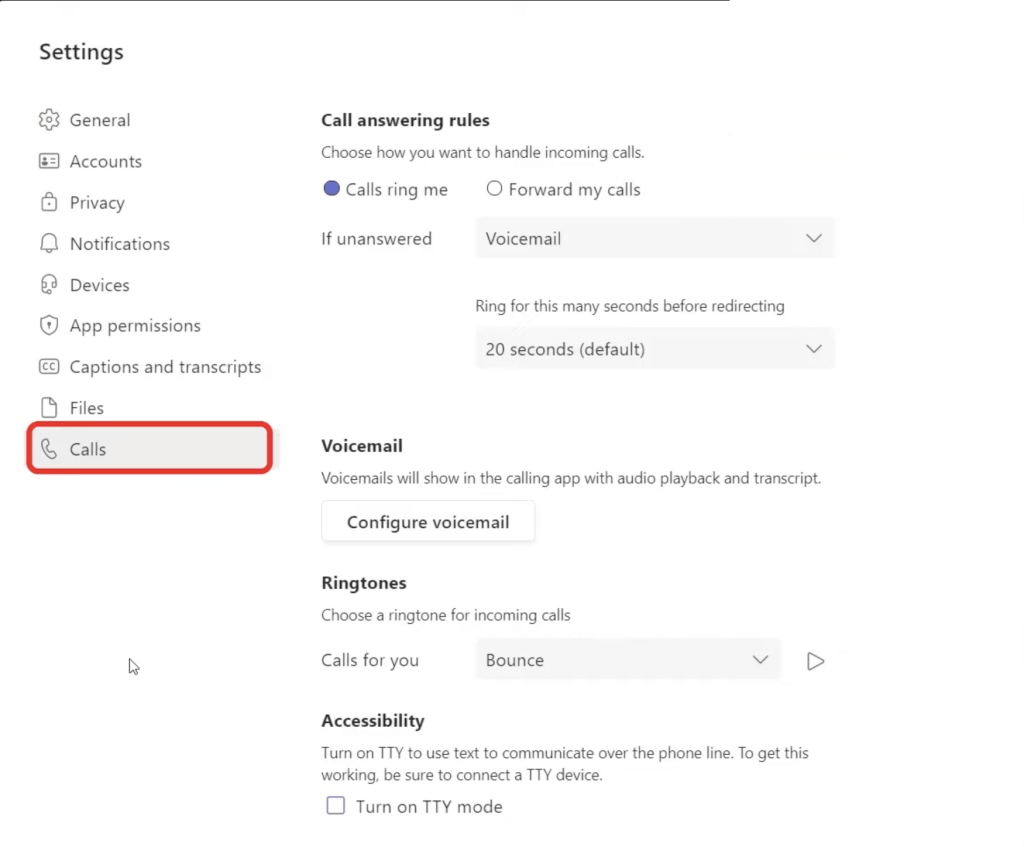
Follow the steps below to change audio settings in Microsoft Teams –
- Open Teams in the desktop version
- Click on three dots > Settings
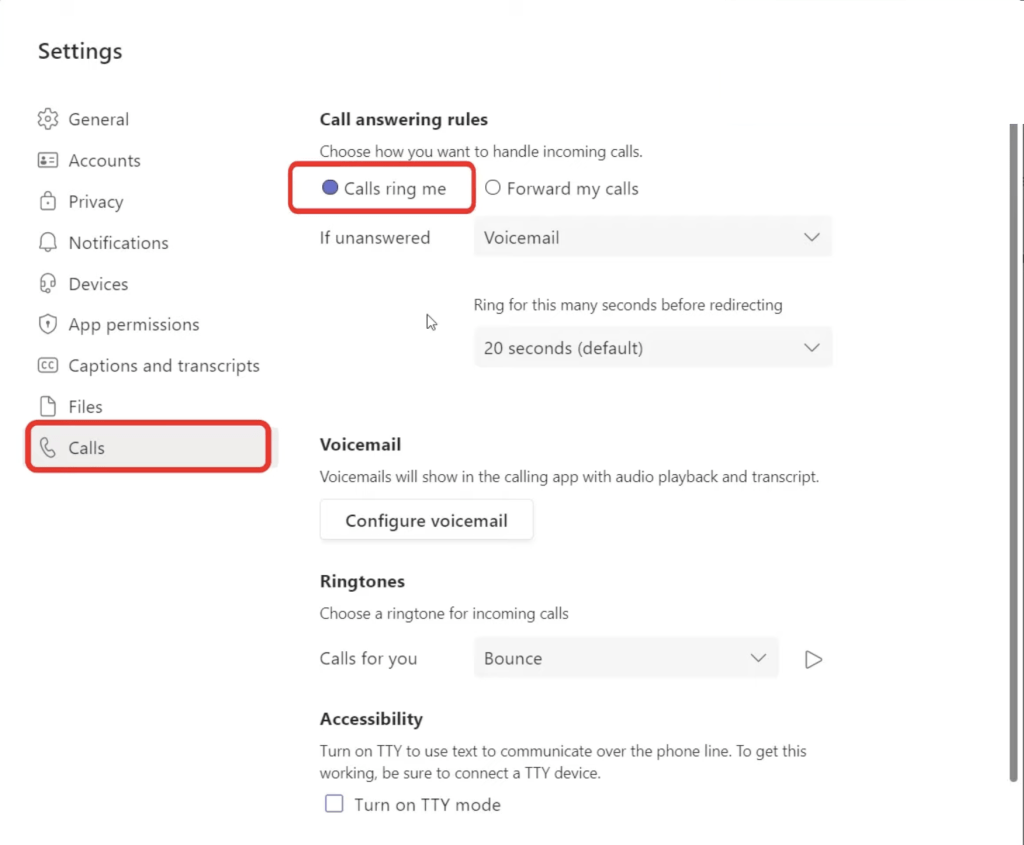
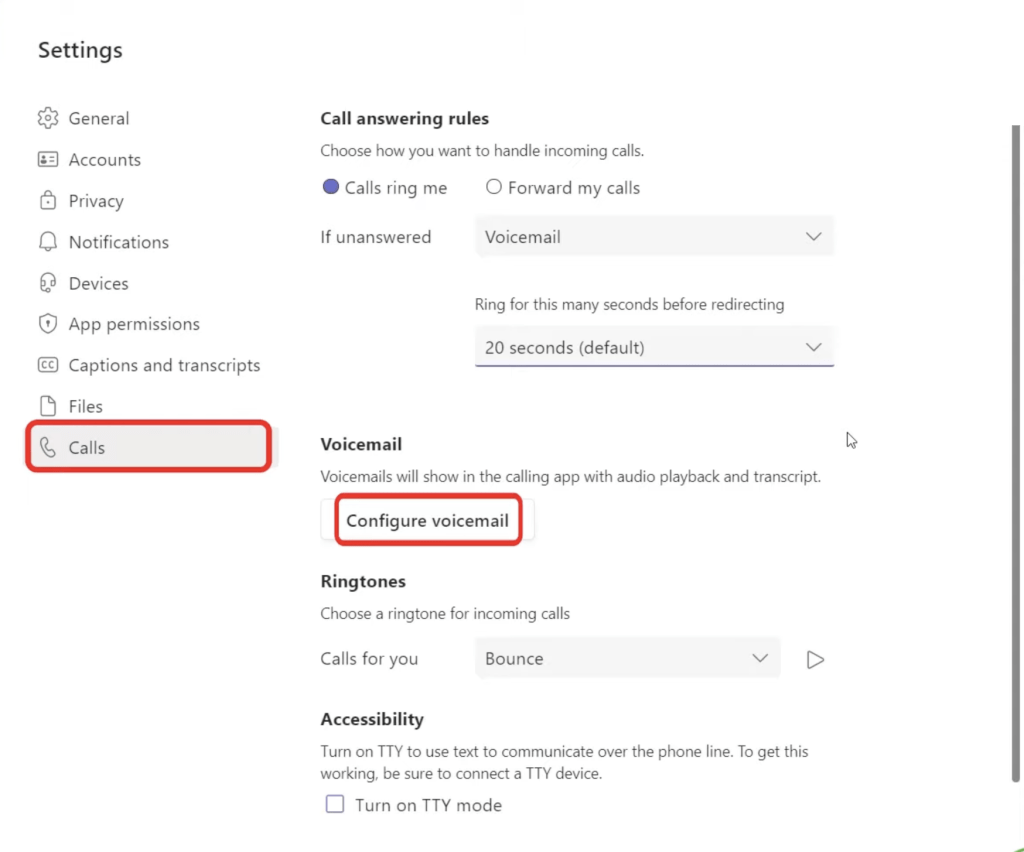
- In the Settings dialog box, click on Calls
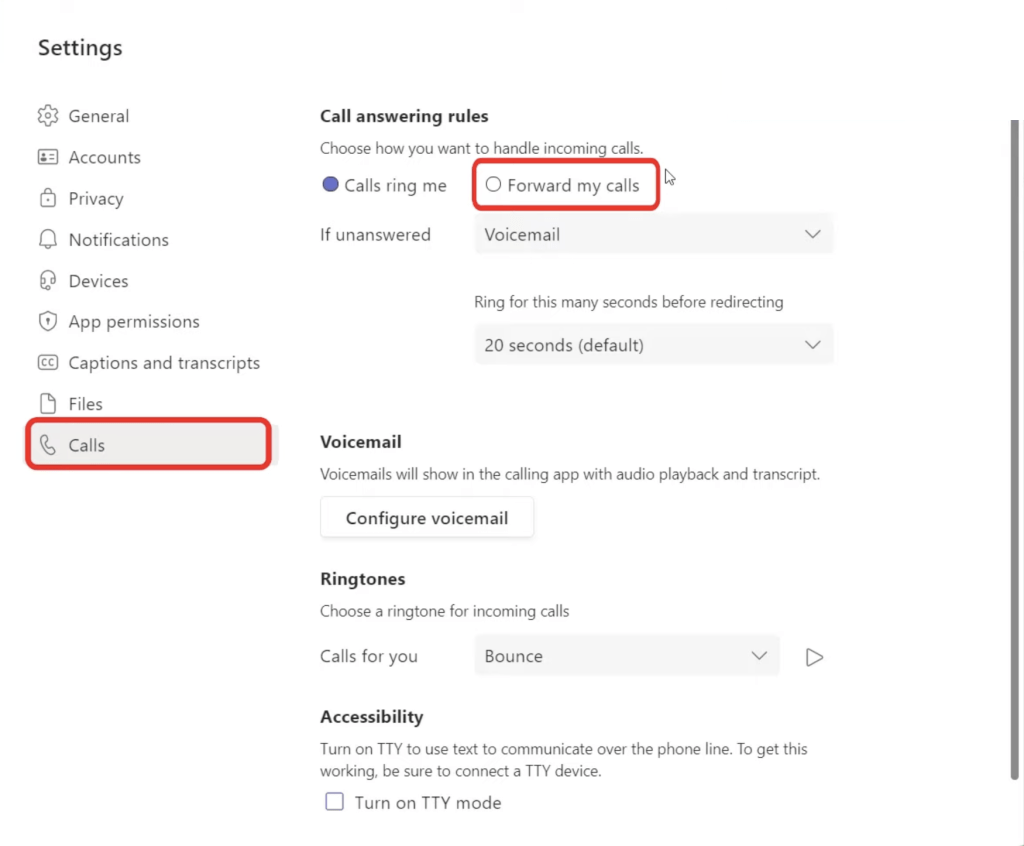
- Click on
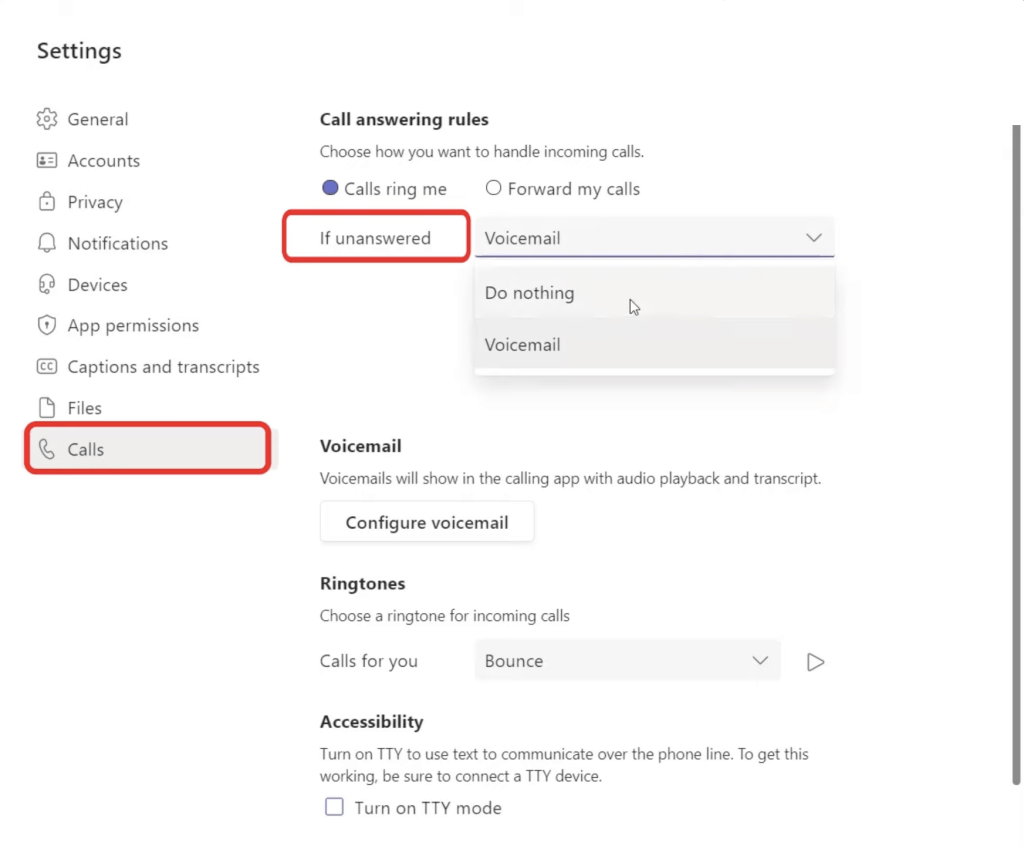
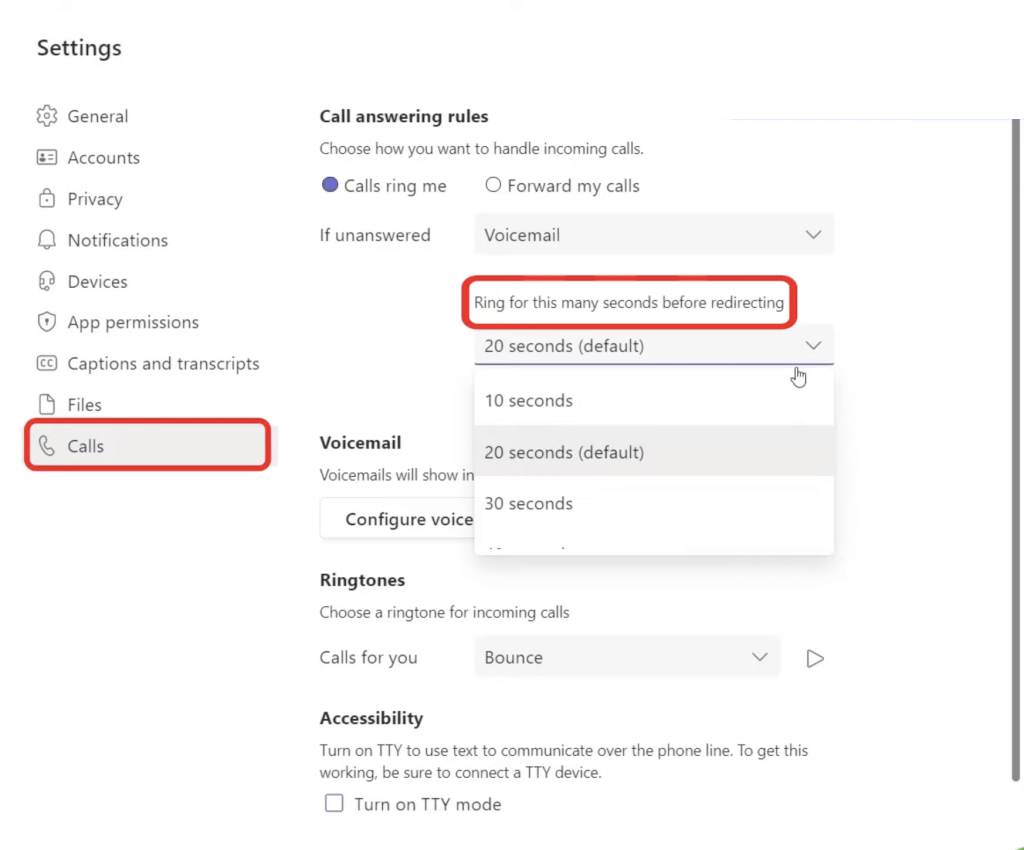
- If the calls remain unanswered, click on the dropdown to select either –
- To set how long the call will ring before getting forwarded to voicemail, go to Ring for this many seconds before redirecting
- To configure the incoming calls that you have missed, click on Configure voicemail
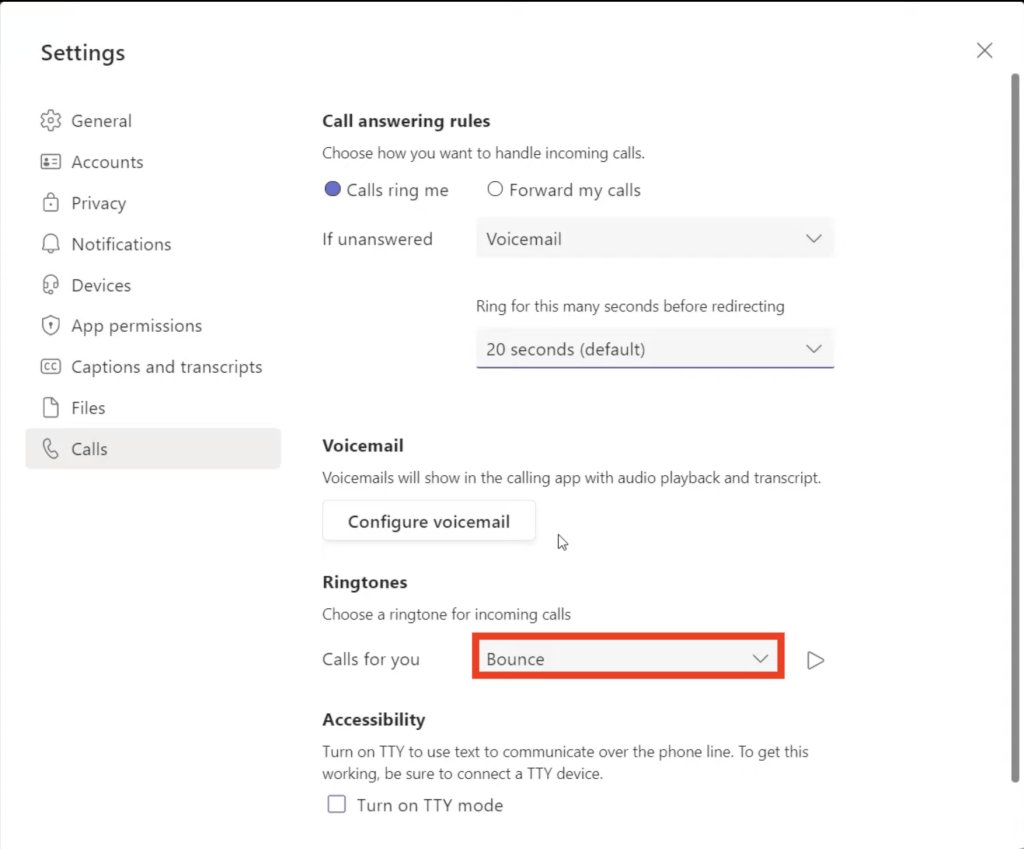
- To select a ringtone for your incoming calls, go to Calls for you > select a ringtone from the dropdown
Project Management with Microsoft Teams
Microsoft Teams is commonly used as communication software but it can also be used to collaborate with your teammates. It can be used for project management as it allows video calling, chatting with colleagues, sharing files and apps, team coordination, keeping track of tasks assigned, and much more.
In this article, we will show you the usefulness of Microsoft Teams for project management –
- Why Use Microsoft Teams for Project Management?
- Managing People
- Managing Projects with Channels
- Managing Projects with File Sharing
- Managing Projects with Apps
- Managing People with Teams Meeting
Watch this Video on Project Management with Microsoft Teams on YouTube and give it a thumbs-up!
Why Use Microsoft Teams for Project Management?
Microsoft teams have four convenient ways to make the life of project managers easier, and those are:
- People (Team)
- Meet
- Share Files
- Share Apps
With the help of Microsoft teams, project managers eliminate old redundant, and inefficient ways of project management with constant replies and communication through email threads. Project management has come a long way and Microsoft Teams has come up with some excellent ways to become an efficient project manager.
Let’s analyze each of the handy project management tools mentioned above in detail.
Firstly it’s important to add the people to the team who will meet together for collaboration.
- Go to the bottom left corner of the screen and click on Join or Create a Team
- Then click on Create a Team
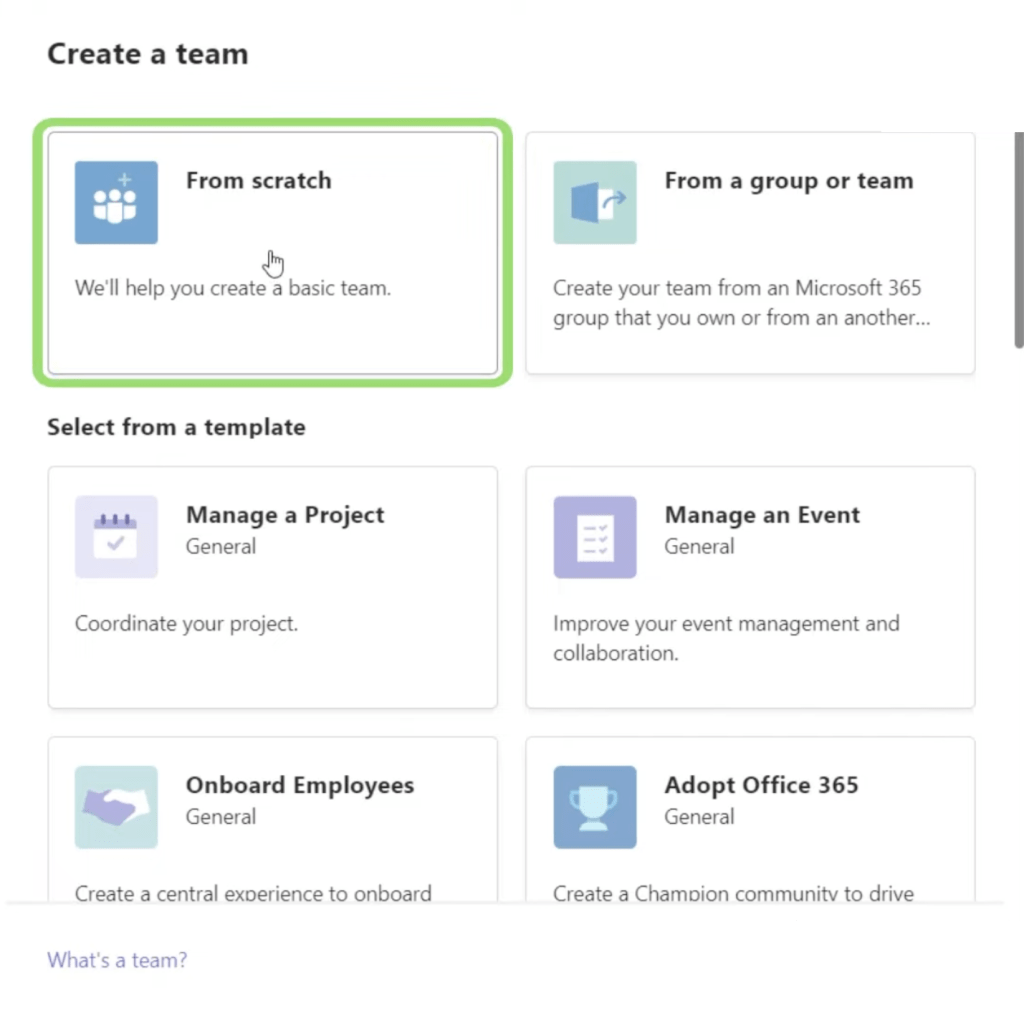
- A create a team dialog box will show up with many options to select from, – click on the option tile From Scratch
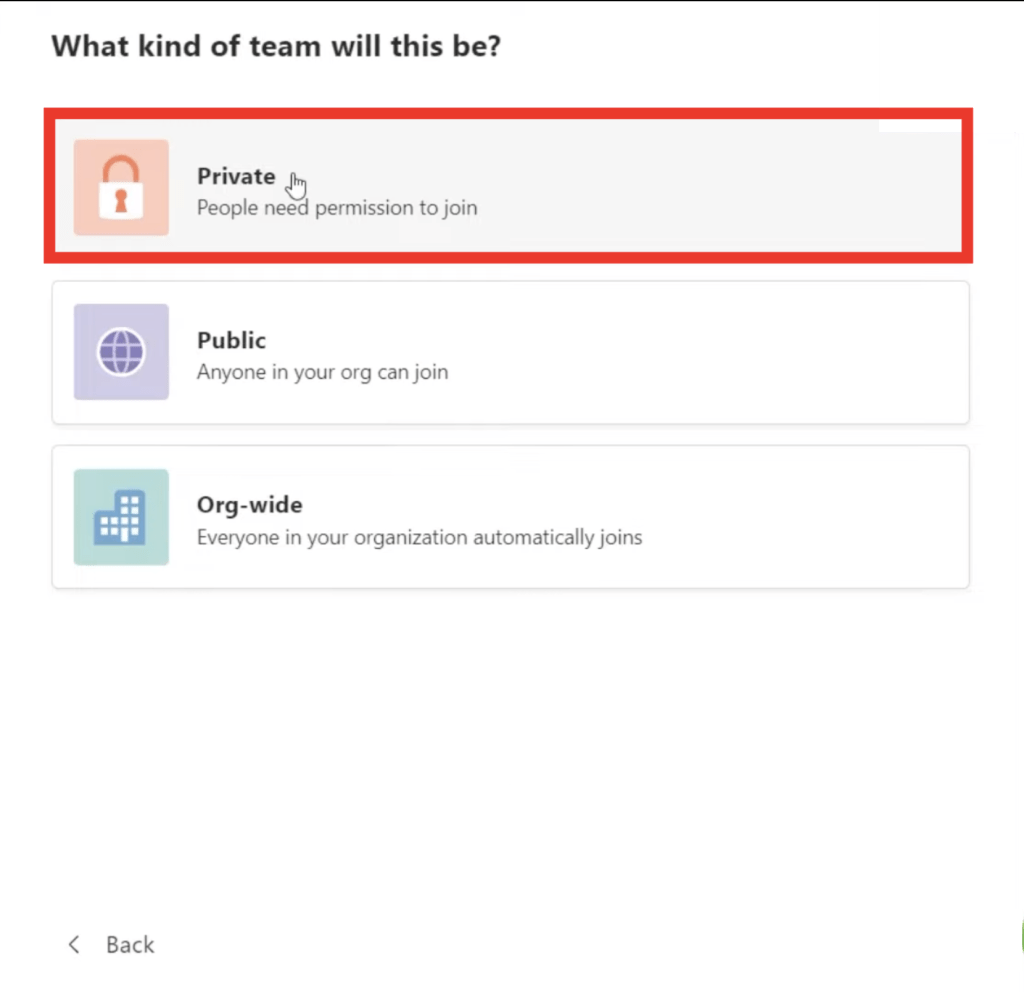
- In the next step choose the type of team –
- If you choose a private team – People will need your permission to join
- If a public team is chosen – then anyone can join, and
- If you choose an organization-wide team – everyone in the organization automatically joins the team
- For this instance go with the Private team option and then give the team a name and then click on Create
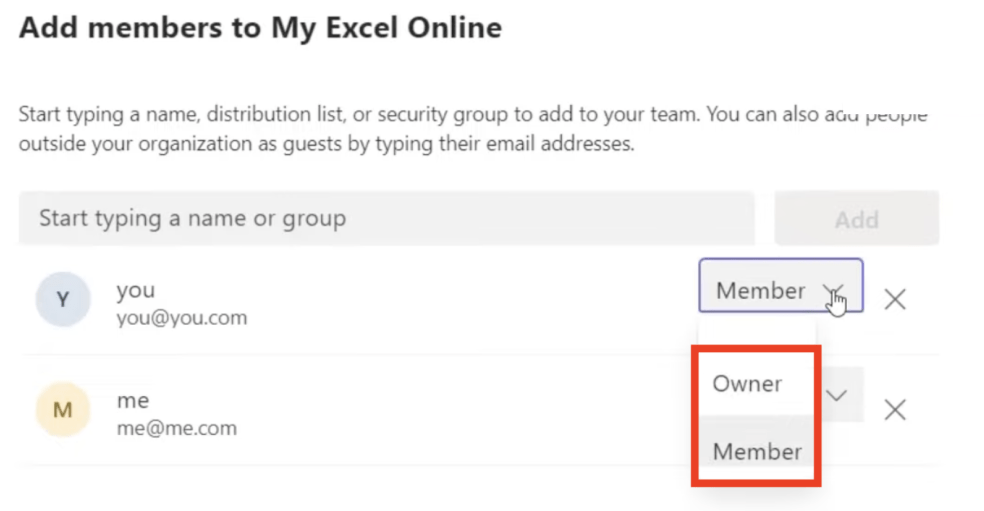
- Now add members to the team, type in the email addresses, and click on the add.
- You can designate each team member as a Member or Owner
- Once the team is created click on the close button and on the left panel area you can find the new team created.
Managing Projects with Channels
You can organize each team into sub-categories or channels. Creating channels helps in specialized or category focussed discussion in each channel.
Follow the steps below to manage projects with the help of channels –
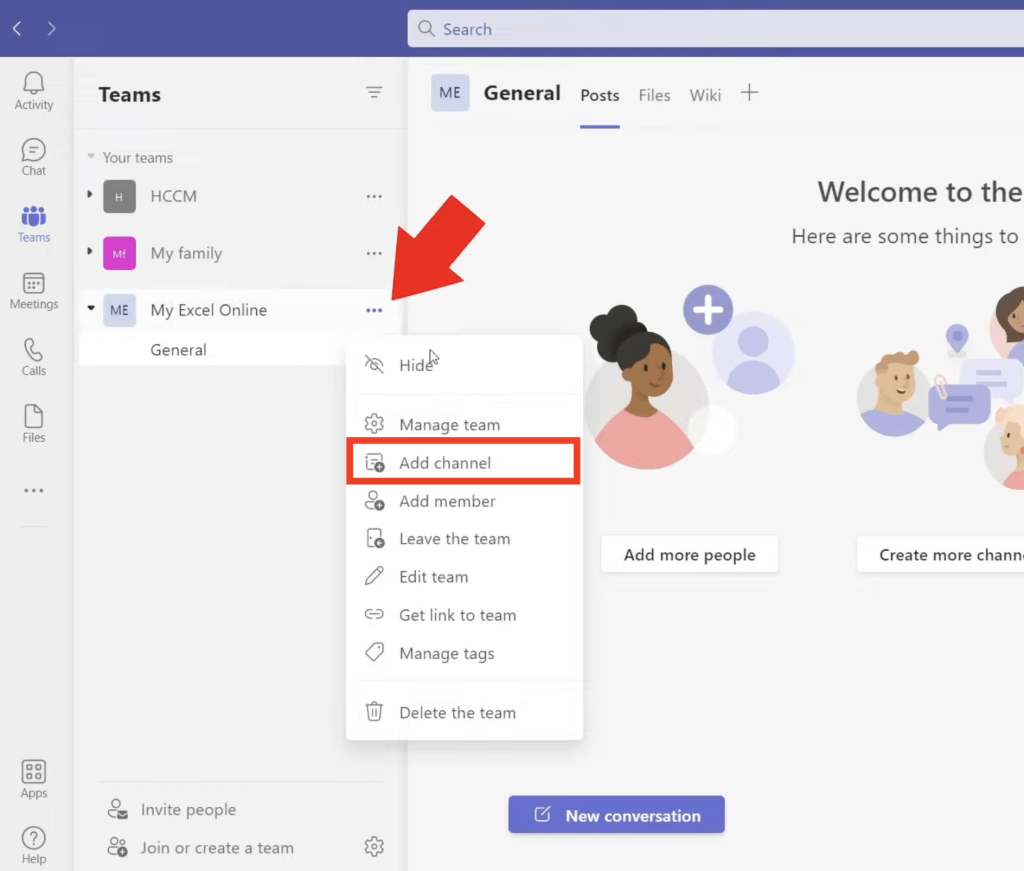
- Click on three dots beside the team name and click Add channel
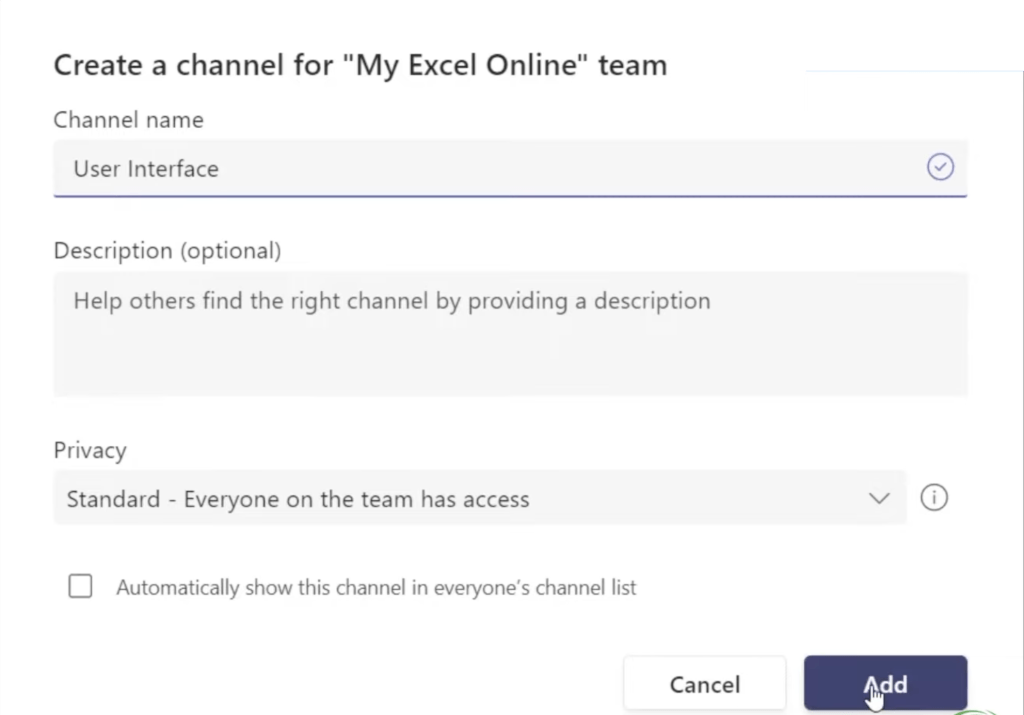
- Give a name to the channel as required.
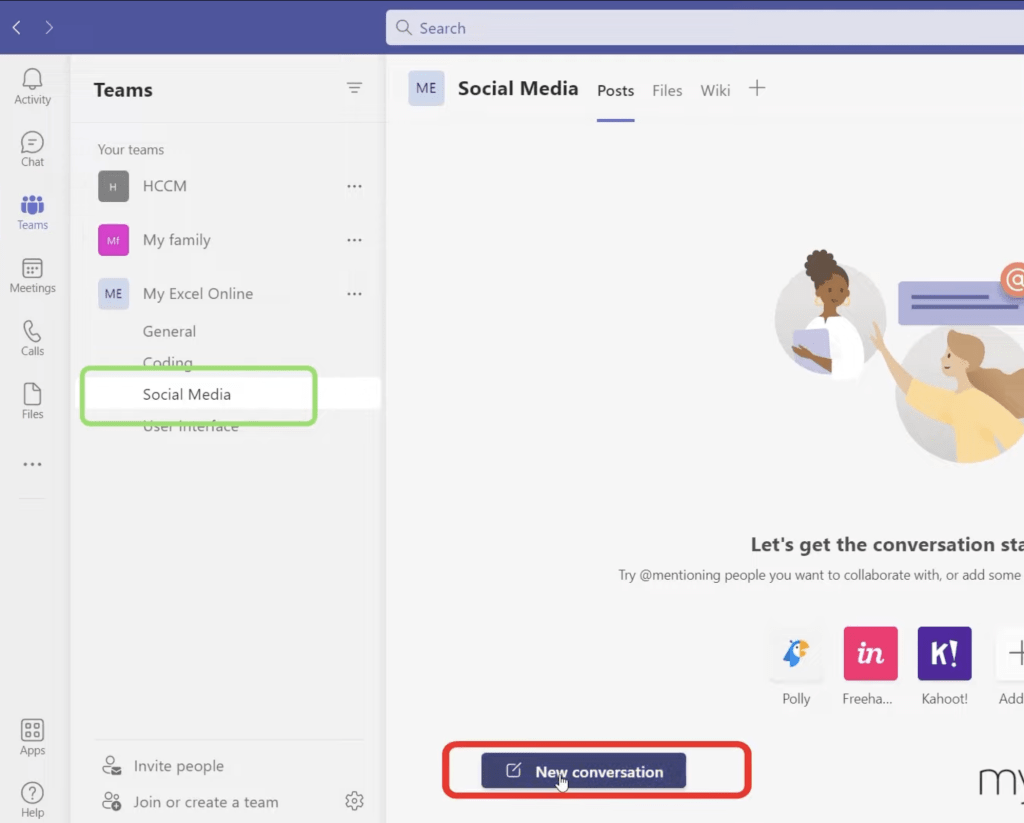
- Click on the Channel and then click on New Conversation
- Type and format your message in the compose box and press the send button
- Your message will be live on that channel
Managing Projects with File Sharing
Each channel in Microsoft Teams has a folder wherein you can share files related to that particular channel. You can store and share files by simply clicking on the Files tab.
To share a new file or folder, click on the Upload button
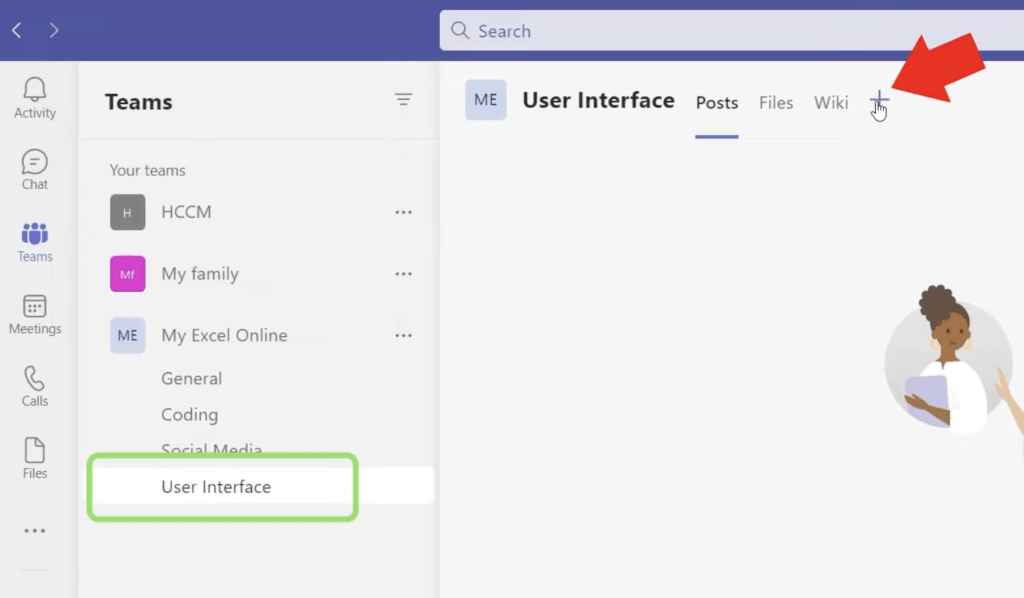
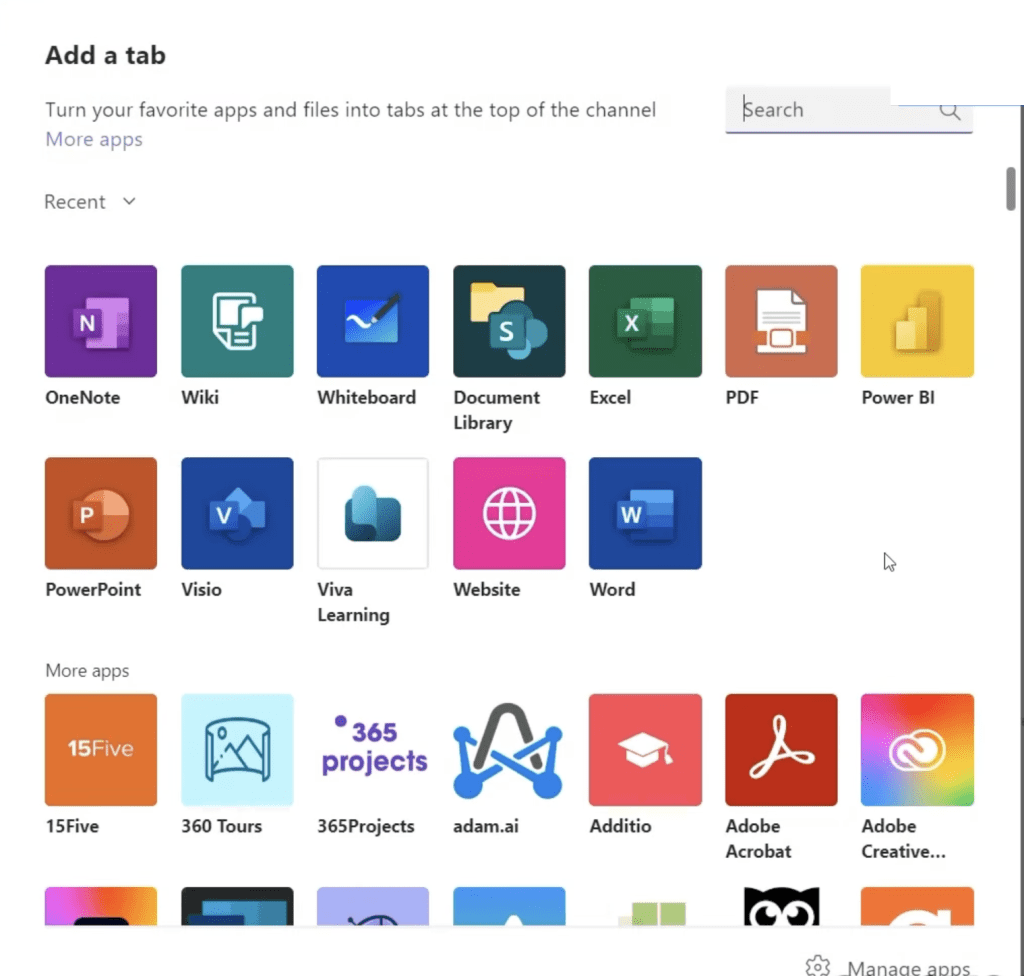
In Microsoft teams, you can add apps to share content and work on projects with other team members.
Managing People with Teams Meeting
You can instantly start a teams meeting for a particular channel by following the steps below –
- Go to Teams and select a channel and then click on Meet Now
- To start the meeting, give it a title and hit Join Now
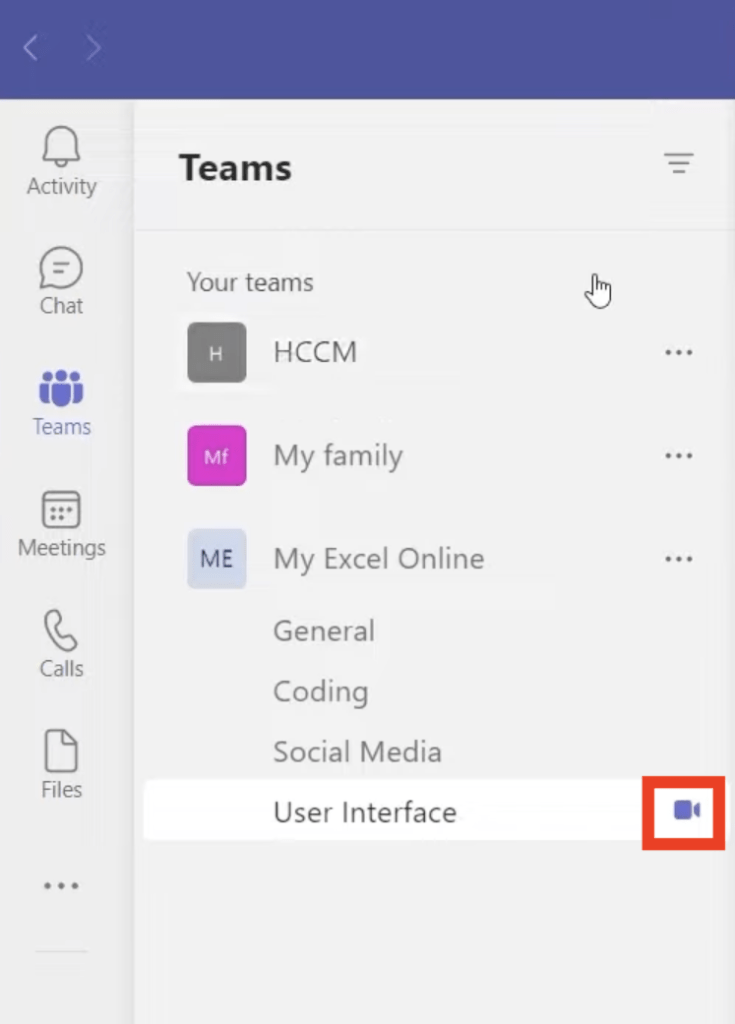
- Anyone on that channel will be able to join the meeting by clicking on the video icon
- You can go to More > Start Recording to record a meeting and later post it on the channel
In this article, you have seen how to manage people by creating a team and using channels. You have also learned about project management by uploading files and using apps and how to create easy-to-access meetings for your whole team with access to all things related to your current project!
Breakout Room in Microsoft Teams
Breakout Room in Microsoft Teams Meeting can be used to divide participants into smaller groups for discussion, collaboration, and brainstorming. It can be done by the organizers of the Teams meeting and they can set up, run and close the breakout rooms.
In this article, we will cover the following subtopics –
- What is a Breakout Room
- Creating a Breakout Room
- Interacting with Breakout Rooms
- Making a Breakout Room Announcement
- Breakout Room Settings
- Returning to the Main Meeting
Watch this video on How to Create a Breakout Room in Microsoft Teams Meeting on YouTube and give it a thumbs-up!
The breakout room is used to provide a smaller space for participants to discuss ideas or projects and then provide feedback in the main meeting. Once the breakout room discussions are complete, the organizer can close those rooms and participants can reconvene the main meeting to present their ideas and inputs to everyone.
This feature of Microsoft Teams is available only to the paid users of Microsoft 365.
There are several reasons why one should use a breakout room in Microsoft Teams –
- If you are teaching a class, a breakout room can be used for students to partner up for a project
- If you are a manager of a corporate, a breakout room can be used for department-specific discussions
- It can also be used to host any impromptu discussion
- It allows participants to use a virtual whiteboard to draw out ideas
- It can be used to provide training to a smaller group separately
- Breakout Rooms allow even participants to record the room meetings
Breakout rooms can be created only on the desktop version of Microsoft Teams. However, attendees can join the breakout rooms using any platform either a web browser or a mobile application.
To create a breakout room in Microsoft Teams, the organizer of the Teams meeting needs to follow the steps mentioned below –
- Open Microsoft Teams and start a meeting
- Select the breakout room icon on the top right corner of the screen
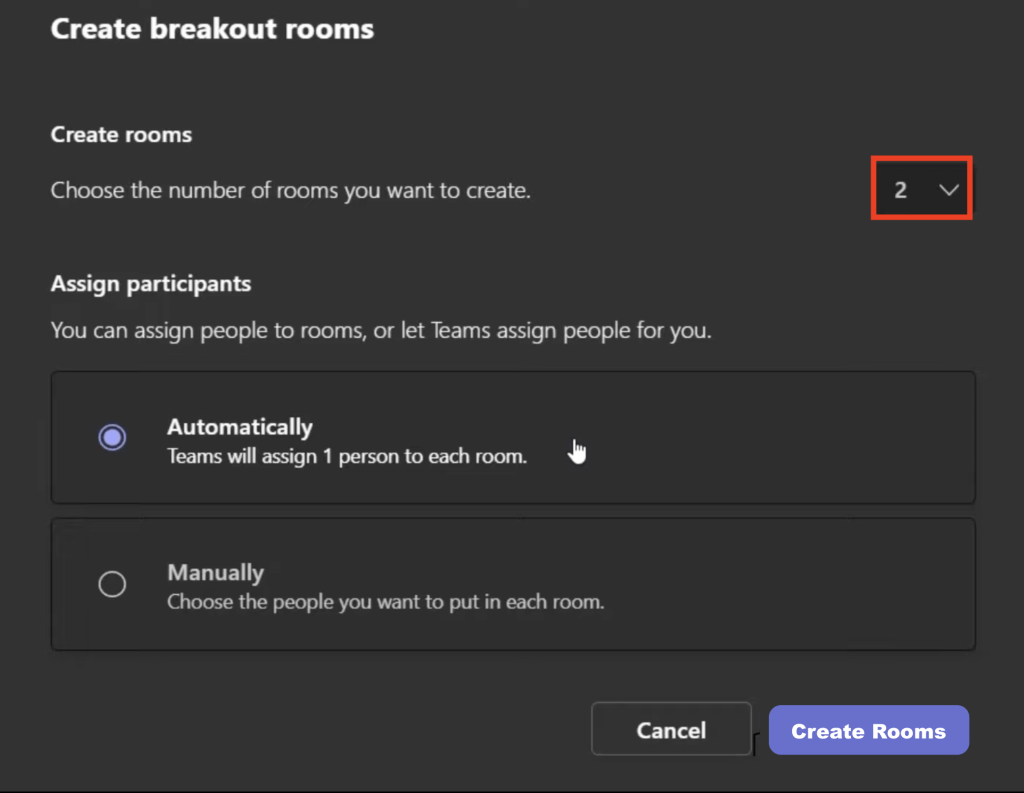
- Select the number of rooms you want to create from the dropdown
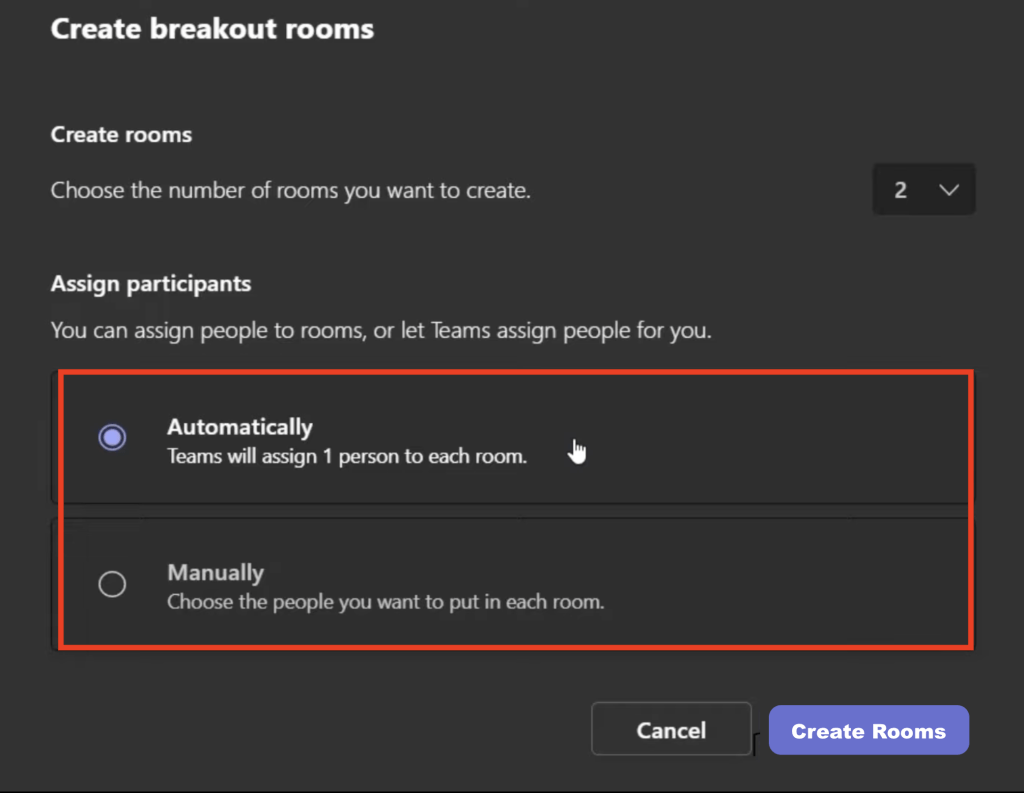
- Choose an option –
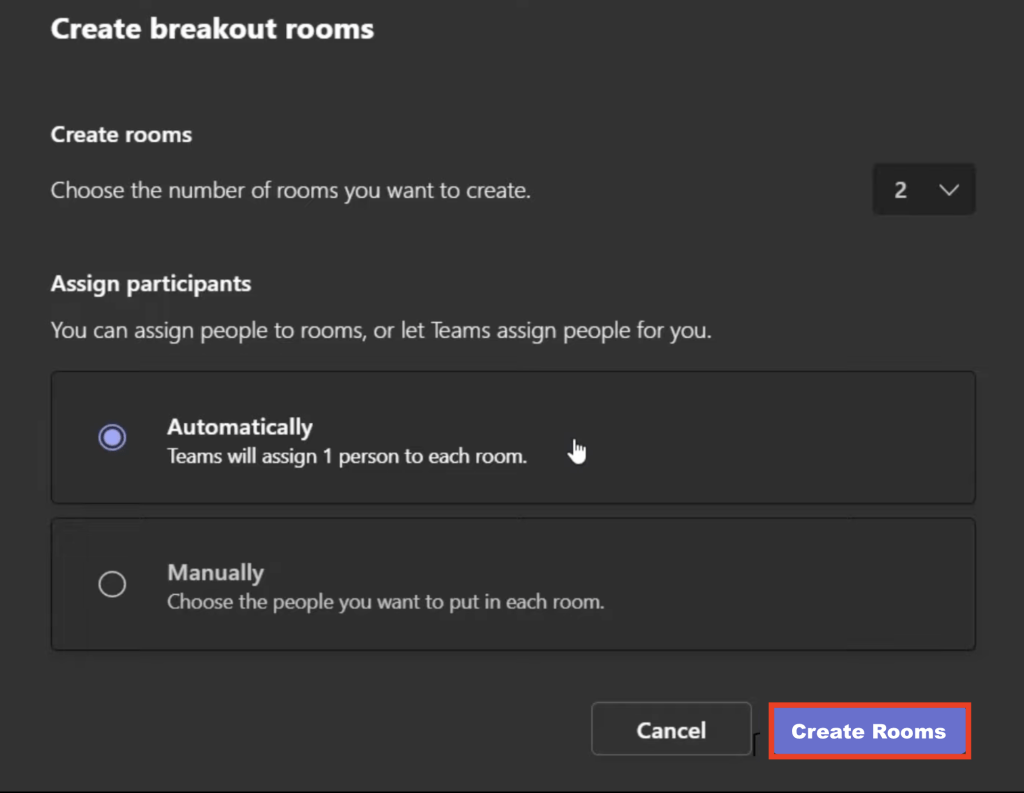
- Click on Create Rooms
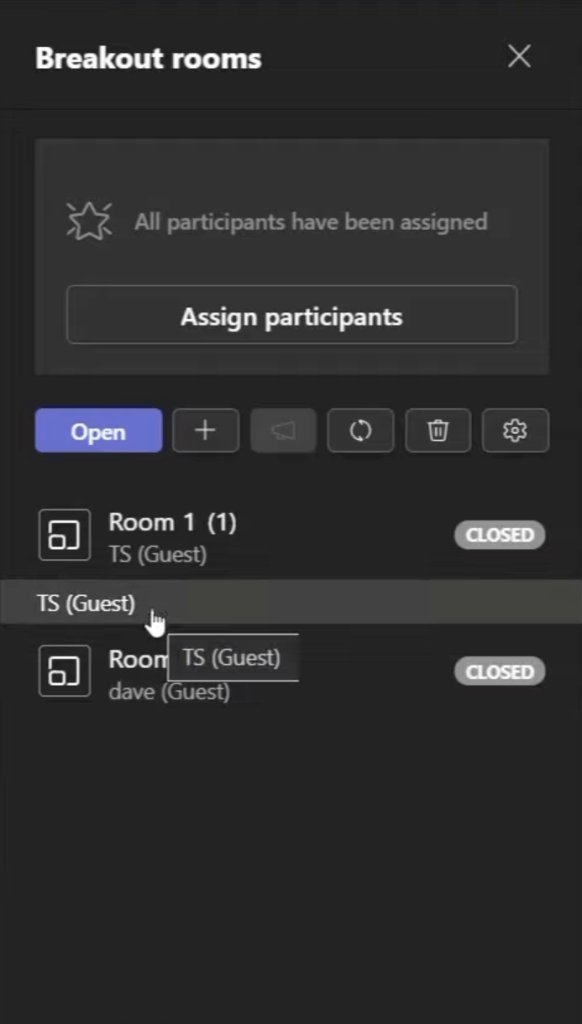
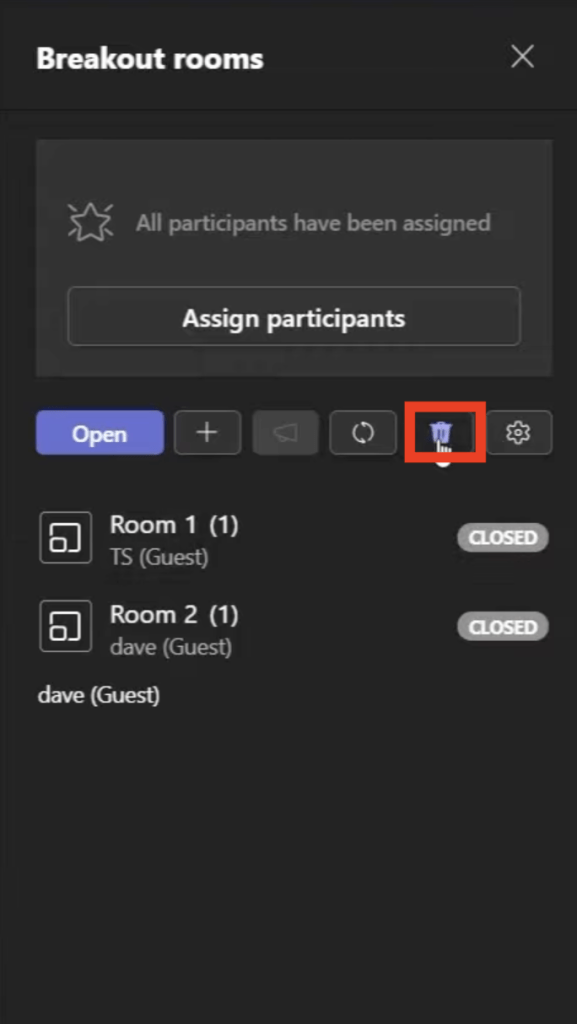
- The breakout room panel will open and you can click on the room to see who is inside a room
- Click on the delete icon to delete all existing rooms
Interacting with Breakout Rooms
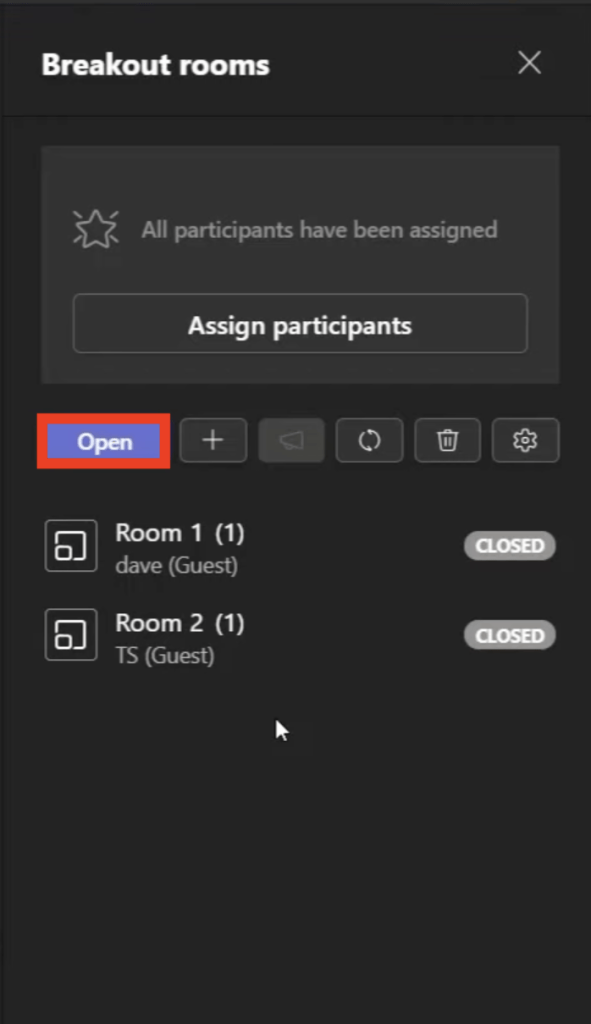
When you are ready to start the breakout room in Microsoft Teams, simply click on Open.
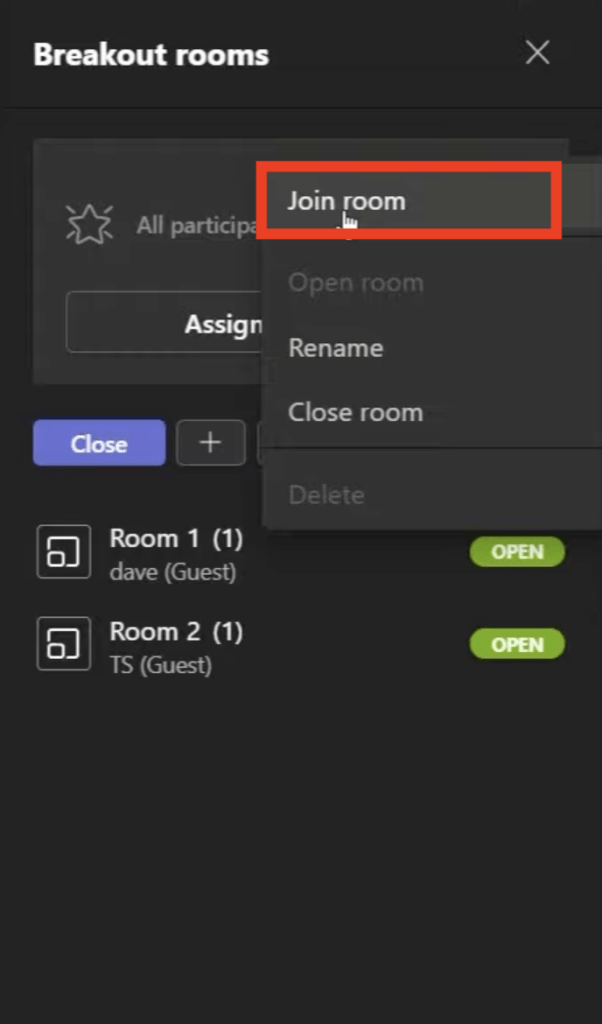
To enter a breakout room, go to the three dots next to the room and click on Join.
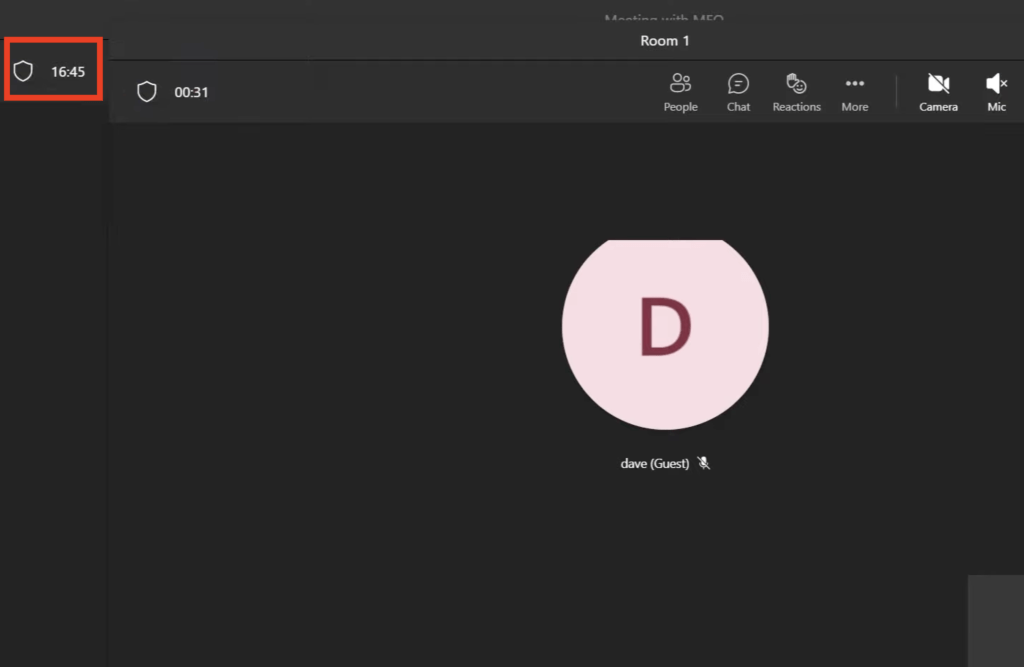
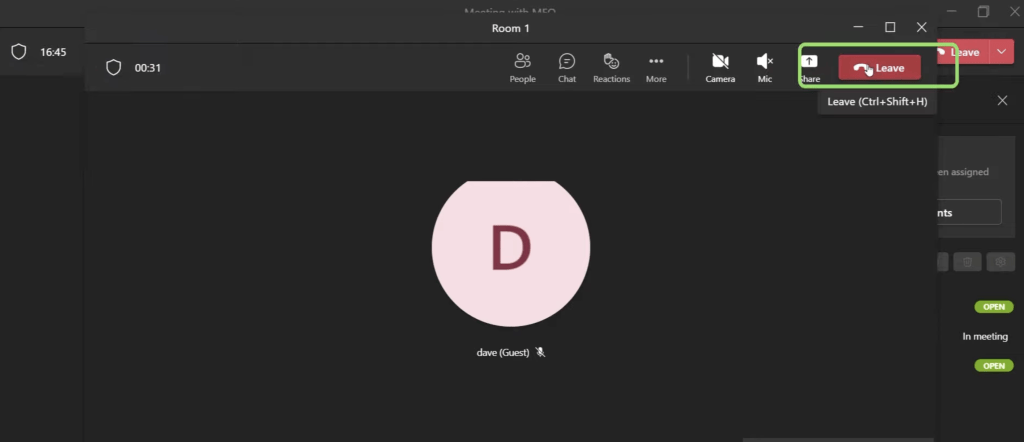
Once you are inside the room, you can see that the main meeting is still running in the background.
To leave the breakout room meeting, simply click on the Leave button.
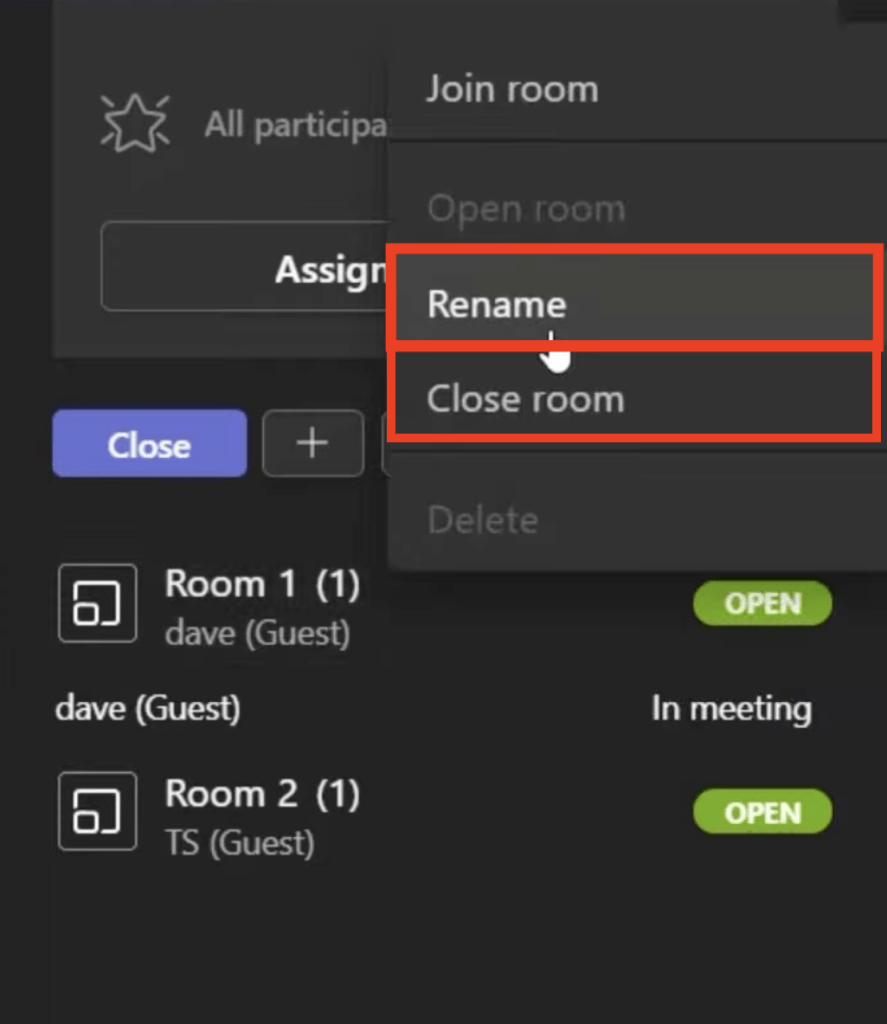
To rename or close a breakout room, simply click on the three dots next to the room name and click on Rename or Close Room respectively.
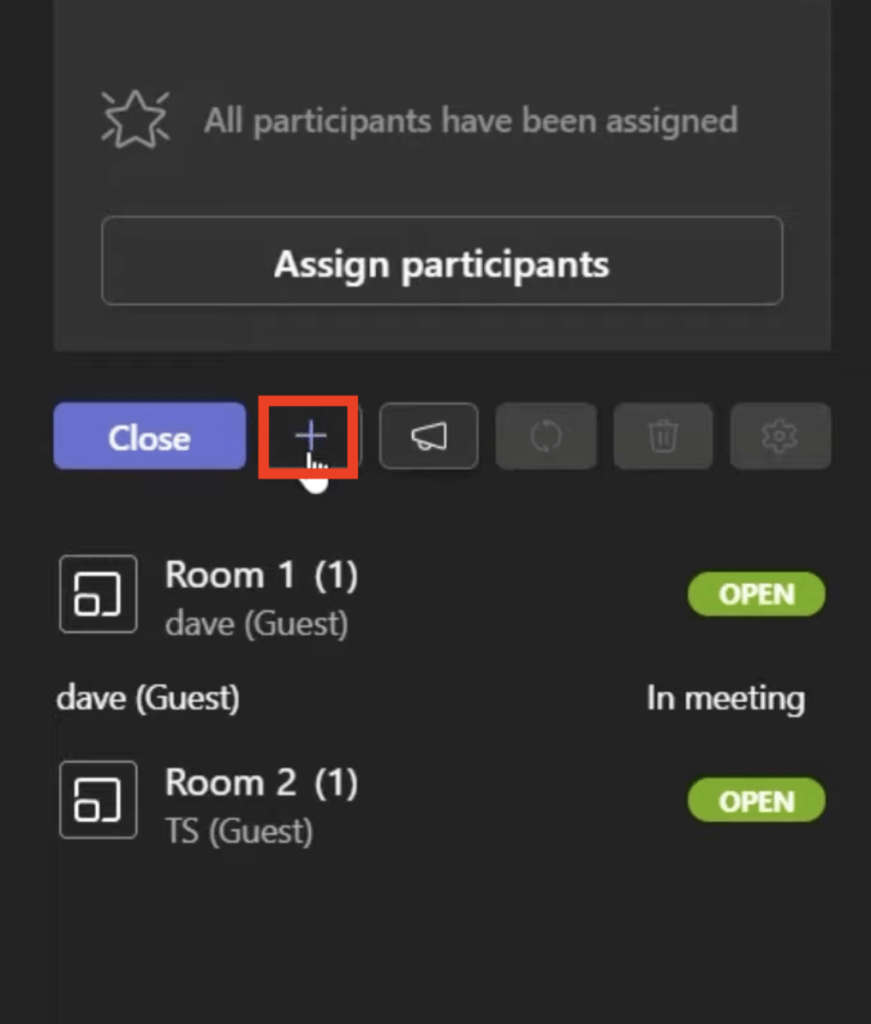
To add a new room, click on the + sign.
Making a Breakout Room Announcement
It is very easy to make an announcement once the group has been divided into small breakout rooms in Microsoft Teams. This feature can be used to provide information to participants such as a general update, remaining breakout session time, or offer suggestions.
To make a text announcement to all breakout rooms in Microsoft Teams, follow the steps below –
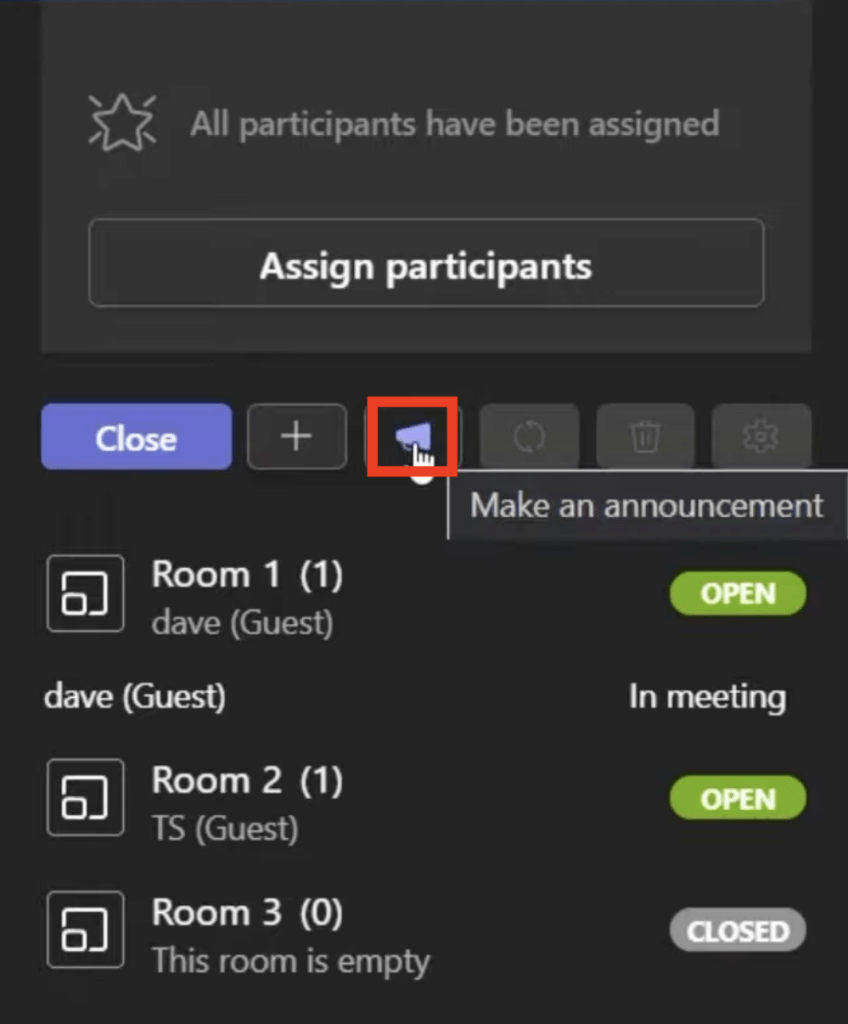
- Go to the Breakout room panel
- Select Make an Announcement
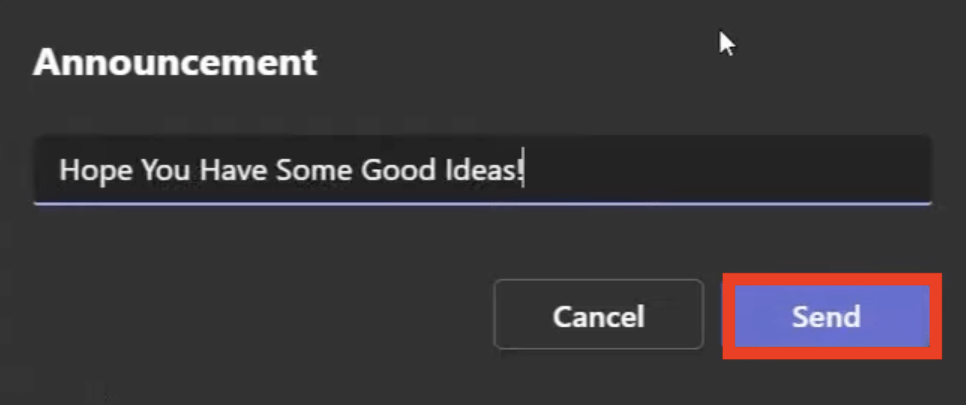
- Type the announcement and hit Send
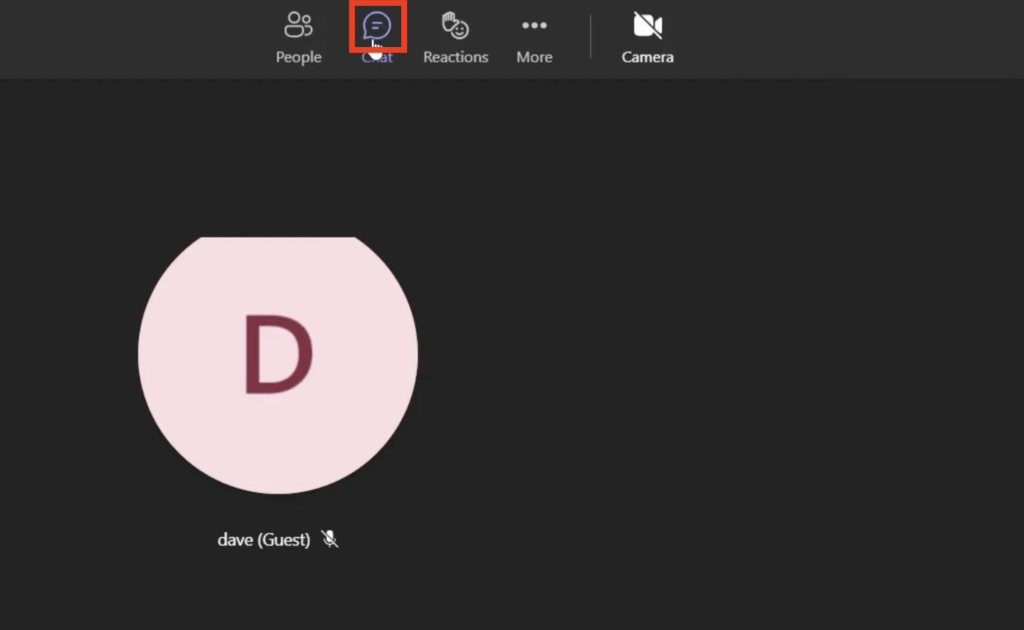
- Head over to the chat section
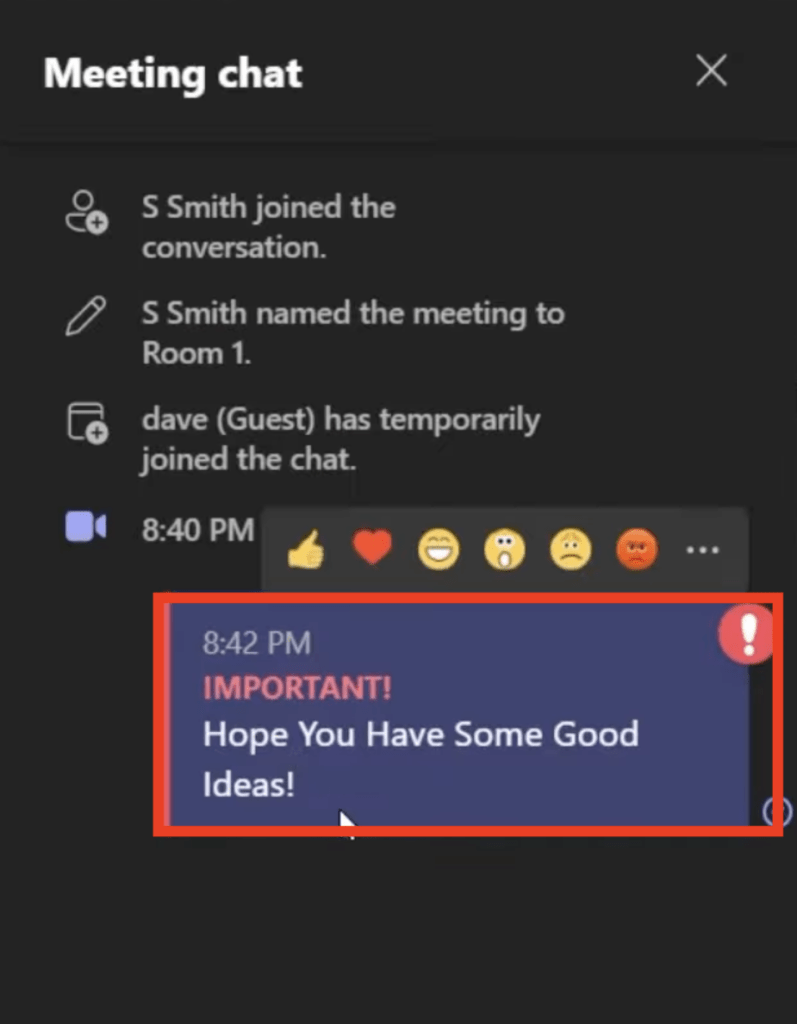
- You will find the announcement in the chat marked as important
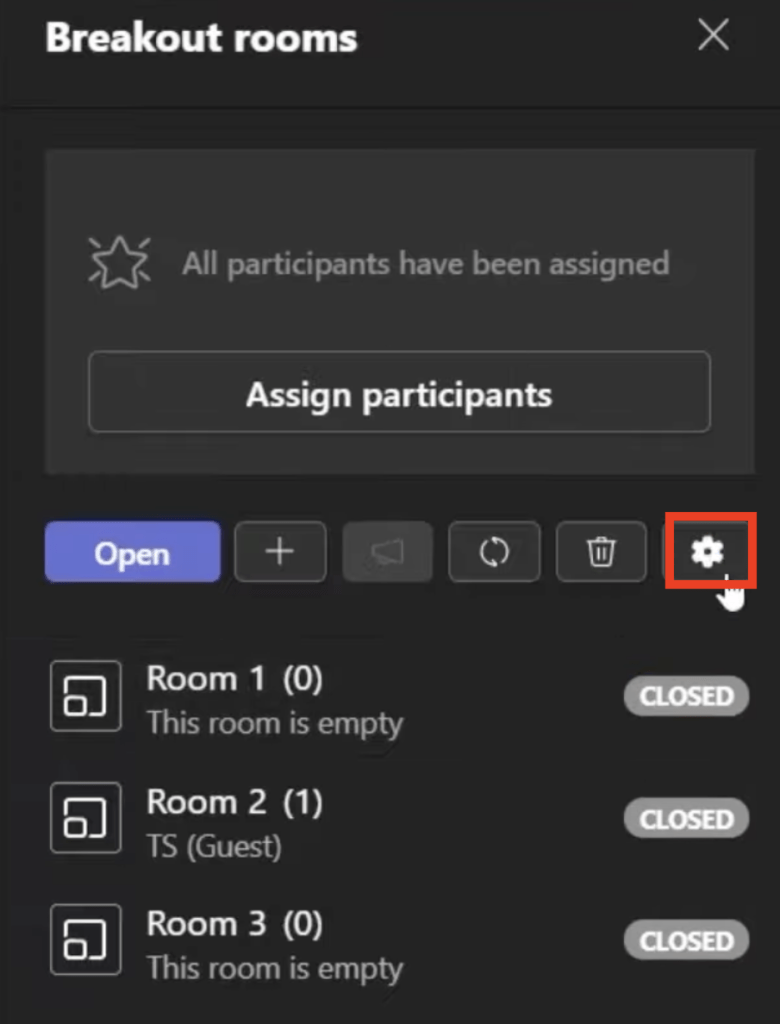
You can select the settings button to make the following changes –
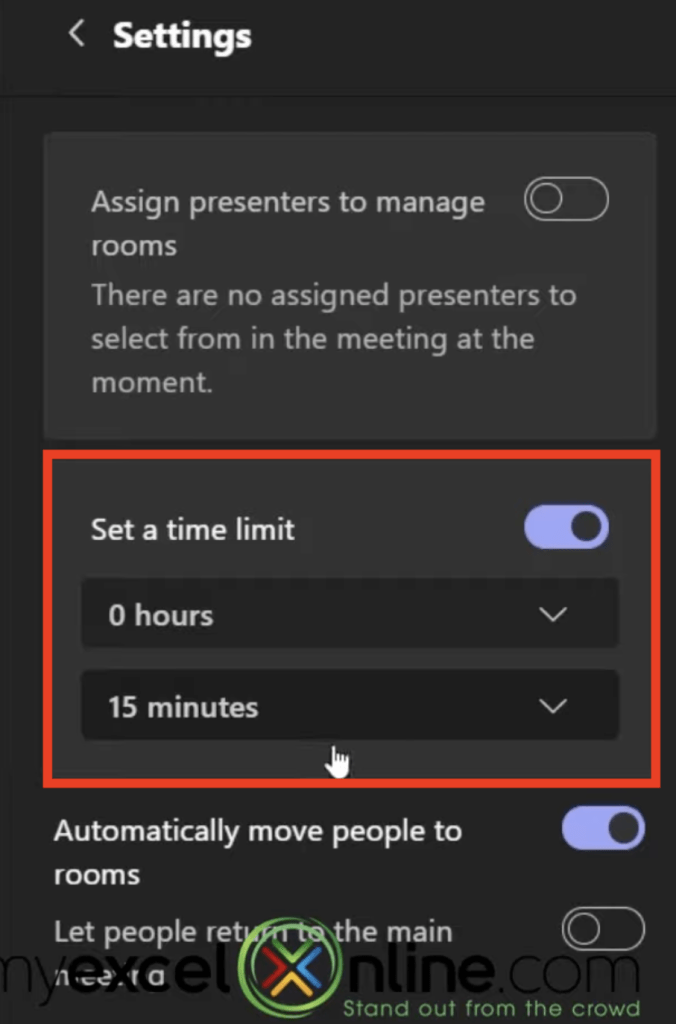
- Set a time limit to make sure that the breakout room meeting lasts till that time only. Once the time is up, the breakout room will be closed and participants will be returned back to the main meeting.
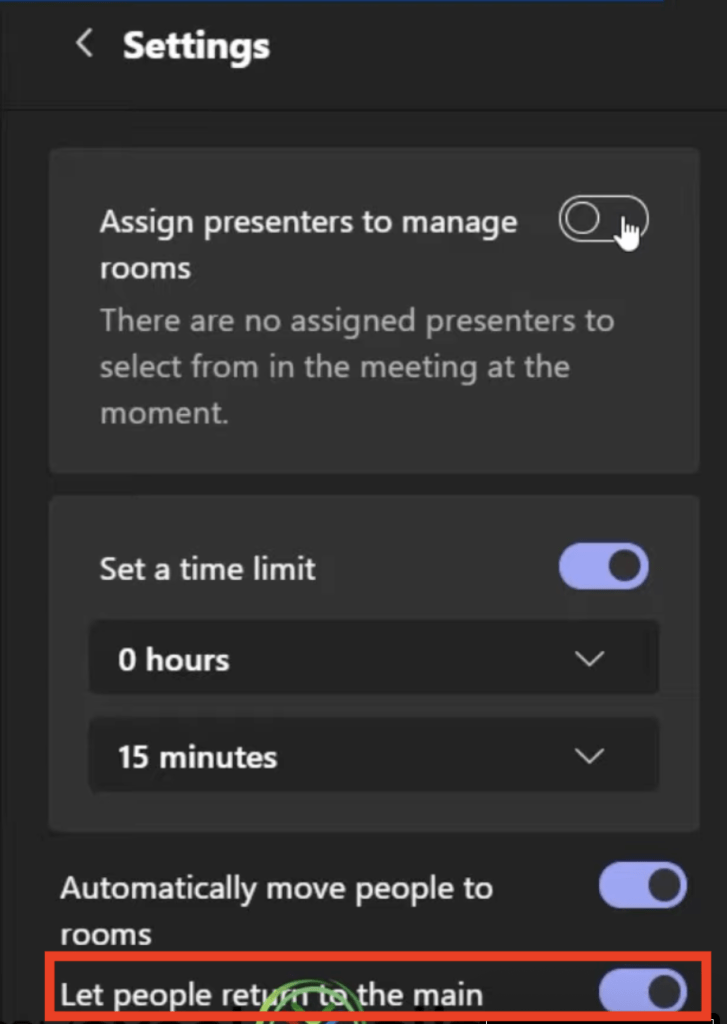
- Let participants decide to leave their breakout room and return to the main meeting.
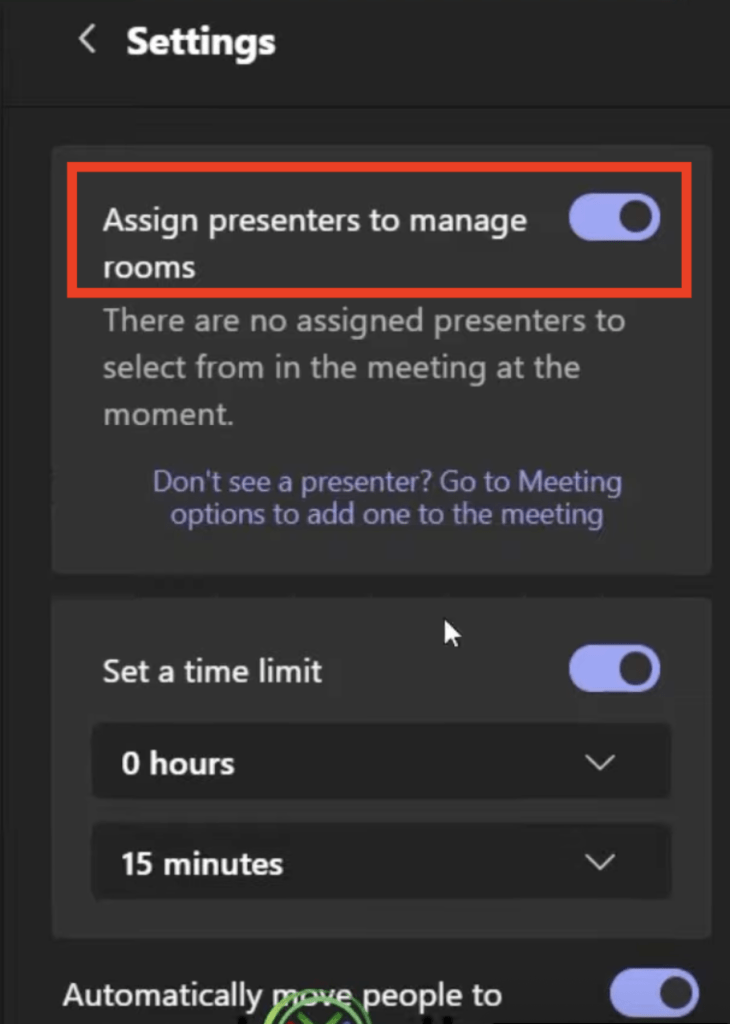
- Assing different presenters to manage different breakout rooms.
Once the breakout room meetings are over, and you want the participants to return back to the main meeting –
- Go to the Breakout room panel
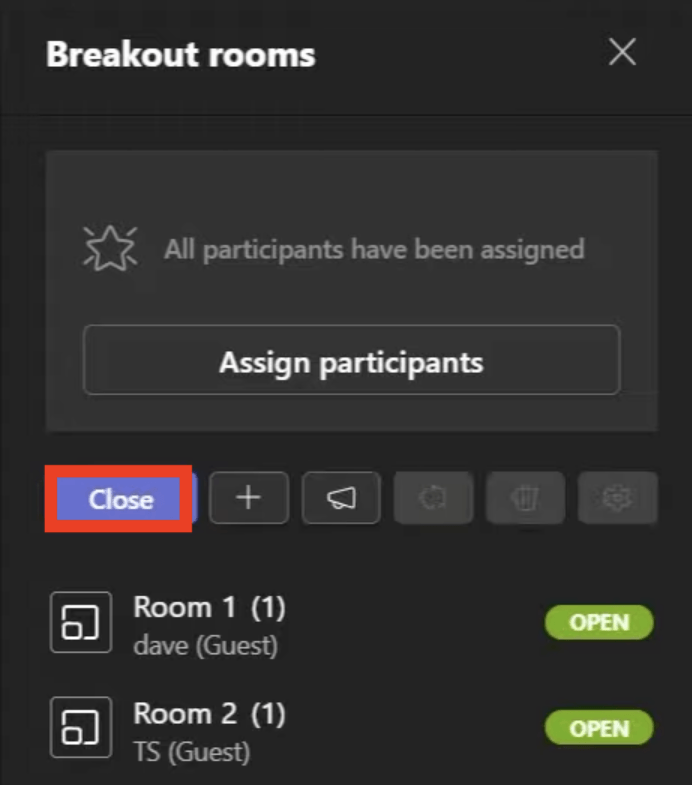
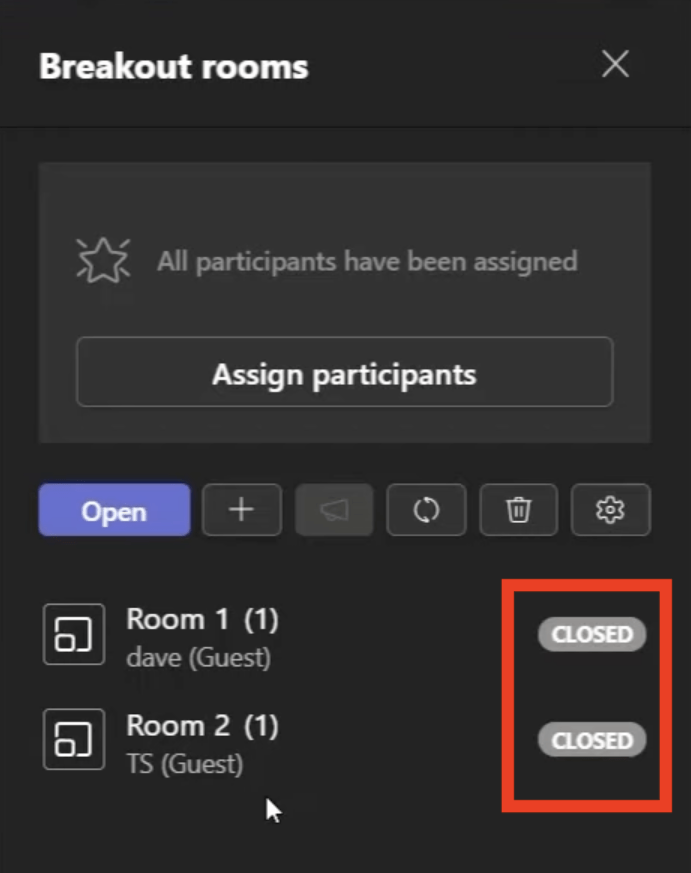
- Click on Close to close all the breakout rooms
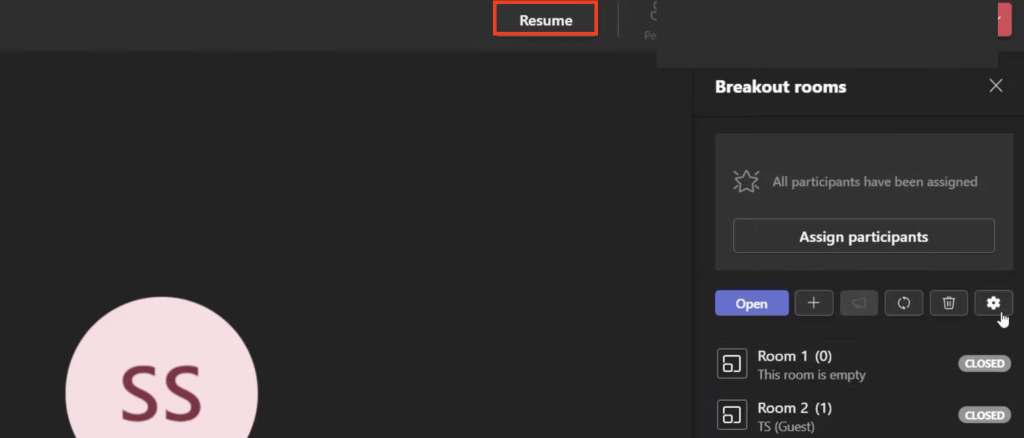
- The status of all the rooms will be changed to Closed
- Select Resume to start the larger group meeting again
In this article, we have defined a breakout room and learned how to create, join, add, and rename a breakout room in Microsoft Teams meeting. We have also seen how to make an announcement to all breakout rooms, change settings for breakout rooms, return to the main meeting in Microsoft Teams, and more!
Using the Whiteboard in Microsoft Teams
Corporations have now shifted to a work-from-home environment where all meetings are held online. One of the main features of an in-person meeting is the ability to sketch out ideas together.
The Whiteboard in Microsoft Teams helps you provide a digital canvas that can be used to brainstorm ideas in an online meeting. It is stored in the cloud and can be accessed by anyone who was part of the meeting.
In this article, we will cover the following in detail –
- Accessing the Whiteboard in Microsoft Teams
- Whiteboard Functionality
- Clearing the Whiteboard
- Using a Whiteboard Template
- Freestyle Drawing on Whiteboard
- Whiteboard Options in Microsoft Teams
- Viewing the Whiteboard Later in Microsoft Teams
Watch this video on How to Use Whiteboard in Microsoft Teams Meeting on YouTube and give it a thumbs-up!
Accessing the Whiteboard in Microsoft Teams
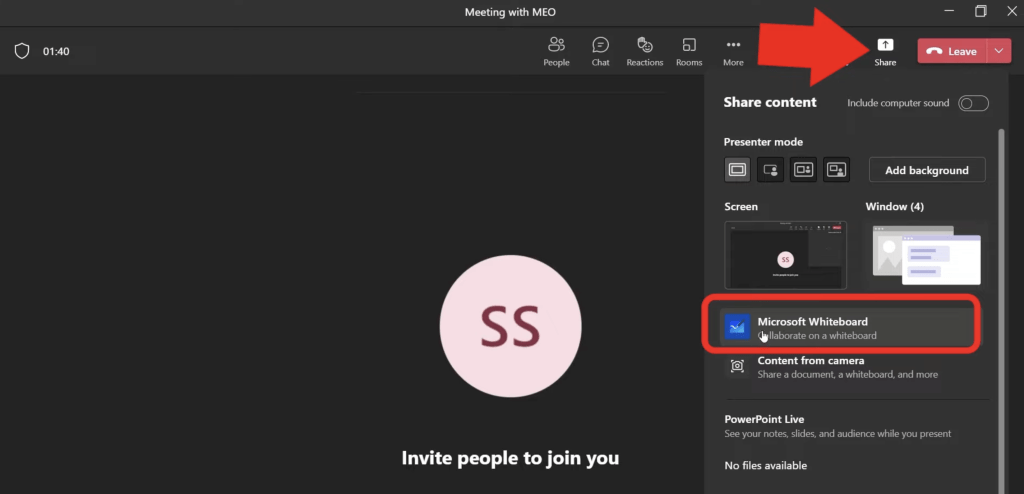
Once the teams meeting starts, you go to the share button and click on Microsoft Whiteboard to open it.
If you are using the free version of Microsoft Teams, this feature may not be available to you. To start using whiteboard using your online meeting, you have to subscribe to Microsoft 365.
Microsoft Teams is very versatile in providing various whiteboard objects, tools, and functionalities for everyone else in the meeting to see and collaborate with. Let’s explore these functionalities –
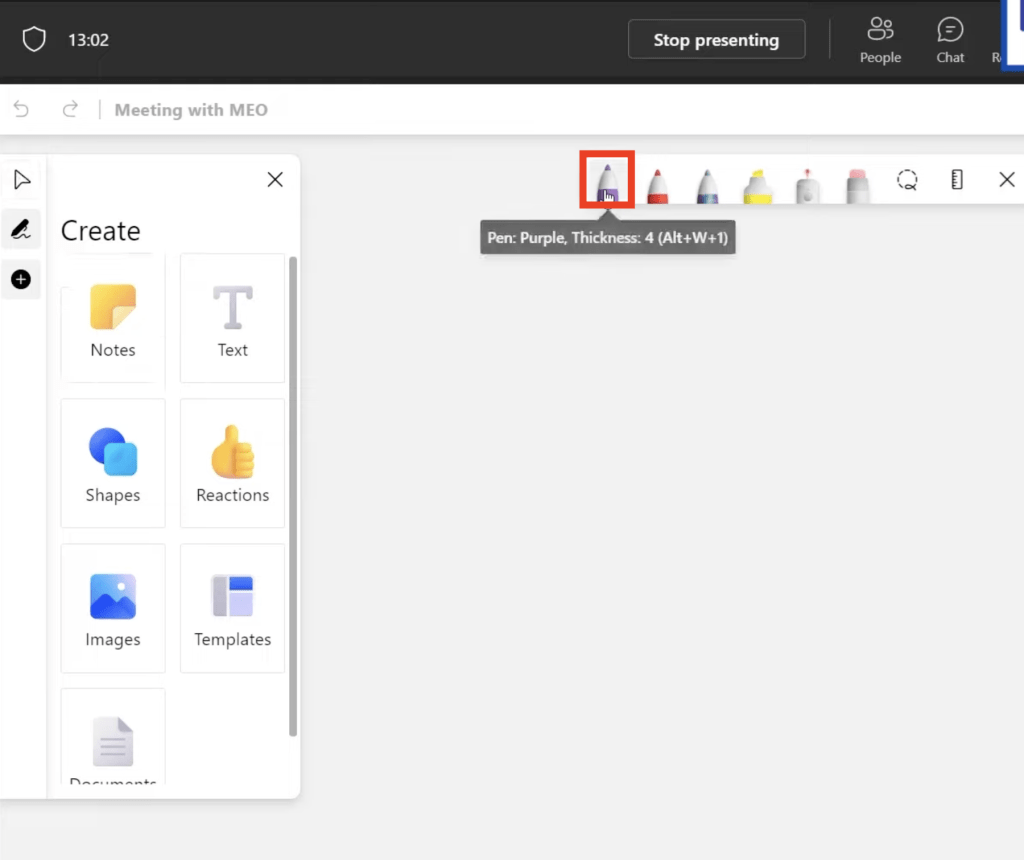
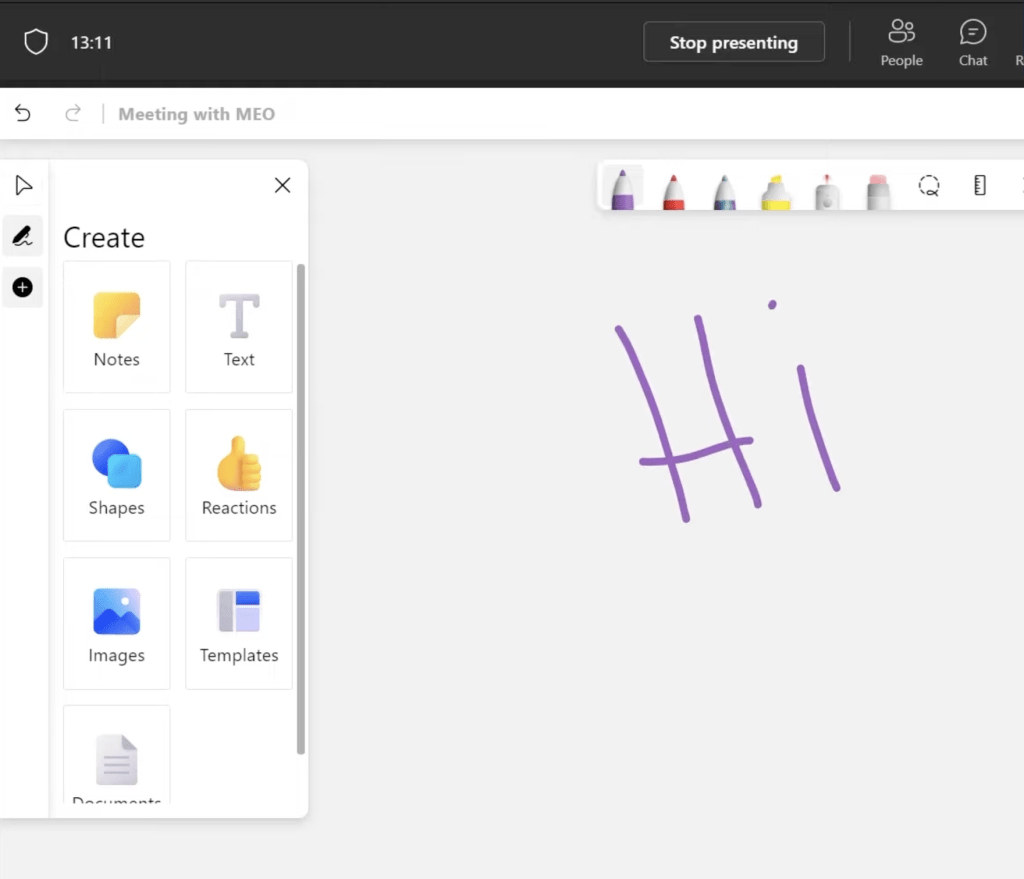
You can use your tablet pen to write, and graphically explain in the meeting. To use this tool :
- Click on the Pen icon on the top
- Start writing on the screen and everyone else in the meeting will be able to see it
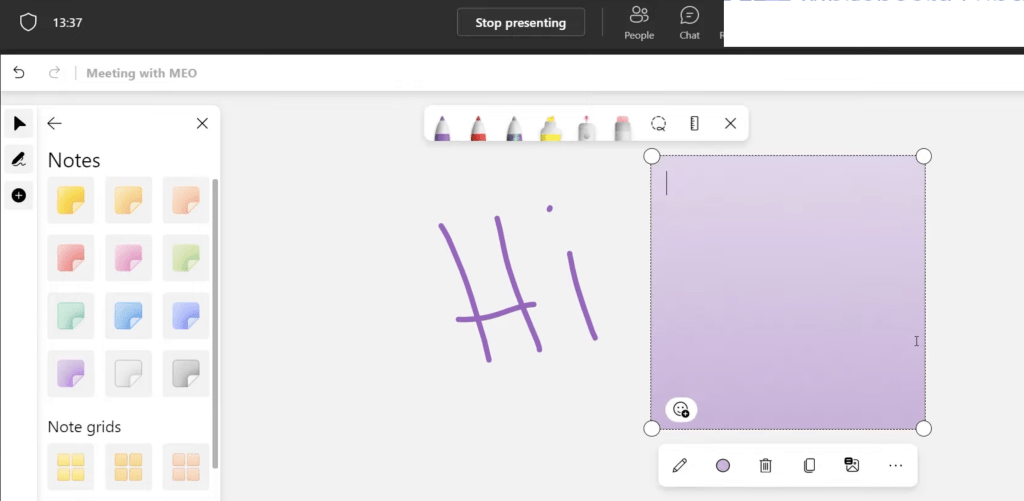
Post-it
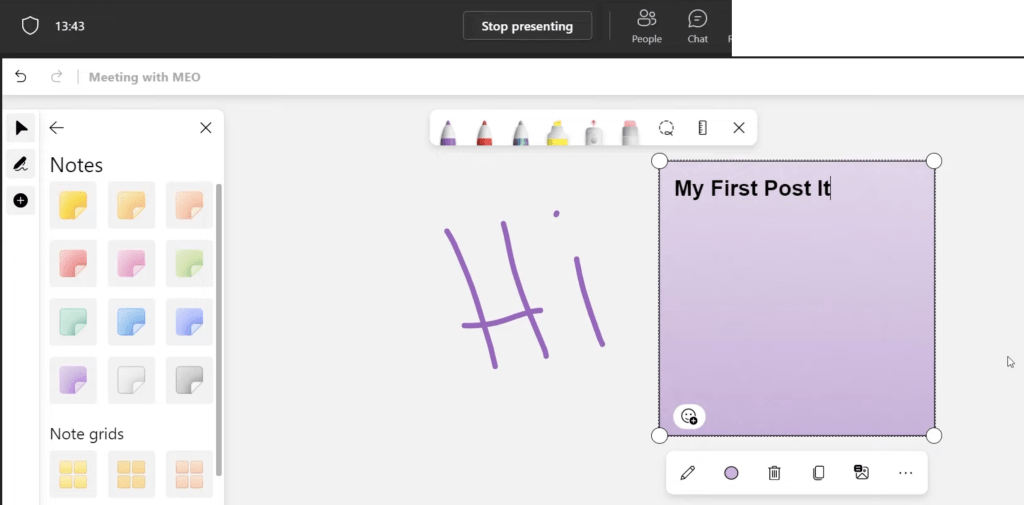
You can use the post-it and use this tool to put up small notes on the whiteboard. Follow these steps to know how to use post it –
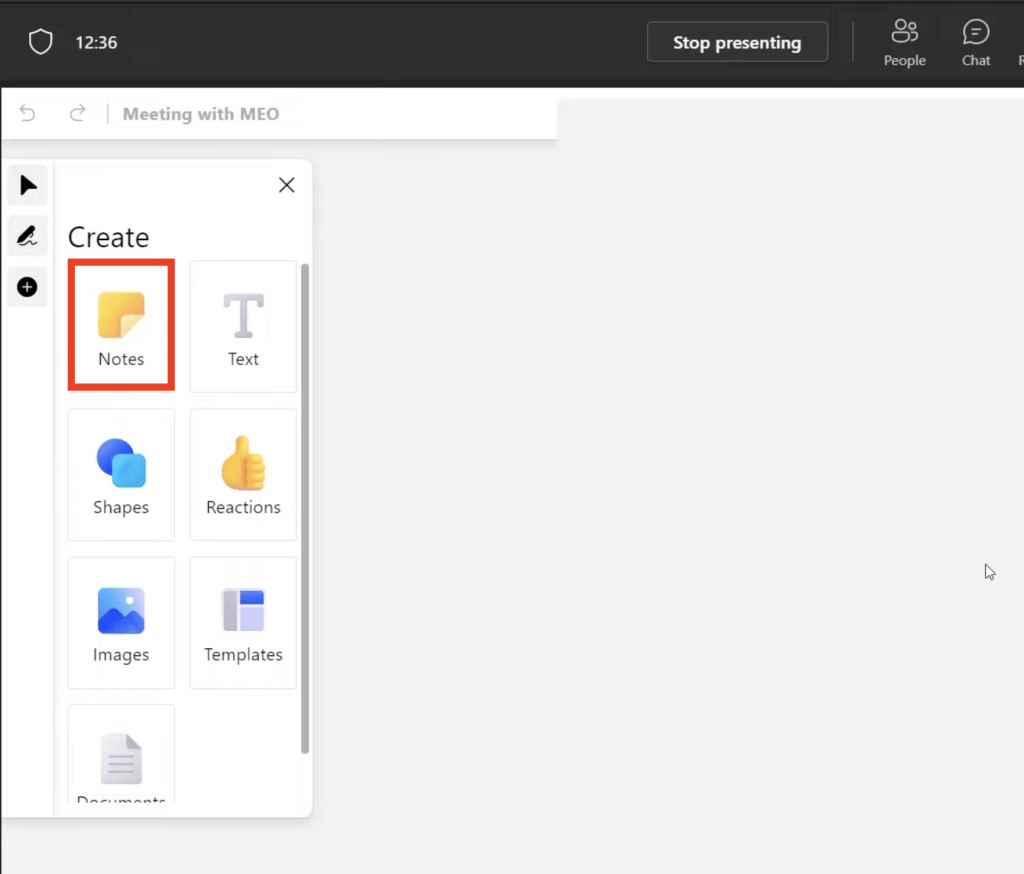
- Click on the notes icon in the create menu on the left.
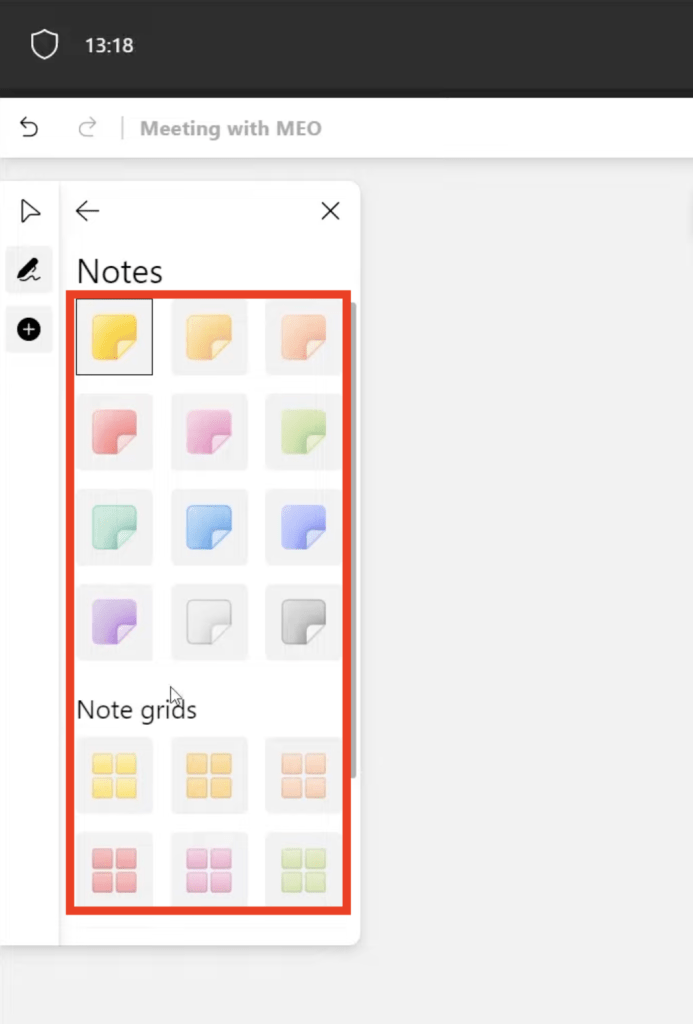
- You’ll be able to see a variety of options and colors available for the post-it notes.
- Drag and drop post-it anywhere in the blank area of the whiteboard
- You can start typing in your note on the post-it note
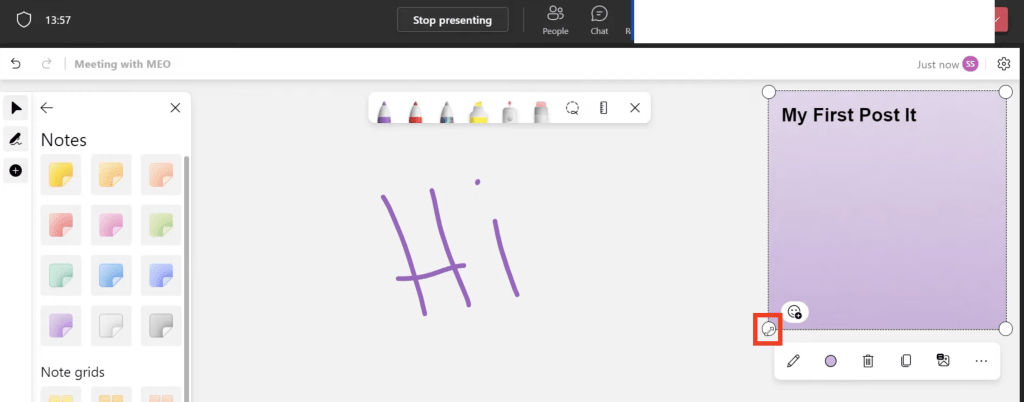
- To move it anywhere else on the screen, just click off it, then click and drag it anywhere you desire.
- You can resize the post-it using the double arrow cursor after placing the arrow on the corner.
Text Box
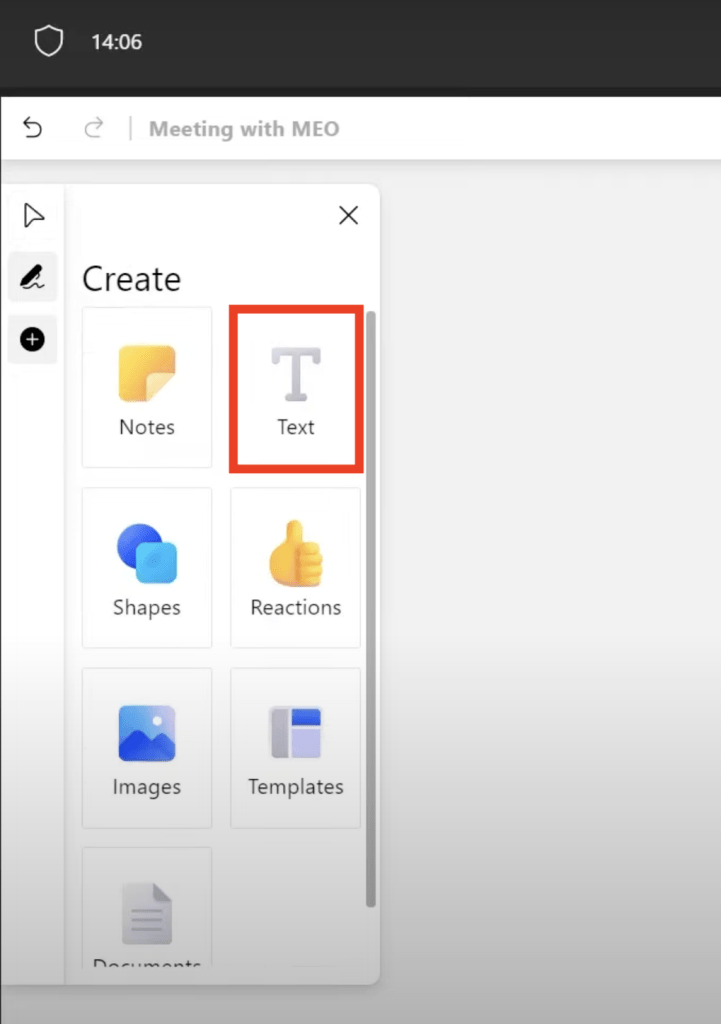
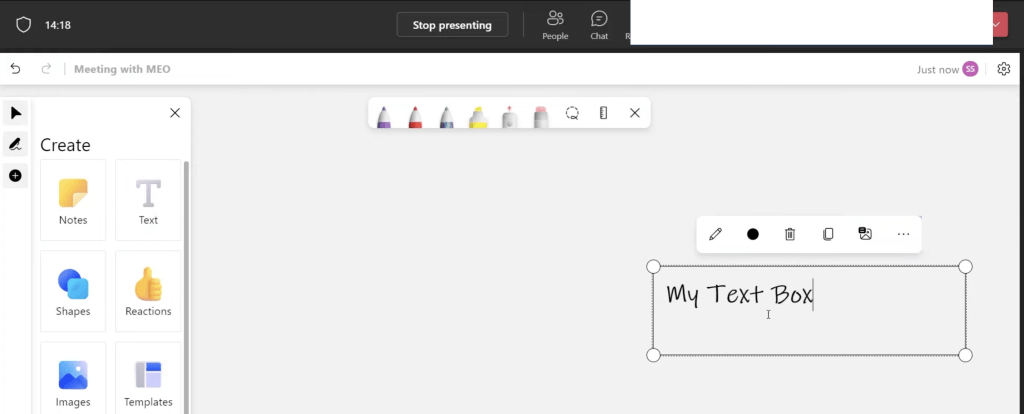
Use a textbox to place text on the whiteboard –
- Click on the Text from the create menu on the left
- Drag and drop the text box on the whiteboard and you can start typing in the textbox
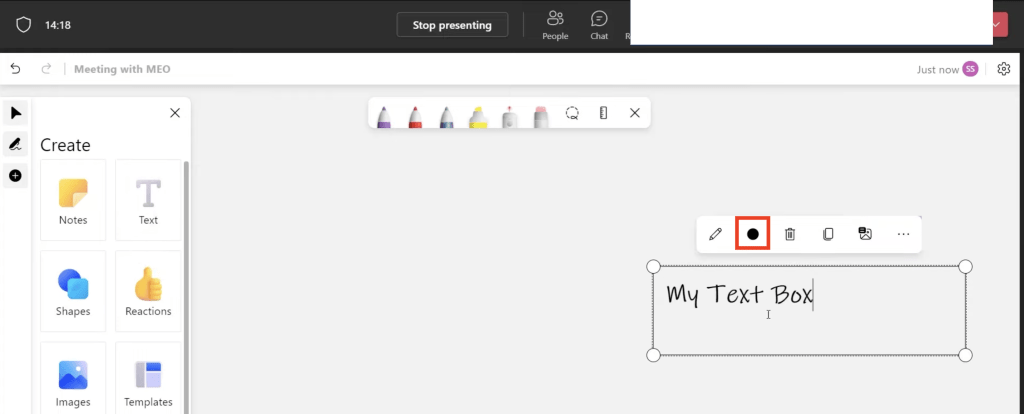
- Click on the color icon and choose any color to change the color of the text
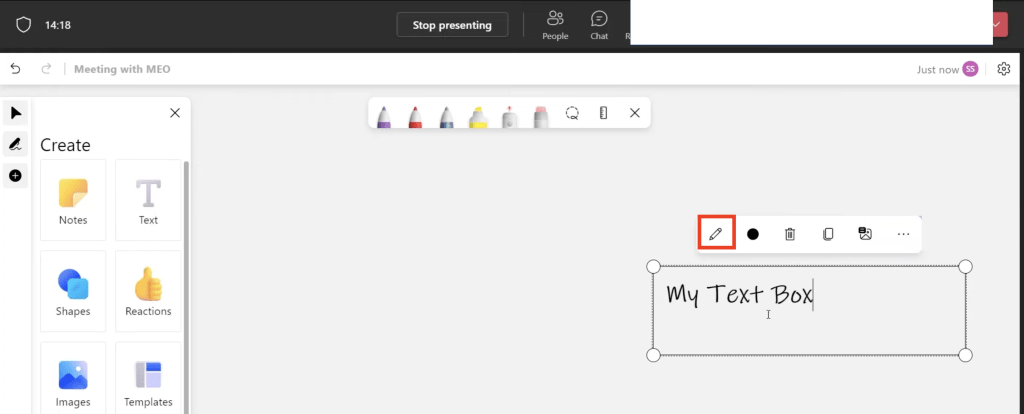
- Click on the pencil icon to edit the text
Shapes
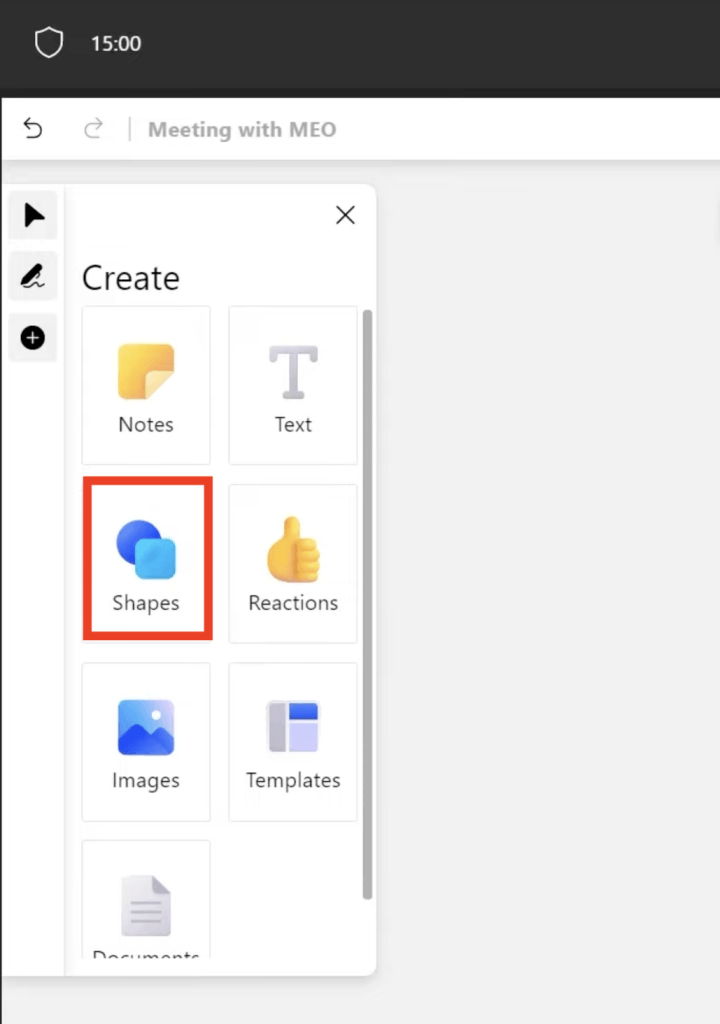
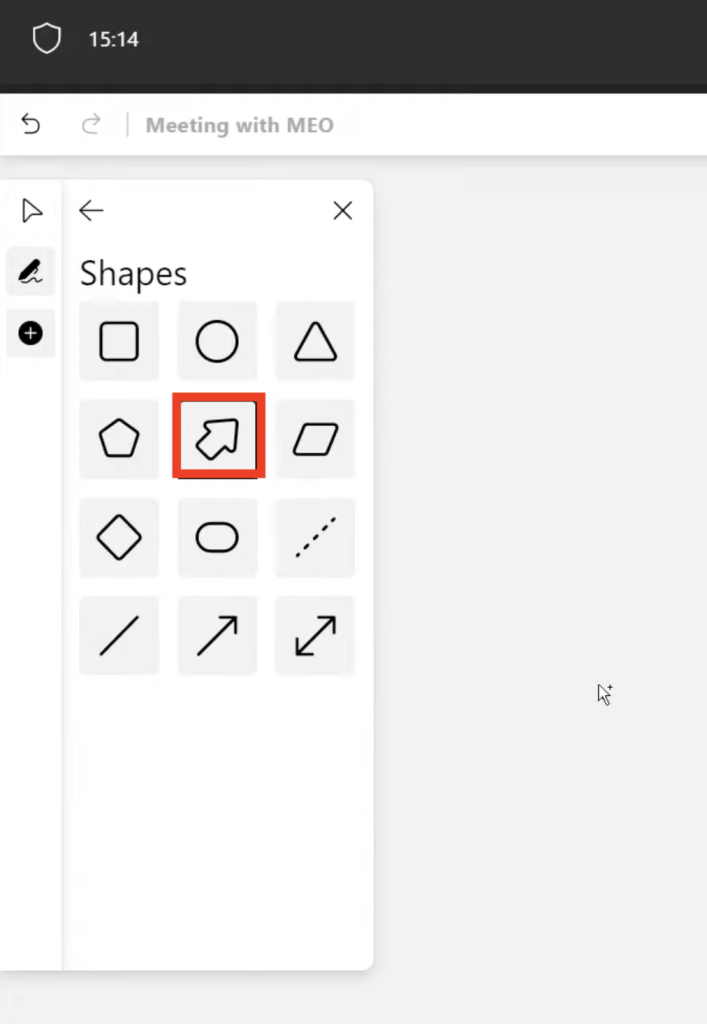
Insert any shape like a rectangle, circle, square, etc to enhance the whiteboard presentation graphically. Follow these simple steps to achieve it –
- Click on the Shape menu item on the left
- Drag and drop any preferable shape from the menu on the whiteboard
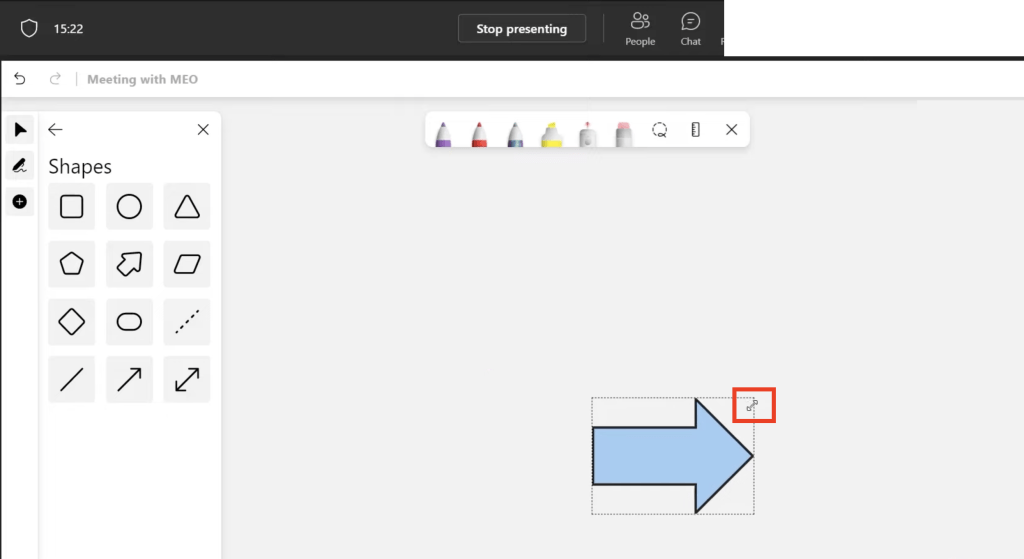
- Resize the shape using the double-arrow cursor on the corner of the object.
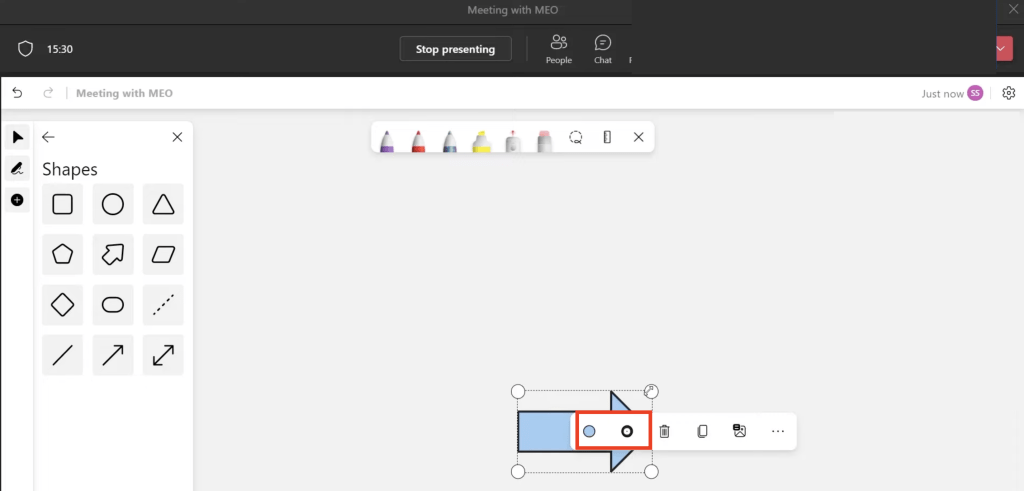
- Change the color of the object and the outline of the object by clicking on the color and outline color tool, a color picker will appear to choose a color from.
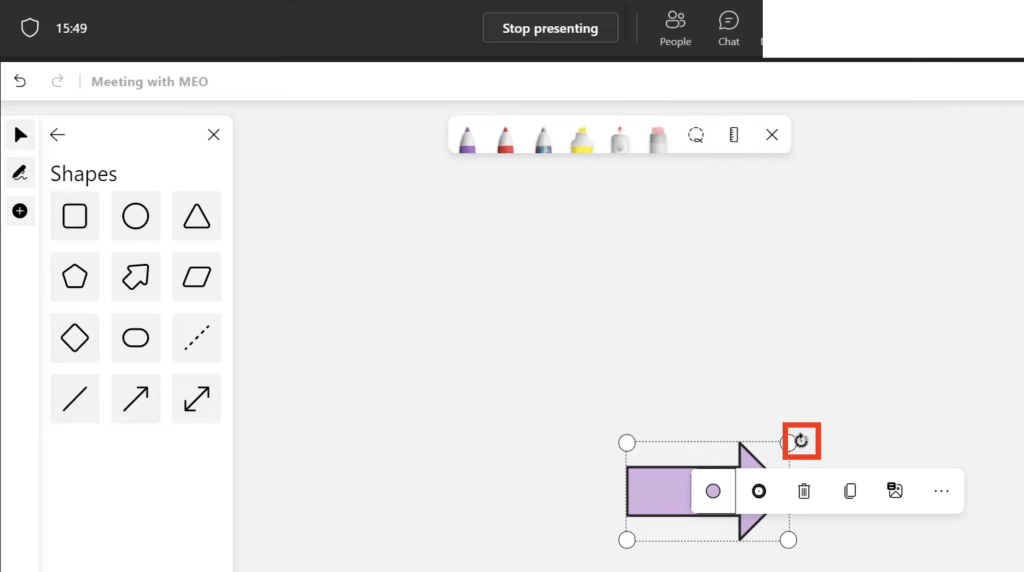
- You can rotate the shape by highlighting the mouse on the corner and waiting till the rotate cursor appears. Then hold our left mouse button and rotate it as per requirement.
- To change the placement of the shape, drag and drop the shape anywhere on the whiteboard.
Image
Insert images from a computer on the whiteboard easily by following these steps:
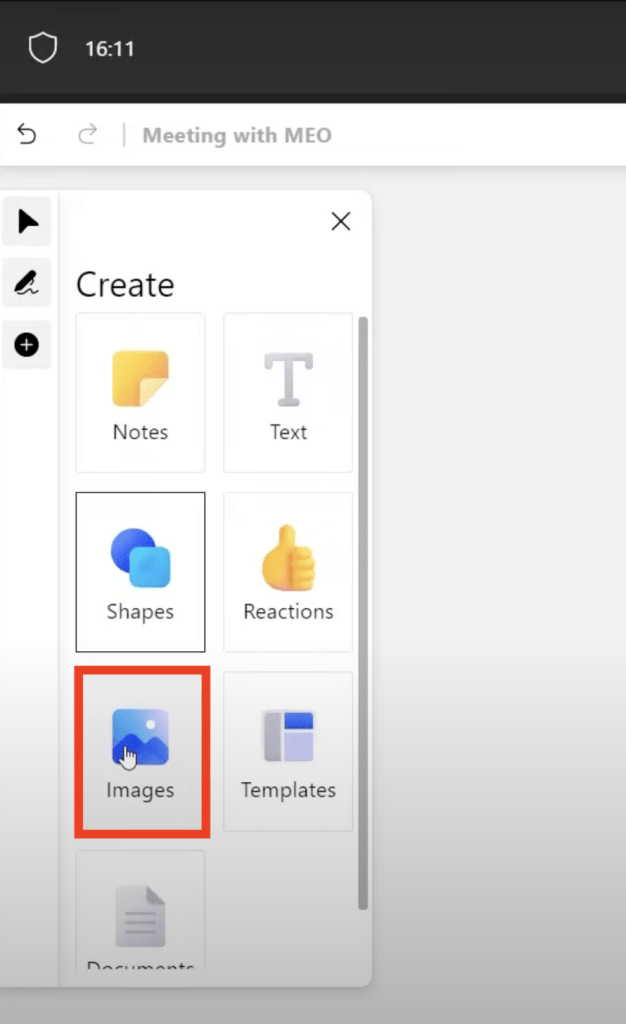
- Click on the Image icon on the create menu
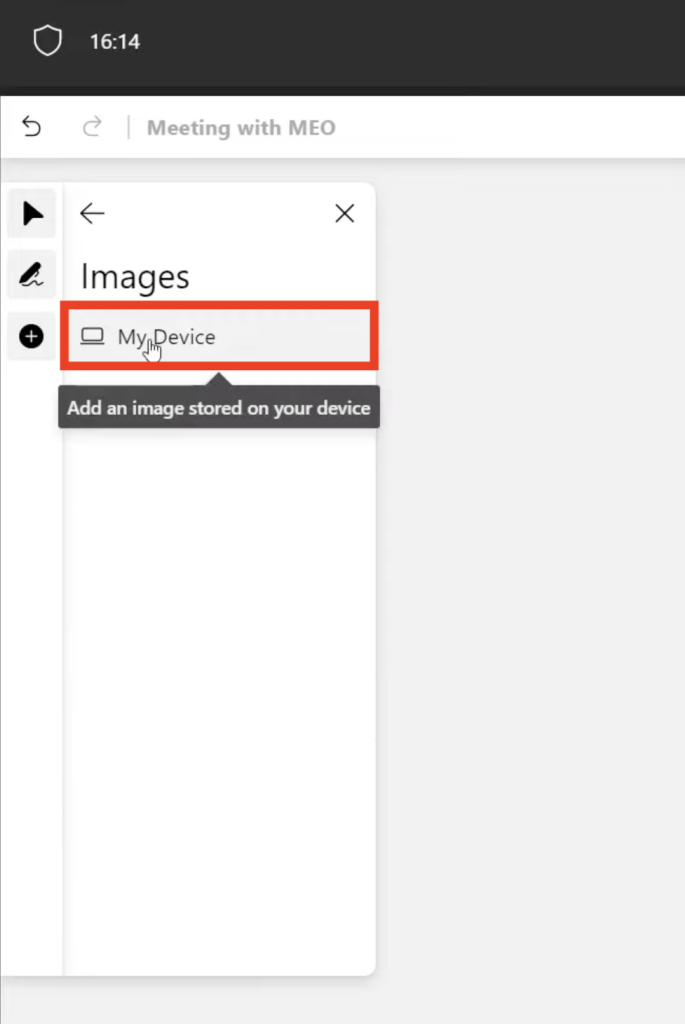
- Click on My Device to insert an image from your computer.
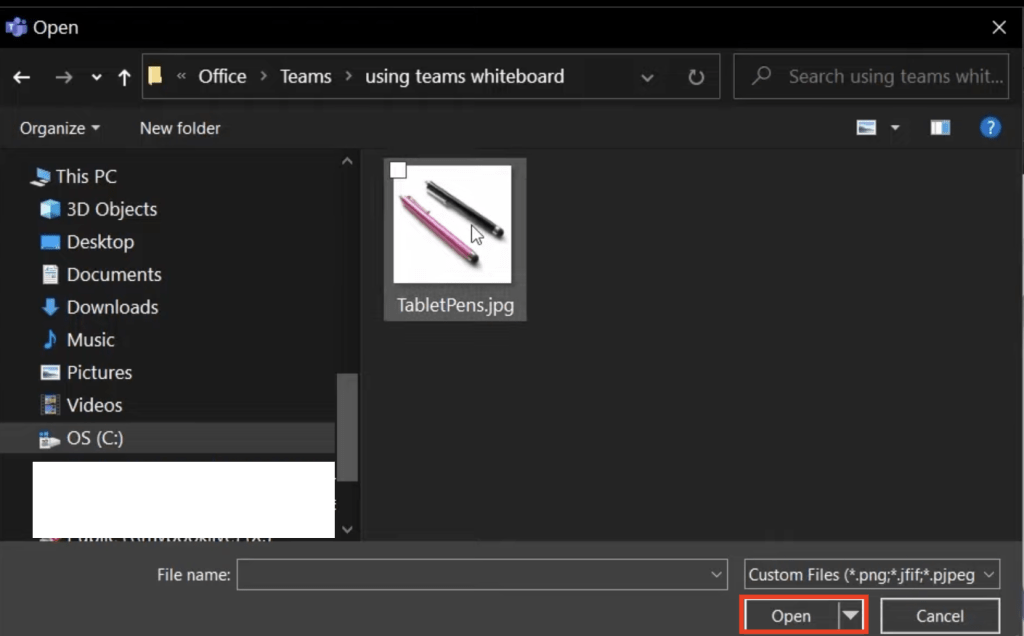
- Browse and select the image from the device and click Open.
- You can resize the image using the double arrow cursor after placing the arrow in the corner.
- Drag and drop the image anywhere on the whiteboard.
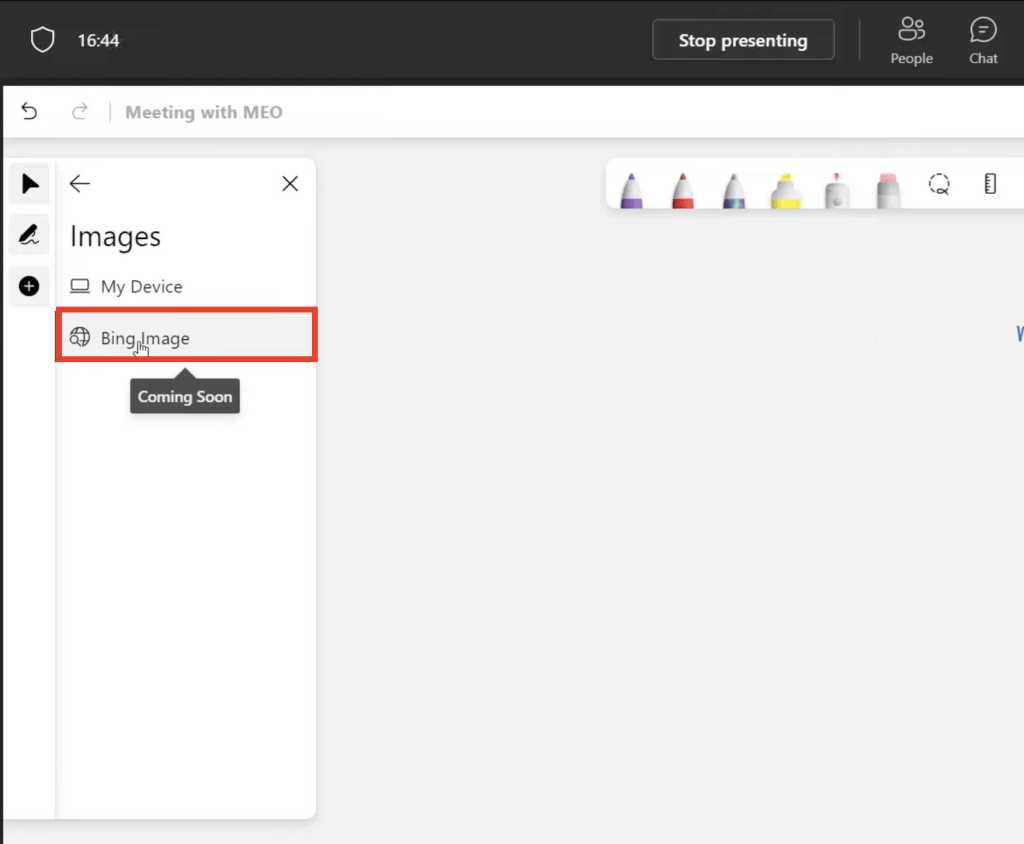
You can also pick images from Bing search in near future. This feature is not ready yet.
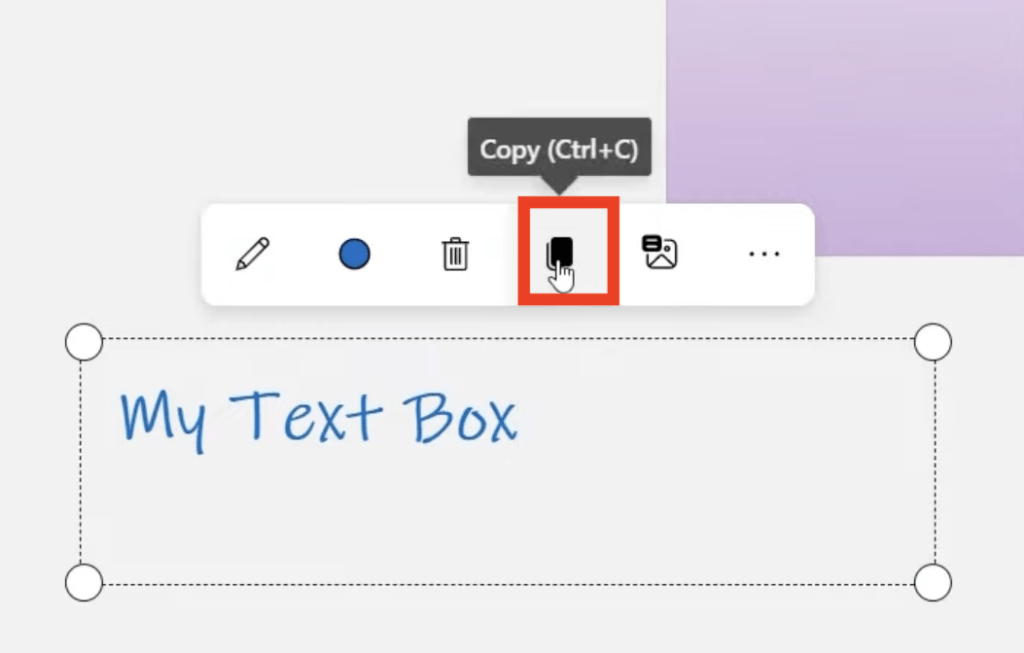
You can copy-paste any object on the whiteboard by simply selecting the object and then
- Copy the Object by pressing Control + C (Windows) or CMD + C (MAC) or by clicking on the duplicate button on the object toolbar menu
- Click anywhere on the blank space of the whiteboard to paste the object.
- Paste the Object by pressing Control + V (Windows) or CMD + V (Mac).
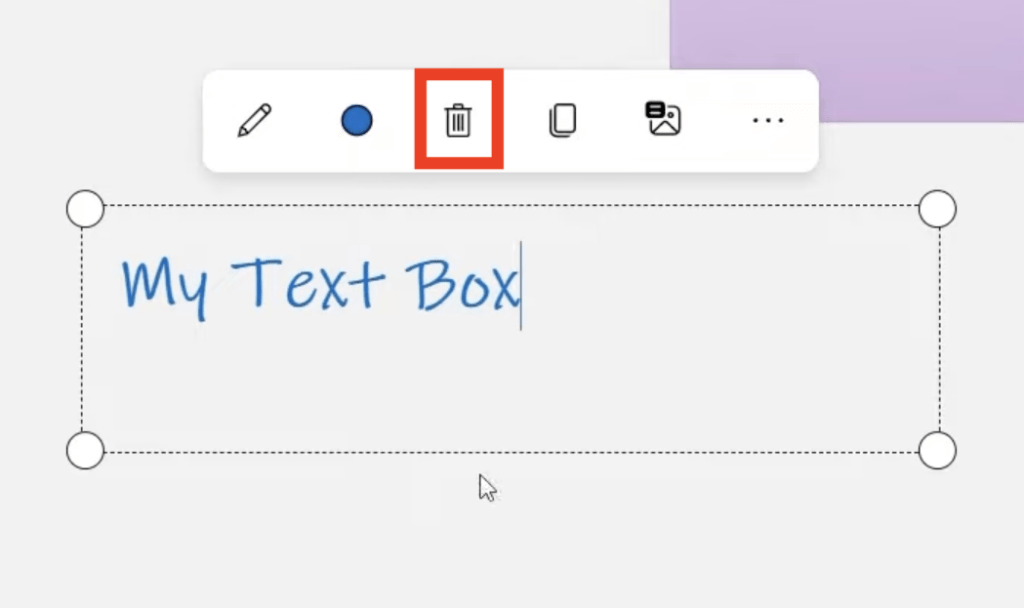
To delete any object click on the delete icon on the object toolbar menu.
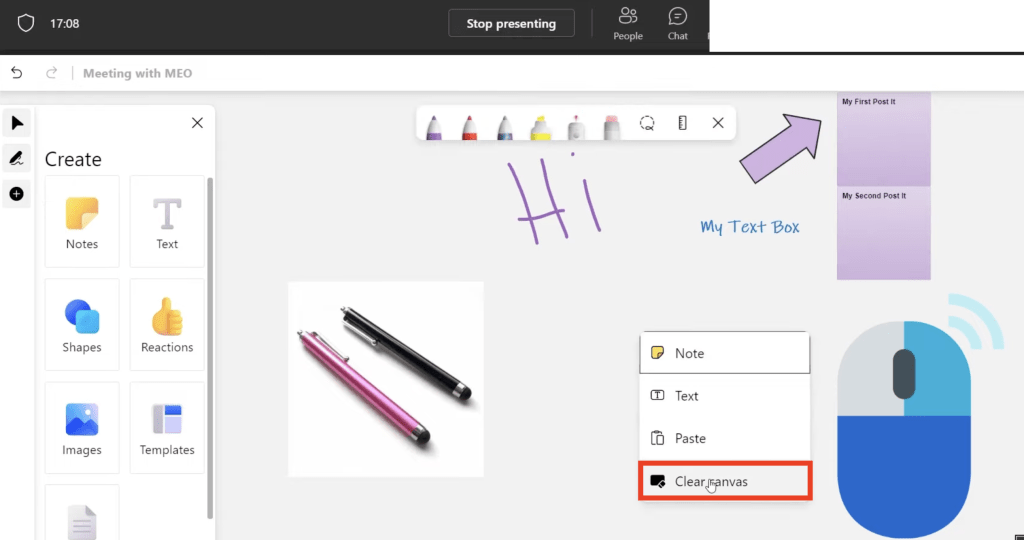
You can easily clear all the objects off the whiteboard with just two clicks –
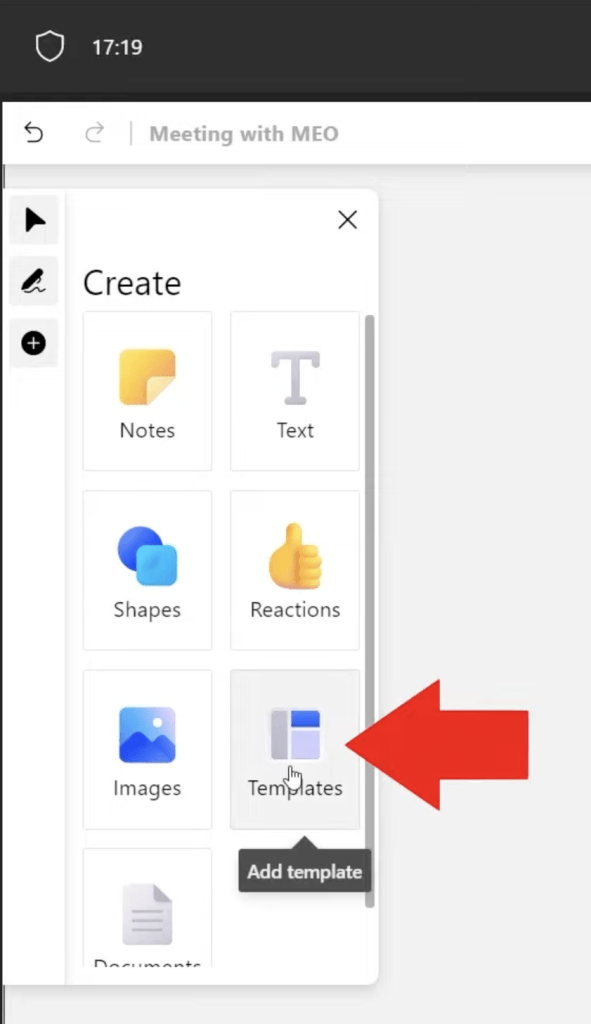
This is a very handy tool for the whiteboard, which enables the user to insert premade templates of objects on the whiteboard.
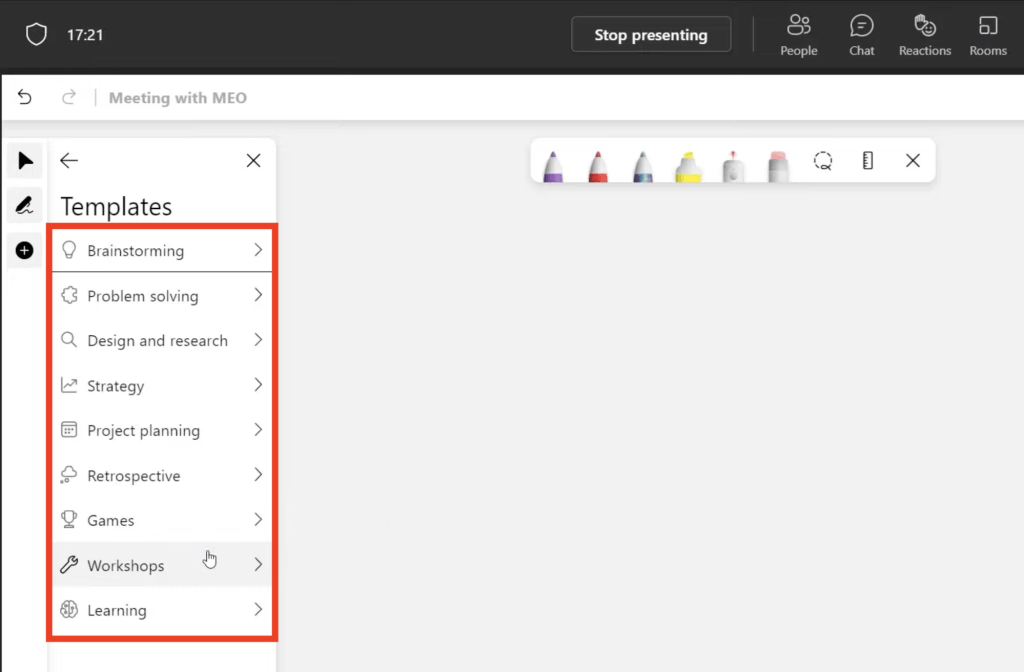
- Click on the template item on the left menu
- Choose a template category from the list of categories
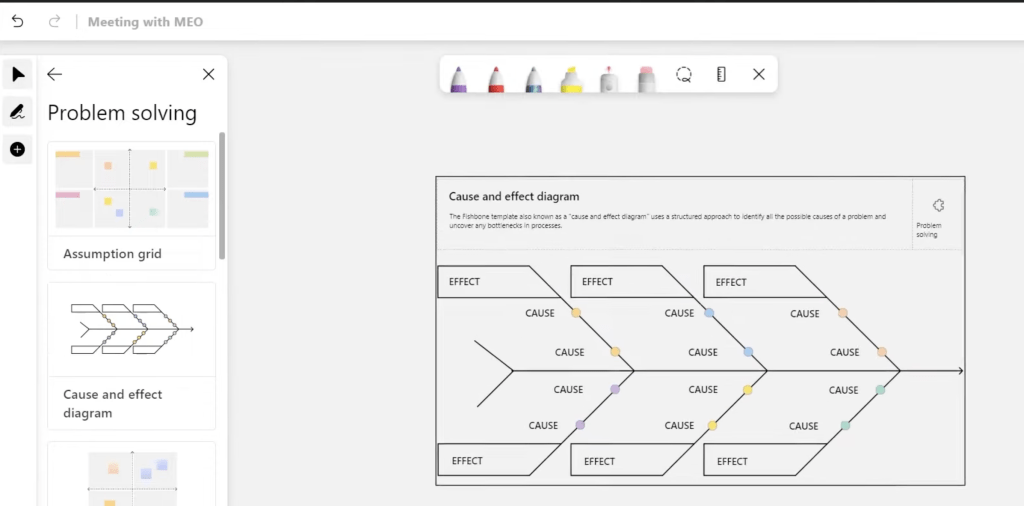
- Once the Problem Solving category is selected, different options will be available. Click an appropriate one.
- Drag and drop the selected template onto the whiteboard
- Resize it by using the double-arrow cursor
Freestyle Drawing on Whiteboard
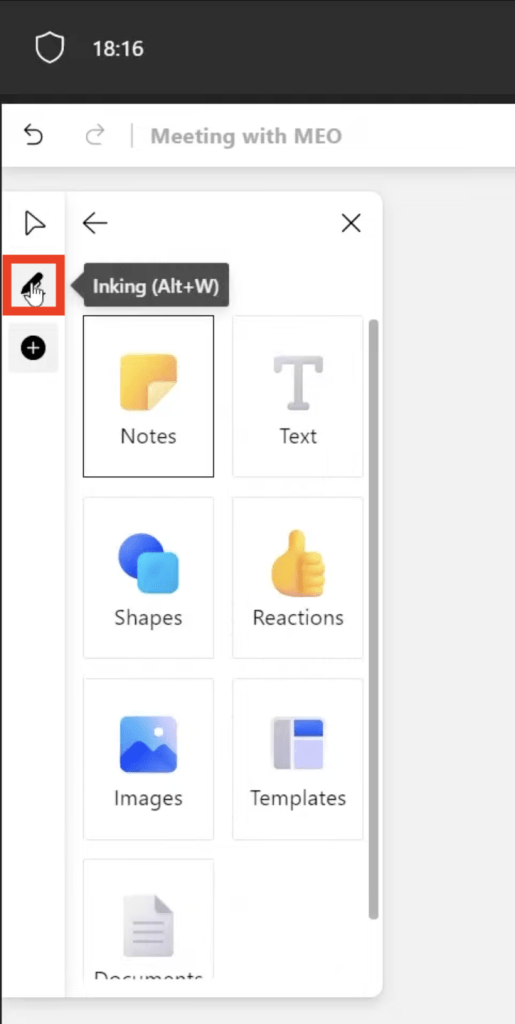
The inking button on the left enables or disables the pen toolbar on the screen.
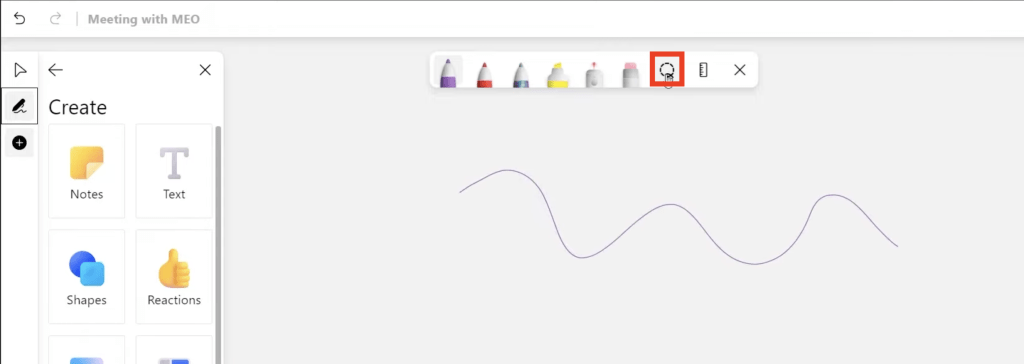
Copy any drawing using the lasso toolbar. Hold to shift and move the drawing anywhere on the screen.
Whiteboard Options in Microsoft Teams
You can easily export the whiteboard in an image format by clicking on the settings icon on the top left and clicking on the Export image option.
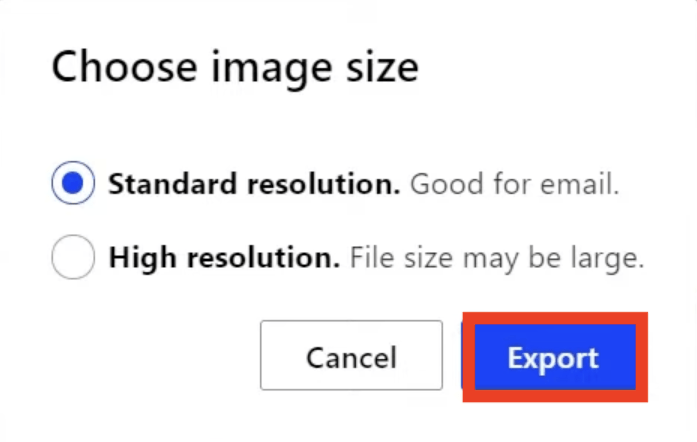
You can choose the standard or high resolution as per requirement and click on Export. The image will be downloaded to the downloads folder of your device.
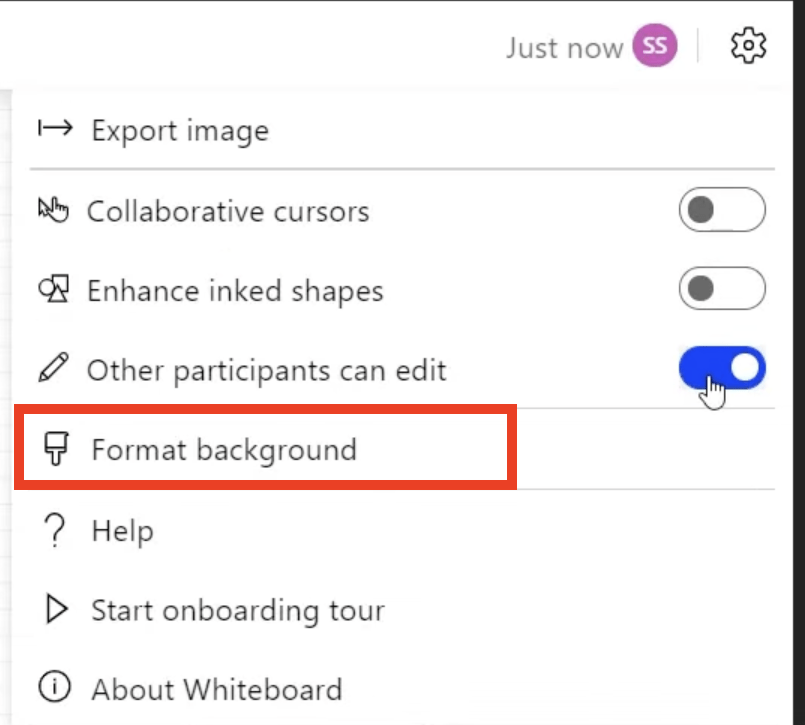
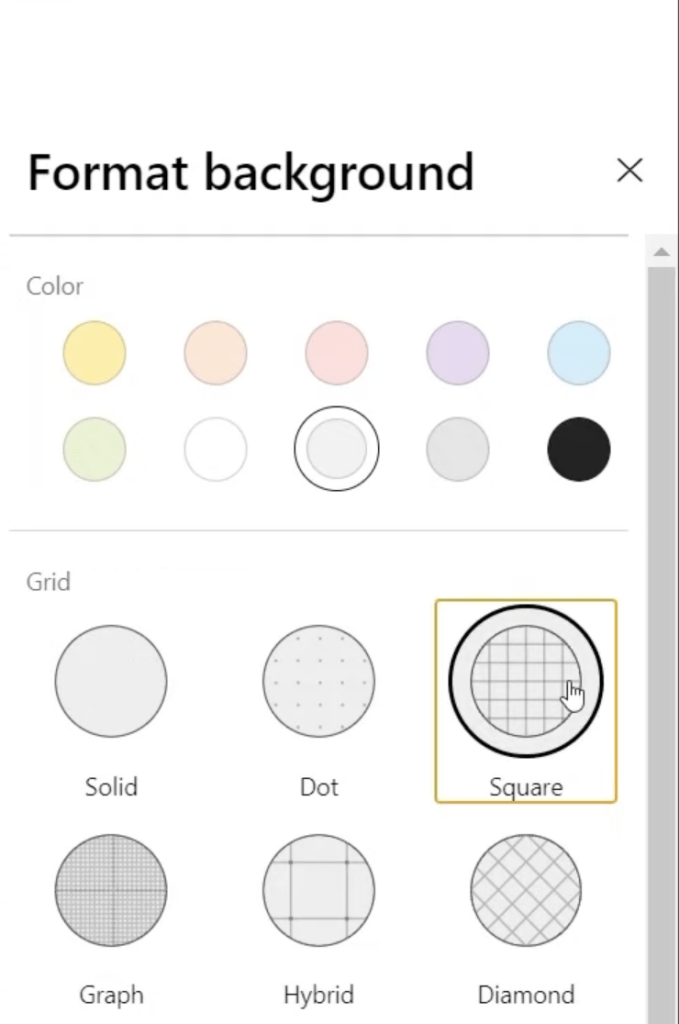
Change the whiteboard background by clicking on the Format Background option on the settings menu on the top right.
You can put a grid on the background or choose any color or put a wide rule or any other option available.
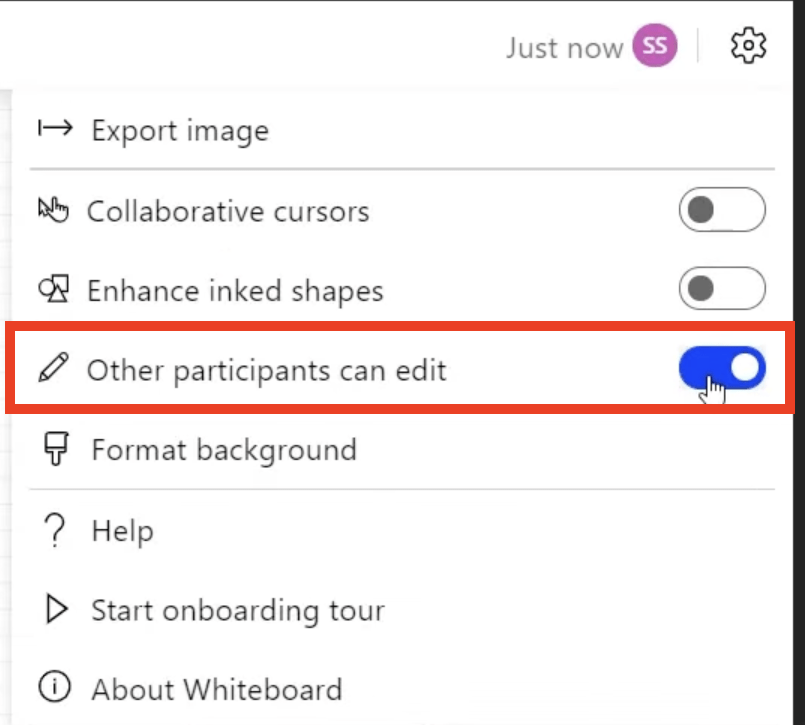
Allow other participants to edit the whiteboard for collaboration by enabling the toggle Other participants can edit from the settings menu.
Viewing the Whiteboard Later in Microsoft Teams
After your Teams meeting has ended, you can still view the whiteboard –
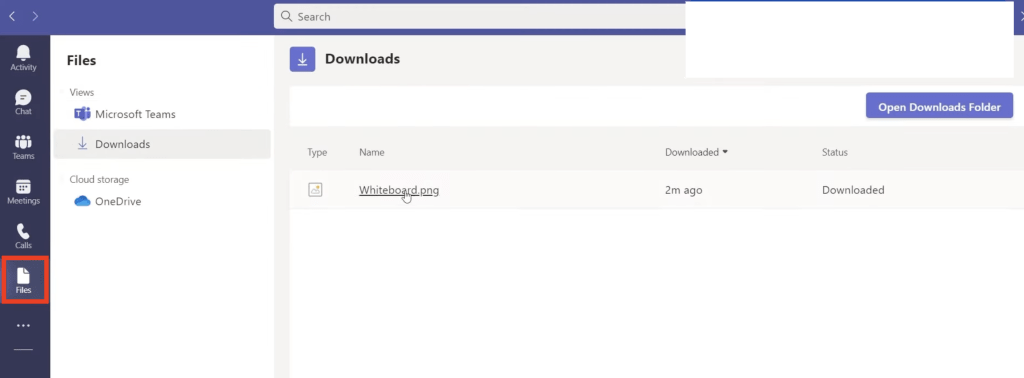
- Download the whiteboard export by going to Files > Downloads in Microsoft teams.
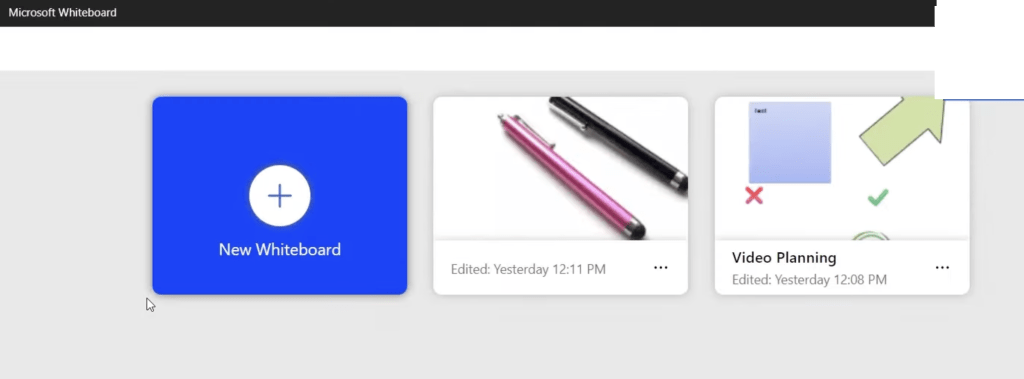
- Open the Microsoft Whiteboard app, you’ll find all the previous whiteboards you were working on or an option to open a new whiteboard.
In this article, we have covered how to access the Whiteboard directly from Microsoft Teams, different options for drawing on the Microsoft Teams whiteboard, saving the Microsoft Teams whiteboard for later, whiteboard settings, and more!
John Michaloudis is a former accountant and finance analyst at General Electric, a Microsoft MVP since 2020, an Amazon #1 bestselling author of 4 Microsoft Excel books and teacher of Microsoft Excel & Office over at his flagship Academy Online Course.
