No More Clutter, Just Calendar
Imagine a world where an overstuffed, confusing email inbox is a thing of the past. With Outlook, that reality is at your fingertips. By converting emails to calendar events, you can sort through the noise and focus on what matters. This nifty trick allows you to preserve your mental energy for the tasks that truly require it, leaving the organizational heavy lifting to your calendar.
Learn our Top 7 Excel Interview Questions to Land Your Dream Job!
Key Takeaways
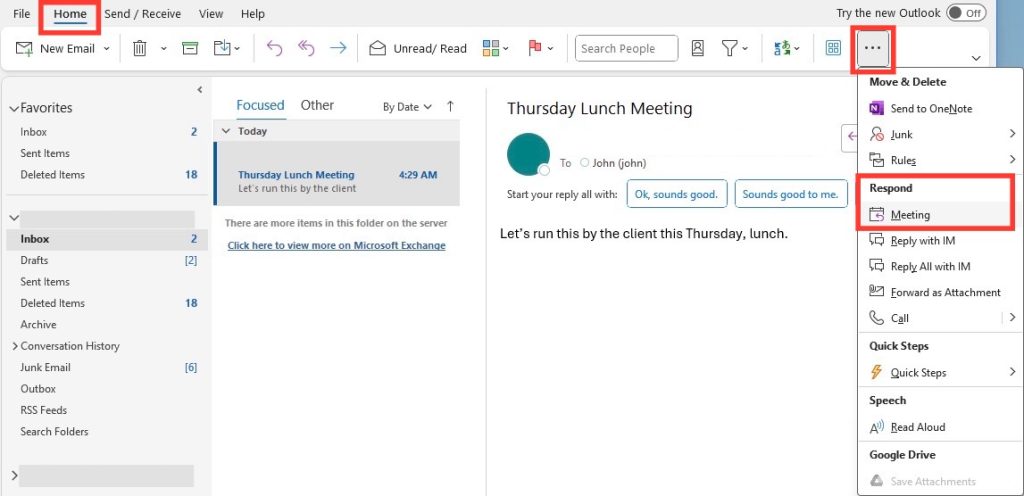
- You can create a meeting directly from an email in Outlook by clicking the three dots in the upper right corner of the selected email and choosing the “Meeting” option from the pop-out menu.
- When creating the meeting from the email, Outlook pre-populates the meeting invitation with the recipients from the email thread, and includes the email string beneath the meeting details for reference.
- Once you have set up the meeting details such as the date, time, location, and added any additional attendees, you can send the invitation. The original email thread is then attached to the meeting invite, ensuring all participants have the context for the meeting.
Table of Contents
Step-by-Step Guide to Creating Meetings from Emails
Identifying the Email That Sparks a Meeting
You’ve been there – an email arrives, or a thread grows, and it becomes clear that typing won’t cut it: it’s meeting time. What to do? First, pinpoint the email—the linchpin of your meeting. Is it the latest response, a summary, or the one with the pivotal ‘Let’s meet’ comment? Whichever it is, once you identify the critical message, the rest is a breeze.
To create a meeting from an email in Microsoft Outlook, follow these steps:
STEP 1: Open Microsoft Outlook and navigate to your email inbox.
STEP 2: Find and select the email message from which you want to create a meeting.
STEP 3: Click on the “Home” tab in the Outlook ribbon (the toolbar at the top of the screen).
STEP 4: Look for the “Respond” group within the “Home” tab.
STEP 5: Click on “Meeting” within the “Respond” group.
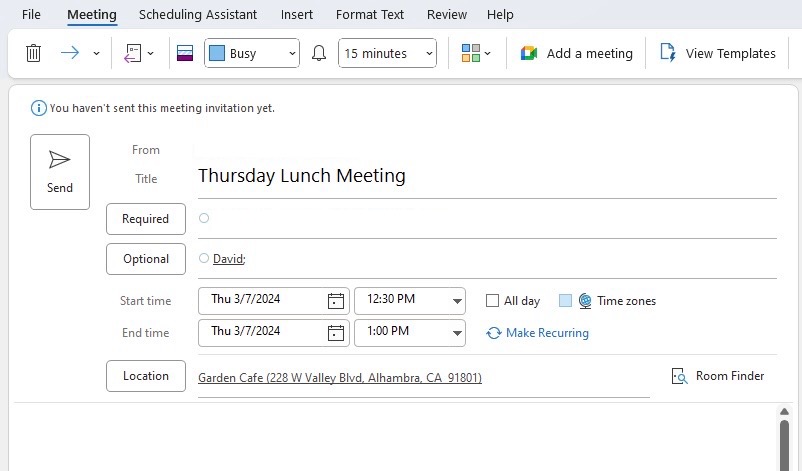
STEP 6: A new meeting request will open with the original email message included in the body of the meeting request.
STEP 7: The sender of the email will automatically be added to the “To” line as a Required attendee.
STEP 8: If there are any recipients in the “CC” field of the original email, they will be added as Optional attendees.
STEP 9: Fill in the meeting details such as Subject, Location, Start Time, and End Time.
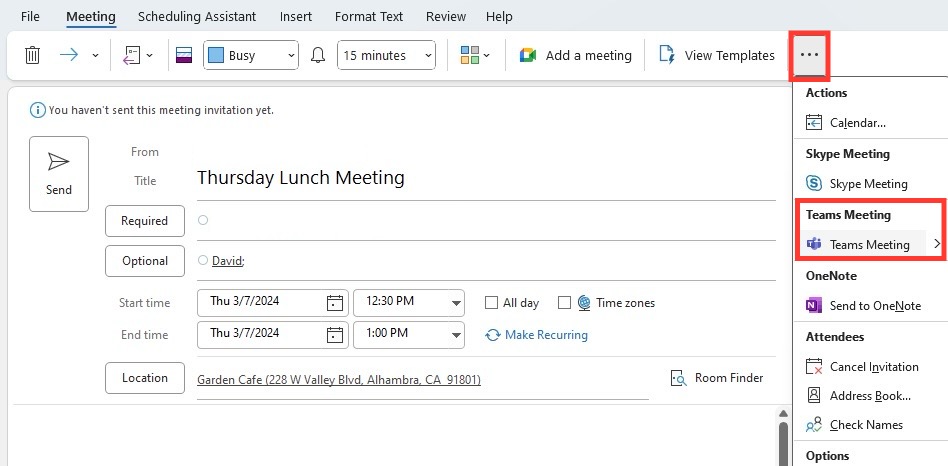
STEP 10: To convert the meeting to a Microsoft Teams meeting, click on the “Teams Meeting” button to add a Teams link.
STEP 11: Review the details and make any necessary adjustments.
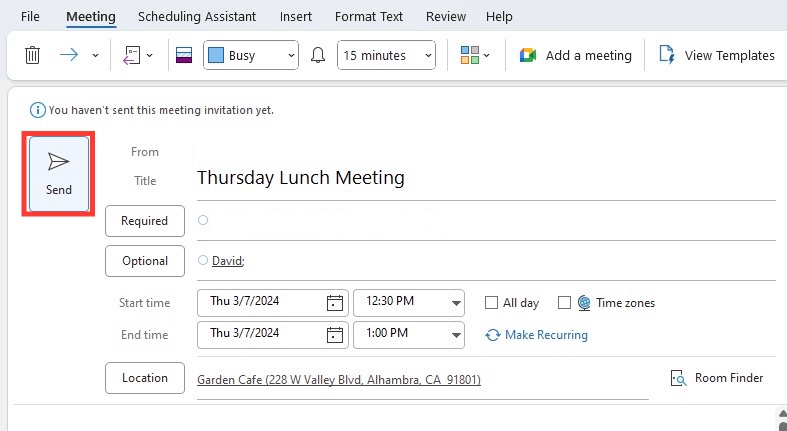
STEP 12: Click “Send” to send out the meeting invitations to all attendees.
Tips to Streamline the Process
Quick Shortcuts and Commands
Next, let’s turbocharge your Outlook efficiency with some keyboard wizardry! Outlook presents a plethora of shortcuts that streamline the meeting setting process. For instance, Ctrl+Shift+Q whisks you straight to a new meeting request, and Alt+S sends your invite on its merry way. Remembering a few of these can shave precious seconds off your scheduling, transforming you into an Outlook power user.
Scheduling Features You Can’t Miss
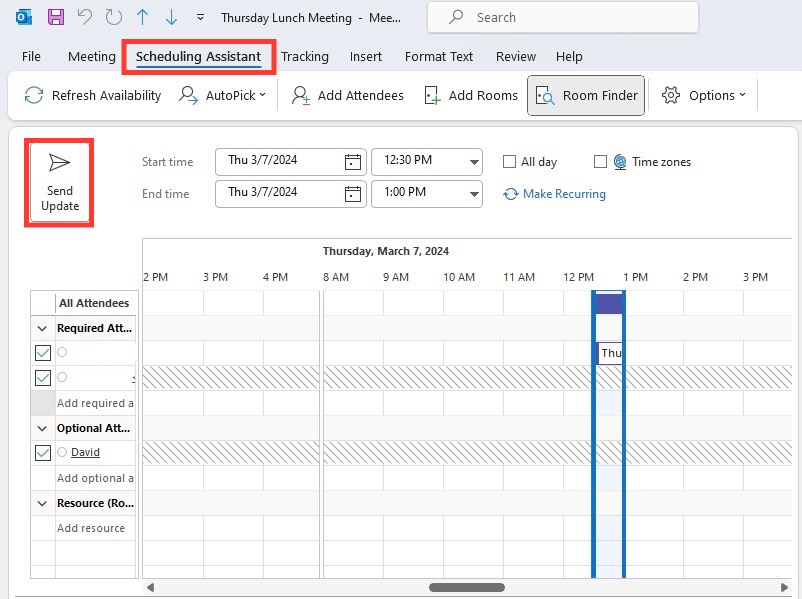
Outlook boasts remarkable features that you simply shouldn’t overlook. The Scheduling Assistant, for instance, is like having a personal planner, showing you when everyone’s available. And if you’re scheduling recurring meetings, the Repeat option ensures no one forgets the bi-weekly check-in. Plus, with the Room Finder, securing a spot for your meeting is as easy as picking a time. These features work in concert to ensure you can focus on the meeting’s content rather than get bogged down by planning logistics.
Troubleshooting Common Issues
When Outlook Doesn’t Cooperate
Sometimes, technology throws a curveball, and Outlook might not play ball. If you’re struggling to drag an email into the calendar or find that meeting invites aren’t sending, don’t fret. Often, it’s a simple fix like restarting Outlook or checking for updates. If the issue persists, a quick check of your internet connection or even the outlook support forums can offer a solution. For the less common issues, Microsoft’s support desk is just an email or a call away.
Avoiding Double Bookings and Conflicts
Double bookings and scheduling conflicts can throw a wrench into even the best-laid plans. To steer clear of these hiccups, utilize the power of Outlook’s automatic conflict detection. When you attempt to schedule a meeting, Outlook informs you if participants have prior engagements. Stay observant of these alerts and possibly activate the option for Outlook to end meetings early to allow buffer time for transit, helping everyone stay punctual and prepared.
Leveraging Outlook for Better Collaboration
From Individual Task to Team Effort
Alone, you move fast; together, we move far. This axiom holds in Outlook, where individual tasks seamlessly transition to coordinated team efforts. By sharing and assigning tasks within your team, Outlook keeps everyone on the same page. Break up a big project by sending tasks to your team’s To-Do lists or keep collaboration fluid by inviting colleagues to a meeting directly from an email thread. These features foster a shared understanding and mutual accountability that drive collective success.
Keeping Track of RSVPs and Follow-ups
A critical aspect of organizing meetings in Outlook is maintaining a clear record of who can attend and what follows after. With the tracking feature, you’ll get a dashboard view of RSVPs, so no more guessing games. Post-meeting, use Outlook to distribute minutes or set reminders for follow-up tasks to ensure that decisions lead to actions. Accountability is the key, and Outlook has just the right lock.
Maximizing Scheduling Efficiency in Outlook
The Art of Timing and Recurrence
Creating recurring meetings in Outlook is nearly an art form; timing is everything. Set up your weekly team sync or monthly reviews with just a few clicks, selecting the pattern that suits your agenda—daily, weekly, monthly, or yearly. Specify intricate recurrence patterns, like an appointment every second Tuesday of the month, and Outlook syncs all future occurrences to everyone’s calendars. It’s not just about saving time; it’s about establishing a reliable rhythm for collaboration.
Utilizing Room Finder and Scheduling Assistant
The Room Finder and Scheduling Assistant in Outlook are true hidden gems for anyone aiming to book the perfect meeting space at the ideal time. Room Finder helps you easily spot available rooms by capacity, location, or availability. Couple that with the Scheduling Assistant, and you’re looking at a harmonious coordination of calendars and spaces. This duo ensures you’ll find the right venue when everyone is free, so your meetings start without a hitch.
FAQ Section
How can I create an Outlook meeting from an email?
To create an Outlook meeting from an email, you can either click Home > Meeting in the ribbon after selecting the email or open the email and click Message > Meeting. This will open a new meeting request with the email contents and recipients as attendees. If you want a Teams meeting, just click “Teams Meeting” in the request.
What’s the fastest way to schedule a meeting from an email conversation?
The fastest way is to open the email, click the three dots in the message view for more options, select “Meeting,” and a new meeting invite will pop up with the email recipients pre-added. Adjust the details and hit send—your meeting from an email conversation is set!
Can I attach the original email to the Outlook meeting invitation?
Yes, you can attach the original email to an Outlook meeting invitation. While creating the meeting request, select the ‘Attach Item’ option from the ribbon and choose ‘Outlook Item’. Then, find the original email and attach it to the invite before sending it out to the participants.
Is it possible to create recurring meetings from a single email thread?
Absolutely, you can create recurring meetings from a single email thread in Outlook. After turning your email into a meeting invite, choose ‘Recurrence’ from the ribbon to set the frequency, pattern, and range of recurrence before sending out the invitation. This will apply the same details to all future instances.
John Michaloudis is a former accountant and finance analyst at General Electric, a Microsoft MVP since 2020, an Amazon #1 bestselling author of 4 Microsoft Excel books and teacher of Microsoft Excel & Office over at his flagship Academy Online Course.
