Download our 141 Free Excel Templates and Spreadsheets!
Key Takeaways
- Utilize the “Junk Email” settings in Outlook to blacklist specific senders by opening their message and selecting “Block” from the “Junk” options dropdown menu.
- Users on the Outlook mobile app can easily block contacts by tapping the three dots to access the menu and choosing “Block this Contact” for immediate action against unwanted emails.
- Leverage Outlook’s built-in filtering capabilities to preemptively stop emails from unwanted sources, including those with certain words or from specific regions, to maintain a secure and organized inbox.
The Implications of Not Managing Spam and Junk
Neglecting to manage the spam and junk in your Outlook can have broader repercussions than just an untidy inbox. Firstly, it’s a time sink; wading through unnecessary emails can drain the minutes from your day, minutes you could better use elsewhere. Also, unmanaged spam can pose security risks. Some of these emails harbor malicious links designed to phish for personal information or install malware on your device. And let’s not forget the mental clutter—an overcrowded inbox increases cognitive load, making it challenging to prioritize your tasks efficiently.
Table of Contents
The Quick Guide to Blocking Senders in Outlook
Step 1: Navigating to the Right Menu
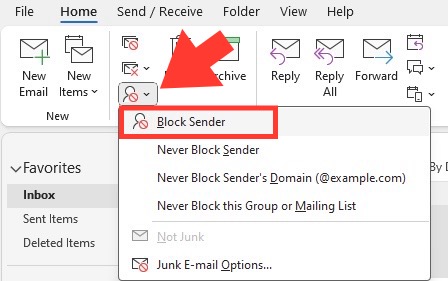
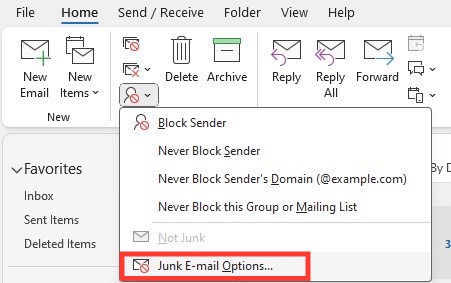
To start your journey towards a cleaner inbox, you’ll need to navigate to the right menu in Outlook. If you’re working on your desktop, go to the top right corner of the Home tab and click on the Block Sender icon.
Step 2: Choosing the Sender or Domain to Block
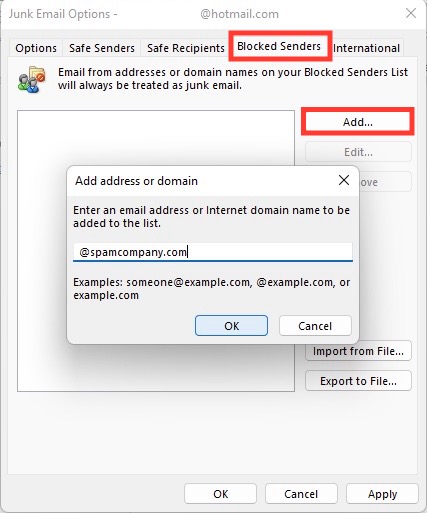
With access to the settings, you’re ready to pinpoint the nuisance senders. There are two key ways to block emails: by specific email addresses or entire domains. To block a specific address, once you’re in the “Blocked senders and domains” section, simply click ‘Add’ and enter the email address you wish to block. If you’re looking to block an entire domain, similar steps apply—just omit the specific user section of the email (e.g., @unwanteddomain.com). This ensures that all emails from that domain will no longer clutter your inbox. Remember to keep your focus on the right targets to prevent accidentally blocking important correspondents.
Step 3: Confirm Your Choice and Update Settings
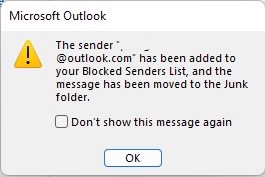
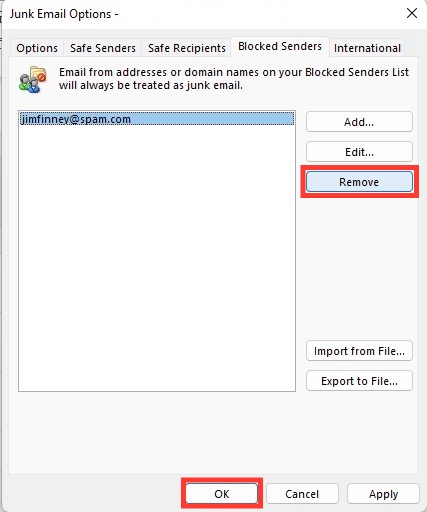
Now that you’ve chosen who to block, it’s crucial to confirm your decision. After adding an email ID or domain to the block list, Outlook will prompt you to confirm. Press “OK” to seal the deal. Confirming makes the changes take effect immediately, and the pesky sender will be shut out of your inbox for good. It’s like telling uninvited guests that they’re no longer welcome. Ensuring you’ve hit ‘OK’ translates your choice into action within Outlook, giving you one less thing to worry about.
Understanding What Happens After You Block a Sender
Do Blocked Senders Know They’re Blocked?
Rest easy knowing that when you block someone in Outlook, they won’t receive a flashing sign that they’ve been blocked. Your privacy is respected, and the sender is kept in the dark. However, if they’re particularly observant, they might notice that you’re not replying to their emails, which could lead them to guess they’ve been blocked. Should they attempt to outmaneuver your block by changing email addresses, you may need to consider further steps to secure your inbox tranquility.
How Blocking Affects Your Inbox and Peace of Mind
Taking the step to block unwanted senders can significantly declutter your Outlook inbox, ensuring that only emails of real importance reach you. This simple act filters out the noise and reduces your exposure to potential cyber threats. But the impact isn’t just digital; it’s psychological too. Less clutter means more clarity and less stress. You’ll spend less time sifting through junk and more time focusing on what’s truly important, both personally and professionally. It’s a small change in your digital routine that fosters a calmer, more organized virtual space.
Other Effective Ways to Combat Unwanted Contacts
Clean Up Your Inbox with Email Rules
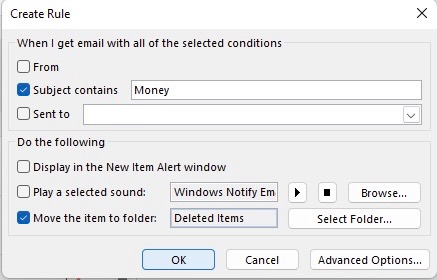
Email rules are Outlook’s secret weapon against inbox chaos. They allow you to customize how Outlook manages incoming messages based on your predefined conditions. For instance, you can set rules that automatically transfer emails from a specific sender to a designated folder, mark them as read, or even delete them altogether.
Here’s a quick guide to setting up an email rule:
STEP 1: Go to the “Home” tab.
STEP 2: Click on “Rules” in the “Move” group.
STEP 3: Choose “Manage Rules & Alerts” from the dropdown.
STEP 4: In the dialog box, click “Create Rule.”
STEP 5: Follow the prompts to specify conditions, actions, and exceptions.
By using rules, you ensure that essential emails are highlighted and the inconsequential ones are out of sight—helping you to maintain not only a tidier inbox but also a sharper focus.
Utilize the “Report Junk” Feature for Phishing Attempts
If you encounter a suspicious email that screams ‘phishing attempt,’ Outlook’s “Report Junk” feature is at your service. Reporting these nefarious messages aids Microsoft in tightening their net against spammers and cybercriminals. Here’s a quick way to utilize this feature:
On Desktop:
STEP 1: Select the questionable email.
STEP 2: Click on the “Report Phishing” button in the ribbon.
STEP 3: Confirm your action to move the email to the Junk folder.
If you do not have the “Report Phishing” button in your Outlook ribbon, here’s how to easily install this handy feature:
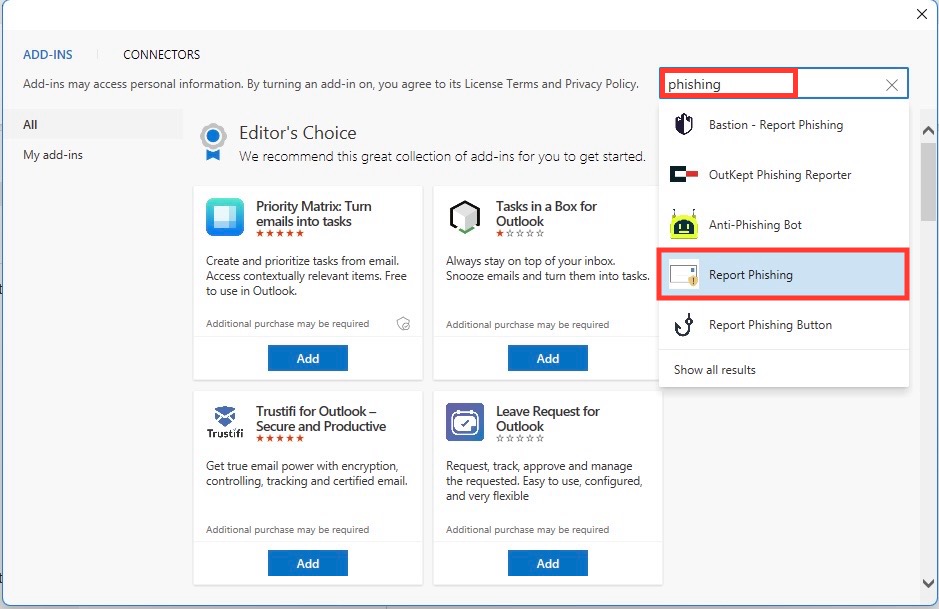
STEP 1: Click on the “All Apps” button in the ribbon. Then, “Get Add-ins”.
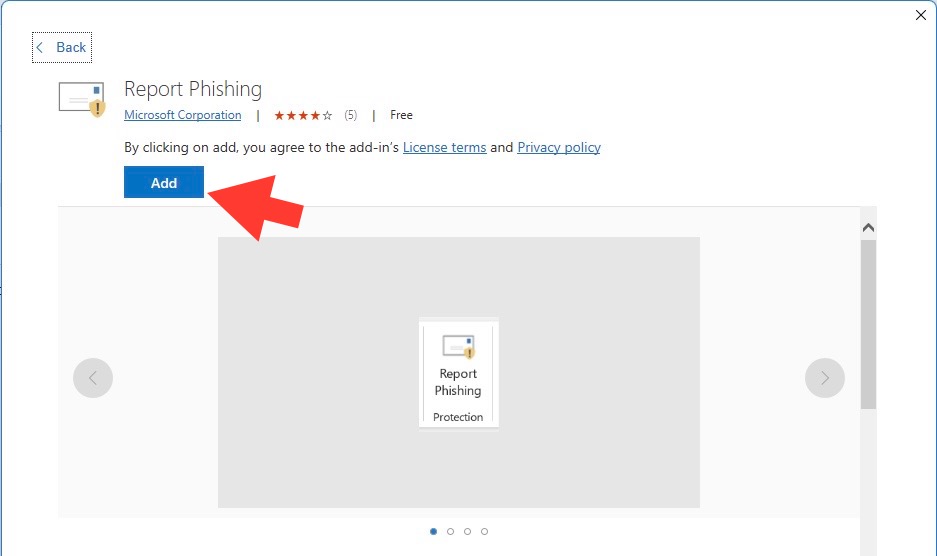
STEP 2: Search for the word “Phishing” and install the Report Phishing add-in:
Voila! You can now utilize the Report Phishing button.
The Mobile Experience: Blocking on the Go
Steps to Block an Email Address in Outlook on Mobile Devices
Blocking an unwanted email sender via Outlook on your mobile device is a breeze and can be done anywhere. Here’s what you need to do:
STEP 1: Open the Outlook app on your smartphone.
STEP 2: Head to your Inbox and tap the email from the sender you want to block.
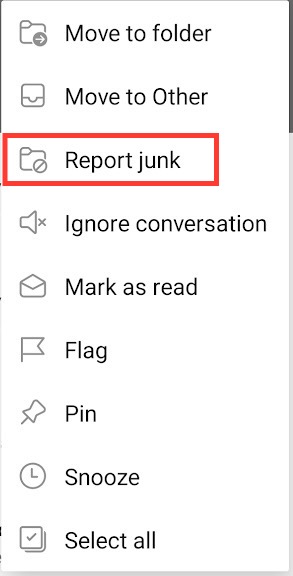
STEP 3: Tap the three vertical dots in the top right corner of the screen.
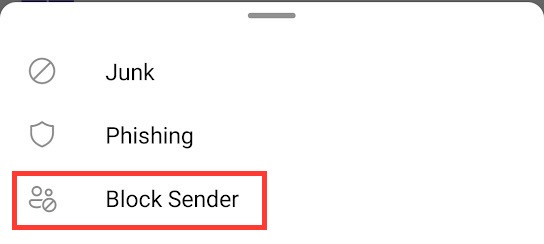
STEP 4: Choose “Report Junk” and then opt for “Block Sender.”
STEP 5: Confirm by tapping “Block Sender” again in the dialogue box that appears.
With these swift moves, that sender will no longer interrupt your mobile email experience. Remember, if second thoughts arise, you can always reverse the block later on.
Maintain Email Health from Anywhere
Mastering the art of blocking on mobile is just the beginning of maintaining the health of your inbox wherever you go. Regularly auditing your inbox to unsubscribe from unneeded subscriptions and using valuable features like ‘Focused Inbox’ can keep important emails front and center. Make a habit of cleaning out your Junk and Deleted folders to ensure they don’t consume unnecessary space. By adopting these habits, you’ll enjoy a more organized, distraction-free mobile email experience, contributing to elevated productivity and a calmer state of mind, even when you’re on the move.
Reconsidering Your Decisions – How to Unblock Senders
When to Give Second Chances: Managing Your Blocked Sender’s List
Occasionally, you might want to revisit your Blocked Senders list. Maybe a misunderstanding led to a hasty block, or a previously unreliable source has become relevant. It’s healthy digital etiquette to periodically audit your block list for any senders who might deserve re-entry into your communications circle. To reconsider a block, weigh if the sender’s content has become useful or if improved email practices on their end now align with your inbox standards. Empathy and evolving circumstances often make for a persuasive case to extend a digital olive branch.
Step-by-Step: Unblocking Contacts in Outlook
If you decide to unblock a sender in Outlook, it’s a straightforward process. Follow these steps to let previously blocked contacts back into your inbox:
For Outlook for Mac:
STEP 1: Go to the ‘Home’ tab.
STEP 2: Click ‘Junk’, then ‘Junk E-mail Options’.
STEP 3: Under the ‘Blocked Senders’ tab, select the contact you want to unblock.
STEP 4: Press ‘Remove’, click ‘Apply’, and then ‘OK’.
With these simple steps, the contact will be able to reach your inbox again, restoring communication lines you deem necessary.
Advanced Tips for Organizing Your Outlook Inbox
Setting The Scene for a Clutter-Free Email Experience
Take control of your digital correspondence by setting the stage for a clutter-free email experience. Outlook has numerous customization options that can help you maintain a clean, organized inbox. Begin by configuring your spam filters to a level that suits your email traffic. Use the “Focused Inbox” feature to separate crucial emails from less important ones during your busy hours. Remember to regularly clear out your Junk Email folder to prevent overload, and don’t forget the power of creating specific folders for projects or topics – this makes retrieval easier and your main inbox less daunting.
Strategies Beyond Blocking: Filters, Archives, and Categories
Beyond simply blocking unwanted emails, Outlook offers a suite of strategies to enhance inbox organization and efficiency.
Filters: Create custom filters to automatically redirect incoming emails based on subject, sender, or keyword to designated folders.
Archives: Utilize the Archive feature to store old but important emails out of the main inbox view, keeping your inbox clutter-free while preserving vital correspondence.
Categories: Assign color-coded categories to your emails to quickly identify and group related messages. This visual cue can help you spot high-priority emails at a glance.
Incorporating these organizational tactics can transform the way you manage your inbox, leading to a cleaner, more efficient email environment.
FAQs: Getting to Grips with Blocking in Outlook
Can I Block Entire Organizations, Not Just Individual Senders?
Yes, you can block entire organizations in Outlook by blocking the domain of the organization’s email addresses. This means any email sent from that domain will be directed to your Junk Email folder, not just from a single sender.
Why are Blocked Emails Still Showing in My Inbox?
Blocked emails might still show up if the sender is using a different email address or domain than the one you blocked, or if Outlook’s settings need refreshing. Ensure you’ve accurately blocked the correct sender and consider setting stricter email rules.
Is It Possible to Block Emails Based on Country Codes?
Yes, Outlook allows you to block emails based on country codes by utilizing the Junk Email Options to filter out messages by specific top-level domains associated with certain countries or regions.
How Can I Use Third-Party Apps for Blocking and Cleaning?
Third-party apps like Clean Email or Leave Me Alone offer robust tools for blocking, cleaning, and organizing your inbox. They simplify managing large volumes of emails with easy unsubscribe features, automation, and domain blocking capabilities. To use these services, you would typically need to sign up, grant access to your email, and then utilize their intuitive interfaces to manage your inbox according to your needs.
John Michaloudis is a former accountant and finance analyst at General Electric, a Microsoft MVP since 2020, an Amazon #1 bestselling author of 4 Microsoft Excel books and teacher of Microsoft Excel & Office over at his flagship Academy Online Course.
