Learn about Excel with our Free Microsoft Excel Online Course!
Key Takeaways
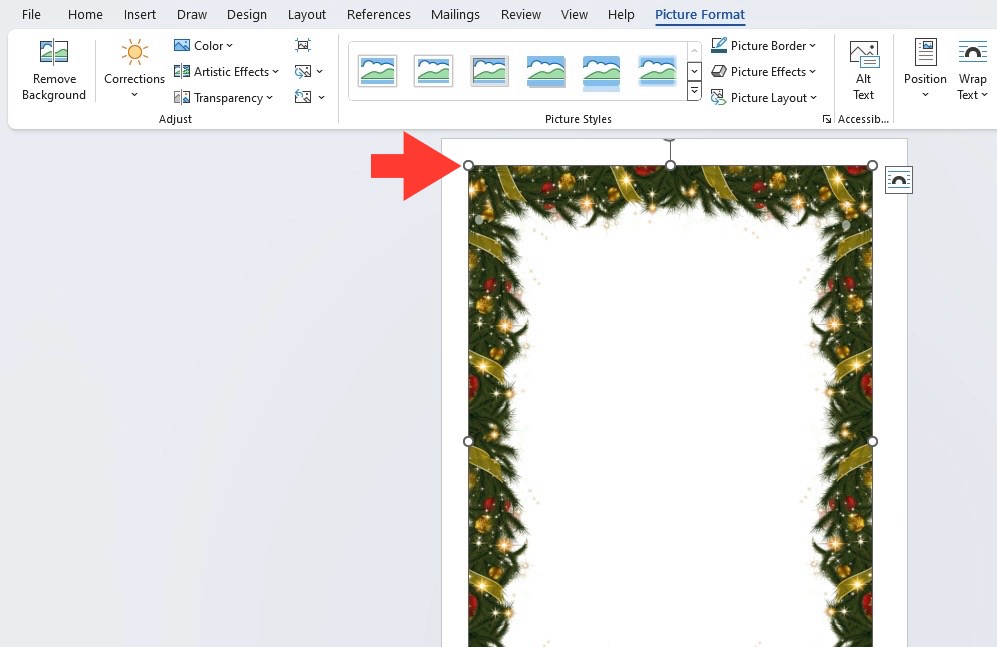
- To add Christmas borders in Microsoft Word, one can start by selecting a free Christmas clip art border from an online search, ensuring it is free to use, and then copying and pasting it directly into the Word document. The border should then be resized to fit the page.
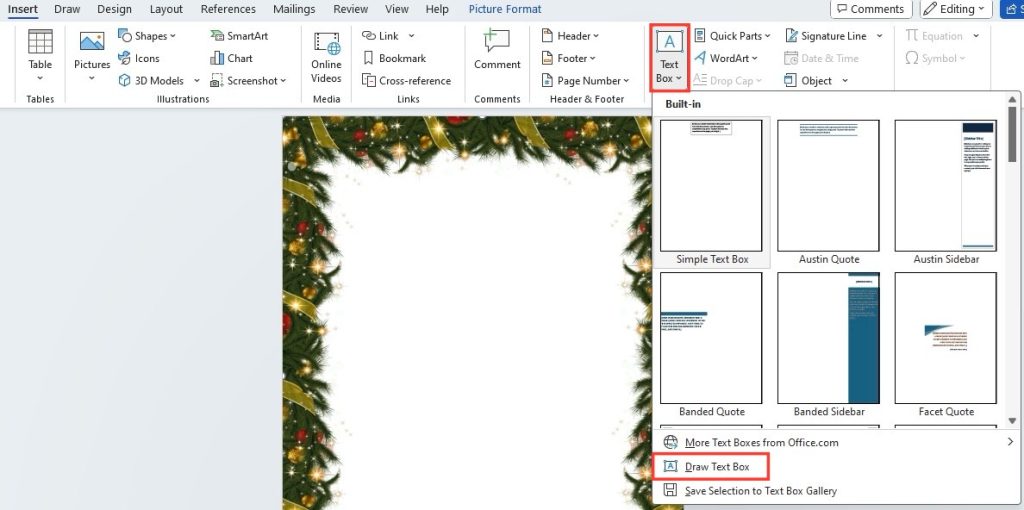
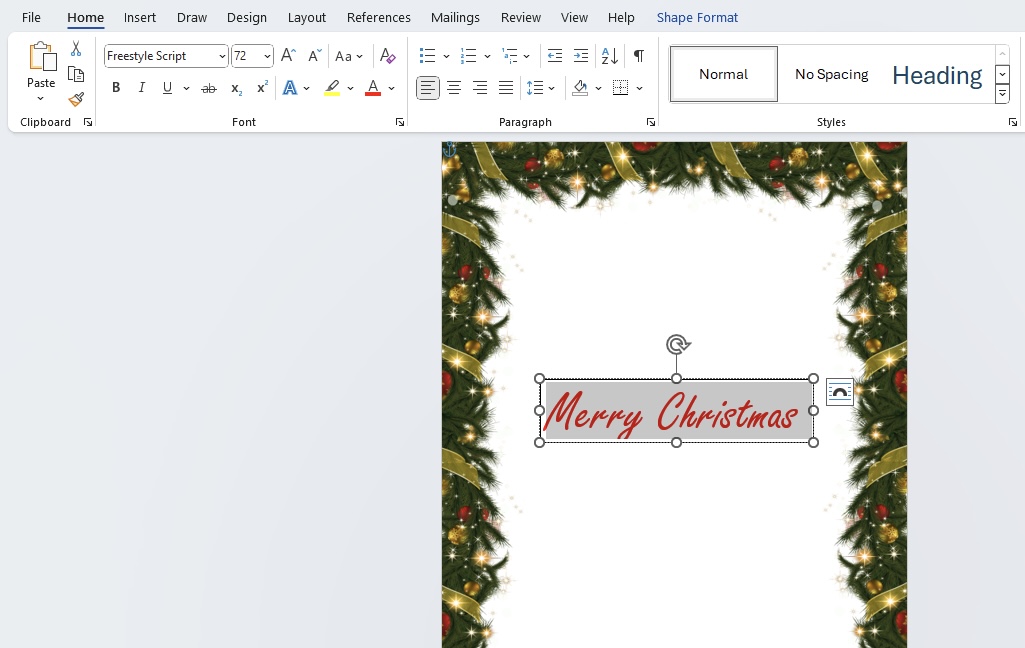
- Users should insert a text box to begin writing their letter or document content. Customization can be enhanced by experimenting with different fonts, sizes, and colors to complement the festive theme of the Christmas border.
- For those preferring a more automated approach, users can utilize ready-made Christmas border templates available online. These can be found on various websites and typically come with customization options to add text and images directly through the template interface or by using the certificate maker features provided.
Why Quick Border Customization Matters
In today’s fast-paced world, quick customization is key in adding a festive touch to your documents without compromising on efficiency. Whether it’s a business or personal project, a unique border can distinguish your communication and make it more engaging. During the holiday season, injecting Christmas spirit into your documents can positively impact client relationships, employee morale, and personal connections. It shows attention to detail and a dedication to celebrating with those who interact with your documents.
Table of Contents
Step into the Winter Wonderland of MS Word
Christmas Borders: A Seasonal Twist to Standard Documents
Adding Christmas borders in Microsoft Word can turn ordinary documents into thematic messages that resonate with the holiday cheer. Think of these borders as the decorative wrapping paper of your digital communications. By choosing designs elaborated with snowflakes, holly leaves, or jolly Santas, you instantly infuse seasonal charm into invoices, memos, or event notices. It’s a visual cue that your or your organization are embracing the spirit of the season, spreading goodwill and joy with each piece of correspondence.
Navigating Microsoft Word: Tools You’ll Need
Before decking out your documents with holiday flair, it’s important to familiarize yourself with the Microsoft Word interface, especially the tools for modifying page layout and design. Look for the ‘Design’ tab – this is where you can find the ‘Page Borders’ button. Here, you have a collection of options to add, adjust, and style borders. Moreover, the ‘Insert’ tab is another treasure chest where you can add images or clip art to further enhance the festive appeal. Ensure you’re also comfortable with utilizing text boxes through the ‘Insert’ menu, allowing for the addition of personalized messages amidst your chosen borders.
Gift-Wrap Your Text in Minutes
Choosing the Ideal Christmas Border
Selecting the perfect Christmas border for your document can depend on a few critical factors. Consider the audience and the purpose of your document. Professional and business-oriented documents might do well with more subtle borders featuring light snowflakes or elegant holly designs. For more personal or playful projects, you can opt for vibrant Christmas themes with Santa, reindeer, or even fun arctic wildlife donning festive attire.
Furthermore, take into account the amount of white space you’ll need within your template. Borders with more intricate designs require careful placement of text and images to ensure readability. Consider downloading high-resolution border images or using a free online border frame maker to create personalized templates with just a few clicks, adding that perfect festive edge tailored to your needs.
A Simple Guide to Applying Borders in MS Word
To surround your document with festive vibes, here’s a straightforward guide to embellishing your files with Christmas borders using Microsoft Word:
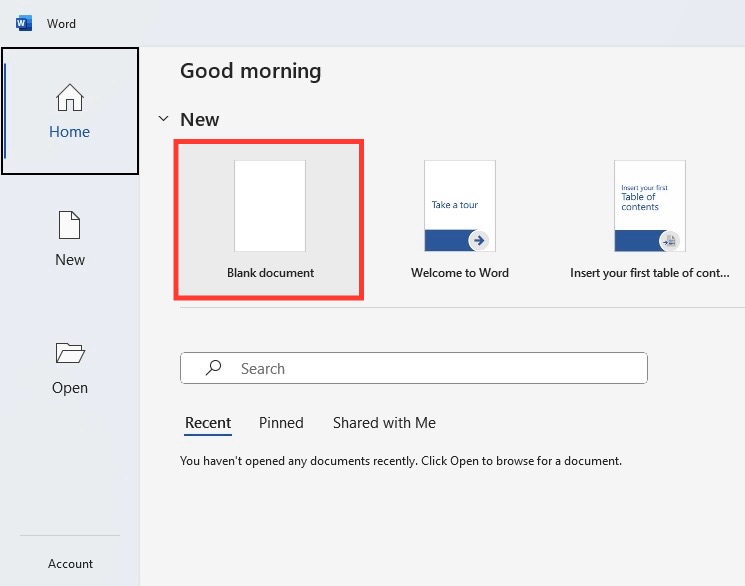
STEP 1: Start a New Document: Open Microsoft Word and choose to create a new document.
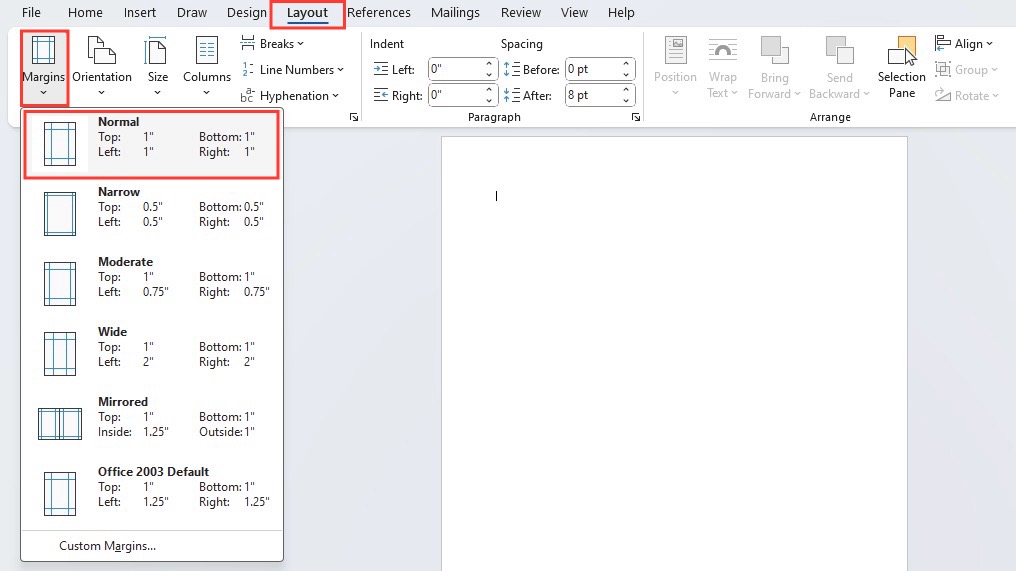
STEP 2: Design and Layout: Under the ‘Layout’ or ‘Page Layout’ tab, you can set your margins to ensure your text doesn’t clash with the border. Consider a one-inch margin for a balanced look.
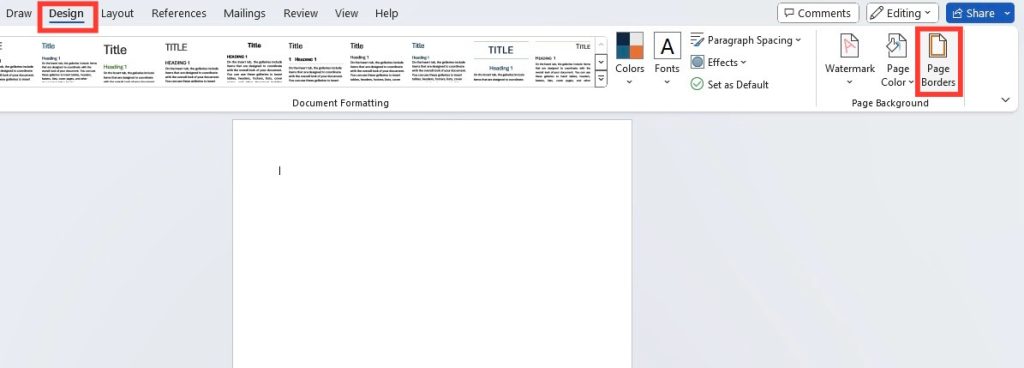
STEP 3: Access Page Borders: Click on the ‘Design’ tab and find the ‘Page Borders’ option. Here, you’ll have a choice of styles, colors, widths, and even art to create your Christmas border.
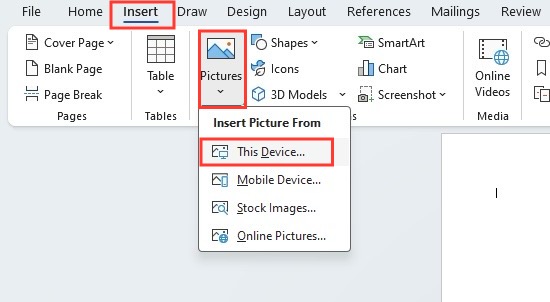
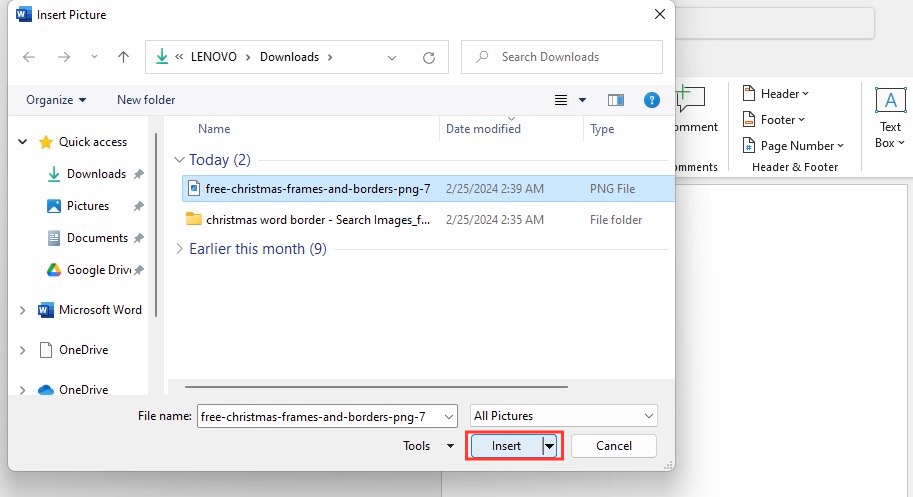
STEP 4: Insert Clip Art or Images: If the built-in options don’t suit your festive needs, go to the ‘Insert’ tab, select ‘Pictures’ to add your downloaded Christmas clip art or image.
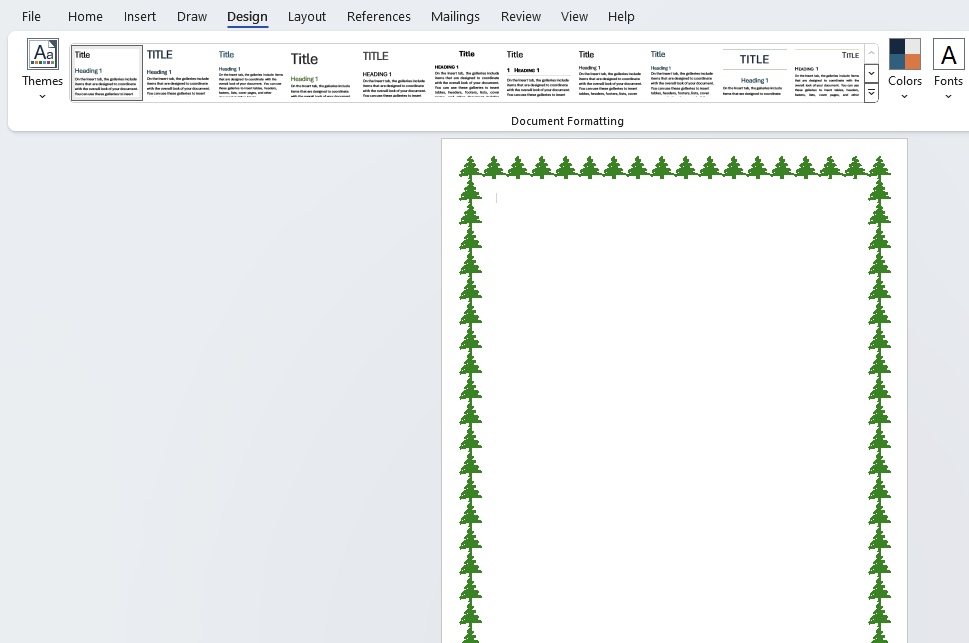
STEP 5: Customize Your Border: After inserting your chosen image, you can copy and paste it into position around the page to create a border. Resize each image as needed for uniformity.
STEP 6: Finalize Positioning: Ensure your images are aligned correctly to create a continuous border effect. You may want to use the ‘Align’ tools under the ‘Format’ tab to help with this.
STEP 7: Additional Text Boxes: Add text boxes within the border for your content. You can personalize the text font and color to match the Christmas theme.
With these steps, you’ve just harnessed the power of Microsoft Word to create a joyful enclosure for your holiday communications!
Customization at the Tip of Your Iceberg
Adding a Personal Touch with Custom Artwork
Crafting documents with a custom Christmas border adds a personal touch that cannot be duplicated with standard designs. Use the following tips to integrate custom artwork into your festive borders:
- Source Custom Designs: Look for unique artwork from local artists or design platforms. Many artists may offer holiday-themed designs that can be downloaded and used.
- Use Built-In Tools: In Microsoft Word, you can customize borders using the ‘Page Borders’ and ‘Borders and Shading’ dialogue boxes. Here, you have the option to import an image file to use as a custom border.
- Incorporate Family Photos: Add a very personal touch by using family or company photos. You can place these strategically in the corners or as a running theme in your border design.
- Add Symbols and Shapes: Microsoft Word also allows adding shapes and symbols which you can fashion into unique festive patterns. Play with star shapes, bells, or candy canes to reinforce the Christmas feel.
- Use Text Effects: With ‘WordArt’ or customized text boxes, you can add festive phrases or greetings that complement your custom artwork border.
- Consider Using Apps: If doing this within Word is too restrictive, apps like Clipchamp or online platforms provide more flexible design interfaces, allowing you to create and then import your bespoke border into Word.
Remember to test print your document to check how your custom artwork looks in physical form, ensuring that it adds to the document rather than detracting from it due to any layout issues.
Tweaking Color Schemes and Styles for a Unique Edge
Adding a personal touch to your Christmas document borders with unique color schemes and styles can give your content an unforgettable flair. Here’s how to do it in Microsoft Word:
- Choose Complementary Colors: Start by selecting a festive color palette. Traditional reds and greens are popular, but don’t be afraid to experiment with icy blues and silvers or warm golds and creams.
- Adjust Border Styles: In the ‘Page Borders’ settings, you can modify the style of the border line. Choose from a variety of line styles that complement your document’s theme, such as dashed, dotted, or wavy lines.
- Shading and Patterns: Add shading or fill patterns to your page borders to create texture and depth. This can be particularly effective for adding a cozy or wintery atmosphere to your document.
- Apply Artistic Effects: Use the artistic effects tool to transform pictures used in the borders into illustrations. This provides a more cohesive look for your document as it helps to merge text and imagery.
- Create a Style Template: Once you’ve perfected your border style, save the format settings as a custom template. This allows for consistent branding on all your holiday documents.
- Contrast with Background: If you’re adding a colorful border, keep the document background simple to ensure readability. Conversely, a neutral or simple border allows for a more vibrant background.
By getting creative with color schemes and styles, you can convey a sense of warmth and festivity, making your documents not only a pleasure to read but also a joy to create.
Overcome Common Snowfalls
Solving Format Frustrations When Using Borders
Encountering formatting issues is a common frostbite when dealing with document borders, but these challenges can be smoothly resolved:
- Border Cutoffs: If your border is being cut off when printing, adjust your document margins. Go to ‘Layout’ > ‘Margins’ > ‘Custom Margins’ and make sure there’s enough space for the full border to print.
- Text Overlap: Should your text overlap with your border, insert a text box and position it where you want your content. This keeps your text within the safe margins while preserving the border design.
- Border Inconsistency: Inconsistent borders across pages are often due to section breaks or different margin settings. Ensure that each section has the same page layout configurations for consistency.
- Image Quality: Utilize high-resolution images for your borders. Low-resolution images may pixelate, especially when stretched to fit the page. Aim for at least 300dpi for printing purposes.
- Compatibility Across Devices: Borders may appear differently on various computers or Word versions. To maintain consistency, consider saving your final document as a PDF.
By staying vigilant and understanding the layout tools in Microsoft Word, any format frustrations with borders can be skillfully navigated like a sled through fresh snow.
Avoiding the Grinch of Printer Issues
When printing documents adorned with Christmas borders, the last thing you need is a run-in with printer issues. To sidestep these Scrooge-like snafus, follow these tips:
- Check Printer Settings: Ensure your printer settings match the document’s layout. Select ‘Print Background Colors and Images’ in the ‘Options’ settings if your border includes such elements.
- Preview Before Printing: Use the print preview feature to spot any issues before committing to paper. This can save you both time and resources.
- Paper Quality: Use the right type of paper for your document. Heavier cardstock or glossy paper can give a more professional feel to cards or invitations but do ensure your printer can handle this kind of paper.
- Test Print: Run a test print with a single page to check the border and overall layout. Make adjustments if necessary before printing the entire batch.
- Printer Margins: Remember that most printers have non-printable margins. If your border is too close to the edge, consider resizing or repositioning it within Word’s page setup.
By employing these measures, you can confidently print your yuletide missives, secure in the knowledge that printer gremlins won’t dampen your holiday cheer.
Tips and Tricks
Here are some additional tips and tricks to elevate your Christmas-border documents:
1. Layer Multiple Borders: For a more complex design, layer thinner borders on top of each other. This can add depth and intrigue to the document’s perimeter.
2. Use Transparent Images: When using images as part of your border, opt for those with transparent backgrounds. These blend seamlessly into the document, avoiding unsightly white boxes.
3. Save as PDF: To preserve the integrity of your document’s design across different devices and printers, save the final version as a PDF.
4. Utilize Header and Footer Space: If you’re struggling with fitting a border, consider placing border elements in the header and footer sections where they are less likely to interfere with the body text.
5. Add a Watermark: For a more subdued effect, a festively themed watermark can complement the border without overwhelming the content.
6. Keep Accessibility in Mind: Use color and design thoughtfully to ensure that your document is accessible to those with visual impairments.
By keeping these tips in mind, your documents are sure to exude the essence of Christmas in a professional, charming, and delightful manner.
FAQs: Deck the Halls with Knowledge
Can I use any image as a border in Microsoft Word?
Yes, you can use almost any image as a border in Microsoft Word. However, there are a few things to keep in mind to ensure the best outcome:
- Image Format: The image should be in a compatible format that Word can handle, such as PNG, JPG, or GIF. PNG is often preferred for its ability to handle transparency.
- Resolution: High-resolution images work best, especially for printing, to avoid pixelation.
- Aspect Ratio: Consider the shape of your document and choose an image that can be sized appropriately without distortion.
- Repetition and Tiling: If you’re using a small image to be repeated around the page as a border, ensure that it tiles well (i.e., it repeats without noticeable gaps or misalignments).
- Transparency: Images with transparent backgrounds are more versatile as they can overlay on the document without obscuring the content.
- Licensing: Ensure you have the right to use the image, especially for commercial purposes. Use royalty-free or properly licensed images to avoid copyright infringement.
With these points in mind, you can choose images that enhance your document’s aesthetic while maintaining its professionalism and readability.
How do I size my borders appropriately for different document types?
Sizing borders appropriately for various document types is crucial for maintaining a professional and visually appealing layout. Follow these guidelines:
- Understand Document Dimensions: Define the dimensions of your document type (A4, letter size, etc.). This will determine the available space for borders.
- Adjust Margins: Modify the document’s margins to create space for the border. In Microsoft Word, you can do this by going to ‘Layout’ > ‘Margins’ and selecting or creating custom margins.
- Use Scale and Position Tools: In the ‘Format’ tab, use the ‘Scale’ and ‘Position’ features to adjust the size and placement of images used in borders.
- Keep Consistency: For professional documents like letterheads or certificates, borders should be consistent in width and style. Aim for subtlety—thin, unobtrusive borders often work best.
- Accommodate for Content: The border should frame the content without encroaching upon it. Always leave ample white space for text and images within.
- Utilize Print Preview: Before finalizing, use ‘Print Preview’ to check the border’s size and adjust it if necessary.
- Test Print: Do a test print on the paper size you plan to use. Sometimes borders that look right on-screen may not print as expected.
By tailoring your borders to fit the specific requirements of different document types, you’ll ensure that they complement rather than crowd your content.
What are some creative ways to utilize Christmas borders in professional documents?
Integrating Christmas borders into professional documents can infuse a sense of seasonal cheer while still maintaining a level of professionalism. Here are some creative approaches:
- Branded Holiday Messages: Use subtle Christmas borders on company correspondence during the holiday season to reflect the festive spirit. Choose designs that align with your brand’s colors and aesthetic.
- Event Invitations: Spruce up invitations to corporate holiday events with elegant Christmas borders, creating a sense of excitement and celebration.
- End-of-Year Newsletters: Incorporate festive borders into end-of-year newsletters that recap the year’s achievements and provide updates, giving it a cheerful look as you connect with clients or employees.
- Gift Certificates or Coupons: Add a Christmas border to gift certificates or promotional coupons to make them stand out as special holiday offers.
- Email Signatures: Attach a small, festive border or graphic to the bottom of your professional email signature during the holiday season.
- Certificates of Appreciation: Show your gratitude to employees, volunteers, or partners with certificates that feature tasteful holiday-themed borders.
- Holiday Sales Proposals: Integrate Christmas borders to highlight sections or offers in sales proposals, making them more noticeable and seasonally appropriate.
By thoughtfully incorporating Christmas borders into professional documents, you create a warm, festive atmosphere that aligns with the spirit of the season without compromising on professionalism.
Are there any free resources for finding high-quality Christmas borders?
Yes, there are multiple online resources where you can find high-quality Christmas borders for free. Here are several options where you can start your search:
- Public Domain Archives: Websites like Pixabay or Pexels offer images and illustrations that are free for personal and commercial use without attribution.
- Educational and Craft Sites: Online platforms dedicated to teachers and crafts often have a selection of free borders which can be used for various projects. For example, Teacher Planet and Classroom Doodles provide themed educational resources.
- DIY Design Websites: Canva and Fotor offer free design elements, including Christmas borders, which can be used to create custom documents online.
- Vector Graphic Sites: Websites like Vecteezy or FreePik have extensive libraries of vector graphics and illustrations, including festive borders that are free with attribution.
- Template Libraries: Microsoft Office’s own template library frequently includes seasonal designs that can be used directly in Word.
- Graphic Design Communities: Platforms like DeviantArt may have artists who offer free Christmas-themed artwork, including borders, although it’s important to respect the creator’s terms of use.
When using free resources, always check the licensing agreements to ensure you comply with any attribution or usage restrictions. Additionally, make sure you download the highest resolution available to ensure print quality.
Remember, while some borders are available for free with a watermark or certain restrictions, you might also encounter the option to pay a small fee for a premium version without a watermark and with additional file types like AI or EPS vectors for greater design flexibility.
John Michaloudis is a former accountant and finance analyst at General Electric, a Microsoft MVP since 2020, an Amazon #1 bestselling author of 4 Microsoft Excel books and teacher of Microsoft Excel & Office over at his flagship Academy Online Course.
