This article provides a brief guide on converting years to days in Microsoft Excel, a tool essential for anyone needing to handle time-based data precisely. It introduces the concept of Excel treating dates and times as serial numbers, which forms the foundation for calculating durations and differences effectively. By converting all time measurements to days, users can simplify analyses, improve clarity in data interpretation, and enhance decision-making processes.
Key Takeaways
- Excel treats dates as serial numbers from January 1, 1900, essential for time calculations.
- Converting years and months to days aids uniform analysis in project management and finance.
- The DATE function creates date serials; DATEDIF calculates time differences in years, months, or days.
- Dynamic DATE formulas with TODAY or NOW keep data current, vital for ongoing projects and analysis.
- Correcting date format errors and optimizing with Excel functions boosts productivity and accuracy.
Table of Contents
Understanding Time Conversion in Excel
The Basics of Date and Time in Excel
In Excel, dates and times are not just mere strings of text but rather a complex system of serial numbers where each integer represents a specific day in history, starting from January 1, 1900. This system enables Excel to perform calculations on dates just as easily as it would with numbers. Understanding this concept is key to manipulating dates and times effectively in your spreadsheets.
Why Convert Years and Months to Days?
Converting years and months to days in Excel can be highly beneficial for various reasons. It simplifies tracking and comparing timeframes, allows for precise duration calculations in project management, and can aid in financial analyses where daily interest or accruals are considered. By reducing all time units to the common denominator of days, you gain uniformity that makes data interpretation clearer and decision-making more informed.
Years to Days Conversion
Using the DATE Function for Precision
The DATE function in Excel is your go-to tool when you need precision in handling dates, including converting years and months to days. It combines individual year, month, and day components to create a date serial number, which Excel recognizes and can be formatted as a date. For example, to represent the 28th of April, 2015, you’d use =DATE(2015, 4, 28). This function is particularly useful when you know the exact date components and want to ensure that Excel interprets them correctly as a date.
The DATEDIF Function Explained
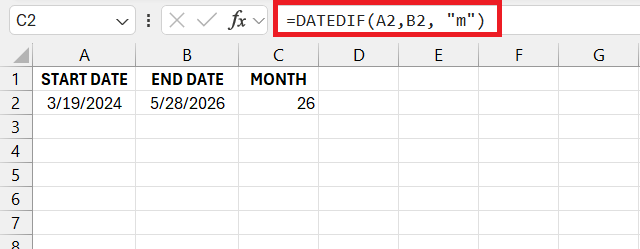
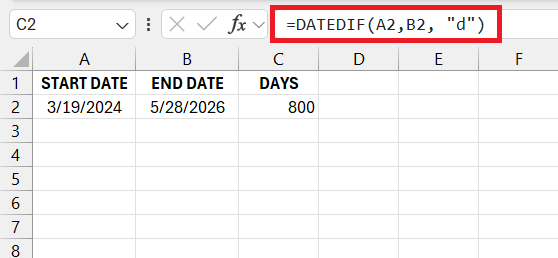
The DATEDIF function in Excel may be less known, but it’s extremely powerful, designed specifically for calculating the difference between two dates. Whether you need the result in years, months, or days, DATEDIF can handle it with the appropriate unit argument:
=DATEDIF(start_date, end_date, "y")calculates the number of complete years.
=DATEDIF(start_date, end_date, "m")gives you the remaining months after complete years.
=DATEDIF(start_date, end_date, "d")returns the days left after complete months.
Remember, Excel doesn’t offer in-ribbon help for DATEDIF, so double-check your arguments.
Dynamic DATE Formula Usage
In Excel, the real power of the DATE function unfolds when you use it dynamically with other functions like TODAY or NOW. This approach keeps your data up-to-date by automatically considering the current date:
- You can use
=DATE(YEAR(TODAY()), MONTH(TODAY()), DAY(TODAY()))or simply input=TODAY()to create a date serial that always reflects today’s date.
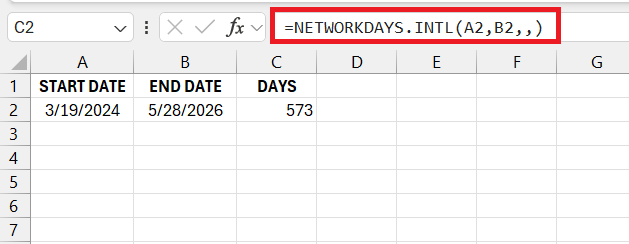
- Combine DATE with DAYS or NETWORKDAYS.INTL to compute spans of time for scheduling or timelines by using a dynamic start or end date.
Dynamic usage of the DATE function helps keep project timelines, deadlines, and age calculations current without the need for manual updates.
Practical Examples and Tips
Case Study: Project Deadline Calculations
Let’s delve into a case study where Excel’s date functions shine—calculating project deadlines. Imagine managing a project with various tasks, each with a different duration.
STEP 1: You’d start by listing each task with its start date and duration in months or years.
STEP 2: Using the EDATE function, =EDATE(start_date, months), you could calculate the end date for each task.
This scenario reveals how Excel helps you plan efficiently by converting years and months into days, thus ensuring on-time project delivery.
Troubleshooting Common Errors
Dealing with Invalid Date Formats
Invalid date formats can cause headaches when you’re trying to sort, filter, or perform calculations on dates in Excel. If you encounter a situation where Excel can’t recognize your dates, follow these steps to troubleshoot:
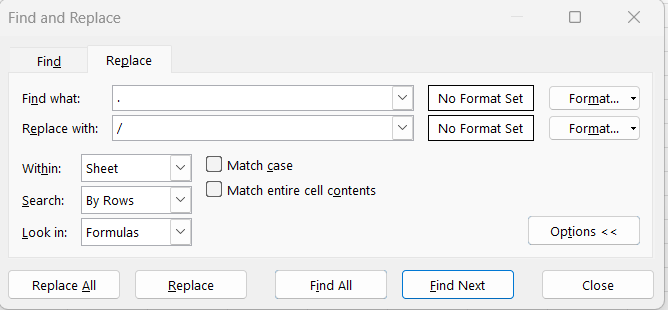
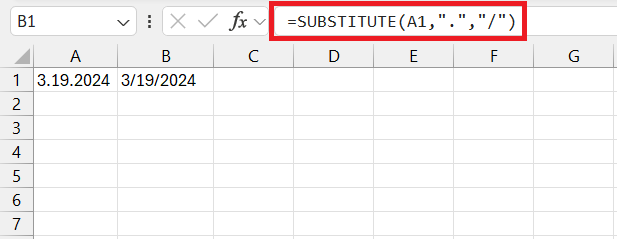
- Find and Replace Tool: Use Excel’s Find and Replace (Ctrl+H) to swap out unconventional delimiters like dots for slashes, which Excel understands.
- SUBSTITUTE Function: For a formula-based solution, try
=SUBSTITUTE(A1, ".", "/"), replacingA1with your date cell and"."with your current delimiter.
- Changing Excel’s Date Recognition Settings: Check that Excel is set to recognize dates in your local format through the Advanced setting
Addressing these format issues will help Excel read and process dates correctly, allowing your data to behave as intended.
Optimizing Your Excel Workflow
Streamlining Data Conversion Processes
Streamlining data conversion processes in Excel not only saves time but also reduces the chances for human errors. To achieve seamless conversion of years or months to days:
- Utilize Cell Formatting: Set the format of cells to Date in advance. This ensures consistency and lets Excel recognize inputs as date values immediately.
- Apply Functions to Multiple Cells: Leverage the Fill Handle or the
=ARRAYFORMULAto apply a function across a range of cells, allowing for bulk calculations with minimal effort. - Create Custom Macros: For repetitive tasks, consider developing a macro that automates the conversion process, reducing it to a button click or a keyboard shortcut.
These techniques paint a picture of efficiency and precision, acutely fine-tuning your workflow in Excel.
Leveraging Excel Functions for Efficiency
Efficiency in Excel often comes from knowing and leveraging its built-in functions. They save you from manual calculations and ensure greater accuracy. Key functions for time unit conversions include:
- EDATE: quickly shifts a date by a certain number of months, perfect for adding or subtracting whole months.
- DAYS: provides the number of days between two dates outright.
- YEARFRAC: calculates the fraction of the year represented by the number of whole days between two dates.
Mastering these functions allows you to tackle complex time-based calculations and analysis with confidence.
FAQs on Converting Time Units in Excel
How to Avoid Mistakes When Converting Years to Days?
To avoid mistakes when converting years to days in Excel, ensure you use the correct number of days per year (365 or 366 for leap years), apply formulas consistently, and double-check your calculations. It’s also wise to use Excel functions like DATE and DAYS, which automatically account for leap years, thus reducing human error.
Can Excel Automatically Account for Leap Years?
Yes, Excel can automatically account for leap years when performing date calculations. Using functions like DATE and YEARFRAC considers whether a year is a leap year, adjusting the days in February as necessary to ensure accuracy in your data and analysis.
How do I convert a date from years to days in Excel?
To convert a date from years to days in Excel, use the formula =YEARFRAC(start_date, end_date) * 365, replacing start_date and end_date with your specific date references. This will give you the total number of days between the two dates, correctly accounting for leap years.
How do I calculate year days in Excel?
To calculate year days in Excel, you can use the formula =DATE(YEAR(A2),12,31)-A2 which subtracts a given date (in cell A2) from the last day of that year, providing the number of days remaining in the year.
How do you convert numbers to years and days in Excel?
In Excel, to convert a number representing days into years and days, divide the number by 365 and use the MOD function to find the remaining days. Use the formula =INT(A2/365) & " years, " & MOD(A2, 365) & " days" where A2 is the cell containing the number of days.
John Michaloudis is a former accountant and finance analyst at General Electric, a Microsoft MVP since 2020, an Amazon #1 bestselling author of 4 Microsoft Excel books and teacher of Microsoft Excel & Office over at his flagship Academy Online Course.


