The Best Guide to Crop Pictures in PowerPoint Perfectly
Why Mastering Crop Tools Enhances Your Presentation.
Cropping is more than just cutting out parts of an image; it's about framing your message and drawing the viewer's attention to the most important aspects of your slide.By mastering the crop tools offered by PowerPoint, you equip yourself with the ability to craft visual stories that captivate and inform your audience, enhancing the overall impact of your presentation.
Why Mastering Crop Tools Enhances Your Presentation
Cropping is more than just cutting out parts of an image; it’s about framing your message and drawing the viewer’s attention to the most important aspects of your slide. By mastering the crop tools offered by PowerPoint, you equip yourself with the ability to craft visual stories that captivate and inform your audience, enhancing the overall impact of your presentation.
Learn about Formulas with our 101 Advanced Excel Formulas and Functions Examples.
Key Takeaways
- To crop pictures in PowerPoint, select the image, then access the “Picture Format” tab and click on the “Crop” button to enable cropping mode, allowing you to adjust the black cropping handles to resize the portion of the image you wish to keep.
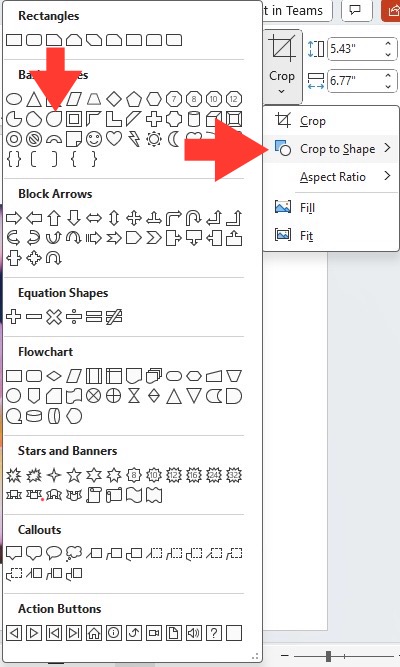
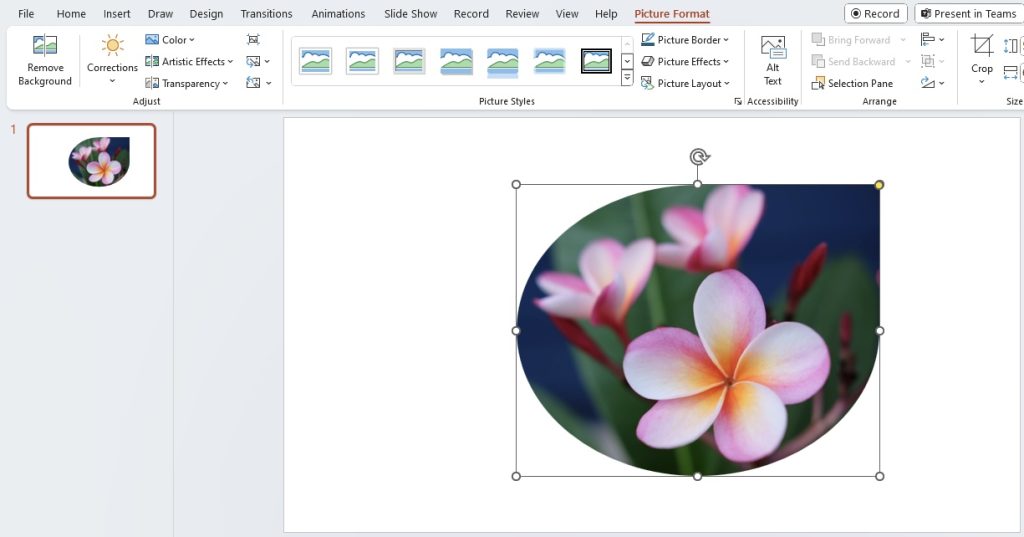
- To crop the image to a specific shape, select “Crop to Shape” from the dropdown menu after clicking “Crop,” and choose from a variety of available shapes to give your image a new outline, adjusting its fit and alignment on the slide as needed.
- After adjusting and cropping your image, click outside the image or press the Esc key to finalize the crop; if not satisfied with the result, the action can be reverted with CTRL+Z, allowing for recropping until the desired outcome is achieved.
Overview of PowerPoint’s Cropping Capabilities
PowerPoint isn’t just for slides packed with bullet points. It’s also equipped with a robust set of tools for editing images, including a powerful cropping feature. Whether you need to sheer off the edges or frame a subject precisely, PowerPoint’s cropping capabilities allow for quick resizing, aspect ratio locking, and even cropping to a variety of shapes and sizes. These functions are designed with ease of use in mind, ensuring that your images contribute to the narrative of your presentation without the need for external software.
Remember, a well-cropped image can keep your audience’s focus exactly where you want it! Make sure to explore all corners of PowerPoint’s cropping functionality to make your slides as impactful as possible.
Step-by-Step Guide to Precision Cropping
Utilizing the Crop Feature for Basic Edits
When it comes to basic image editing in PowerPoint, the Crop feature is your trusted sidekick. Here’s how to use it:
STEP 1: Select your image and the “Picture Format” tab will appear.
STEP 2: Click on the “Crop” button within this tab to activate cropping mode.
STEP 3: You will see black crop handles appear around the edge of your image. Click and drag these handles to adjust the crop area.
As you adjust, aim for a composition that supports your slide’s message. This might mean zooming in on a subject or excluding irrelevant background details. A pro tip is to use the gridlines that appear when dragging the handles for even more precise control.
Keep in mind that even the most straightforward edits can elevate your presentation from good to great, so don’t overlook the power of this basic cropping functionality.
Advanced Cropping Techniques
Cropping to Custom Shapes for Creative Impact
For those moments when a standard rectangle or square won’t do, PowerPoint allows you to get creative and crop your images into custom shapes. This is ideal for when you want to add a stroke of style or direct focus in a visually engaging way. Here’s how to do it:
STEP 1: Click on your chosen image, then navigate to the “Picture Format” tab.
STEP 2: From there, click on the “Crop” drop-down arrow and select “Crop to Shape.”
STEP 3: Choose from a wide array of shapes—ovals, circles, stars, arrows, and more.
STEP 4: After selecting a shape, you can adjust the positioning and scale by clicking and dragging the crop handles.
By adding this creative twist, your images can break free from conventional boundaries and become part of an expressive and dynamic design within your slides.
Remember to use these custom shapes judiciously; they are like spices that can enhance a dish when used in moderation but can overwhelm when overdone. The goal is always to complement your content, not distract from it.
Fine-Tuning Images with Aspect Ratio and Offset Adjustments
To achieve the precision you desire when cropping images in PowerPoint, you might need to make some advanced adjustments using aspect ratio and offset tools. Here’s how to fine-tune your images for a clean, professional look:
STEP 1: After selecting your image, click on the “Crop” tool in the “Picture Format” tab.
STEP 2: Choose “Aspect Ratio” from the dropdown list, then select either the standard 4:3 or widescreen 16:9 ratios for presentations, or another option that suits your needs.
STEP 3: Resize and adjust your image within the crop frame as needed by dragging the edges.
STEP 4: If your image doesn’t sit correctly within the cropped area, you can offset it. Right-click the image, choose “Format Picture,” and then click the “Picture” icon.
STEP 5: Adjust the “Offset X” for horizontal shifts and “Offset Y” for vertical ones, to position the image where you want it within the frame.
These adjustments ensure every image not only fits perfectly in your slides but also aligns with the professional and engaging aesthetic needed for a standout PowerPoint presentation.
Keep in mind that using aspect ratios correctly can help unify the look and feel of your slide deck by maintaining consistent dimensions across all images, so your audience experiences a cohesive visual flow from start to finish.
Overcoming Common Cropping Challenges
How to Resolve Issues When Cropping Gets Tricky
Even the seasoned PowerPoint user may occasionally run into a snag when cropping images. If you’re facing issues where cropping isn’t working as expected, here’s how to troubleshoot:
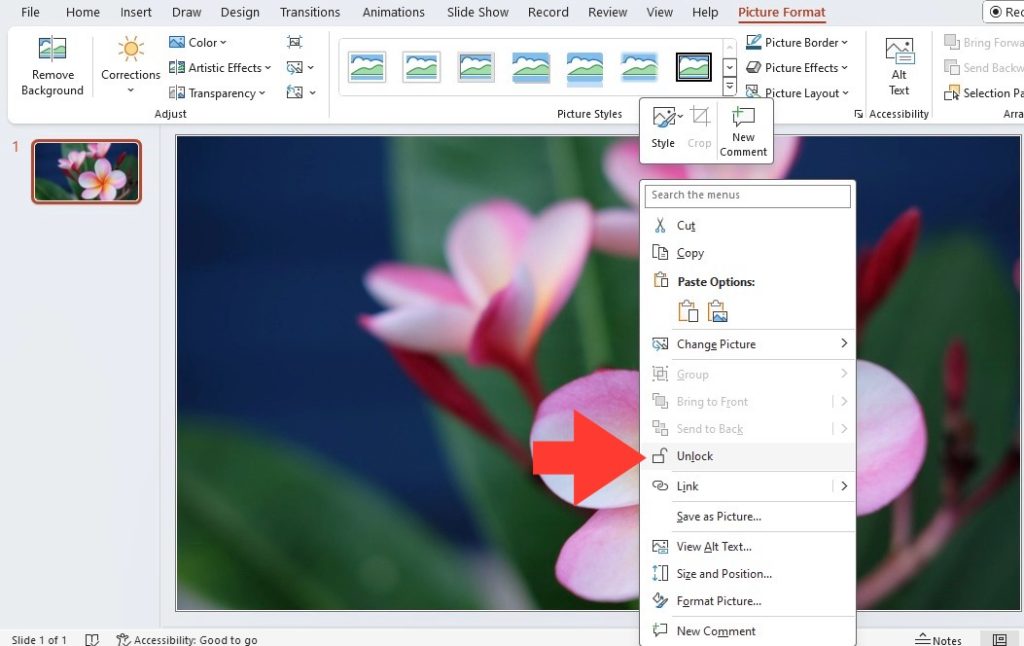
- Ensure your image is not locked as a background or part of a master slide, which might prevent editing. You can check this by right-clicking on the image and looking for any “Lock” options.
- Double-check that you’ve selected the correct image. It sounds simple, but sometimes clicking on the wrong element can lead to confusion.
- Try resetting the image via the “Picture Format” tab. This can clear any unexpected formatting issues that might hinder cropping.
- If a glitch persists, close and reopen your PowerPoint file, or even the application entirely, to reset its functionality.
- Make sure your PowerPoint is up-to-date, as updates can fix known issues with the image editing features.
In most cases, these steps will resolve your cropping conundrums, allowing you to get back to crafting engaging slides. Keep a cool head, and remember, like any technology, PowerPoint has its quirks—but they’re nothing you can’t handle!
Be patient and methodical. Sometimes the simplest solutions will correct your cropping issues, ensuring that your image editing process in PowerPoint is smooth sailing.
Pro Tips for Maintaining Image Quality After Cropping
Cropping can transform a good image into a great one, but it’s crucial not to compromise quality in the process. Here are some pro tips to keep your images looking sharp:
- Start with the Best Quality: Use the highest resolution images available. Higher resolution means more detail, so even after cropping, your image remains clear.
- Avoid Over-Cropping: Zoom in on your focal point but leave some breathing room. Over-cropping can lead to a loss of context or essential details.
- Watch for Pixelation: If an image becomes blurry or pixelated after cropping, it might be stretched too thin. Attempt to resize or undo the crop slightly to preserve image quality.
- Preserve Aspect Ratio: To maintain the original dimensions of the image, hold down the ‘Shift’ key while dragging the crop handles. This keeps the aspect ratio intact and avoids distortion.
- Use Vector Images When Possible: For logos or icons, vector images are ideal as they can be cropped and resized without any loss of quality.
By following these guidelines, your cropped images will look just as crisp and compelling as the originals.
Remember, the quality of your images is a reflection of the quality of your presentation. Take the time to crop correctly, and your audience will definitely take notice.
Elevating Your Slides with Cropped Images
Integrating Text and Cropped Images for Dynamic Slides
To create slides that truly resonate with your audience, it’s crucial to balance visuals and text. Here’s how to integrate both for a dynamic effect:
- Position Smartly: Once you’ve cropped your image, think about placement. Position your text so that it complements the image without obstructing important details. Use alignment tools to ensure everything is tidy.
- Contrast and Legibility: Ensure there is a high contrast between the text color and the image background. If needed, add a transparent overlay or a shape behind the text to boost readability.
- Hierarchy and Flow: Use font size and weight to establish a visual hierarchy in your text. Arrange your text to follow the natural flow of the image, guiding the viewer’s eyes through the slide.
- Cohesion: Your text and image should work together seamlessly. Select fonts and cropping styles that align with the mood of your image, whether it’s professional, playful, or poignant.
Keep it simple and impactful. An image paired with a powerful statement often says more than a slide crowded with bullet points.
With these strategies, your slides will not only convey information effectively but will also leave a lasting visual impact.
Using Cropped Images to Enhance Your Presentation’s Narrative
Using Cropped Images to Enhance Your Presentation’s Narrative
Cropped images are not just decorative elements; they can play an integral role in telling the story of your presentation. Here’s how to use them for narrative enhancement:
- Be Purposeful: Choose images that are directly relevant to your content. Crop these images to highlight or mimic the message of your narrative.
- Create Emotion: Use cropping to zoom in on the emotional center of an image. Is there joy, concern, excitement, or calm within the image? Bring that to the forefront.
- Sequence Thoughtfully: Place cropped images in a sequence that supports the flow of your presentation. Think of images as scenes in a film that should connect logically and emotionally.
- Symbolism: Crop images to emphasize symbolic elements that support your argument or message. Sometimes, what’s omitted is as powerful as what’s highlighted.
- Consistency: Maintain a consistent style of cropping throughout your presentation to create a cohesive visual experience that complements your narrative.
These techniques will ensure cropped images are not merely present for visual appeal but are actively contributing to the story you’re unfolding with each new slide.
By incorporating these visual storytelling practices, your presentation will resonate more deeply, making your message both memorable and impactful.
FAQ: Mastering PowerPoint Picture Cropping
What Should I Do if the Crop Function Isn’t Working Properly?
Experiencing difficulties with the Crop function in PowerPoint? Here’s a quick troubleshooting guide:
STEP 1: Check if the image is selected. The Crop tool won’t be available unless the image itself is active.
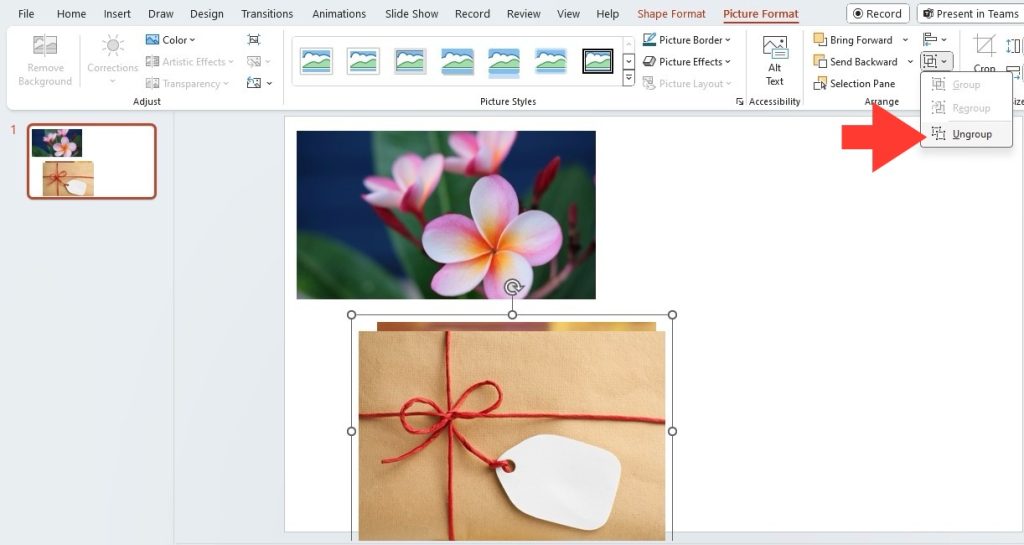
STEP 2: Ensure the image isn’t grouped with other objects. If it is, ungroup by going to the “Arrange” menu and selecting “Ungroup,” then try cropping again.
STEP 3: If the image was added via a Photo Album, remove it and reinsert it using “Insert” > “Picture” > “Picture from File” to ensure it is editable.
STEP 4: For vector graphics, you’ll need to convert them to a raster format like JPEG, as PowerPoint doesn’t crop vector images.
If all else fails, close and restart PowerPoint, or consider checking for software updates.
By following these steps, you should be able to get past any hurdles and make use of the Crop tool to enhance your slides.
Can I Crop Multiple Images at Once in PowerPoint?
Yes, in PowerPoint, you can crop multiple images simultaneously, which saves time and ensures consistency across your visuals. Here’s how:
STEP 1: Select all images you would like to crop by holding down the ‘Ctrl’ key as you click on each one.
STEP 2: Go to the “Picture Format” tab that appears when the images are selected.
STEP 3: Click the “Crop” button. The crop handles will appear around all selected images.
STEP 4: Adjust the handles as desired. Any changes will apply to all selected images uniformly.
Keep in mind that all images will be cropped to the same proportions, so this works best when the images require similar edits.
This feature is perfect for creating a neat, organized slide where images need to maintain the same size and shape for a professional look.
John Michaloudis is a former accountant and finance analyst at General Electric, a Microsoft MVP since 2020, an Amazon #1 bestselling author of 4 Microsoft Excel books and teacher of Microsoft Excel & Office over at his flagship Academy Online Course.


