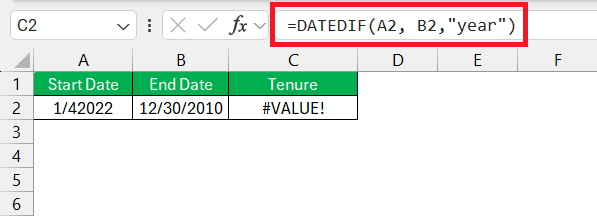
Discover the potential of Microsoft Excel‘s DATEDIF function, a vital tool to calculate date difference. From tracking project deadlines to calculating exact ages, DATEDIF simplifies complex time-related data analysis, making it an essential skill for efficient Excel usage.
Key Takeaways
- Basic Syntax Mastery: Understand the DATEDIF function’s basic syntax, =DATEDIF(start_date, end_date, “unit”), to perform accurate date difference calculations.
- Versatile Unit Options: Familiarize yourself with DATEDIF’s diverse units (“y”, “m”, “d”, “md”, “ym”, “yd”) for tailored calculations, enhancing your data analysis flexibility.
- Practical Applications: Utilize DATEDIF for real-world applications such as calculating ages from birthdates or determining the tenure between significant dates, adding value to your data management tasks.
- Advanced Usage: Combine DATEDIF with other functions (e.g., TODAY(), IF) for complex, nuanced date calculations, addressing specific analytical needs with customized solutions.
- Error Troubleshooting: Learn to troubleshoot common DATEDIF errors, such as incorrect unit parameters or date format issues, ensuring smooth and error-free calculations.
Table of Contents
Introduction
Unveiling the Power of DATEDIF in Excel
Dates are more than just numbers on a calendar—they are crucial markers in time management, project planning, and historical tracking. Microsoft Excel, a powerhouse in data analysis, acknowledges this through its DATEDIF function. Whether you’re looking to determine someone’s exact age or count down to a project deadline, DATEDIF is your go-to tool.
Calculating Dates Efficiently with DATEDIF
When it comes to managing date calculations effectively, the DATEDIF function becomes indispensable. With its ability to churn out results in years, months, or days, you can bid farewell to manual calculations that are both time-consuming and error-prone. Harnessing DATEDIF allows you to automate these calculations, ensuring accuracy while saving precious time.
Understanding DATEDIF Function
The Basic Syntax of DATEDIF
Understanding the basic syntax of DATEDIF is the cornerstone to leveraging its full potential. The formula appears as follows:
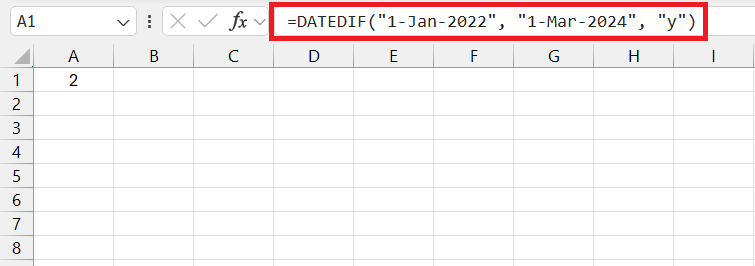
To grasp how it works, imagine you want to find the number of complete years, months, and days from January 1, 2022, to March 1, 2024. You’ll use:
This simple expression uses the DATEDIF function to return a precise period, ensuring you are well-equipped for any kind of date arithmetic in Excel.
Different Units of Measurement within DATEDIF
DATEDIF expands your analytical capabilities by offering you a palette of time units to measure intervals with precision. Here are the units at your disposal:
"y": Returns the difference in full years."m": Computes the total number of complete months."d": Gives you the difference in days."md": Calculates the days difference, ignoring months and years."ym": Shows the difference in months, disregarding years."yd": Reveals the difference in days, leaving out years.
Understanding these units ensures you can tailor your date difference calculations to suit specific needs, whether that’s calculating the tenure of an employee or countdown to a product launch.
Practical Applications of DATEDIF
Calculating Age from a Birthdate
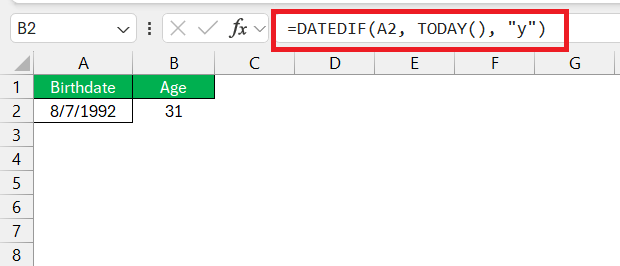
To convert a birthdate into an exact age, turn to the DATEDIF function with the TODAY() formula as your end date marker. For a birthdate entered in cell A2, here’s how it’s done:
But to grasp the complete age in years, months, and days, concatenate different DATEDIF units like this:
This command returns a comprehensive age profile—essential for tasks from managing retirement plans to celebrating birthdays.
Finding the Tenure Between Two Significant Dates
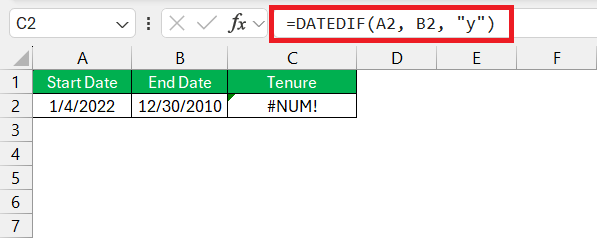
Whether you’re measuring the length of service of an employee or the duration of a lease, computing tenure is a breeze with DATEDIF. By setting up your two key dates in cells A2 (start date) and B2 (end date), the formula you need is:
This will produce a detailed tenure report showing the years, months, and days that have elapsed between the two dates – an invaluable figure for those significant milestones.
Advanced Tips and Tricks
Combining DATEDIF with Other Functions to calculate date difference
Of course, real-world scenarios often require even more nuanced date calculations. Excel’s DATEDIF becomes truly powerful when combined with other functions. For example, integrate DATEDIF with TODAY() to compute ages or tenure to the current date, or wrap it within an IF statement to handle conditional logic based on the time between dates.
Take this advanced formula for a spin:
This tells you whether a period (like employment) is more or less than 10 years. It’s Excel’s way of customizing data insights to fit your unique requirements.
Troubleshooting Common Errors with DATEDIF
Even seasoned Excel users can hit snags with DATEDIF, but fear not! Most issues stem from simple oversights. Here’s how you can identify and fix them:
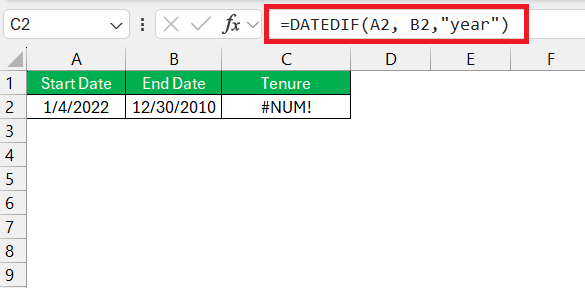
End Date Before Start Date: Ensure the end_date in =DATEDIF(start_date, end_date, "unit") is on or after the start_date to avoid a #NUM! error.
Incorrect Unit Parameter: Wrap the unit argument in double quotes and use the correct abbreviation to instruct Excel properly; otherwise, you may receive an error.
Date Format Recognition: Excel must recognize your dates as valid. If not formatted correctly as a date, Excel will return a #VALUE! error.
If Errors Persist: Implement the IFERROR function to catch and handle problems dynamically, offering a custom message or a zero instead of an error code.
Take the habit of double-checking your date formats and arguments, and you’ll conquer the common pitfalls of DATEDIF with ease.
Enhance Your Excel Skills
Streamlining Your Workflow with DATEDIF Shortcuts
Efficiency in Excel isn’t just about knowing the right formulas—it’s also about navigating swiftly. Here’s a couple of DATEDIF related shortcuts to expedite your workflow:
- Quick Date Entry: Press
Ctrl + ;to insert today’s date into a selected cell instantly. - AutoFill Handle: After entering your DATEDIF formula, use the AutoFill handle to drag it down and replicate the formula for adjacent rows, Excel automatically adjusts the cell references.
These shortcuts, along with your mastery of DATEDIF, will help you manage date differences with unprecedented speed and accuracy.
FAQ Section
What is the primary use of the DATEDIF function in Excel?
The primary use of the DATEDIF function in Excel is to calculate the difference between two dates based on the interval specified by the user. This interval can be days, months, or years, allowing for versatile date-related calculations such as age in years, months until a future date, or days since an event.
Can you give an example of how to combine DATEDIF with another function?
An example of combining DATEDIF with another function is using it alongside the TODAY() function to calculate a person’s age in years. For instance, =DATEDIF(A1,TODAY(),”Y”) would calculate the number of complete years between the date in cell A1 (a person’s birthdate) and today’s date, effectively giving the person’s age.
How to calculate the date difference between two dates in Excel?
To calculate the date difference between two dates in Excel, you can simply subtract the earlier date from the later date, such as in =B1-A1, where A1 holds the start date and B1 holds the end date. This subtraction will return the difference in days between the two dates.
What are the common mistakes when using Datedif()?
Common mistakes when using the DATEDIF function in Excel include using an end date that is earlier than the start date, which results in an error, and misunderstanding the unit argument (e.g., “Y” for years, “M” for months, and “D” for days), leading to incorrect calculations. Additionally, users sometimes overlook that DATEDIF calculates complete units (years, months, days) between dates, not accounting for partial units, which can lead to confusion when the results are not as expected
How can I subtract two dates in Excel to find the difference in days?
To subtract two dates in Excel to find the difference in days, you can use a straightforward subtraction formula, such as =End_Date – Start_Date. For example, if cell A1 contains the start date and cell B1 contains the end date, the formula =B1-A1 will yield the number of days between the two dates.
John Michaloudis is a former accountant and finance analyst at General Electric, a Microsoft MVP since 2020, an Amazon #1 bestselling author of 4 Microsoft Excel books and teacher of Microsoft Excel & Office over at his flagship Academy Online Course.
