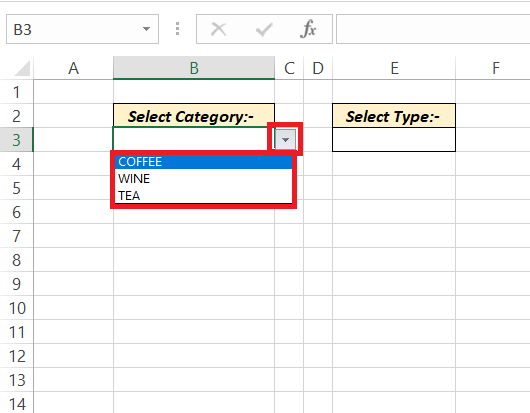
Cascading drop downs in Microsoft Excel are a powerful tool that allows users to create cascading lists where the selection in one dropdown determines the options available in another. This feature enhances data entry efficiency and accuracy by limiting choices based on previous selections. Commonly used in forms and data management, dependent dropdowns help streamline workflows and ensure consistency in data input.
Key Takeaways:
- Simplified Data Entry: Cascading drop-down lists streamline the data entry process by presenting users with only relevant choices based on prior selections, reducing the likelihood of errors.
- Data Preparation: Proper setup is crucial for creating effective cascading lists. Ensure your data is well-organized in separate columns with no duplicates or blanks to maintain data integrity.
- Primary List Setup: The primary drop-down list is created using Excel’s Data Validation feature. This list serves as the foundation for subsequent dependent lists and must be clear and well-defined.
- Connecting Secondary Lists: Secondary (dependent) lists are linked to the primary list using named ranges and the INDIRECT function. Accurate naming and range definition are essential for seamless functionality.
Table of Contents
Introduction to Cascading Drop-Down Lists in Excel
The Power of Dependent Data Selection
Imagine choosing a category like ‘Produce Type’ and immediately having another list populated with relevant options like assorted fruits or vegetables. That’s the impressive power of dependent data selection in Excel. With dependent drop-down lists, a choice in one cell influences the list of options in another, reducing errors and simplifying the process of data entry.
Streamlining Data Entry with Cascading Functionality
Cascading functionality in Excel is a true time-saver. Instead of sifting through irrelevant choices, you efficiently zoom in on the data that matters, simply by making a selection from a prior related drop-down list. It’s an elegant way to streamline data entry and guide users through a series of choices, ensuring they can’t select a “Drink” when they should be picking a “Category of beverage.
Setting the Stage for Your Drop-Down Lists
Preparing Your Data for Cascading Lists
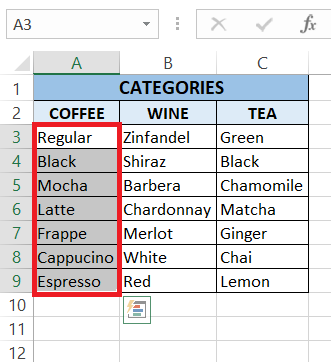
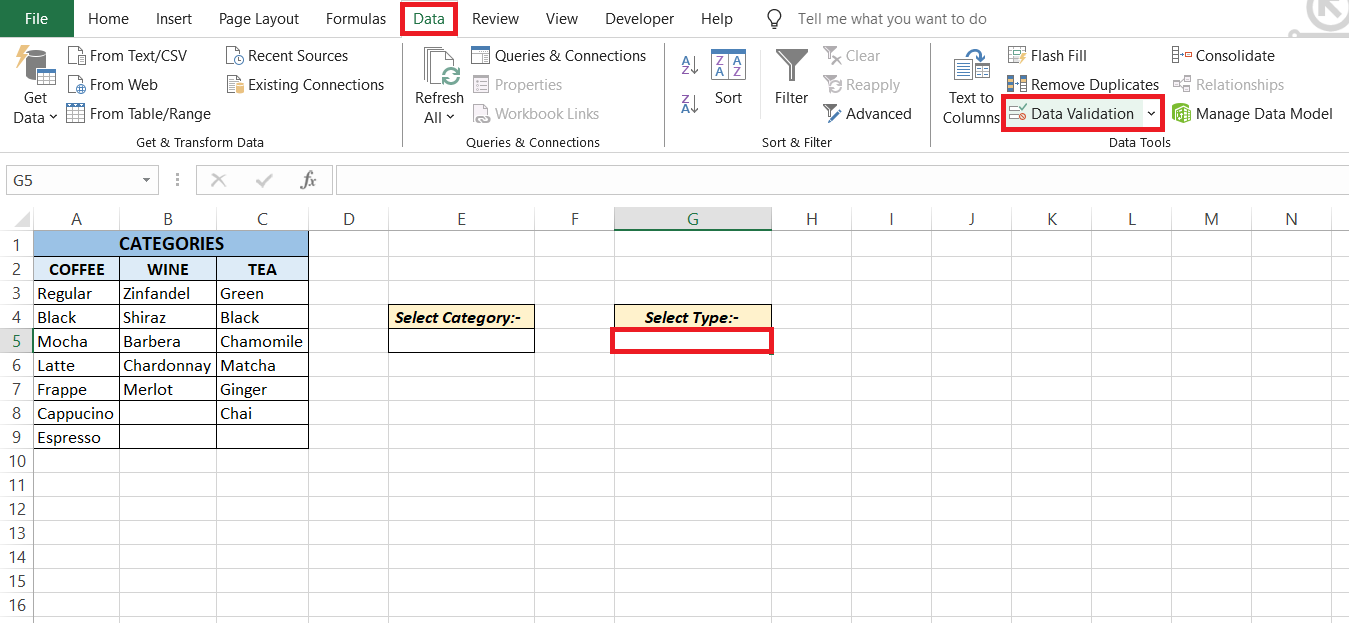
Before diving into creating cascading lists, you need to lay the groundwork. Arrange your data neatly in separate columns: one for each level of your cascading sequence. Ensure the data is clean, with no duplicates or blank entries, as they could lead to confusion or errors down the line. Think of it as setting the stage for your Excel masterpiece where every cell plays a pivotal role.
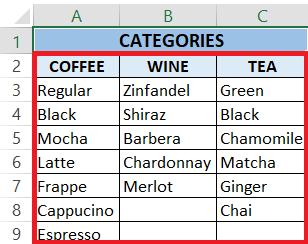
The data set looks like this;
Why Proper Setup is Crucial for Dependable Drop-Downs
Starting off on the right foot with a well-structured setup is key to avoiding headaches later. Proper preparation prevents performance problems; this adage holds especially true for dependable drop-downs. By establishing a sound data foundation, you ensure that your cascading lists work harmoniously, providing users with a seamless experience and maintaining data integrity across your workbook.
Step-by-Step Creation of Main Drop-Down List
Defining Your Primary Data Choices
Your primary data choices act as the cornerstone of your drop-down lists. These are your headers or main categories that will guide the rest of the selections. Lay these out clearly and distinctly, as they dictate what options will be available in the subsequent dependent lists. It’s about striking the right balance – detailed enough to cover all options, yet concise enough to prevent overwhelm.
Applying Data Validation for Your First List
To create your first drop-down list, you’ll employ Excel’s Data Validation feature. It’s a straightforward process where you:
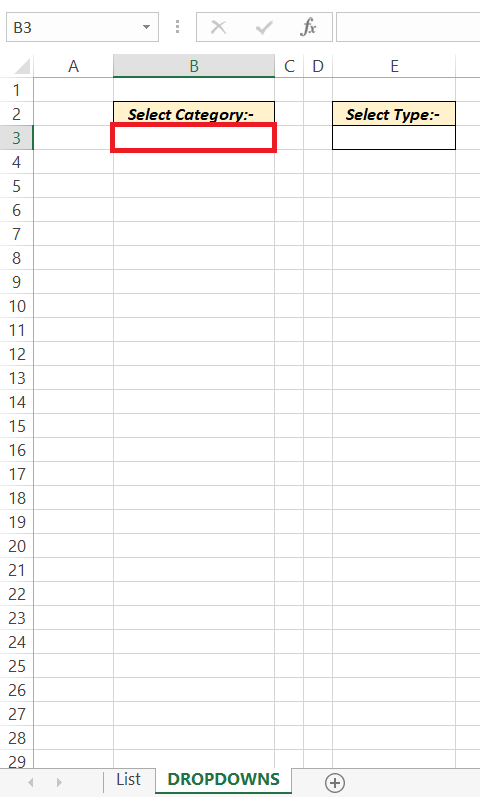
STEP 1: Choose the cell that will house your main drop-down.
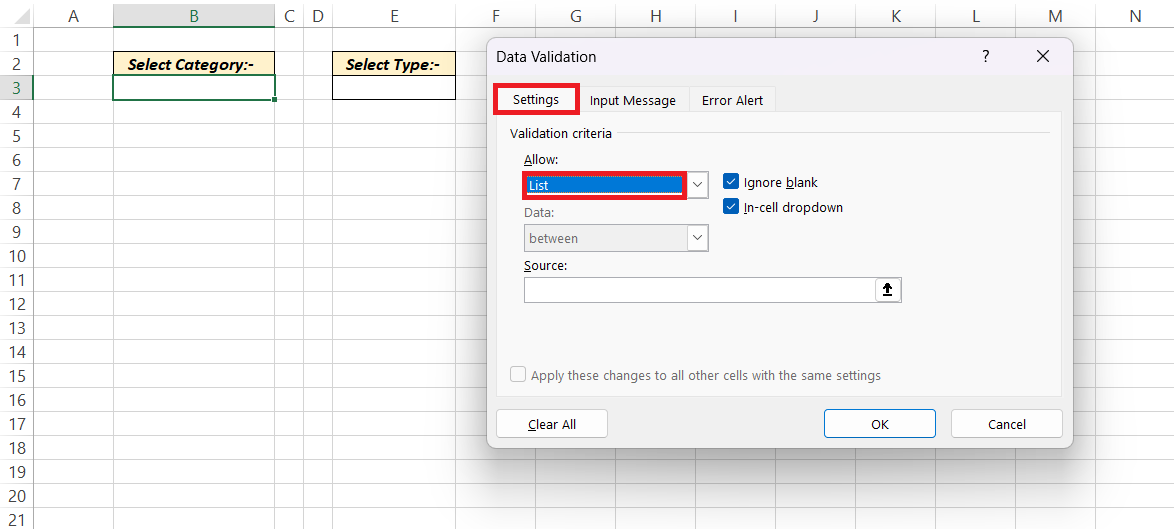
STEP 2: Go to the ‘Data’ tab, and click on ‘Data Validation.
STEP 3: From the settings, select ‘List’ under the validation criteria.
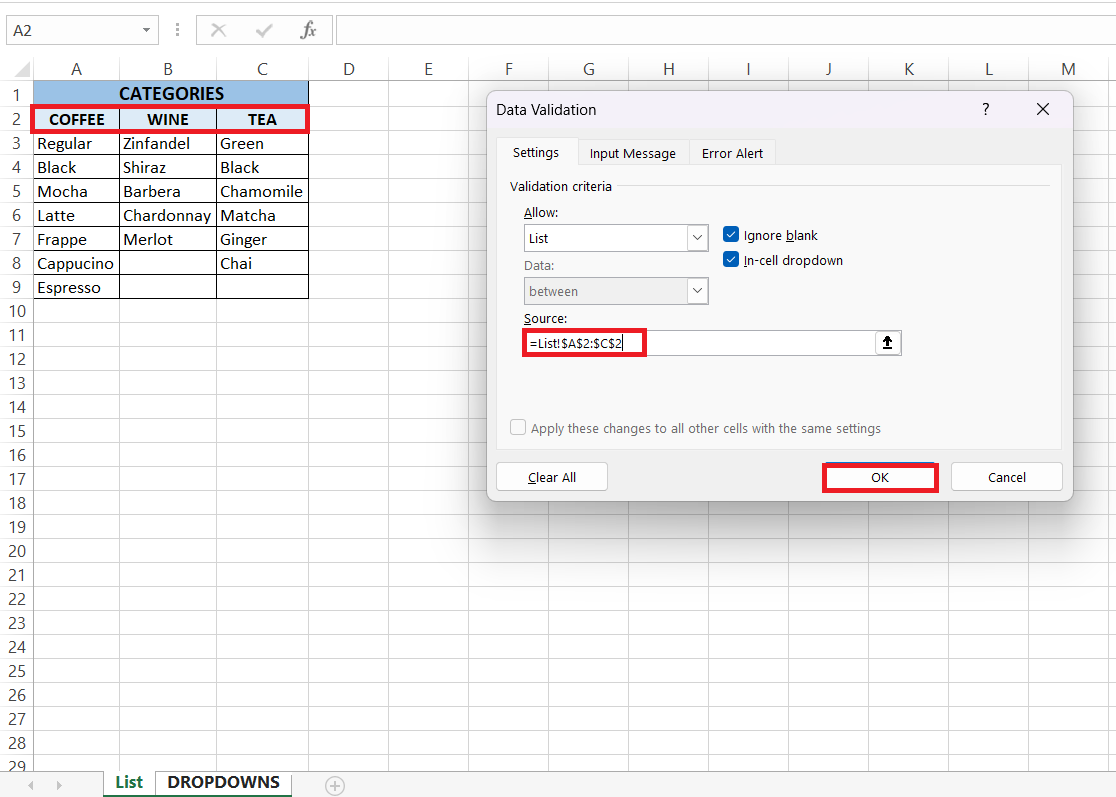
STEP 4: Set the source to reference the cells containing your primary choices i.e., the categories.
RESULT: By completing these steps, you’ll have set up a user-friendly, error-resistant primary drop-down list, ready to be connected to your dependent lists.
Crafting the Dependent (Child) Drop-Down List
Connecting Secondary Lists to the Primary Selection
To achieve the magic of cascading, you must now connect your secondary lists to the primary selection. This involves a bit of Excel wizardry with named ranges and the INDIRECT function to ensure that the choices in your second drop-down are contingent on what was selected in the first list.
It requires attention to detail, as the named ranges must precisely match the primary entries for the connection to work flawlessly.
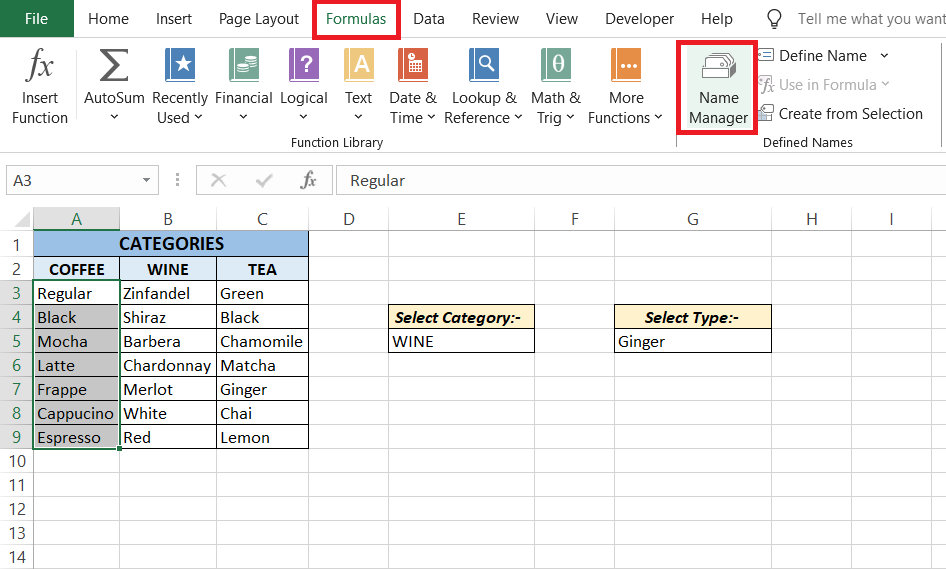
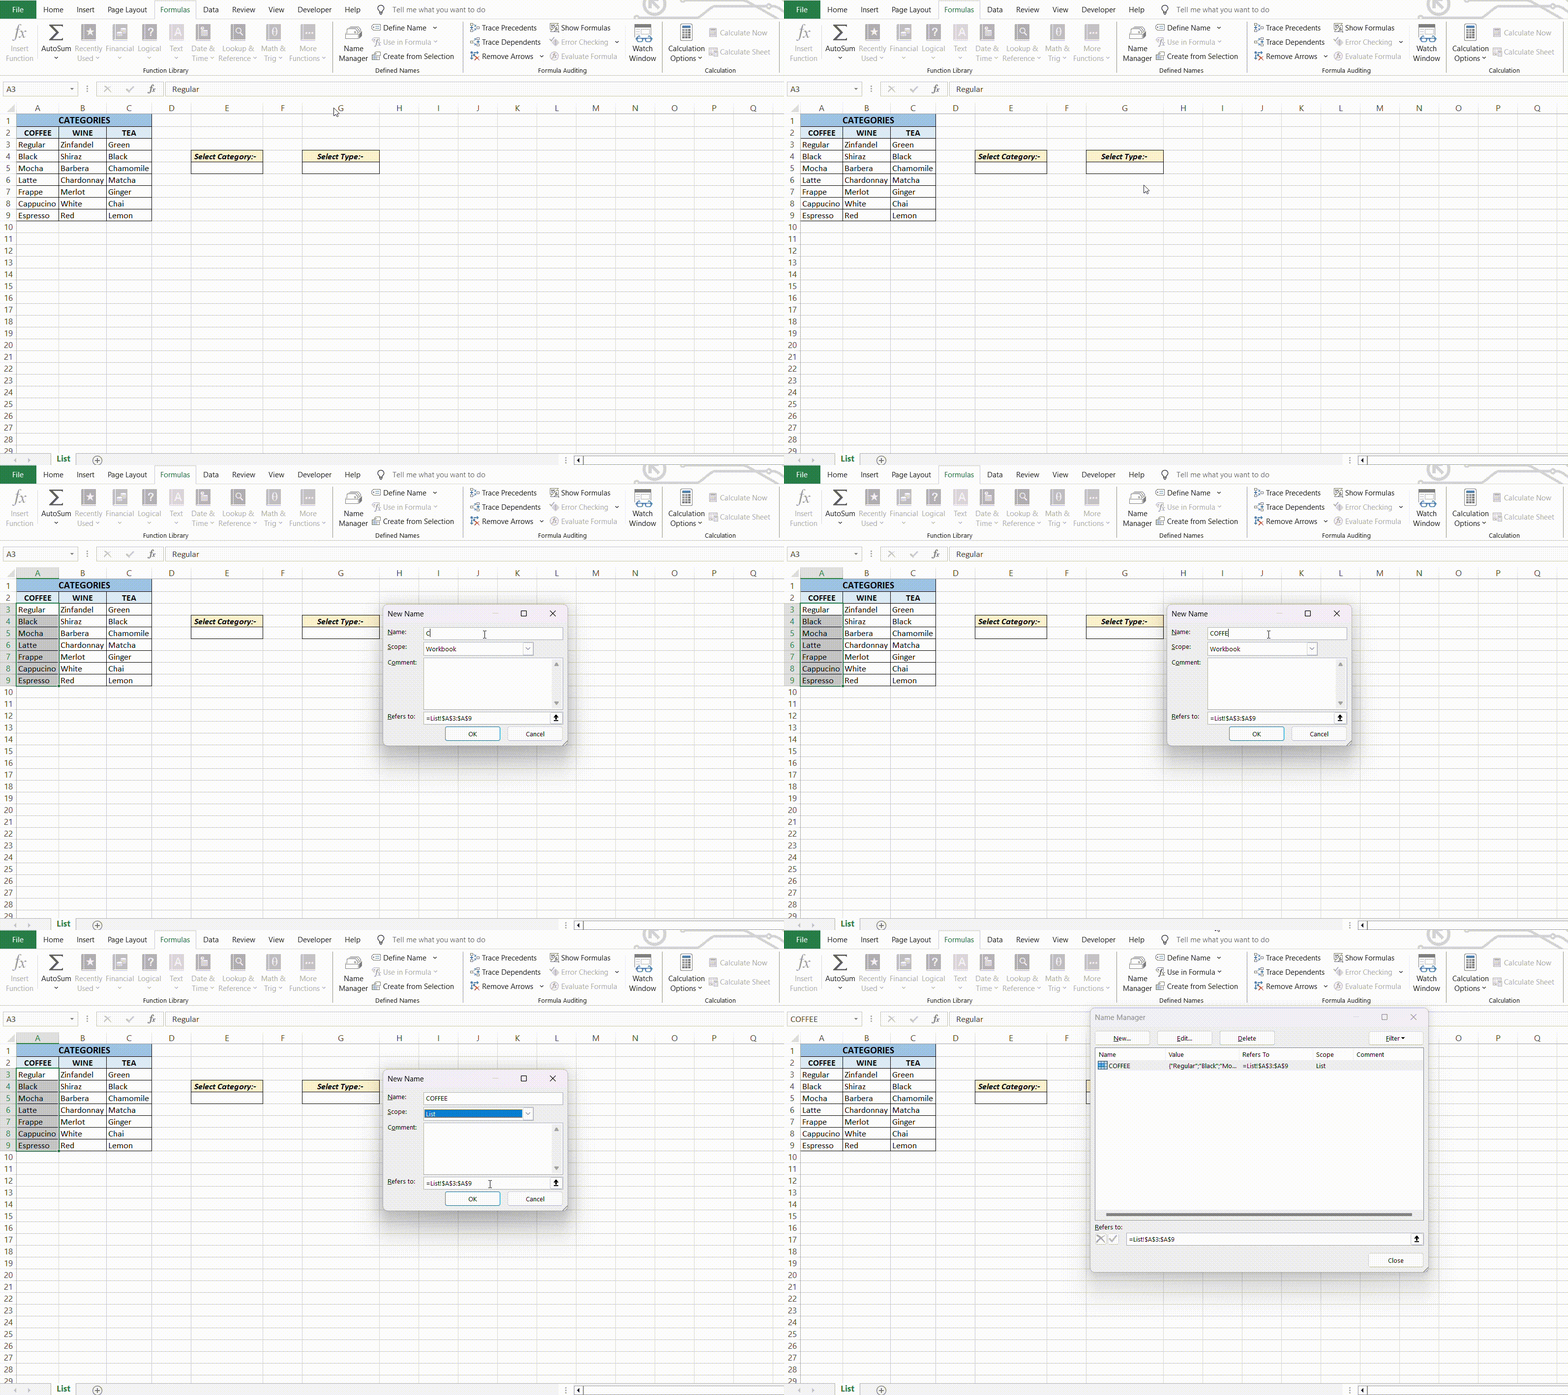
STEP 1: Create Named Ranges: Define named ranges for each category based on the primary list items using Formulas > Name Manager.
- Select the Data Range: Highlight the cells that contain the data for one of your secondary categories.
- Open Name Manager: Go to the Formulas tab and click on Name Manager.
- Create a New Named Range: Click New, enter a name that exactly matches the corresponding primary list item, and ensure the range is correctly referenced. Click OK.
- Repeat for Other Categories: Repeat the above steps for each secondary category, ensuring each named range corresponds accurately to its primary list item.
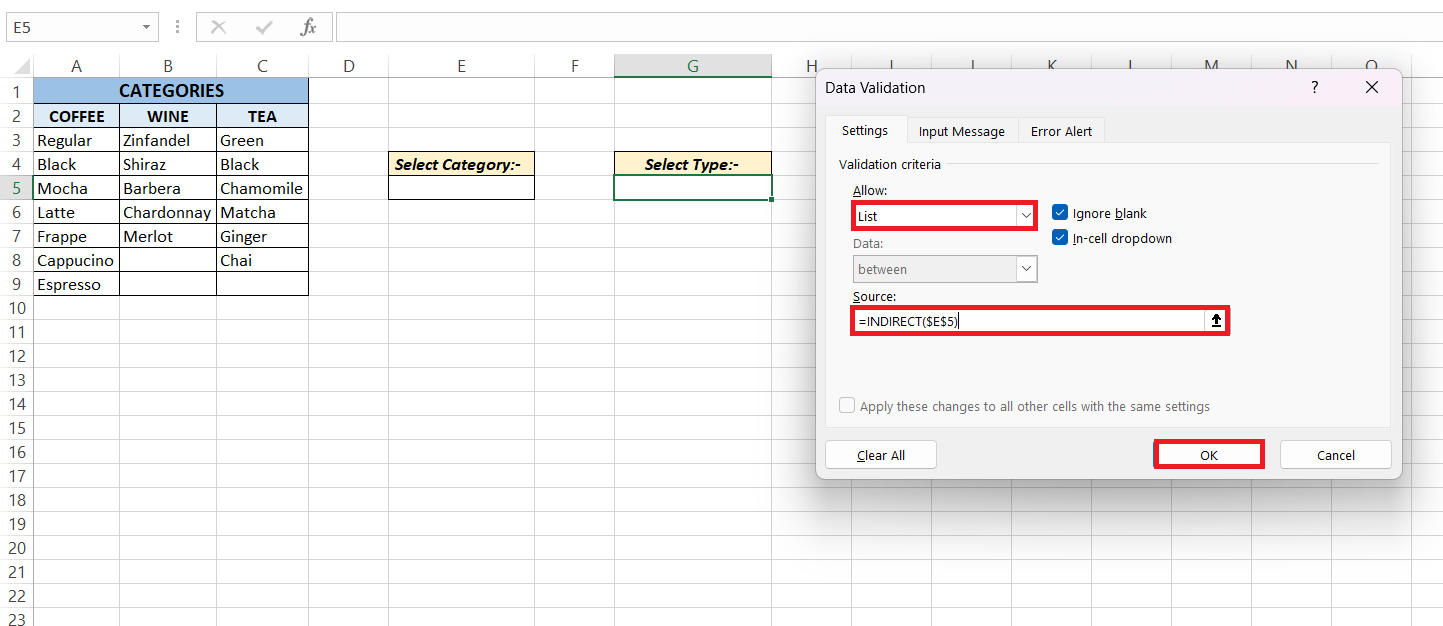
STEP 2: Prepare Secondary List: Select the cell for the secondary drop-down list, and go to Data > Data Validation.
STEP 3: Use INDIRECT Function: Choose List then in the source field, enter =INDIRECT(E5), assuming E5 is the cell with the primary selection.
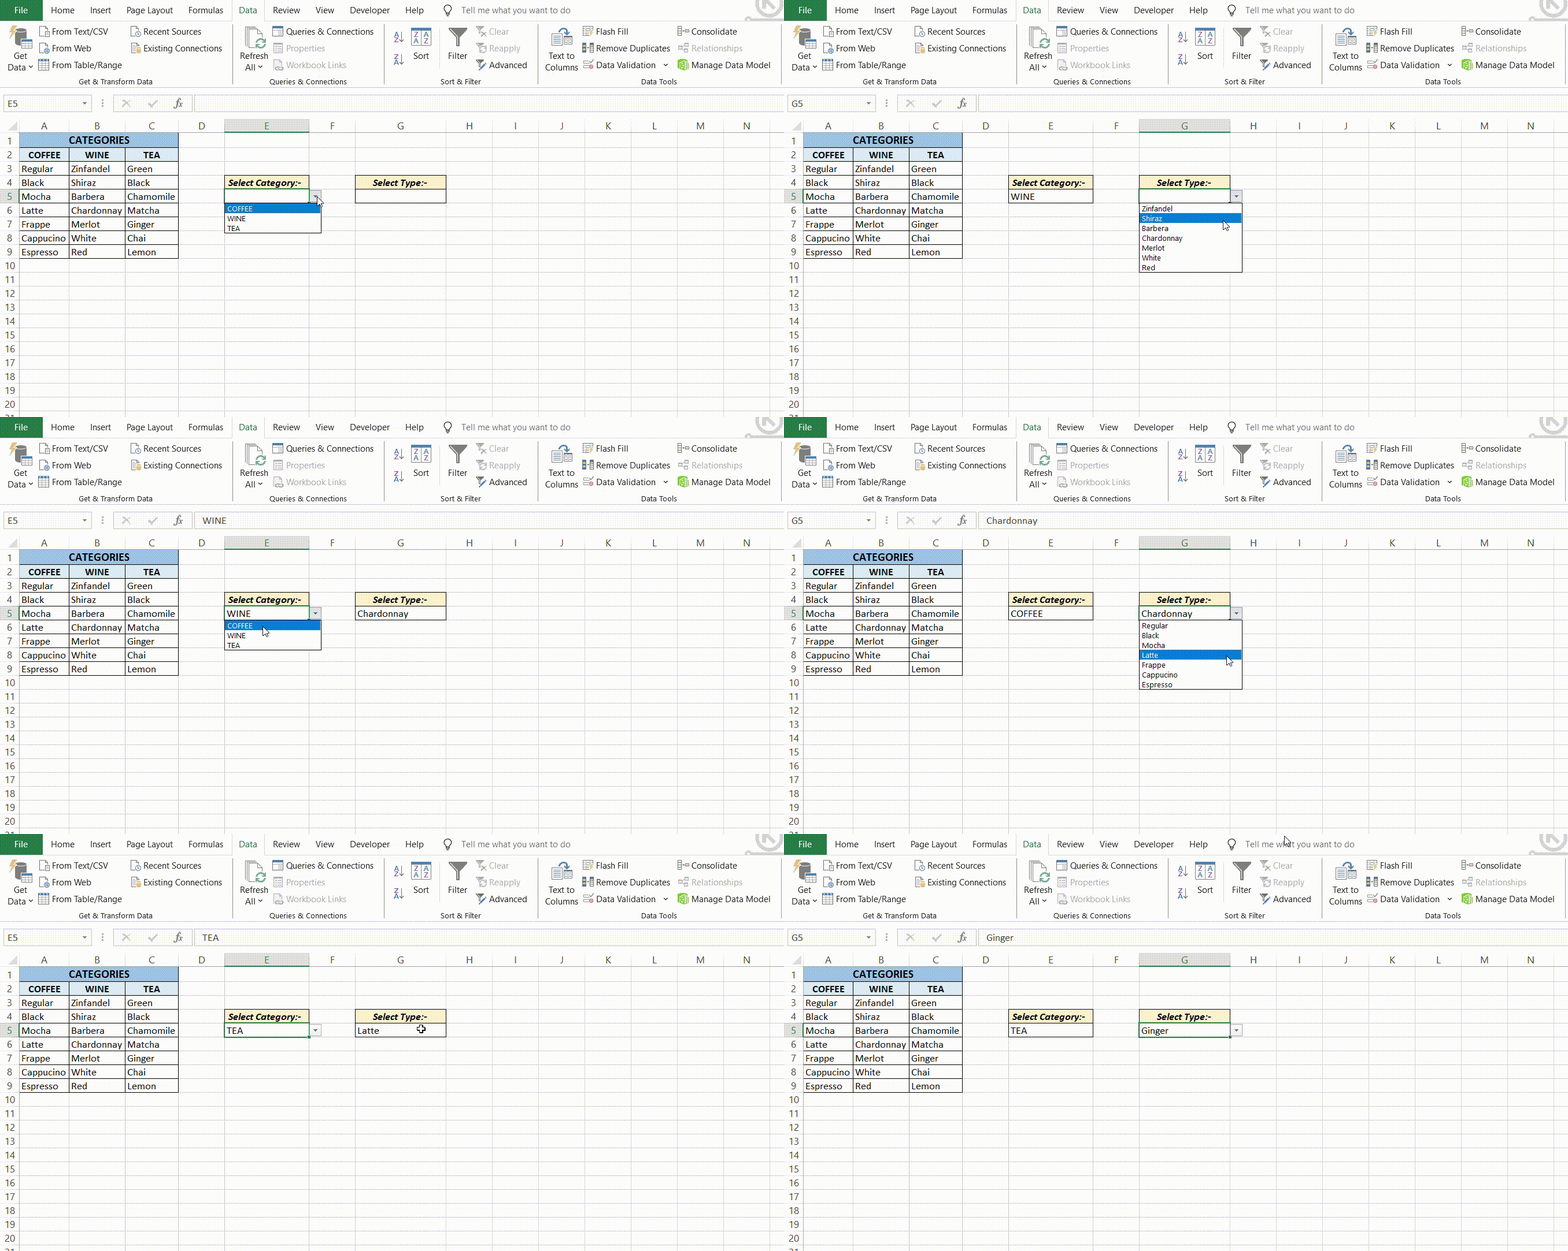
STEP 4: Verify Functionality: Test by selecting different options in the primary list to ensure the secondary list updates correctly.
NOTE: Adjust Named Ranges: Ensure named ranges exactly match the primary list items to avoid errors.
Time-Saving Tips and Tricks
Speeding Through Drop-Down List Creation
To speed through the creation of drop-down lists, familiarize yourself with Excel shortcuts and embrace the power of drag-and-drop for copying your Data Validation settings. You can also use templates or previously crafted lists as a starting point, saving valuable time. Automating repetitive tasks with macros can be another game-changer, cutting down the manual workload and ensuring a uniform structure across your workbook.
FAQs About Dependent Cascading Drop Down Lists
What is a dropdown list?
A dropdown list in Excel is a helpful feature that lets users select a value from a set of predefined options within a cell. This not only speeds up data entry but also reduces mistakes, as choices are limited to those in your list, ensuring consistency and accuracy in your data.
What Are Dependent Cascading Drop-Down Lists in Excel?
Dependent cascading drop-down lists in Excel are connected lists where the options in a secondary drop-down change based on the selection made in the first drop-down. It’s a smart way to navigate through layers of data and is particularly useful for handling large, complex datasets with interrelated attributes.
Can You Create a Cascade with More Than Two Levels?
Absolutely, you can create a cascade with more than two levels in Excel. This allows for an even more detailed and structured approach to data selection, guiding the user through a series of dependent choices. Multi-level cascading is ideal for complex data categorization where selections need to be refined at each stage.
How Do You Update or Modify an Existing Cascading Drop-Down List?
To update or modify an existing cascading drop-down list, you typically need to adjust the named ranges or Data Validation settings that control the lists. Adding or changing entries may also require updates to the dependent lists’ references. Regular maintenance ensures that your cascading lists remain functional and current with your dataset.
How many levels of dynamic (cascading) dropdowns can you construct ?
You can construct numerous levels of dynamic (cascading) dropdowns, typically as many as needed, as long as the hierarchy remains clear and manageable. However, bear in mind that the more levels you add, the more complex it becomes to manage and maintain the data. Therefore, for practicality and ease of use, it’s best to keep the levels to a reasonable number.
John Michaloudis is a former accountant and finance analyst at General Electric, a Microsoft MVP since 2020, an Amazon #1 bestselling author of 4 Microsoft Excel books and teacher of Microsoft Excel & Office over at his flagship Academy Online Course.
