In the bustling world of data management, to find duplicates in Excel is a crucial task for ensuring data integrity and accuracy. This guide will walk you through a variety of formulas and tools designed to help you swiftly identify and handle duplicate values or rows, enhancing your efficiency in working with large datasets or merging numerous spreadsheets. Whether you’re a beginner or an adept user, these strategies will empower you to maintain a clean and reliable data set in Microsoft Excel.
Key Takeaways
- Use Conditional Formatting: Quickly spot duplicates by highlighting them with Conditional Formatting, making them visually stand out.
- Remove Duplicates Easily: Excel allows for the simple removal of duplicate data through the “Data” tab, enhancing data accuracy.
- COUNTIF for Detailed Checks: Apply the COUNTIF function to identify exact counts of duplicate entries, offering deeper insight into data redundancy.
- Power Query for Large Datasets: Utilize Power Query to efficiently remove duplicates from large datasets, automating and simplifying the process.
Download the spreadsheet and follow the tutorial on How to Find Duplicates in Excel – Download excel workbookDuplicates-in-Excel.xlsx
Table of Contents
Unveil the Excel Secrets
Streamline Your Data Analysis
Excel isn’t just a tool for inputting and organizing data; it’s a gateway to efficient data analysis. They can unlock the secrets of their data by using Excel to remove duplicates, providing a clearer, more accurate picture of what is essential.
Enhance Productivity with Simple Tricks
Integrating a few Excel tricks into their workflow can have a tremendous impact on productivity. By learning some simple yet effective techniques, they can reduce the time spent on data processing and focus more on analysis and decision-making. Consider incorporating shortcuts, formulas, or data review processes to streamline daily tasks and bring their productivity to new heights.
Methods to Discover Duplicates in Excel
Illuminate Duplicates with Conditional Formatting
With Conditional Formatting in Excel, duplicates can be illuminated with just a few clicks, making them stand out visibly on their screen. Here’s how:
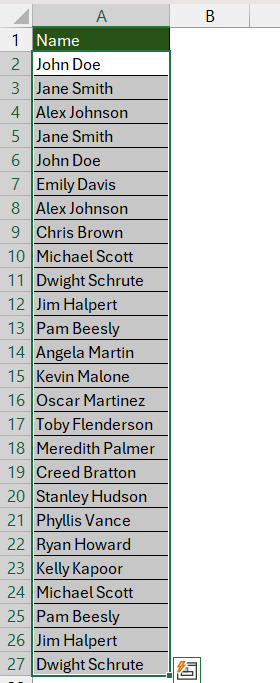
STEP 1: Select the range of cells where they suspect duplicates might be.
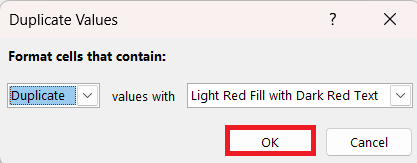
STEP 2: Go to the ‘Home’ tab, and find the ‘Conditional Formatting’ button. Choose ‘Highlight Cell Rules’ and then click on ‘Duplicate Values’.
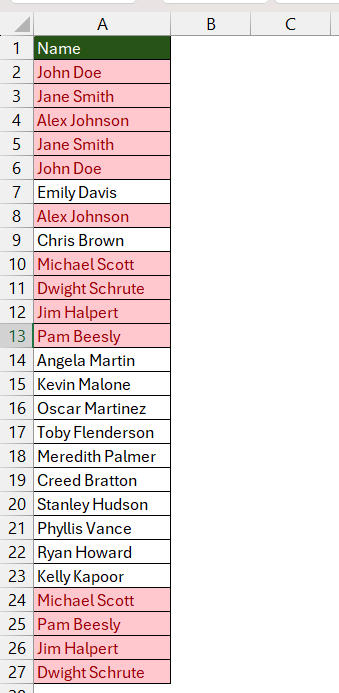
STEP 3: Pick a formatting style that will make the duplicates pop out from the rest of their data, such as ‘Light Red Fill with Dark Red Text’. Click ‘OK’ and watch as Excel reveals the duplicates in their selected range.
They now have a clear visual signal of data redundancy, which they can address according to their project’s requirements.
Remove Duplicate Data
Removing duplicates in Excel is a straightforward process that helps you clean your data by eliminating repeated entries. Here’s a step-by-step guide to do so:
STEP 1: Click on any cell within your dataset. If your data is in a table format, Excel automatically detects the entire table.
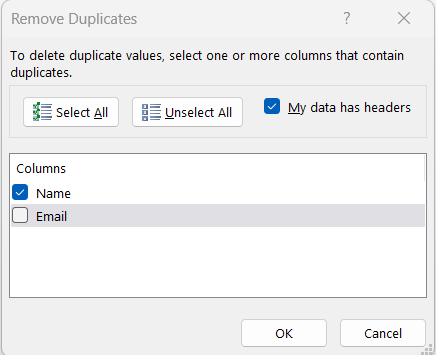
STEP 2: Navigate to the “Data” tab on the Ribbon. In the “Data Tools” group, click on “Remove Duplicates”. This opens the Remove Duplicates dialog box.
STEP 3: In the dialog box, you’ll see a list of all columns in your dataset.
- If you want to remove rows that have the same value in every column, ensure all columns are checked.
- If you only want to remove duplicates based on specific columns, uncheck the columns you don’t want to consider for finding duplicates.
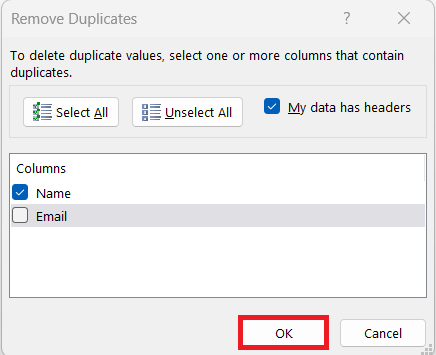
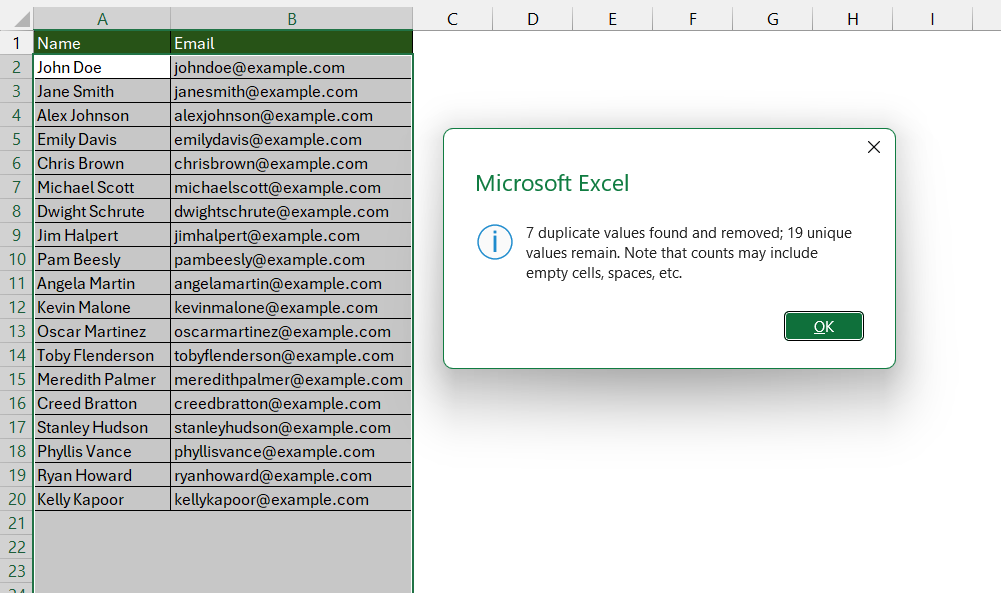
STEP 4: After selecting the relevant columns, click “OK”. Excel will process your data, and remove duplicate rows based on your selection, and a dialog box will appear indicating how many duplicate values were found and removed and how many unique values remain.
STEP 5: After Excel has finished removing duplicates, it will show you a summary dialog box with the results of the operation. Click “OK” to close it.
Beyond Basics: Advanced Methods using COUNTIF
To spot duplicates in Excel using the COUNTIF function, you can follow these steps to highlight or identify duplicate values in your dataset:
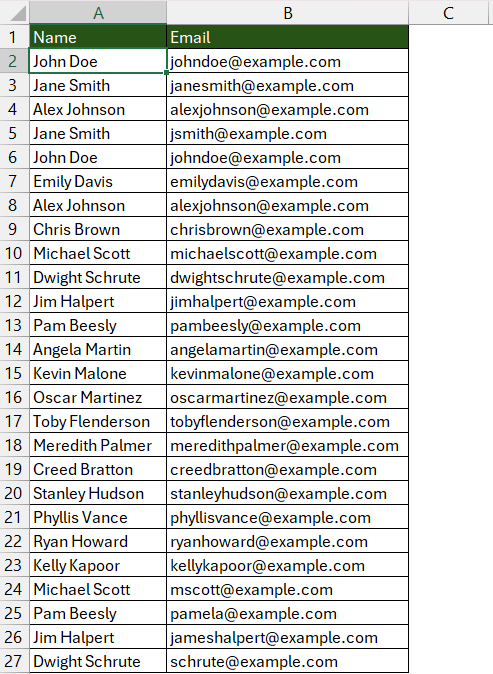
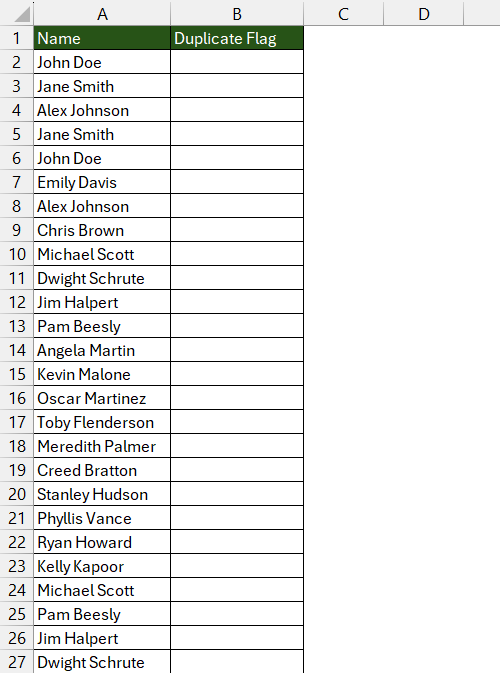
STEP 1: Open your Excel workbook and ensure your data is organized in a column or row format. Each piece of data you want to check for duplicates should be in its cell.
STEP 2: Add a new column where you will input the COUNTIF formula. This column will serve as a “Duplicate Flag” to identify duplicates.
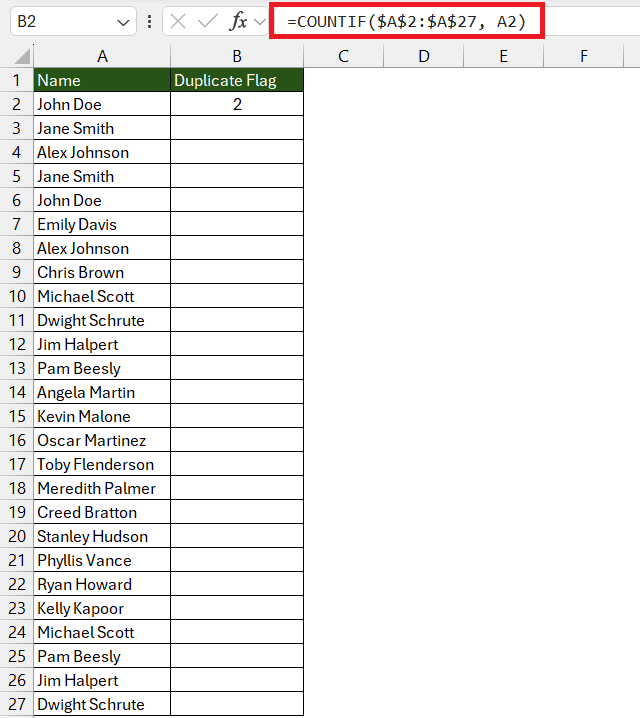
STEP 3: Enter the COUNTIF formula to count how many times each value appears in your target column. The formula structure is as follows:
=COUNTIF(range, criteria)
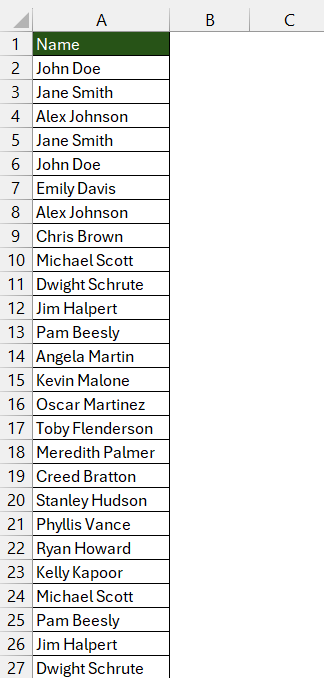
=COUNTIF($A$2:$A$27, A2)
- range is the range of cells where you want to search for duplicates.
- criteria is the specific cell you are checking for duplicates within the specified range.
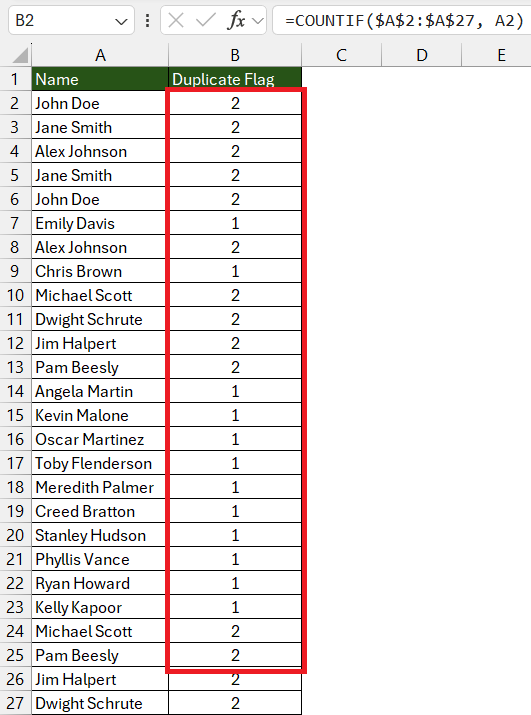
STEP 4: After entering the formula, drag the fill handle (the small square at the bottom right corner of the cell) down to copy the formula to the rest of the cells in the column, corresponding to each piece of data you’re checking for duplicates.
The COUNTIF function will return the count of how many times each value appears in the specified range. Any cell with a result greater than 1 indicates that the value is a duplicate.
Use Power Query to Remove Duplicate
Power Query is a transformative tool within Excel that offers a powerful solution to remove duplicates with precision. Here’s a simple guide to harness its capabilities:
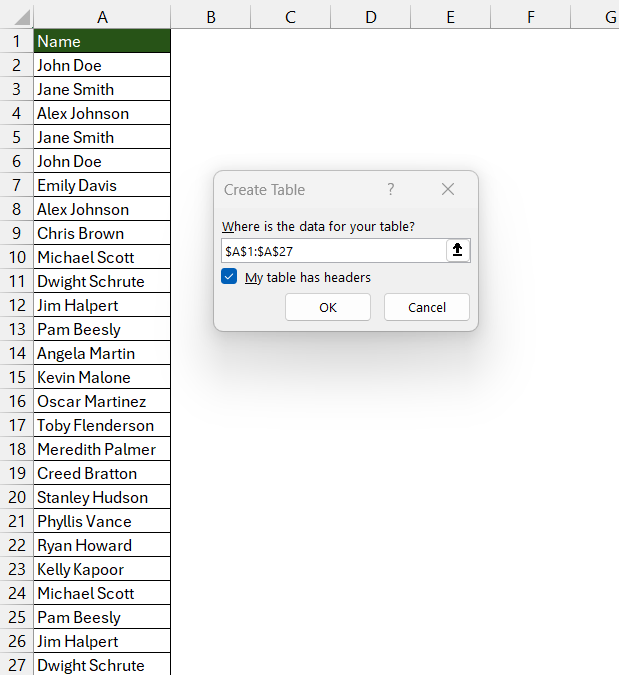
STEP 1: Select their data and convert it to a table using CTRL+T, ensuring the ‘My table has headers’ option is selected.
STEP 2: Navigate to the ‘Data’ tab and click ‘From Table/Range’ in the ‘Get & Transform Data’ section.
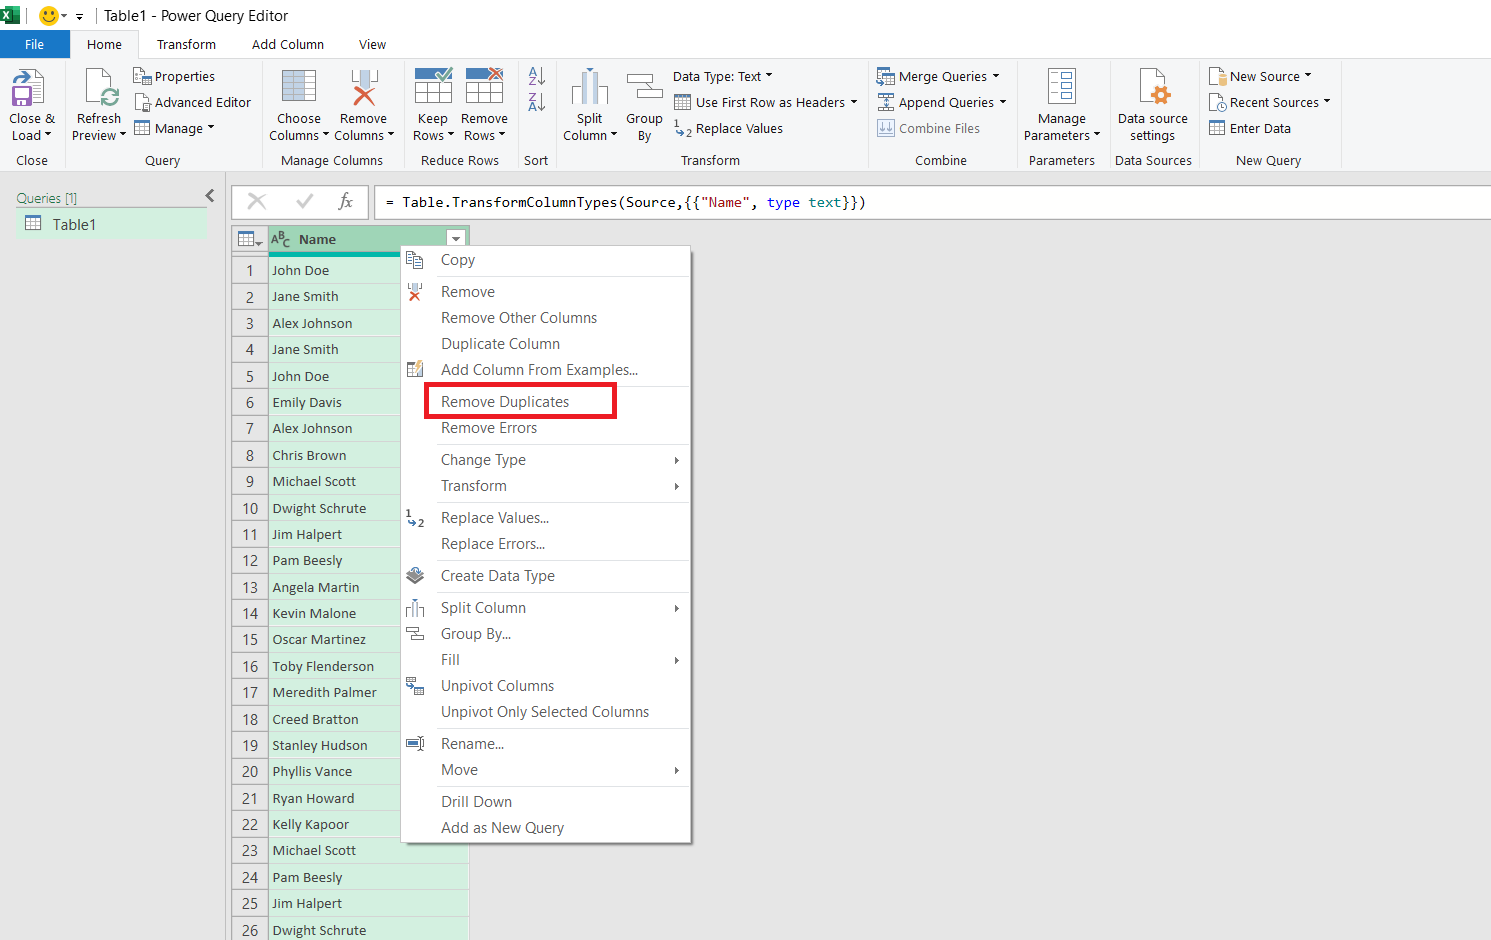
STEP 3: In the Power Query Editor, right-click on the table and select ‘Remove Duplicates’.
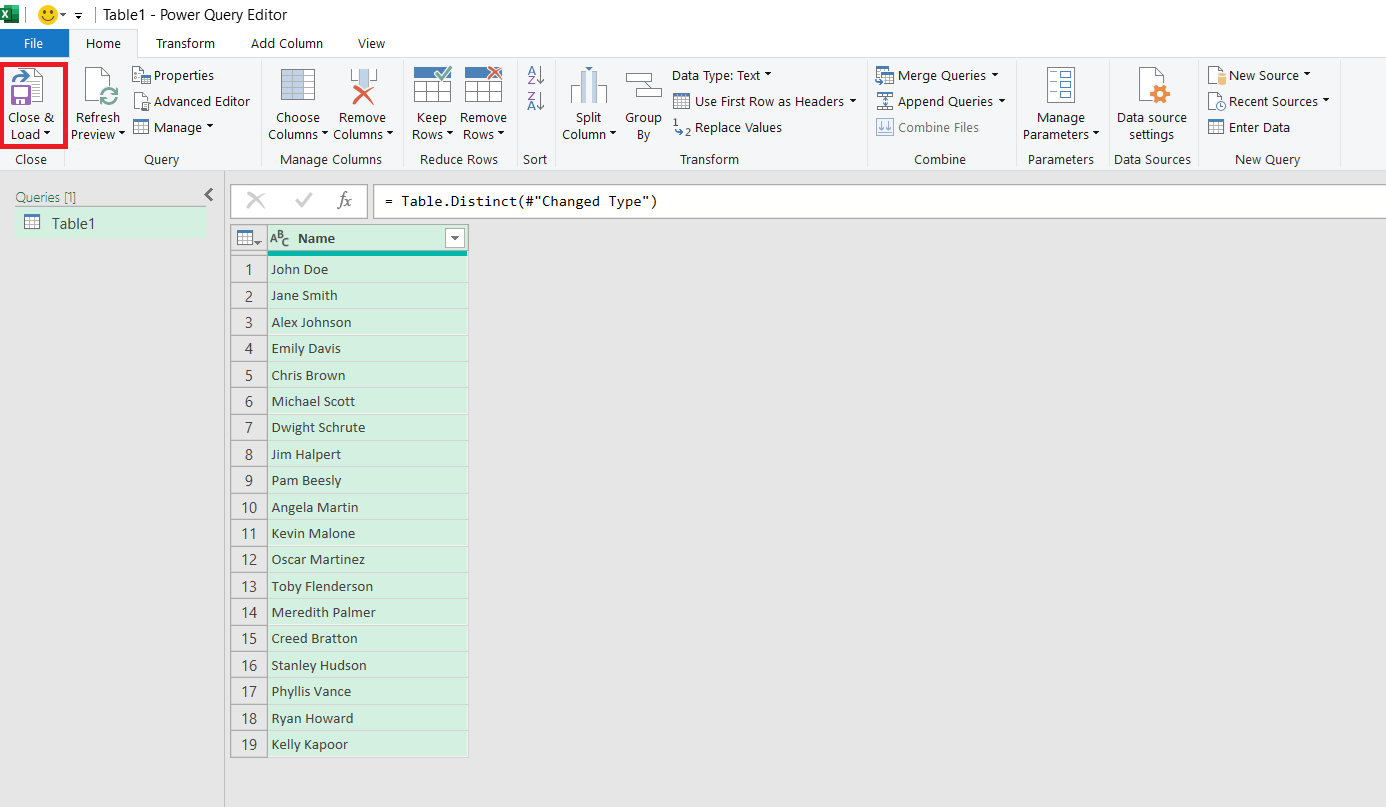
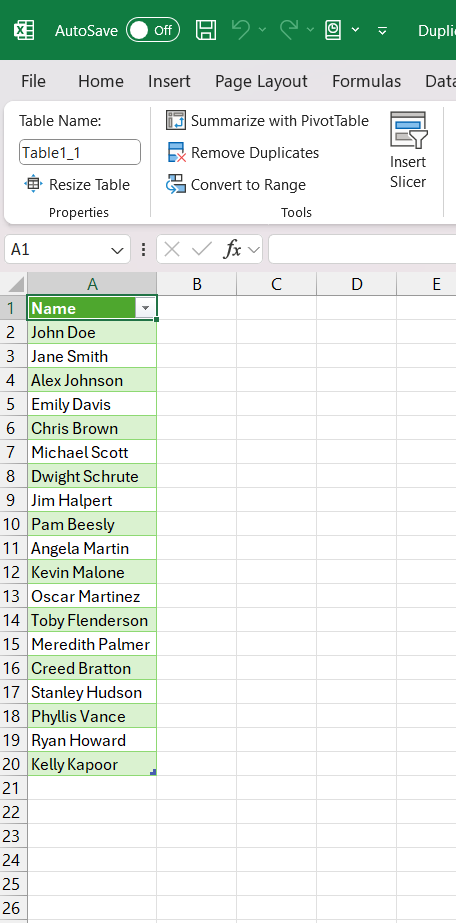
STEP 4: Once the duplicates are purged, simply click ‘Close & Load’ to update the table in their Excel workbook.
This technique is particularly useful when dealing with large data sets or when they need to automate the process of duplicate removal as part of their data management routine.
Excel Magic in Action
Real-world Applications and Case Studies
Seeing Excel’s magic in action through real-world applications and case studies can be incredibly enlightening. Here are a few examples:
- Sales Inventory Management: Discover how a retail company streamlined its inventory process by using Excel to identify and remove duplicates, leading to better stock management and reduced overhead.
- Client Data Organization: Learn about a marketing agency that used conditional formatting and pivot tables in Excel to manage vast client databases, enhancing campaign targeting and customer relationship management (CRM).
These cases illustrate how mastering Excel’s duplicate-finding features and beyond can transform their data sets, offering practical benefits that ripple through the entirety of their work or business.
Tips and Tricks from Excel Wizards
Gleaning insights from Excel wizards who have honed their skills over the years can be a game-changer. They offer a treasure trove of tips and tricks:
- Keyboard Shortcuts: Learning and using keyboard shortcuts can significantly speed up data handling without even touching the mouse.
- Excel Tables: Utilize Excel Tables (Ctrl+T) for dynamic ranges that automatically update formulas and charts as new data is added.
- Named Ranges: Define Named Ranges for frequently used cells or ranges to simplify formula creation and increase worksheet readability.
- Data Validation Tricks: Implement Data Validation to restrict user entries to specific ranges or lists, reducing errors in data collection.
By adopting these suggestions, they will not only boost their efficiency but also elevate the accuracy and clarity of their data presentations.
FAQs
Do I need advanced Excel knowledge to find duplicates?
Not at all! Excel is designed to be user-friendly, and finding duplicates doesn’t require advanced knowledge. The features discussed, like Conditional Formatting and the Remove Duplicates tool, are straightforward to use and can be quickly learned by even beginner Excel users. They can master these with practice and the right guidance.
Can I find duplicates without affecting my data?
Absolutely! They can identify duplicates using Conditional Formatting without altering any data. This method visually highlights the duplicates, allowing them to review the information before deciding to remove or keep it, ensuring that their data remains intact until they take further action.
How do you filter out duplicates in Excel?
Filtering out duplicates in Excel is simple: use the ‘Remove Duplicates’ feature under the ‘Data’ tab, or apply a filter to view unique records only. This leaves their original data unaffected while providing a clear view of non-duplicate entries for easier analysis.
How to use the power query tool to remove duplicates in excel?
To use Power Query for removing duplicates in Excel:
- Select the data range and create a table (Ctrl + T).
- Go to ‘Data’ > ‘Get & Transform Data’ section > ‘From Table/Range’.
- Within Power Query Editor, select ‘Home’ > ‘Remove Rows’ > ‘Remove Duplicates’.
- After duplicates are removed, click ‘Close & Load’ to apply changes back to the workbook.
It’s a straightforward process even for those not deeply familiar with Power Query.
How to find duplicates in Excel using countif?
To find duplicates in Excel using the COUNTIF function, enter the formula =COUNTIF(range, criteria) in a new column next to your data. Replace range with the range of cells you want to check for duplicates and criteria with the cell you’re checking. Excel will then count how many times each value appears in the range, highlighting duplicates with a count greater than 1.
John Michaloudis is a former accountant and finance analyst at General Electric, a Microsoft MVP since 2020, an Amazon #1 bestselling author of 4 Microsoft Excel books and teacher of Microsoft Excel & Office over at his flagship Academy Online Course.
