Microsoft Excel is an indispensable tool for organizing and analyzing data. One crucial aspect of ensuring clarity in your spreadsheets is properly adjusting column widths to fit the content within. Autofitting column width in Excel is a simple yet effective feature that streamlines this process, automatically resizing columns so that all data is fully visible without manual adjustments. This seamless adjustment enhances both the readability and the professional appearance of your spreadsheets.
Key Takeaways
- Double-click the boundary to the right of the column header to automatically adjust the column width to fit the longest entry.
- Use the “AutoFit Column Width” option in the Format Cells dialog under the Home tab for precise adjustment.
- Select multiple columns first if you want to AutoFit several columns at once for consistent sizing.
- Remember that wrapping text or merging cells can be alternatives for handling longer text entries in Excel.
Table of Contents
Introduction
Discovering the Power of Excel’s Autofit Feature
Are you ready to say goodbye to the time-consuming task of manually resizing columns and rows in Excel? Let’s dive into the seamless world of Excel’s Autofit feature, a powerful ally for anyone who needs to quickly prep their data for prime time.
Streamlining Your Data Presentation with Quick Adjustments
Excel’s Autofit feature is a real game-changer for organizing and presenting your data. With a simple tweak, you can transform a messy spreadsheet into a tidy, professional document. It’s all about making data not just visible, but optimally displayed for analysis or reporting. Imagine, with just a quick adjustment, your Excel sheet goes from cramped and unreadable to streamlined and accessible.
Understanding Autofit in Excel
What Is Autofit and Why Use It?
Autofit in Excel is a handy feature designed to automatically adjust column widths and row heights to fit the content within them perfectly. They get the space they need—no more, no less. But why use it? Autofit ensures that your data is comprehensively visible at a glance, reducing the likelihood of overlooking important information due to clipping or overflow. It enhances the readability and professionalism of your sheets and saves you the hassle of manually sizing every column and row, especially beneficial in sheets packed with extensive data.
The Impact of Autofit on Productivity
Using Autofit has a ripple effect on productivity. It’s not just about making your spreadsheet look good – it’s about efficiency. Imagine tidying up a complex sheet full of data in seconds rather than minutes or hours. This streamlined approach reduces the risk of data misinterpretation and ensures that patterns and trends aren’t obscured by messy formatting. With more time on your hands, you can focus on what the data is telling you, rather than wrestling with column sizes. That’s why embracing Autofit is a savvy move for anyone looking to optimize their time and output in Excel.
Quick Tips to Master Autofit
AutoFit Using the Mouse for Speedy Resizing
Love seamless and quick solutions? AutoFit using your mouse is your go-to method. Here’s how you can master column and row resizing in a snap:
For Columns:
- Place your cursor at the right border of the column header.
- Wait for the cursor to change into a double-sided arrow.
- Double-click and voilà! The column width adjusts to the content.
For Rows:
- Move your cursor to the bottom border of the row header.
- Look for the double-sided arrow cursor.
- Double-click and the row height perfectly fits your content.
Speed and efficiency can be yours—using the mouse for AutoFit helps you resize with ease and gets your data looking its best in no time.
Harnessing the Ribbon for Precise Autofit Control
If you’re seeking precision and control in adjusting your data display, the ribbon in Excel offers just that. With just a couple of clicks, you can have your rows and columns resized to an ideal fit. Let’s see how:
For Columns:
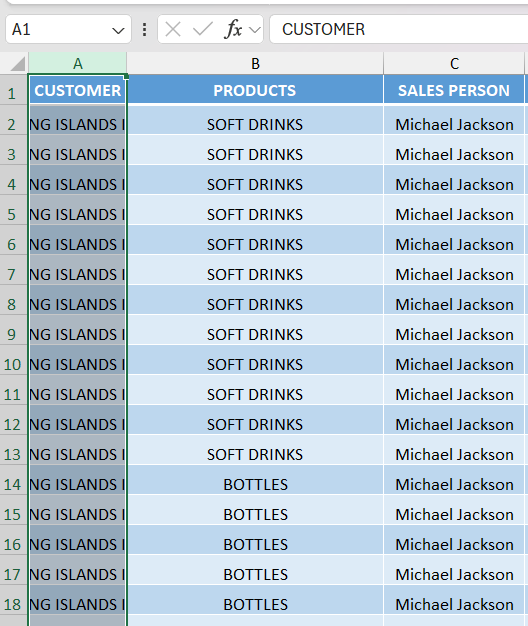
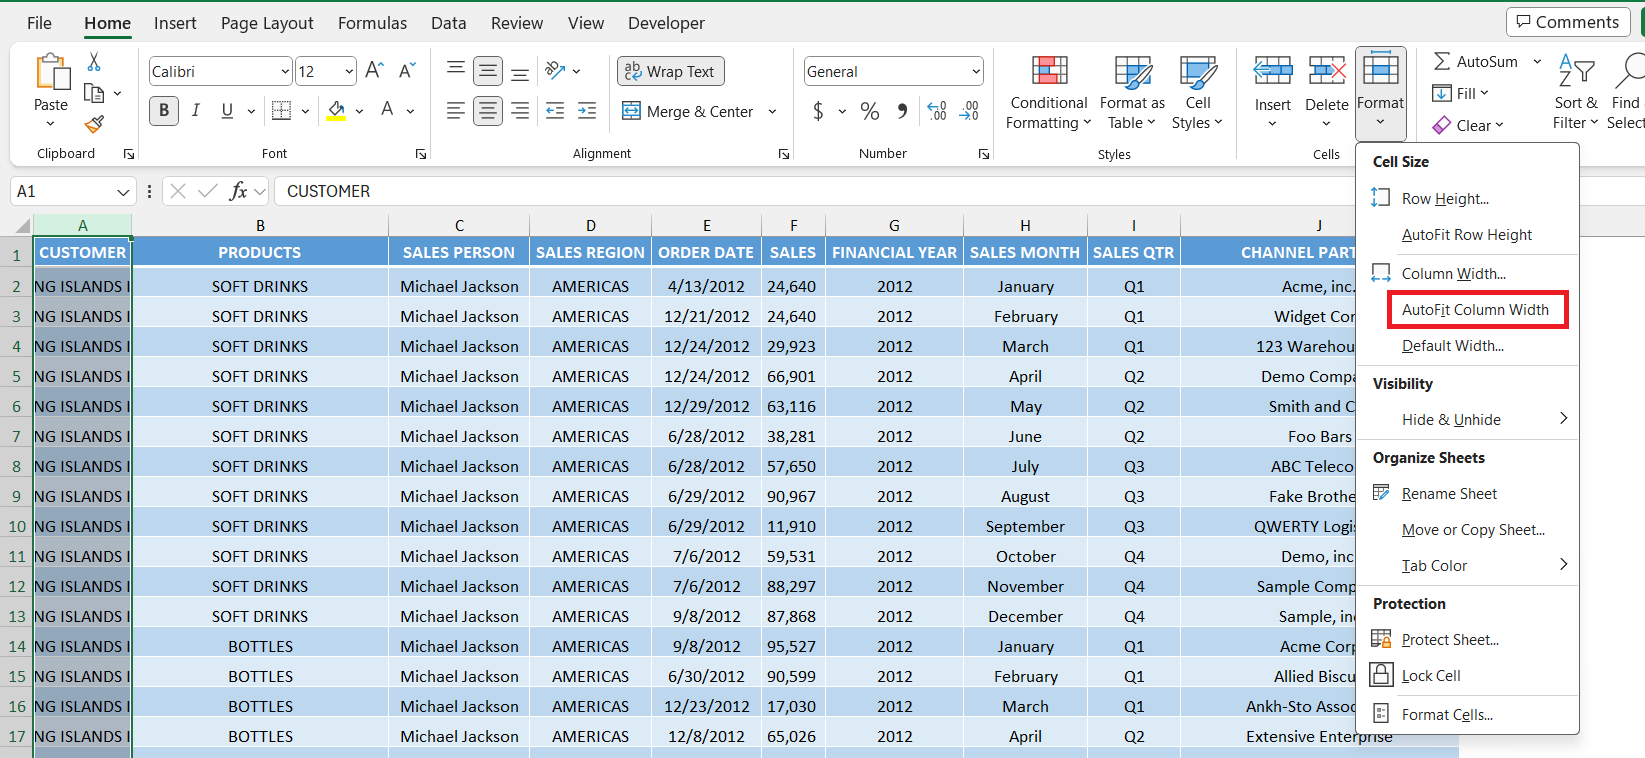
STEP 1: Select the columns you wish to autofit.
STEP 2: Head to the Home tab.
STEP 3: Locate and click the Format button within the Cells group. Choose ‘AutoFit Column Width’ from the dropdown options.
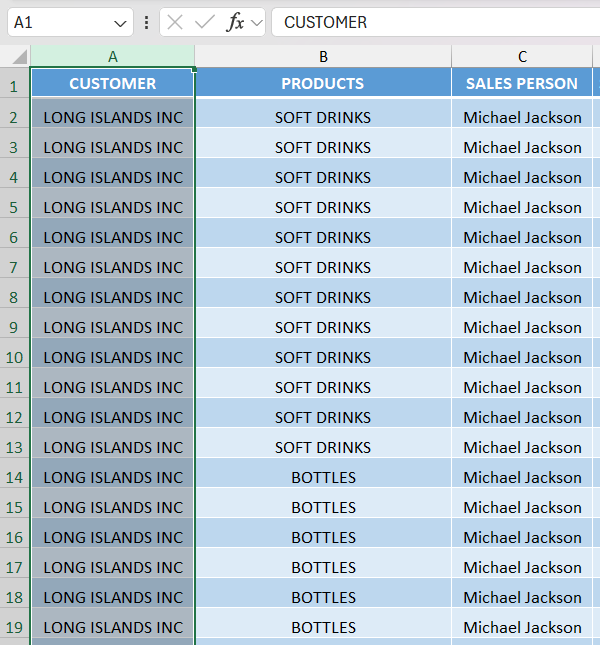
The column is automatically fitted now.
For Rows:
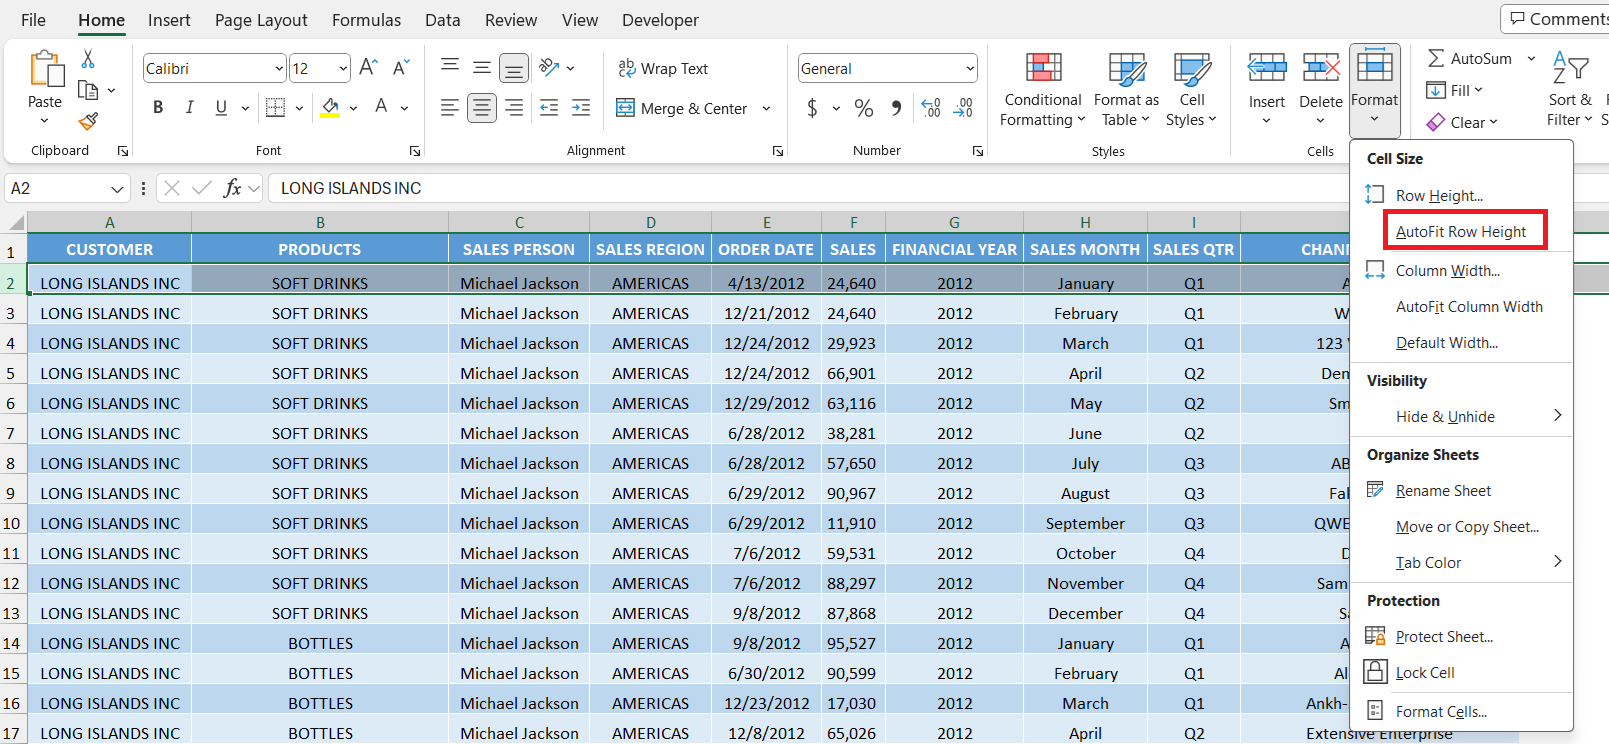
STEP 1: Click on the row header to highlight the entire row.
STEP 2: Go to the Home tab.
STEP 3: Click on Format in the Cells group. Select ‘AutoFit Row Height’ from the menu.
The row is automatically fitted now.
By harnessing the ribbon for Autofit, you gain the ability to make bulk adjustments or tailor individual rows and columns effortlessly, ensuring your spreadsheet’s appearance is nothing short of professional.
Advanced Autofit Techniques
Keyboard Shortcuts for the Excel Power User
Elevate your Excel efficiency to new heights by mastering keyboard shortcuts for Autofit. They’re the express lane to resizing rows and columns—no mouse clicks are needed! Let’s look at these powerful keystrokes:
Autofit Column Width Shortcut:
- Simply press
Alt, followed byH,O, andIin succession. - Your selected column(s) will spring to the perfect width to display all the content.
Autofit Row Height Shortcut:
- Press
Alt, thenH,O, andAone after the other. - Watch as the rows adjust their height automatically.
Embrace these shortcuts and join the ranks of Excel “Power Users” who navigate spreadsheets with blazing speed and precision. After all, in the world of data analysis, time saved is insight gained.
Solving Common Autofit Challenges
Addressing Issues with Merged Cells
Encountering snags with Autofit due to merged cells in Excel? You’re not alone. Merged cells can often cause Autofit to behave unexpectedly since they span multiple columns or rows. Here’s how you can navigate this common issue:
- Unfortunately, the Autofit feature doesn’t work directly on merged cells. You’ll need to manually adjust the row height or column width.
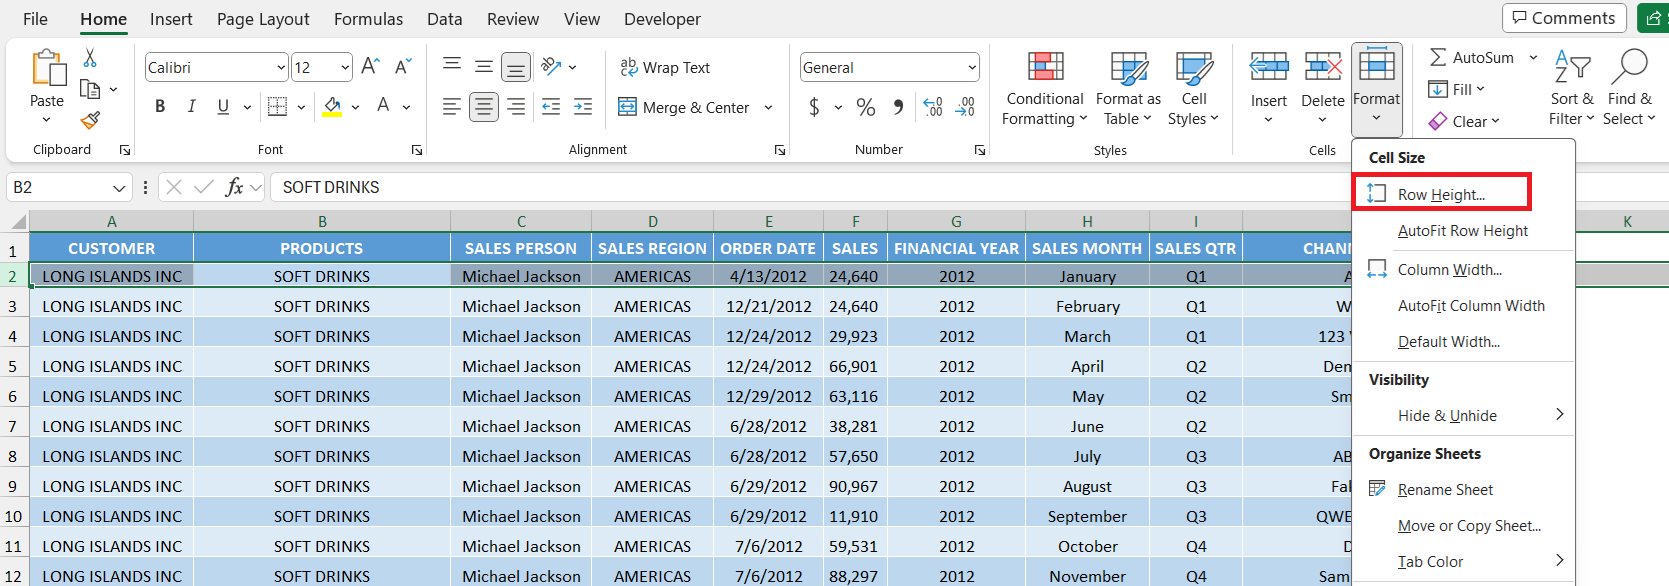
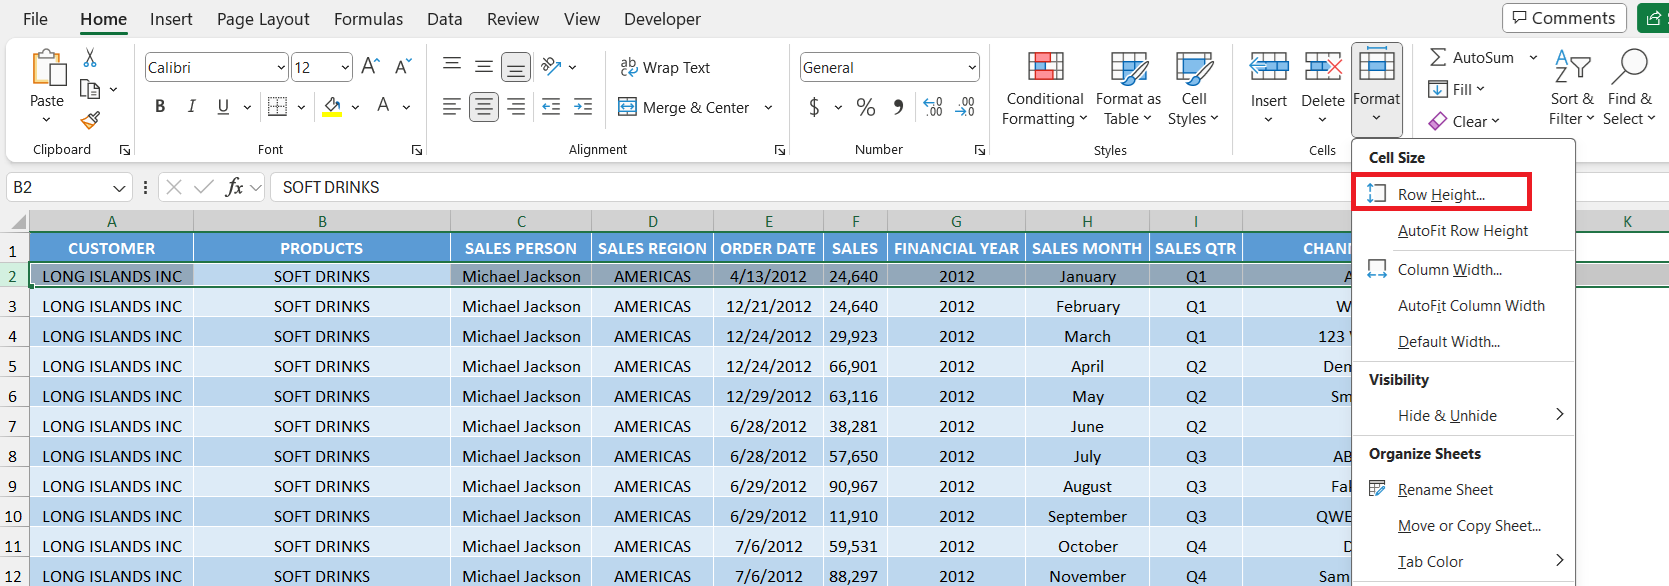
- Click and drag the borders of the merged cell rows or columns to resize, or input the desired size by selecting Home > Format > Row Height.
While merged cells can be visually effective, they do add an extra step to the formatting process. However, with a conscious approach, you can ensure that your cell merging doesn’t impede the overall readability and appearance of your spreadsheet.
Overcoming Autofit Limitations with Wrap Text and More
When you find Autofit falling short, particularly with lengthy text entries, it’s time to employ additional strategies such as Wrap Text to ensure content visibility without oversized columns.
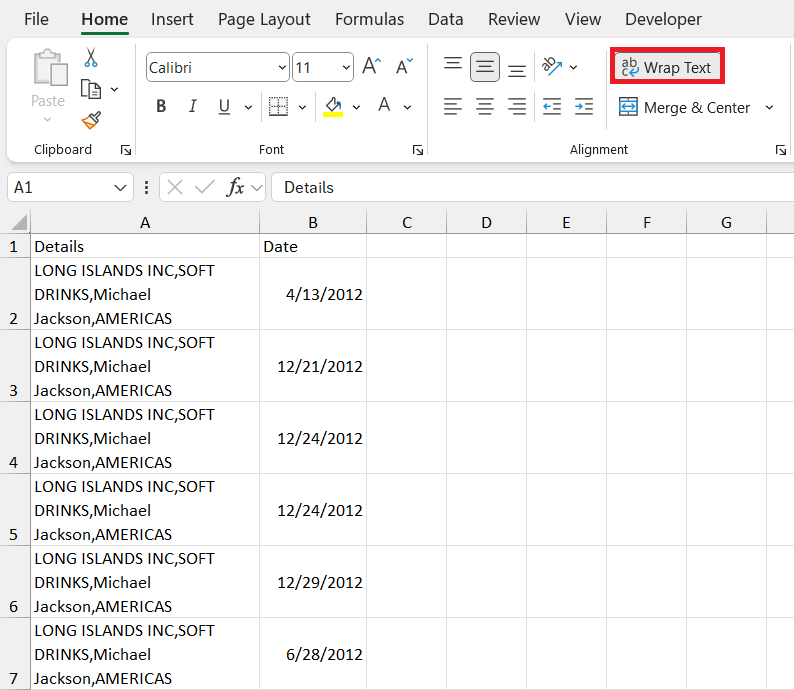
- To enable text wrapping, click the ‘Wrap Text’ option under the Home tab in the Alignment group. The text within a cell will now be displayed on multiple lines, and rows will be adjusted to accommodate the changes.
- You can also tweak the row height manually after wrapping text for finer control. Simply select the row, right-click, choose ‘Row Height’, and set your value.
Additionally, consider using merged cells for a larger display area but do so sparingly to avoid complicating your Autofit needs. Another tactic is to shorten the text with abbreviations or reduce font size, provided that readability is not compromised.
Remember that a combination of these techniques can often deliver the best result in overcoming the limitations of Autofit, making your data presentation both effective and aesthetically pleasing.
Putting Autofit into Practice
Practical Scenarios for Optimizing Column Widths
Understanding when and how to adjust column widths can dramatically improve your workflow. Here are a few practical scenarios:
- Data Entry: When typing or importing data into Excel, you can quickly run the Autofit feature to ensure all data is visible.
- Report Preparation: Before printing or sharing a report, use Autofit to ensure that text doesn’t spill over into adjacent cells which can be confusing for readers.
- Data Analysis: If you’re looking to spot trends and make data comparisons, adjusting column widths for a clear view of your charts and tables is crucial.
Each situation may call for a different approach, but Autofit options in Excel provide a flexible solution to meet your column width adjustment needs efficiently.
Advancing Beyond Basics with Dynamic Templates
Once you’ve mastered the basics of Excel, including AutoFit, it’s a great time to take things up a notch. Dynamic Excel templates are your pathway into more advanced territory:
- Why Dynamic Templates?: They offer pre-built, sophisticated solutions for tasks like project management, budgeting, and scheduling, equipped with formulas and functions ready to use.
- Customizable Reports: Dynamic templates often include out-of-the-box tools to create stunning reports and dashboards, enabling you to generate actionable insights with minimal effort.
The Benefits of Dynamic Templates:
- Time-efficient: Significantly reduce the time spent on setup and formatting.
- Professional results: Deliver high-quality, consistent reports.
- Data-driven decision-making: Spotlight critical insights that can guide business strategies.
Whether you’re a business owner, a student, or an aspiring data analyst, these advanced Excel tools can amplify your abilities, enabling you to present and analyze data like a seasoned pro.
Frequently Asked Questions on How To Autofit In Excel
Can I apply Autofit to multiple columns or rows at once?
Yes, you can apply Autofit to multiple columns or rows at once in Excel. To do so, select the columns or rows by clicking and dragging across the headers, then double-click the border between any two selected headers to resize them all simultaneously. For the entire sheet, press Ctrl + A and then double-click a column or row boundary.
What to do when Autofit doesn’t seem to work?
If Autofit doesn’t work, first check if there are merged cells or hidden columns; unmerge and unhide as needed. Confirm that Wrap Text is enabled for lengthy content. If issues persist, try setting column width or row height manually through the Format option under the Home tab.
What is the shortcut for AutoFit column width in Excel?
The shortcut for AutoFit column width in Excel is Alt followed by H, O, and I. Press these keys in succession while a column or range of columns is selected to adjust their widths to fit the content automatically.
How do I turn off AutoFit column widths?
Excel doesn’t have an option to disable AutoFit, but you can maintain column widths by manually setting them. Right-click a column header, select ‘Column Width,’ and enter a number to set your desired width. Repeat as needed to prevent automatic resizing.
John Michaloudis is a former accountant and finance analyst at General Electric, a Microsoft MVP since 2020, an Amazon #1 bestselling author of 4 Microsoft Excel books and teacher of Microsoft Excel & Office over at his flagship Academy Online Course.

