An Excel spreadsheet is a very powerful software which was developed by Microsoft in 1985 and is used by over 800 million users for number crunching, data analysis & reporting, charting and note taking – wherein its true power is often underutilized 🙂
It is widely used by organizations for calculating, accounting, preparing charts, budgeting, project management, and various other tasks. The different uses of an Excel spreadsheet is in fact limitless! In this tutorial we will hold your hand and teach you how to use Excel for the first time.
Want to know How To Master Excel from Beginner to Expert?
*** Watch our video and step by step guide below with a free downloadable Excel workbook to practice ***
Watch it on YouTube and give it a thumbs-up!
Table of Contents
An Excel Spreadsheet is the go-to software to analyze, sort, or present a large amount of information and data in no time.
In this Excel tutorial, I will cover the Basics of Excel that you need to know to get started with how to use Excel. This Excel for dummies guide will include tutorials on:
- Opening an Excel Spreadsheet
- Understanding the Different Elements of an Excel Spreadsheet
- Entering Data in an Excel Spreadsheet
- Basic Calculations in an Excel Spreadsheet
- Saving an Excel Spreadsheet
Let’s start this step by step Excel tutorial on – “How to use Excel”
Opening an Excel Spreadsheet
To open an Excel Spreadsheet, follow the steps of this Excel tutorial below:
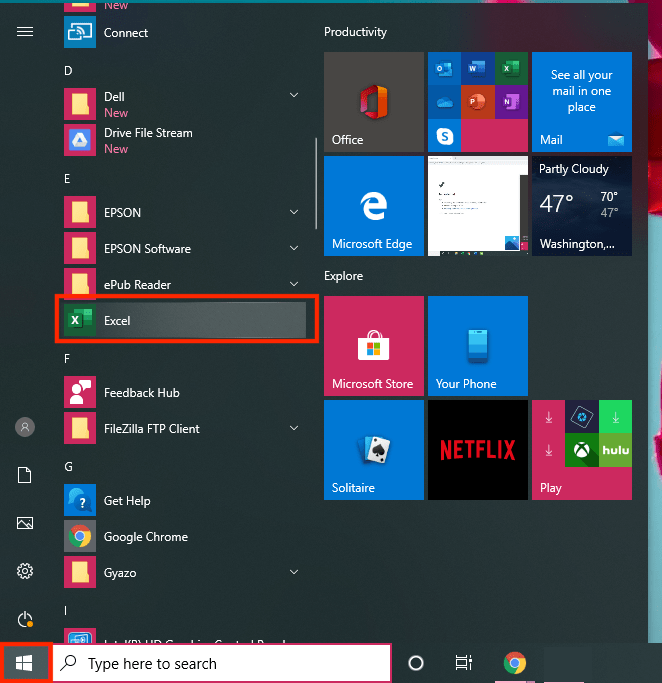
Step 1: Click on the Window icon on the left side of the Taskbar and then scroll below to find “Excel”.
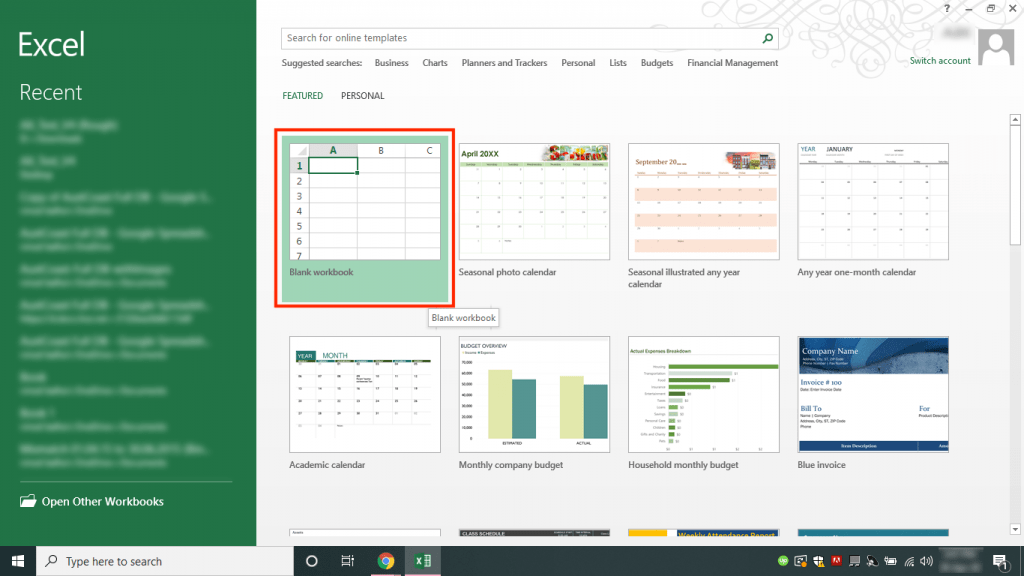
Step 2: You can either click on the “Blank Workbook” button to open a blank Excel spreadsheet or select from the list of pre-existing templates provided by Excel.
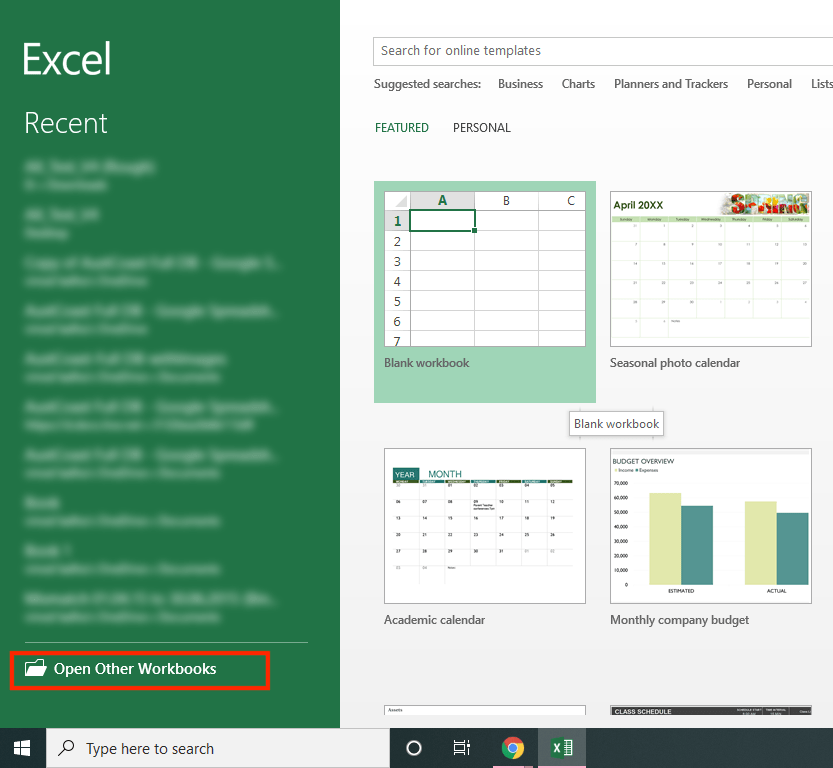
To open an existing Excel spreadsheet, click on the “Open Other Workbooks” and select the Excel sheet you want to work on.
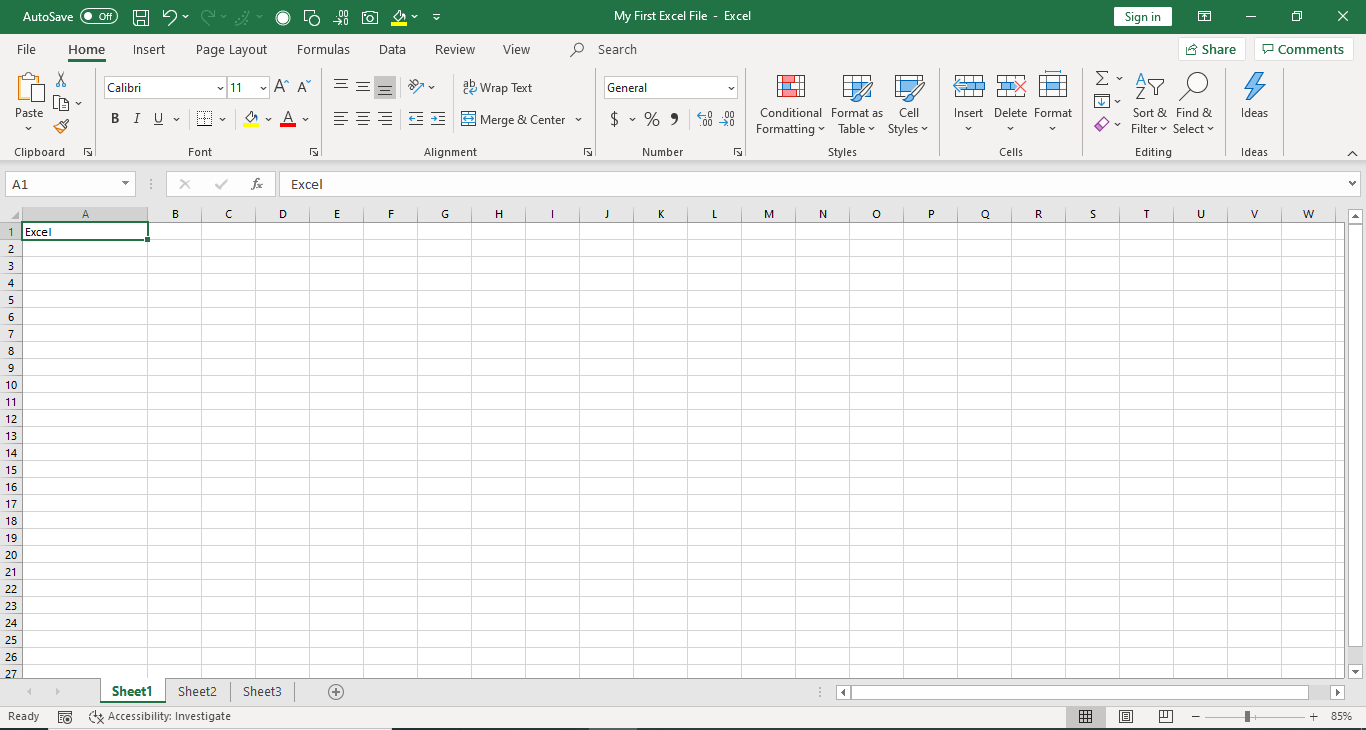
Step 3: An Excel spreadsheet is now opened and you are ready to explore the wonderful world of Excel.
Understanding the Different Elements of an Excel Spreadsheet
To explore the different ways on How to use Excel you should be familiar with the different elements of Excel first.
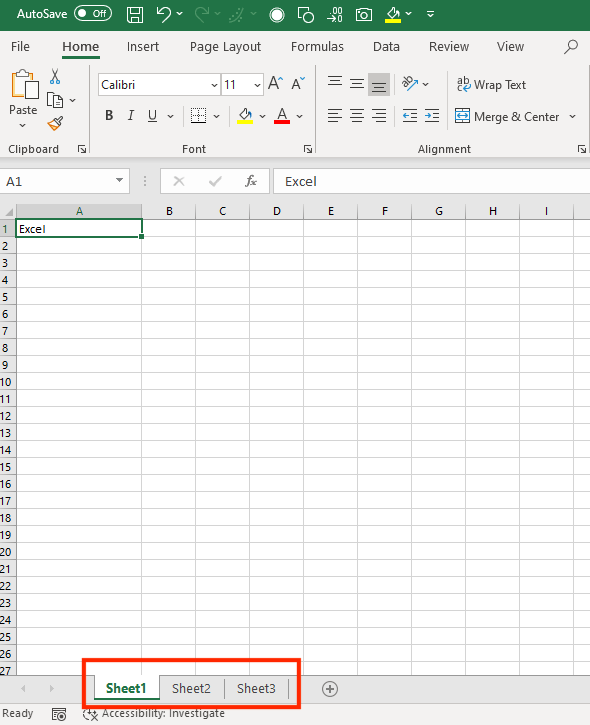
Excel Workbook and Excel Worksheet are often used interchangeably, but they do have different meanings. An Excel Workbook is an Excel file with the extension “.xlsx” or “.xls” whereas an Excel Worksheet is a single sheet inside the Workbook. Worksheets appear as tabs along the bottom of the screen.
Now that you are clear about these two terms, let’s move forward and understand the layout of an Excel Spreadsheet. It is a crucial step if you want to know how to use Excel efficiently.
Excel Ribbon
The Excel Ribbon is located at the top of the Excel Spreadsheet and just below the title bar or name of the worksheet. It comprises various tabs including Home, Insert, Page Layout, Formulas, Data, etc. Each tab contains a specific set of commands.
By default, each Excel spreadsheet contains the following Tabs – File, Home, Insert, Page Layout, Formulas, Data, Review, and View.
- File Tab can be used to open a new or existing file, save, print, or share a file, etc.
- Home Tab can be used to copy, cut, or paste cells and work on the formatting of data.
- Insert Tab can be used to insert the picture, charts, filter, hyperlink, etc.
- Page Layout Tab can be used to prepare the Excel spreadsheet for printing and exporting data.
- Formula Tab in Excel can be used to insert, define the name, create the name range, review the formula, etc.
- Data Tab can be used to get external data, sort filter and group existing data, etc.
- Review Tab can be used to insert comments, protect the document, check spelling, track changes, etc.
- View Tab can be used to change the view of the Excel Sheets and make it easy to view the data.
You should be familiar with these tabs so you can understand how to use Excel efficiently. You can even customize these Tabs using the following steps:
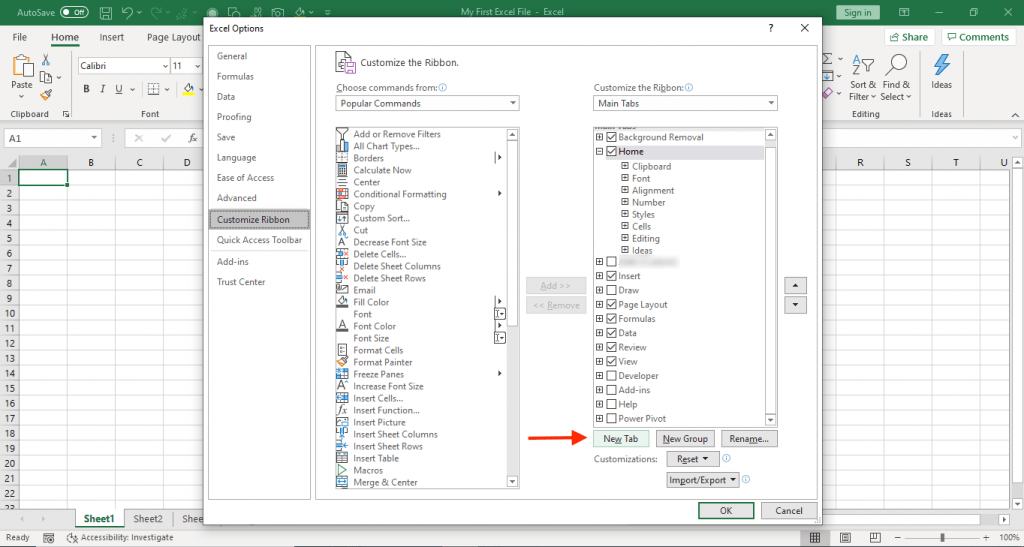
Step 1: Right-click on the ribbon and click on “Customize the Ribbon”
Step 2: An Excel Options dialog box will open, click on the New Tab.
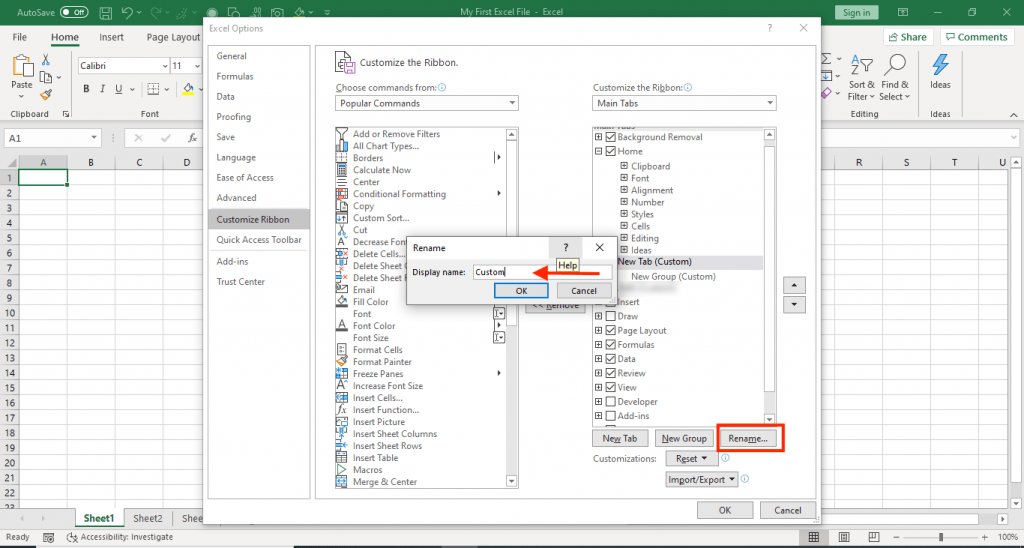
Step 3: Select that newly created tab and click on Rename and give it a name e.g. Custom
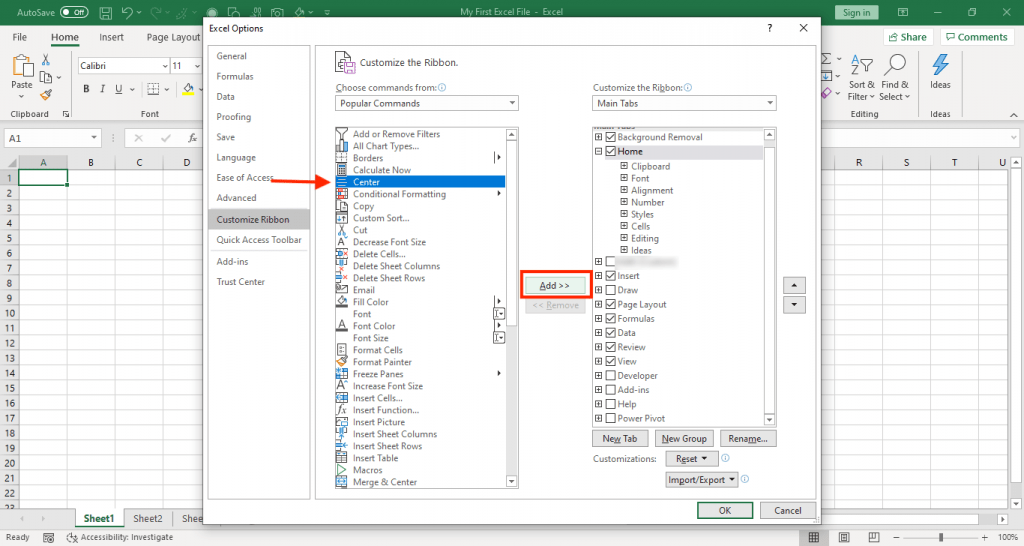
Step 4: Now you can add the commands that you want under each group by simply clicking on the command from the Popular Command column and click on Add >>
This will create a New Tab called “Custom” with a popular command “Center“.
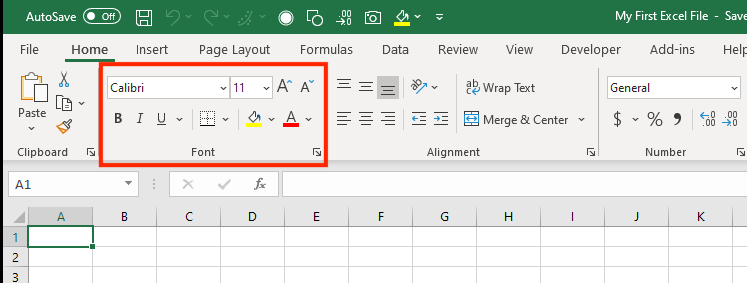
Under each Tab, there are various buttons grouped together. For Example – Under the Home Tab, all font-related buttons are clubbed together under the Group name “Font”.
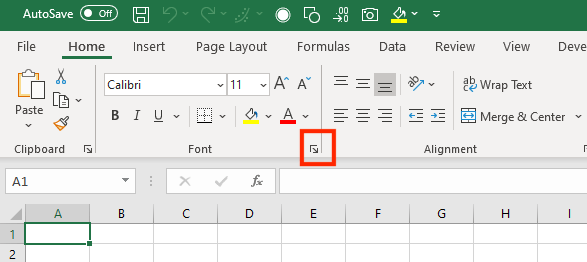
You can access other features related to that group by clicking on the small arrow at the end of each Group. Once you click on that arrow, a dialog box will open and you can make further edits using that.
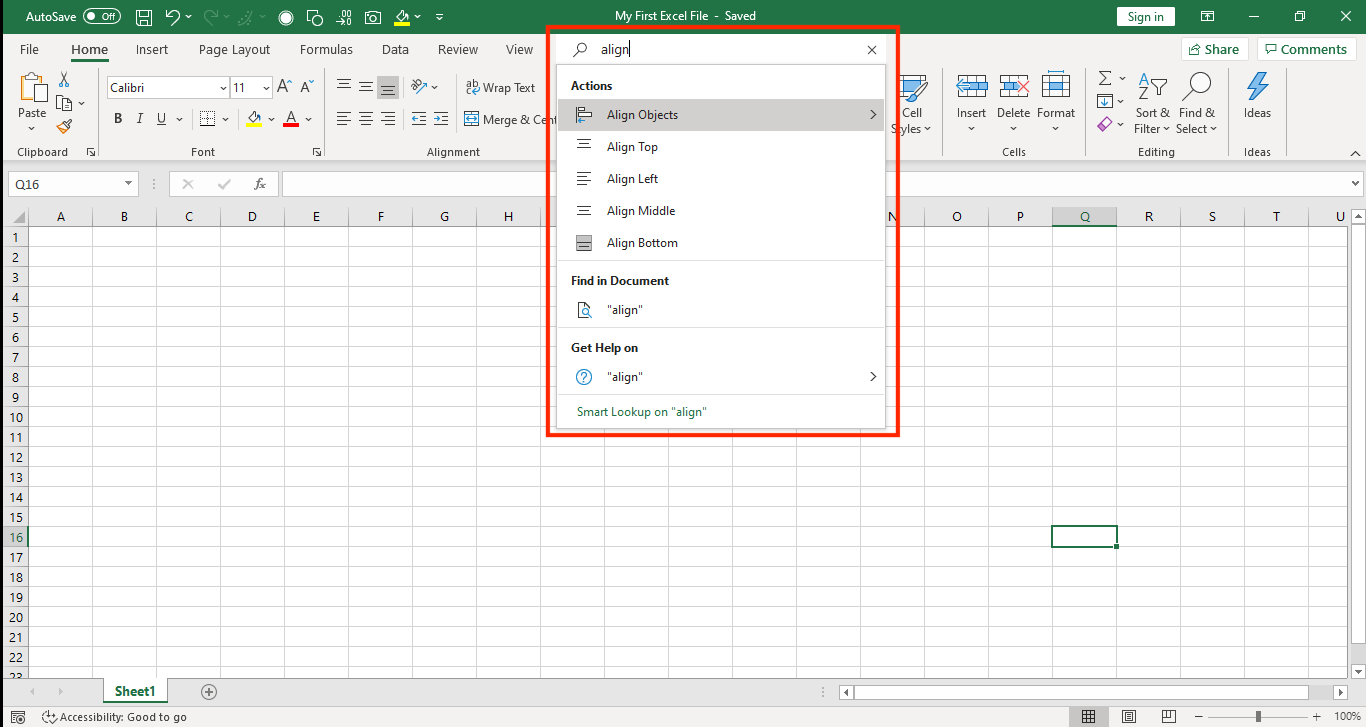
There is also a search bar available next to the tabs which was introduced in Excel 2019 and Office 365. You can type the feature that you are after and Excel will find it for you.
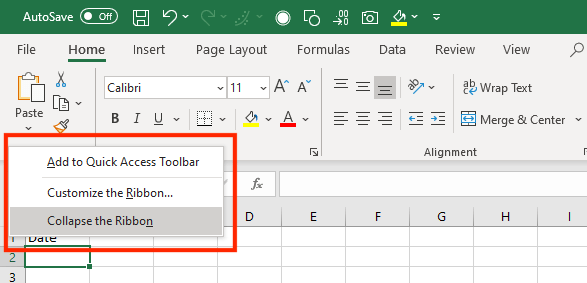
You can also collapse the ribbon to provide extra space in the worksheet by pressing the keyboard shortcut Ctrl + F1 or by right-clicking anywhere on the ribbon and then clicking “Collapse the Ribbon”.
This will collapse the Ribbon!
Formula Bar
Excel’s Formula bar is the area just below the Excel Ribbon. It contains two parts – on the left is the name box (it stores the cell address) and on the right is the contents of the currently selected cell. It is used to type values, text or an Excel formula or function.
You can hide or unhide the formula bar by checking/unchecking “Formula Bar” under View Tab.
You can also expand the formula bar if you have a large formula and its contents are not entirely visible. Click on the small arrow at the end of the formula bar and it will be expanded.
Status Bar
At the bottom left side of the workbook, all the Excel worksheets are shown. You can access an Excel sheet by simply clicking on it.
To add more Excel sheets, click on the “+” sign below which will add a new blank Excel sheet.
You can reorder the Excel sheets in your workbook by dragging them to a new location with your left mouse button.
You can also rename each Excel sheet by Right Clicking on a Sheet Name > Click on Rename > Type the Name > Press Enter.
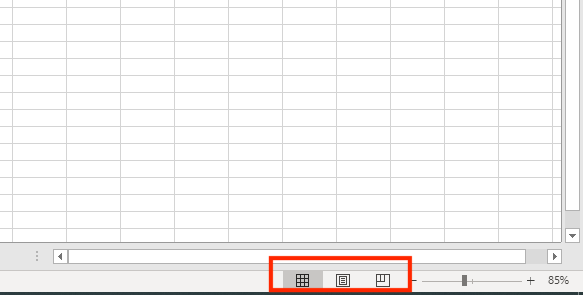
At the bottom right of the Excel spreadsheet, you can quickly zoom the document by using the minus and plus symbols. To zoom to a specific percentage, in the ribbon menu go to the View tab > Click Zoom > Click on the specific percentage or type in your custom % > Click OK.
There are different Excel workbook views available at the left of the zoom control: Normal View, Page Break View, and Page Layout View. You can select the view as per your choice.
Cell & Excel Spreadsheet Basics
Any information including text, number, or an Excel formula can be inserted within a Cell. Alphabets are used to label Columns and numbers are used to label Rows.
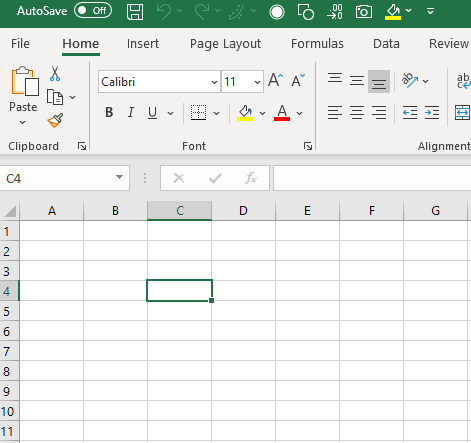
An intersection of a Row and Column is called a Cell. In the image below, cell C4 is the intersection of Row 4 and Column C.
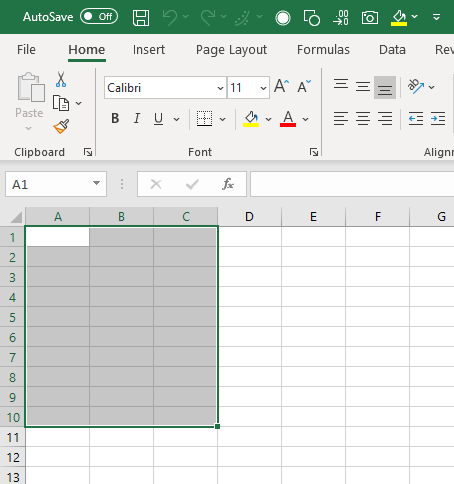
You can refer to a series of cells as a range by putting a colon between the first and last cells within the range. For example, the reference to the range starting from A1 to C10 will be A1: C10. This is great when you are using an Excel formula.
Now that you are familiar with the different elements in an Excel Spreadsheet, let’s show you how to use Excel to enter data and do some calculations!
Entering Data in an Excel Spreadsheet
Follow this step -by-step tutorial on how to use excel to enter data below:
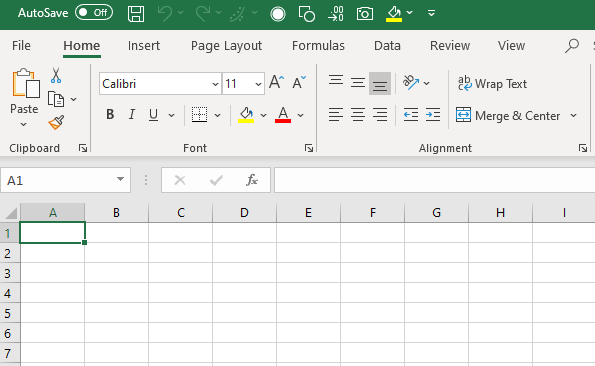
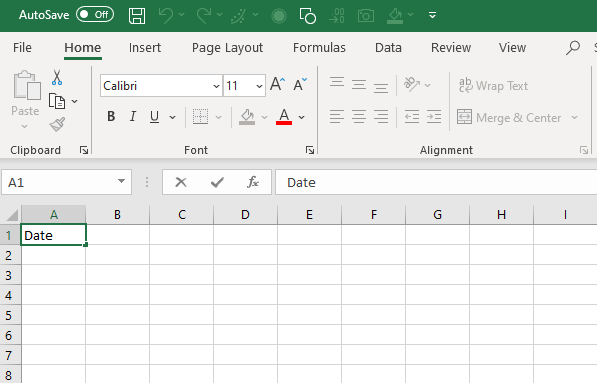
Step 1: Click the cell you want to enter data into. For Example, you want to enter your sales data and want to start with the first cell, so click on A1
Step 2: Type what you want to add, say, Date. You will see that the same data will be visible on the Formula Bar as well.
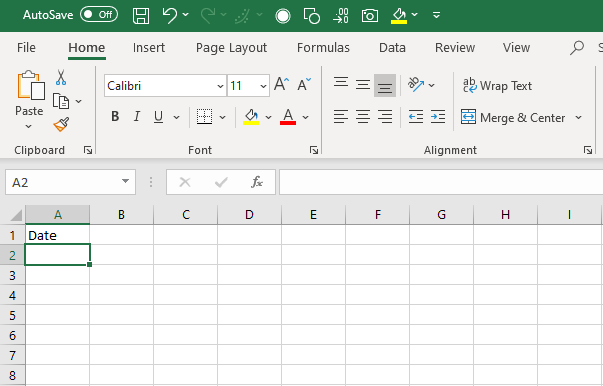
Step 3: Press Enter. This will store the written data on the selected cell and move the selection to the next available cell, which is A2 in this example
To make any changes in the cell, simply click on it and make the changes.
You can copy (Ctrl + C), Cut (Ctrl + X) any data from one Excel worksheet and paste it (Ctrl + V) to the same or another Excel worksheet.
Basic Calculations in an Excel Spreadsheet
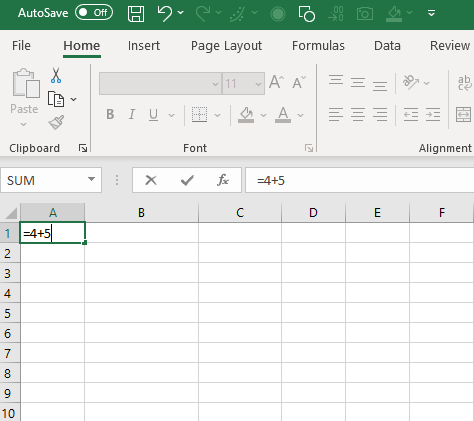
Now that you have understood how to use Excel to enter data, let’s do some calculations on the data. Let’s say you want to add two numbers: 4 and 5 in the excel spreadsheet.
Follow the steps below on how to use Excel to add two numbers:
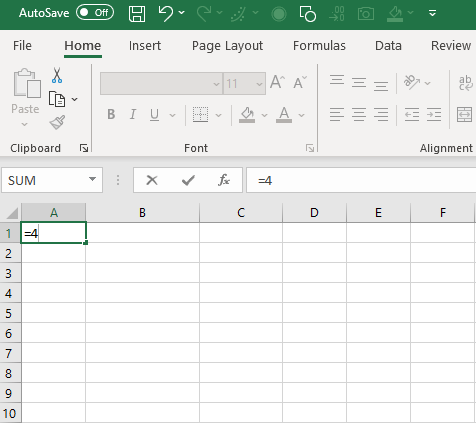
Step 1: Start with the = or the + sign to tell Excel that you are ready to run some sort of calculation.
Step 2: Type number 4.
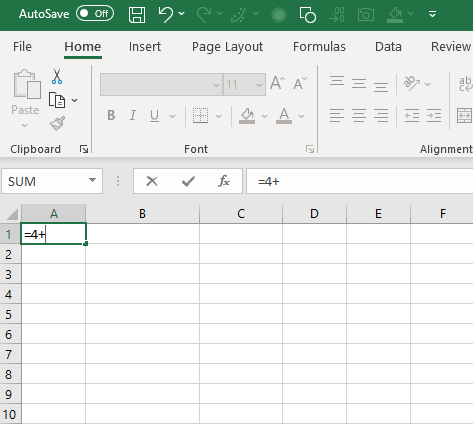
Step 3: Type + symbol to add
Step 4: Type number 5.
Step 5: Press Enter.
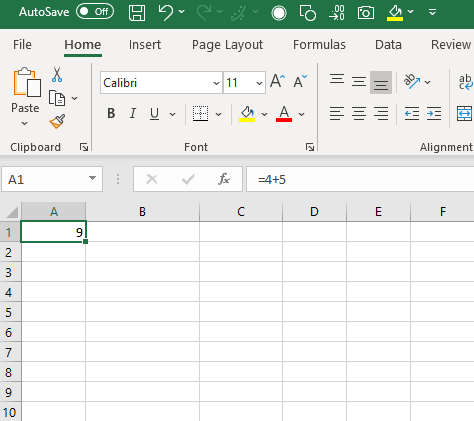
You will see the result 9 is displayed in the cell A1 and the formula is still displayed in the formula bar.
Let’s try to use a cell reference to make calculations.
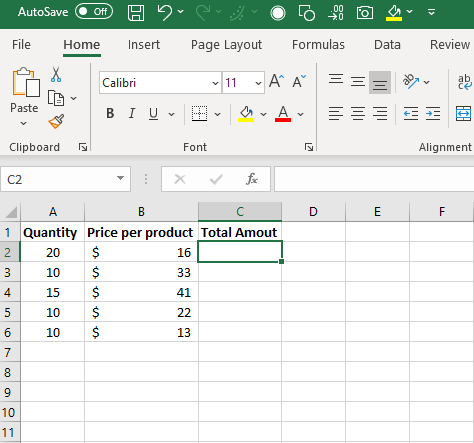
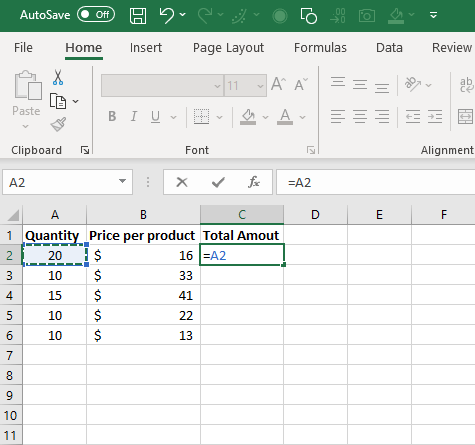
In the example below, you have Column A that contains the number of products sold and Column B that contains price per product and you need to calculate the total amount in Column C.
To calculate the total amount, follow the steps below:
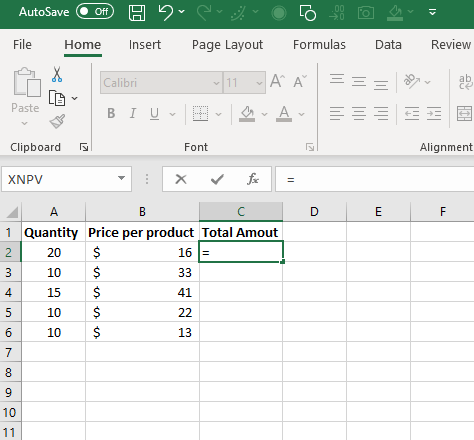
Step 1: Select cell C2
Step 2: Type = to start the formula
Step 3: Select cell A2 with your mouse cursor or by using the left arrow key.
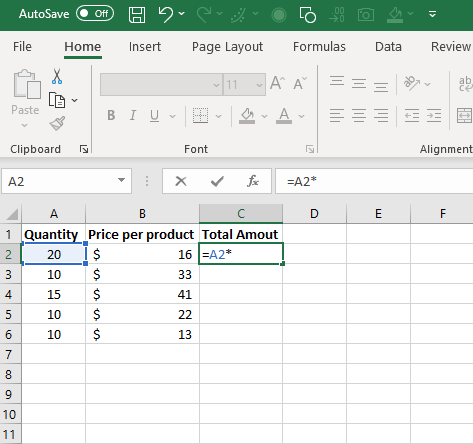
Step 4: Type the multiplication sign *
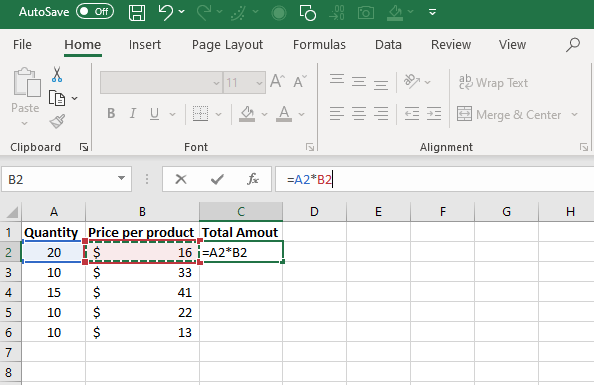
Step 5: Select cell B2
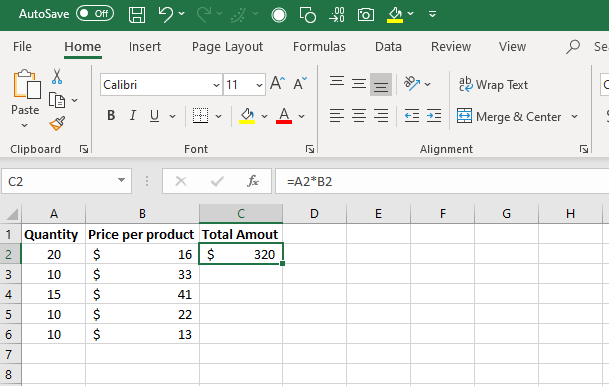
Step 6: Press Enter
You can use various calculation operators, such as Arithmetic, Comparison, Text Concatenation and Reference operators that will be useful for you to have a clear and complete idea on how to use Excel.
Here is a walk-through for Excel for Dummies by Microsoft covering the most requested features of Excel.
Saving an Excel Spreadsheet
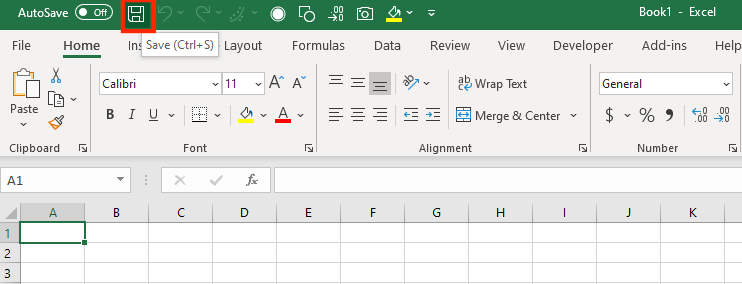
To save your work in Excel, click on the Save button on the Quick Access Toolbar or press Ctrl + S.
If you are trying to save a file for the first time, then follow these steps:
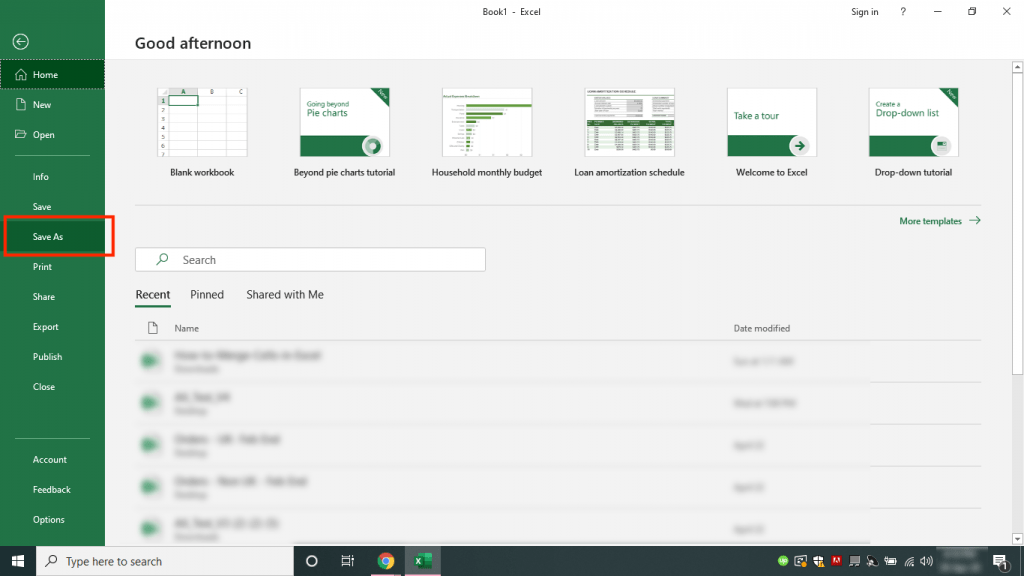
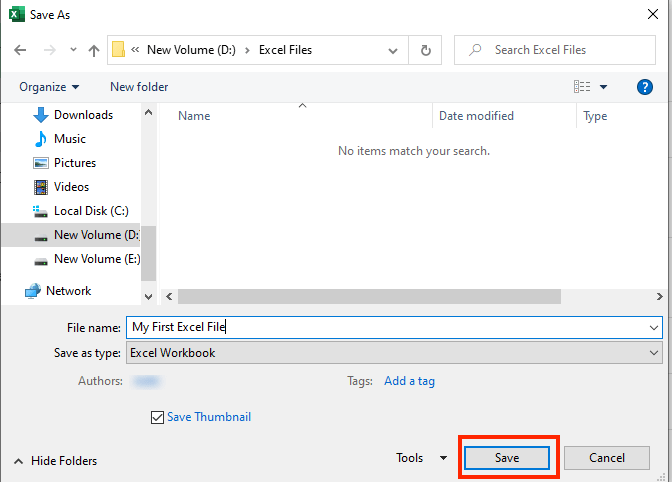
Step 1: Press Ctrl + Shift +S or Click on the “Save As” button under the File tab.
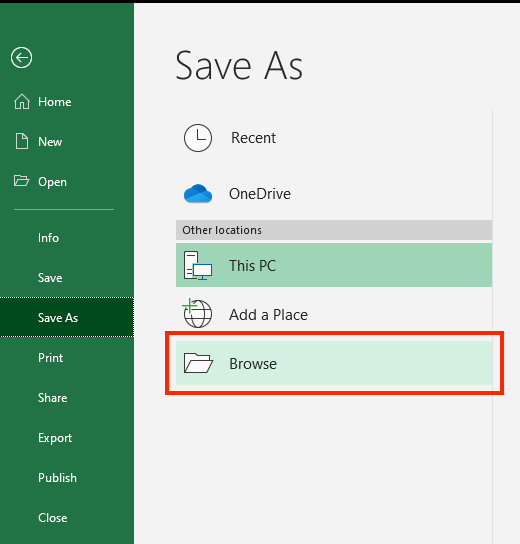
Step 2: Click on “Browse” and choose the location where you want to save the file.
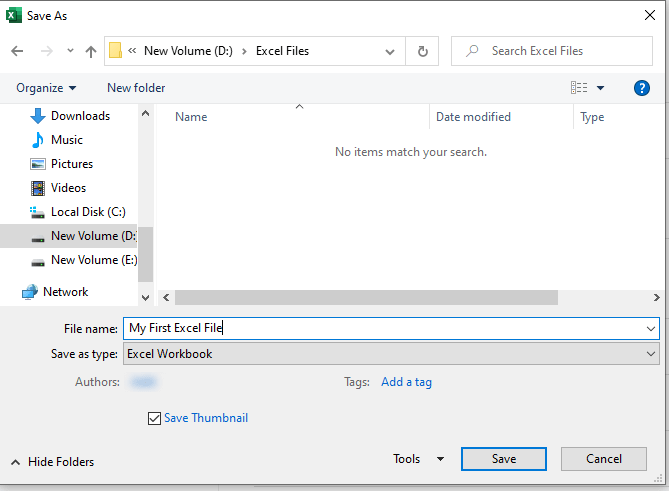
Step 3: In the File name box, enter a name for your new Excel workbook.
Step 4: Click Save
Here is an Excel for Dummies Video from Microsoft explaining how to save an Excel Workbook.
This brings us to the end of this how to Use Excel tutorial.
I have just covered the basics of how to use Excel in this article. As an Excel newbie, Excel is a completely unexplored & exciting world for you right now and you are going to learn so much along your journey.
My advice is to take baby steps, learn how to use one Excel feature, apply it to your data, make mistakes and keep on practicing.
Within 7 days your Excel confidence will skyrocket!
Make sure to download our FREE PDF on the 333 Excel keyboard Shortcuts here:
You can learn more on how to use Excel by viewing our FREE Excel webinar training on Formulas, Pivot Tables and Macros & VBA!
You can follow our YouTube channel to learn more about How To Use Excel for Dummies!
John Michaloudis is a former accountant and finance analyst at General Electric, a Microsoft MVP since 2020, an Amazon #1 bestselling author of 4 Microsoft Excel books and teacher of Microsoft Excel & Office over at his flagship Academy Online Course.

