When working with Microsoft Excel, unexpected issues such as system crashes or power failures can lead to potential data loss. Fortunately, Microsoft Excel’s AutoRecover features act as a safety net, enabling automatic preservation of your work and making it possible to restore previous versions of your files. Understanding how to utilize these features can save you from the frustration of losing important data.
Key Takeaways
- Utilize Excel’s AutoRecover feature to retrieve unsaved documents after unexpected crashes or power failures.
- Locate the AutoSave option and enable it to automatically save copies of your workbook as you work.
- Check Excel’s temporary files in case you inadvertently close a workbook without saving changes.
- Explore previous versions of the workbook by accessing the file history if mistakes were made and saving over updates.
Table of Contents
Introduction to Excel AutoRestore
The Lifesaver for Your Unsaved Spreadsheets
AutoRestore in Excel is akin to a digital safety net for your spreadsheets. It provides a crucial layer of protection against the loss of unsaved data due to unexpected incidents such as computer crashes, power failures, or accidental closures of the Excel application.
Understanding AutoRestore and How It Differs from AutoSave
AutoRestore, often referred to as AutoRecover, is Excel’s feature designed to help you retrieve unsaved files after an unexpected event has disrupted your work. This function is different from the AutoSave feature, which works seamlessly to save your files automatically every few seconds or minutes, primarily when the documents are stored on cloud services like Microsoft OneDrive or SharePoint.
While AutoSave proactively saves the document as you work, AutoRecover steps in reactively, saving a version of your document at intervals set by you, but only comes into play during disruptions. It’s important to note that AutoRecover is effective only for Excel workbooks that have been saved at least once; it cannot retrieve data from a file that has never been saved initially.
This distinction is critical to remember as it directs the way we approach our data protection strategies in Excel.
Configuring AutoRestore Settings
Step-by-Step Guide to Enable the AutoRestore Feature
Enabling AutoRestore in Excel is a straightforward process. To make sure your Excel application can recover unsaved files, follow these steps:
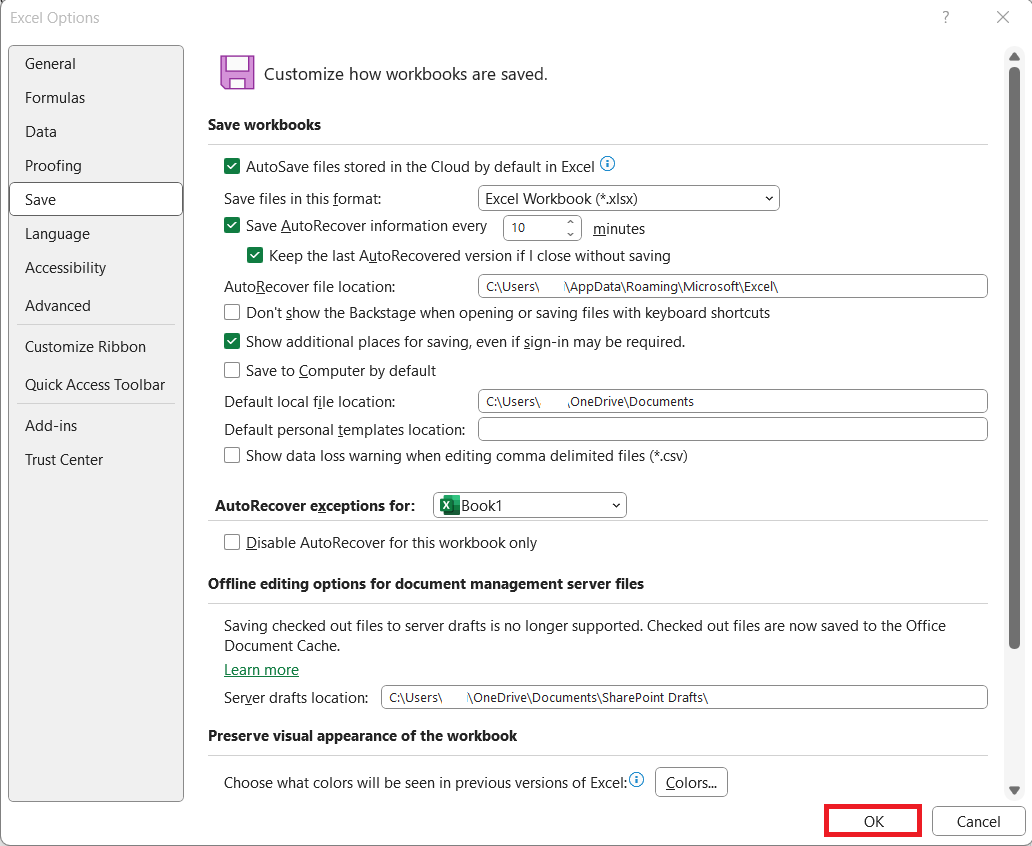
STEP 1: Launch Excel and select the “File” tab situated in the upper-left corner of the application window. From the dropdown menu, select “Options” to open the Excel Options dialog box.
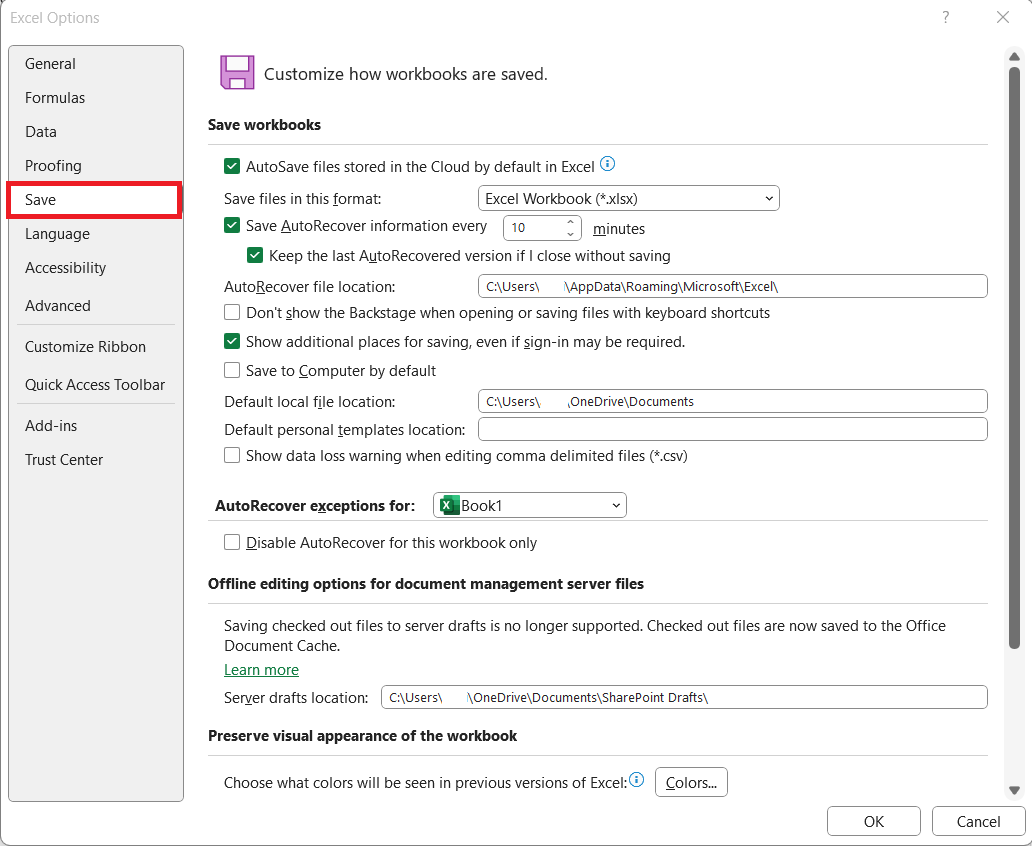
STEP 2: In the Excel Options dialog box, click on the “Save” category in the left sidebar.
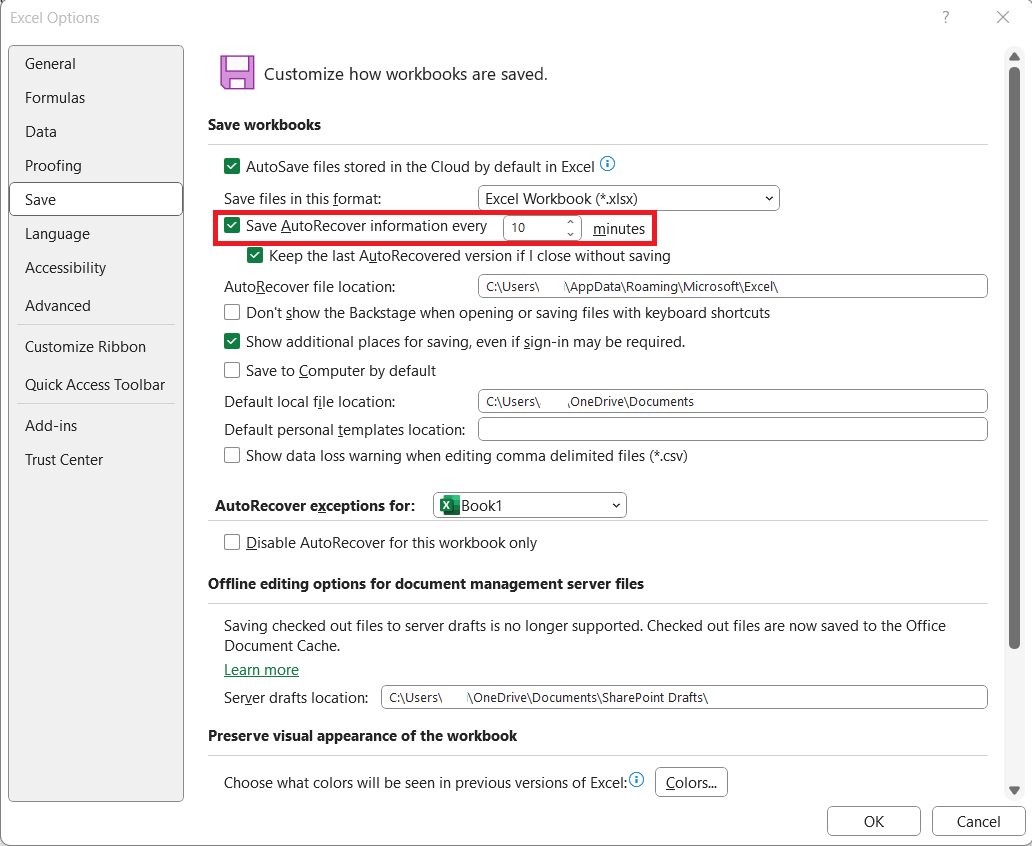
STEP 3: Look for the section labeled “Save workbooks” within the Save options. Ensure that the “Save AutoRecover information every * minutes” box is checked.
This is where you determine the frequency with which Excel saves a recoverable version of your work.
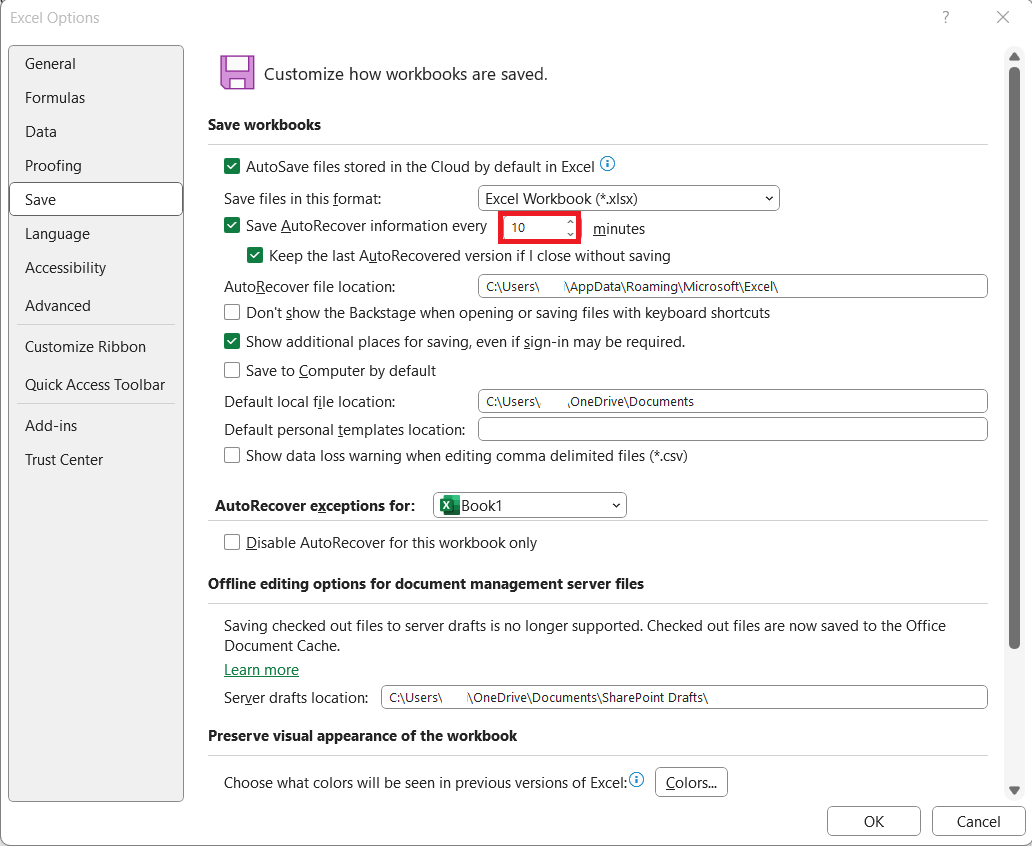
STEP 4: Set your preferred time interval in minutes within this option to control how often Excel will automatically save a copy.
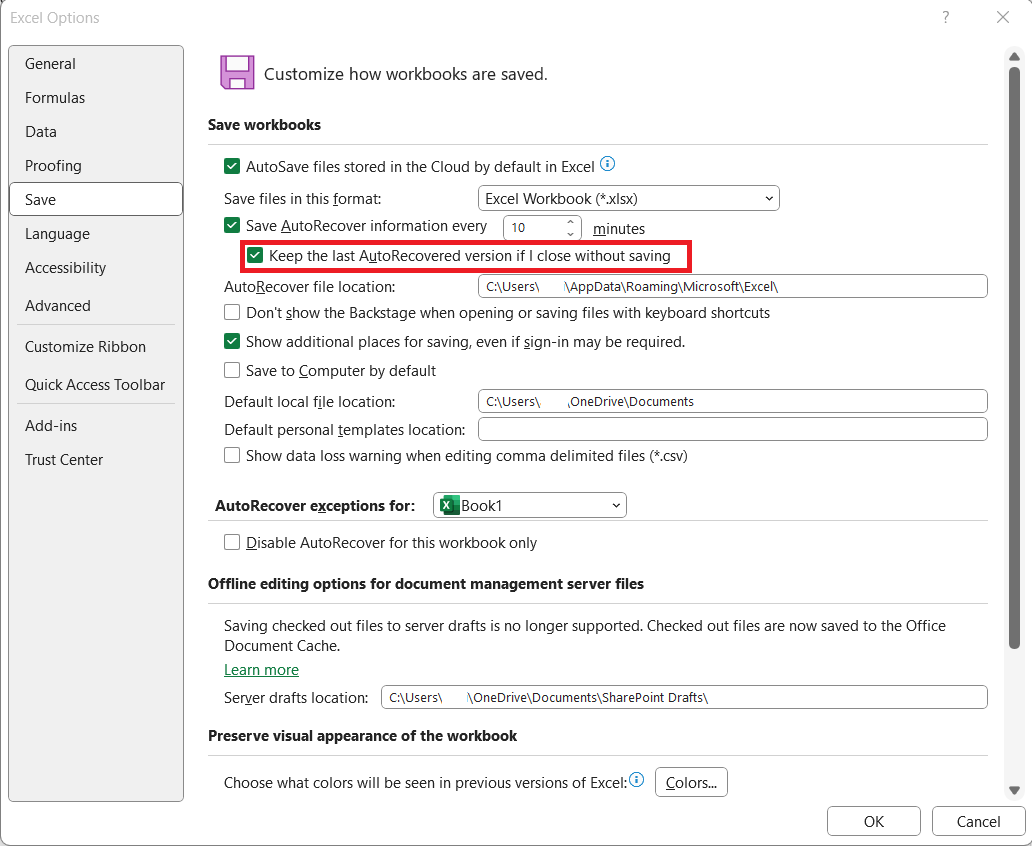
STEP 5: Also, check the “Keep the last AutoRecovered version if I close without saving” box to retain the last autosaved file in case you close the document without saving it manually.
STEP 6: After configuring these settings, click on the “OK” button to apply and save your changes.
Remember to save your initial Excel file to allow AutoRecover to work effectively since it cannot recover an unsaved file created from scratch. After enabling AutoRecover, Excel will begin to periodically save a copy based on the time interval you’ve selected, which will start to protect your data from then on.
Where to Find AutoRecover Files in Excel
Locating AutoRecovered files in Excel is a simple process once you know where to look. These are the steps to access the files that Excel has automatically saved through the AutoRecover feature:
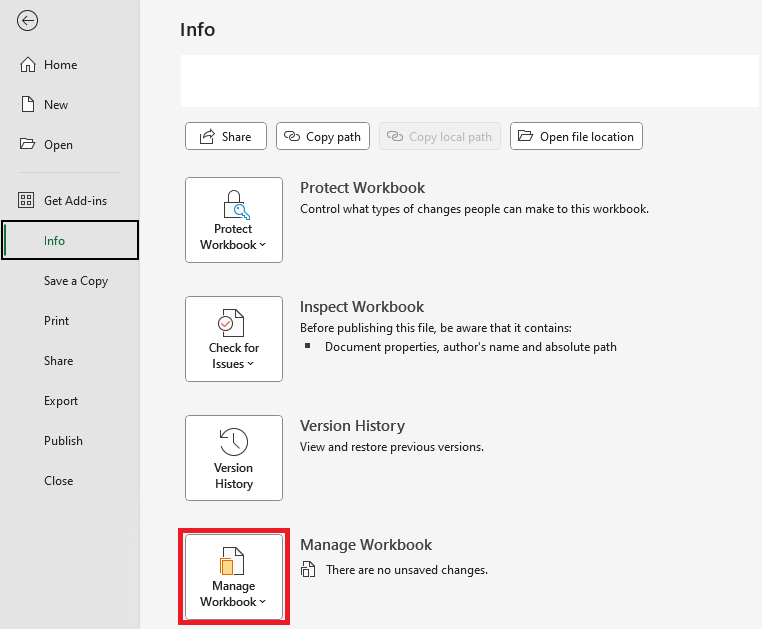
STEP 1: Go to the “File” tab in Excel and select ‘Info’.
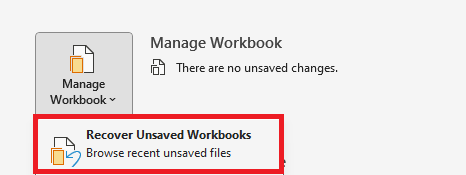
STEP 2: Under the ‘Manage Workbook’ dropdown, you will see options to recover unsaved workbooks.
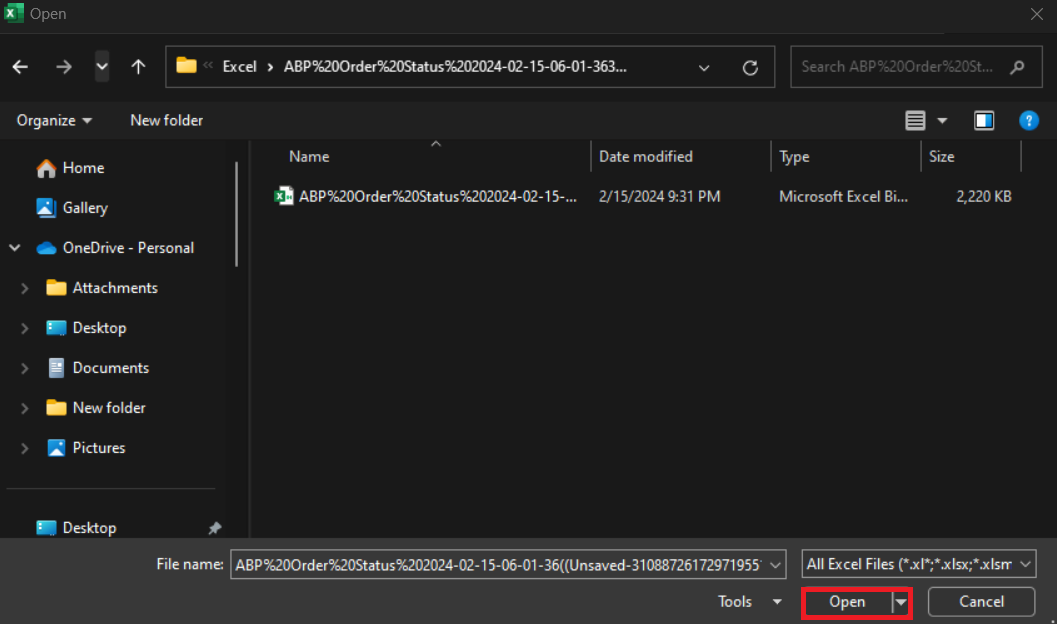
STEP 3: Click on “Recover Unsaved Workbooks” to see a list of recent unsaved files that you can open and save.
Understanding where Excel stores its AutoRecovered files is essential. This knowledge expedites the retrieval process, allowing you to regain your lost work promptly and relieve the stress typically associated with data loss.
Preventing Data Loss in Excel: Best Practices for Saving and Backing Up Your Work
Maintaining the safety and integrity of your Excel workbooks involves regular saving and backing up of files. Even with features like AutoSave and AutoRecover, adhering to best practices for data protection is essential. Here are some methods you can employ to ensure your work is secure:
- Make it a habit to save your work frequently by using the shortcut
Ctrl + S(orCmd + Son a Mac). This basic yet critical habit can save you from losing significant progress. - When working with files stored in cloud services like OneDrive or SharePoint, take advantage of the AutoSave feature to continually save changes as they happen.
- Create backups of critical workbooks. This could mean periodically saving copies to an external drive or cloud storage, or using Excel’s own backup options.
- Make use of Excel’s version history feature, especially when working via OneDrive or SharePoint, to revert back to previous states if necessary.
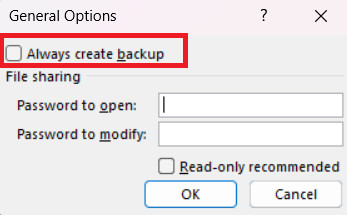
- Go to “File -> Save As” and access “Tools -> General Options” in the Save As dialog box. Here you can check the “Always create backup” option to have Excel save an extra copy of the workbook in the same location.
- When saving versions manually, use clear and consistent file naming conventions that include date or version numbers for easy tracking.
- Maintain an archive of your workbooks periodically. This can be a folder in your computer or a dedicated space in your cloud storage where you move older versions of files.
- If you’re working in collaboration with others, ensure that everyone is aware of and adheres to the practices for saving and backing up work.
By incorporating these best practices into your routine, you not only safeguard your work against potential data loss but also create a structured and reliable workflow. Consistently backed-up work ensures that even in the face of unforeseen events, your data remains recoverable and secure.
Balancing the use of Excel’s built-in features with disciplined habits forms a robust defense for your important spreadsheets. Remember, it’s often far less painful to prevent data loss than to recover from it, so proactive saving and backing up are vital disciplines for any Excel user.
Troubleshooting Common AutoRestore Issues
How to Deal with Corrupted Excel Files
A corrupt file is a file that has been damaged or altered in such a way that it can no longer function as it is supposed to. This corruption can occur for a variety of reasons, resulting in a range of issues when you try to open, use, or manipulate the file. When a file is corrupted, it may exhibit one or more of the following characteristics:
- It becomes completely inaccessible and cannot be opened by any program.
- The content of the file may appear garbled or unreadable.
- The file may open but with significant portions of data missing or altered.
- The file’s structure or formatting could be severely disrupted, presenting a changed layout.
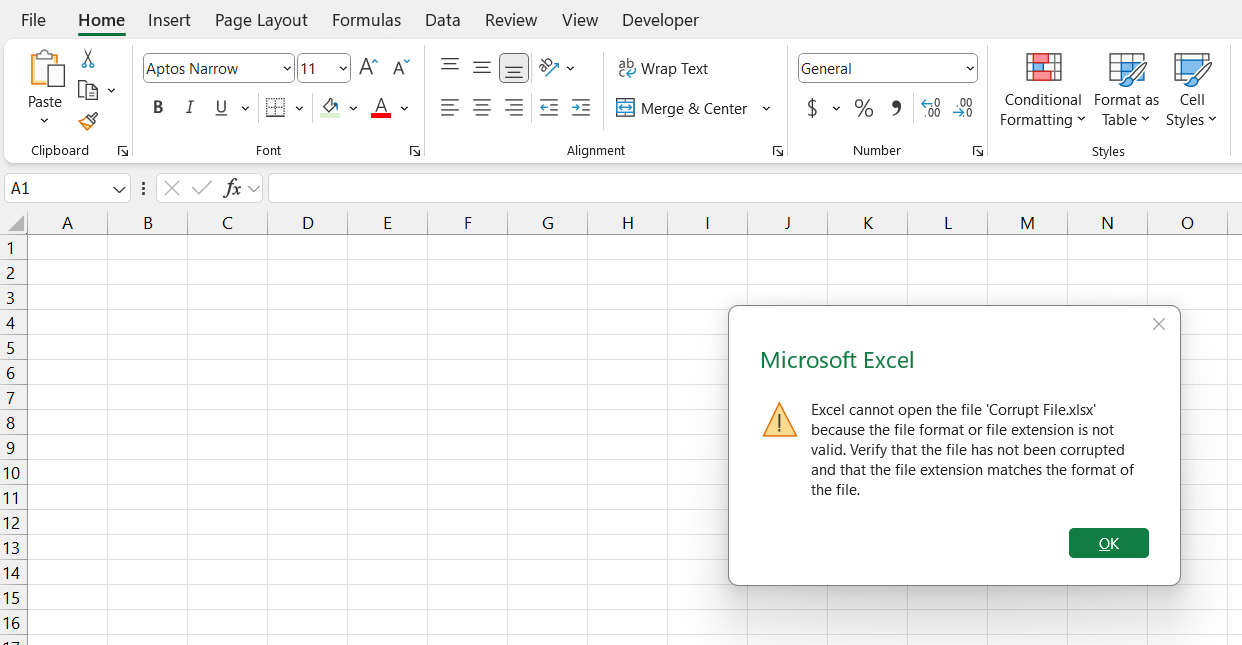
- Error messages may pop up when attempting to open or use the file.
When you encounter a corrupted Excel file, it can be an incredibly frustrating experience, especially if the file contains important data. Fortunately, there are a few strategies you can utilize to attempt to recover your file:
Method 1:
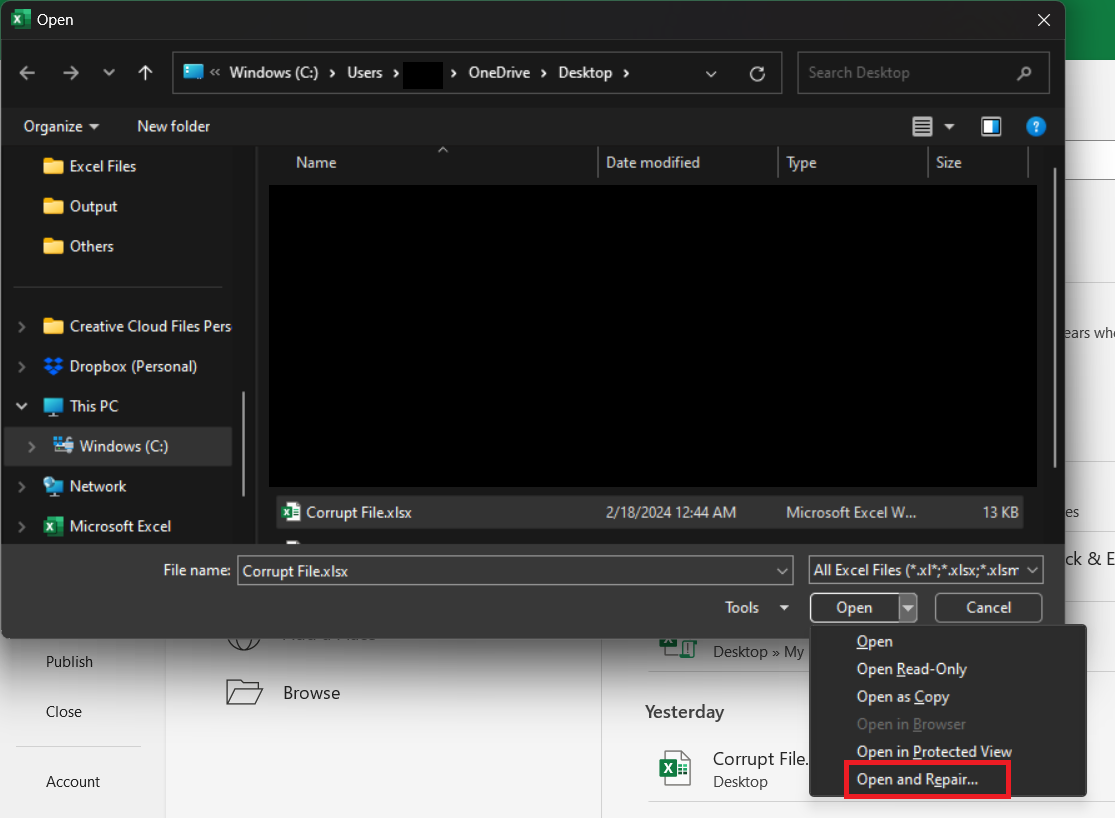
STEP 1: Open Excel and go to “File > Open.”
STEP 2: Navigate to the folder containing your corrupted file and select the corrupted Excel file. Click on the arrow next to the ‘Open’ button and choose “Open and Repair” from the dropdown menu.
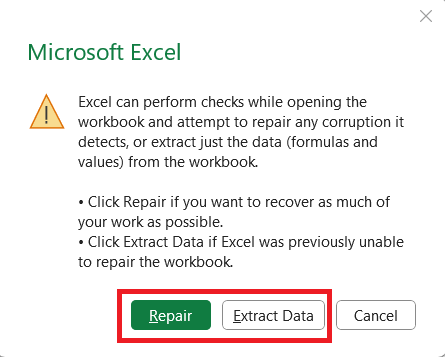
STEP 3: Click “Repair” to fix the file. If that doesn’t work, try “Extract Data” to retrieve values and formulas from the workbook.
If the ‘Open and Repair’ does not work, try reverting to the last saved version of the file. Backups or previous versions can save you from having to fix the current corrupted file.
Method 2:
Excel often saves temporary backup files (TMP) that can be found in the unsaved files directory. To use TMP files in Excel to recover lost, replaced, or overwritten Excel files, follow these steps:
STEP 1: Navigate to the temporary Excel file location with a .TMP extension. Windows users can go to C:\Users\<Username>\AppData\Local\Microsoft\Office\UnsavedFiles and Mac users to /Users/<Username>/Library/Containers/com.microsoft.Excel/Data/Library/Preferences/AutoRecovery.
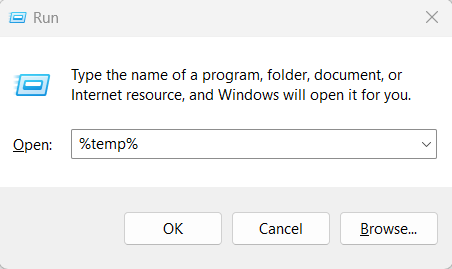
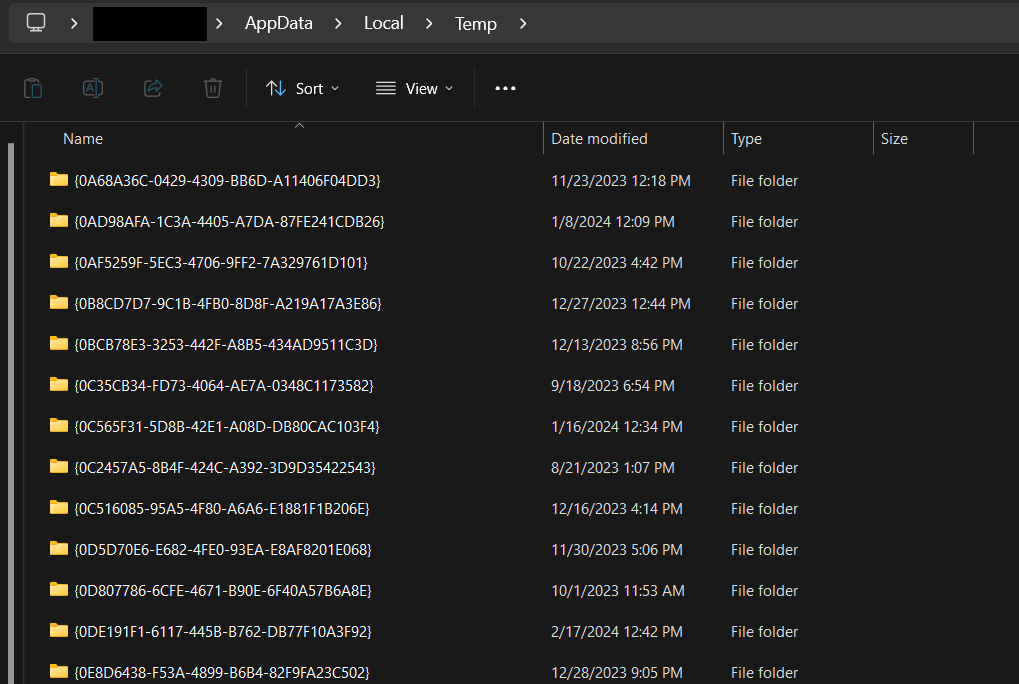
STEP 2: Alternatively, press `Windows + R` key, type `%temp%`, and hit Enter to open the temp folder.
STEP 3: Select the relevant Excel temp file by date, then copy and paste it to a different location.
STEP 4: Change the file extension from .TMP to the appropriate Excel format, which could be .XLS, .XLSX, or .CSV.
Remember, while these steps can help you recover corrupt files in Excel, regular backups and saving habits are essential preventive measures. It’s crucial to be proactive in protecting your data to minimize the reliance on recovery processes, which can be uncertain and time-consuming.
FAQ: Mastering AutoRestore in Excel
How Can I Edit the Time Interval for an AutoRecovered Version?
To edit the time interval for an AutoRecovered version in Excel, go to the “FILE” tab and select “Options” from the FILE menu. In the Excel Options dialog, click on “Save” in the left-hand pane, and then you can adjust the dropdown value next to “Save AutoRecover information every” to your preferred number of minutes.
By default, this is set to save every 10 minutes, but you can choose intervals as frequent as 1 minute for more frequent AutoRecover saves.
Is There a Way to Keep the Last AutoRecovered Version if I Close Without Saving it?
Yes, there is a way to keep the last AutoRecovered version in Excel if you close without saving. To enable this, you must go to File > Options > Save and select the checkbox labeled “Keep the last autosaved version if I close without saving.” This option allows Excel to retain a version of your work, safeguarding against potential data loss due to unsaved changes if the program closes unexpectedly.
Does Excel automatically save your work?
Yes, Excel automatically saves your work seamlessly every few seconds or minutes, primarily when the documents are stored on cloud services like Microsoft OneDrive or SharePoint.
How to do autorestore in Excel?
To perform auto recovery in Excel, start by confirming the activation of the AutoRecover feature. Navigate to “File” > “Options” > “Save” and make sure that both the “Save AutoRecover information every X minutes” and “Keep the last autosaved version if I close without saving” options are selected.
If an unexpected crash occurs, you can recover previous versions of your Excel file by going to the “File” tab, clicking “Info” > “Manage Workbook,” and selecting a previous version from the list. Adjusting the AutoRecover save interval or changing the file location is optional to enhance the security of your data.
John Michaloudis is a former accountant and finance analyst at General Electric, a Microsoft MVP since 2020, an Amazon #1 bestselling author of 4 Microsoft Excel books and teacher of Microsoft Excel & Office over at his flagship Academy Online Course.
