Merging multiple Excel files has become an essential task in data analysis and management, offering a streamlined and error-reduced process thanks to recent updates in Excel. This capability allows for a unified data overview, crucial for decision-making across various business functions. With advancements in Microsoft Excel for Mac and other versions, users can now combine files more efficiently, emphasizing the importance of proper data organization and backup before initiating the merge.
5 Key Takeaways
- The process of merging Excel files has significantly improved, making it user-friendly and less prone to errors.
- Combining multiple Excel files into a single dataset simplifies analysis, ensuring consistency and saving time.
- Organizing your data with uniform layouts and backing up files are crucial steps before merging.
- Excel offers various methods for data consolidation, including manual copy-paste, built-in ‘Combine’ features, Power Query, and VBA macros, each suited for different levels of complexity and data volumes.
Table of Contents
Introduction to Excel File Merging
The Evolution of Data Consolidation in Excel
Over the years, Microsoft Excel has become an indispensable tool for data analysis and management. The capability to merge multiple Excel files, known as data consolidation, has evolved significantly. Initially, this process could be quite labor-intensive and prone to error, but with new updates and features, Excel for Mac has made it much more streamlined and user-friendly.
Why Merge Multiple Excel Files?
When you work on multiple projects or handle various datasets, it becomes necessary to consolidate information for a comprehensive overview. By merging multiple Excel files, you create a singular point of reference that simplifies analysis and fosters better decision-making. Whether you’re compiling monthly sales reports, aggregating customer feedback, or comparing financial data, merging cuts down on the time you spend switching between files and ensures consistency across your datasets.
Preparing Your Excel Files for Merging
Essential Data Organizing Tips
Before you dive into merging Excel files, it’s crucial to have your data well-organized. Start by ensuring each sheet you plan to merge has the same layout for columns and headers, which will facilitate a smoother integration process. Additionally, double-check for any blank rows or columns—these can cause issues during the merge. Uniform data formatting across all files will also make the consolidation process more seamless since it removes the need for adjustments post-merge.
Backup Before You Start
It’s a golden rule to always back up your Excel files before merging them. This safety net ensures that your original workbooks remain intact should anything go amiss in the combining process. Consider storing your backups in a different location—like an external hard drive or cloud storage—to avoid any potential data loss due to system failures.
Manual Merging Techniques Explained
Copy-Paste: The Basic Approach
The copy-paste method stands as the most straightforward technique for merging Excel files manually. Here’s what you need to do:
STEP 1: Open the source worksheet. Select the data you need by pressing Ctrl + A (for Windows) or Cmd + A (for Mac), or just highlight the specific range you want to copy.
STEP 2: Copy the selection using Ctrl + C (Windows) or Cmd + C (Mac).
STEP 3: Navigate to the destination workbook, add a new worksheet if necessary, and select where you wish to paste the data. Paste using Ctrl + V (Windows) or Cmd + V (Mac).
Remember, a standard paste will carry over not only the values but also any formulas, formatting, and cell attributes. If you simply want the values, use the ‘Paste Special > Values’ option to paste just the values without formulas.
This approach is best for small datasets or one-time projects as it lacks automation.
Using Excel’s Built-In ‘Consolidate’ Features
Excel offers a more sophisticated way to merge files through its built-in ‘Consolidate’ features, which can automate the process to some extent. Here’s how you can leverage these features:
STEP 1: In the new worksheet where you want to see the combined data, go to the Data ribbon and select ‘Consolidate’.
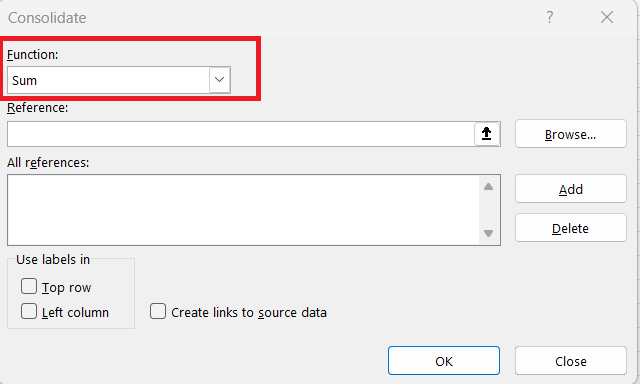
STEP 2: Choose the function you want to apply to the data—’SUM’ is the default and most common for numeric data.
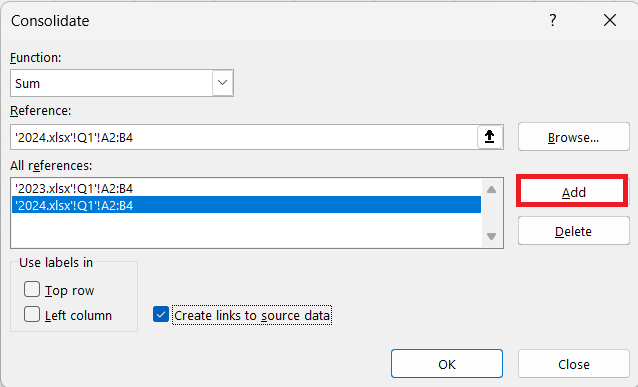
STEP 3: In the ‘Reference’ section, select the ranges from the source worksheets you wish to include and click ‘Add’. Repeat as necessary.
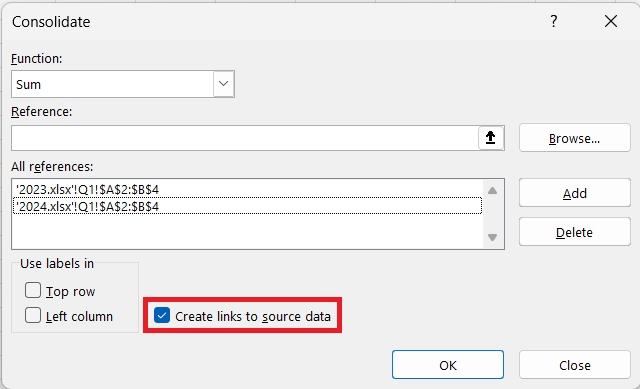
STEP 4: For dynamic updating, opt for ‘Create links to source data’ before finalizing with the ‘OK’ button.
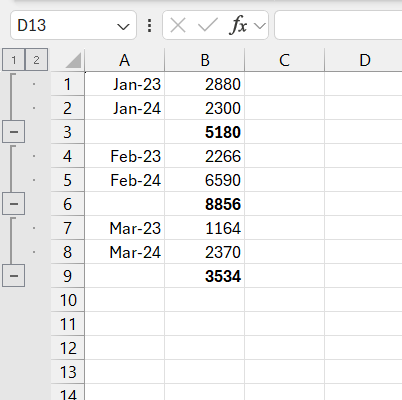
Excel then aggregates the data, creating a new range where each unique label has its own row.
Using this method, it’s simple to create reports similar to a PivotTable, but remember that it can only work efficiently when your data is uniformly formatted with no blank spaces.
Advanced Merging Methods
Excel Power Query: A Robust Tool for Merging
Excel Power Query is a game-changer for data analysis, designed to handle complex merging tasks with relative ease. Using this powerful tool, you can import, reshape, and amalgamate data from various sources, including multiple Excel files. It’s particularly useful when you’re dealing with large volumes of data that need to be consolidated, allowing you to automate repetitive tasks, such as:
- Combining data from multiple, similarly-formatted workbooks into a single table.
- Filtering and sorting combined data to create tailored datasets.
- Removing duplicates and transforming columns without affecting the source data.
The Power Query Editor puts a rich set of data transformation tools at your fingertips, enabling you to clean and prepare data for analysis within a few clicks.
Merging your CSV files using Power Query in Excel is a powerful yet user-friendly method to combine data from multiple sources. Here’s a simplified guide to help you through this process:
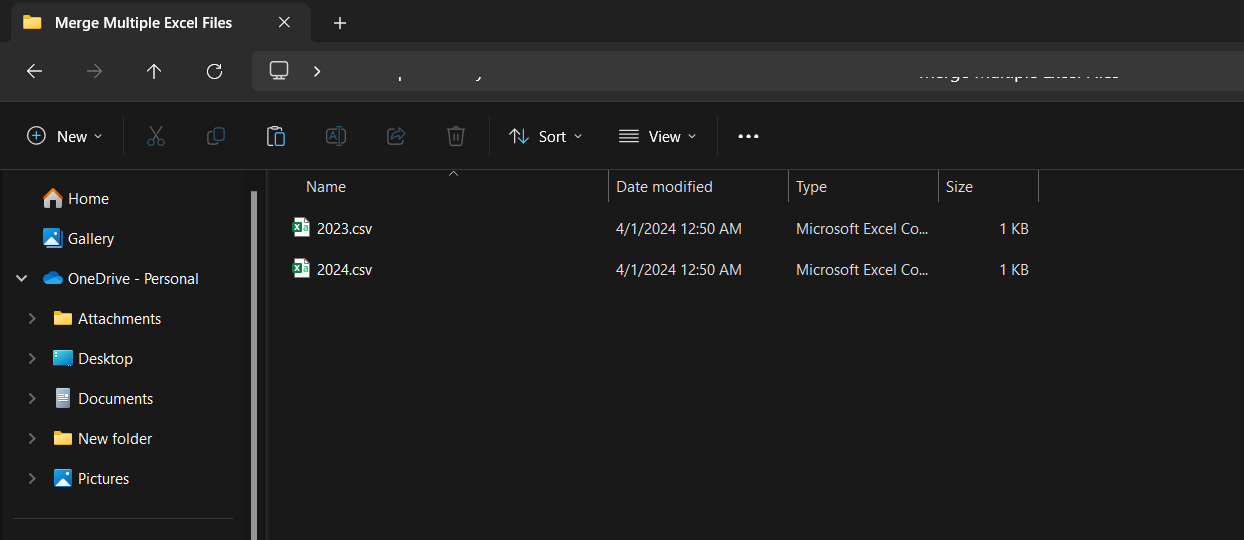
STEP 1: Ensure all the CSV files are placed in a single folder, and that folder contains only the files you want to merge.
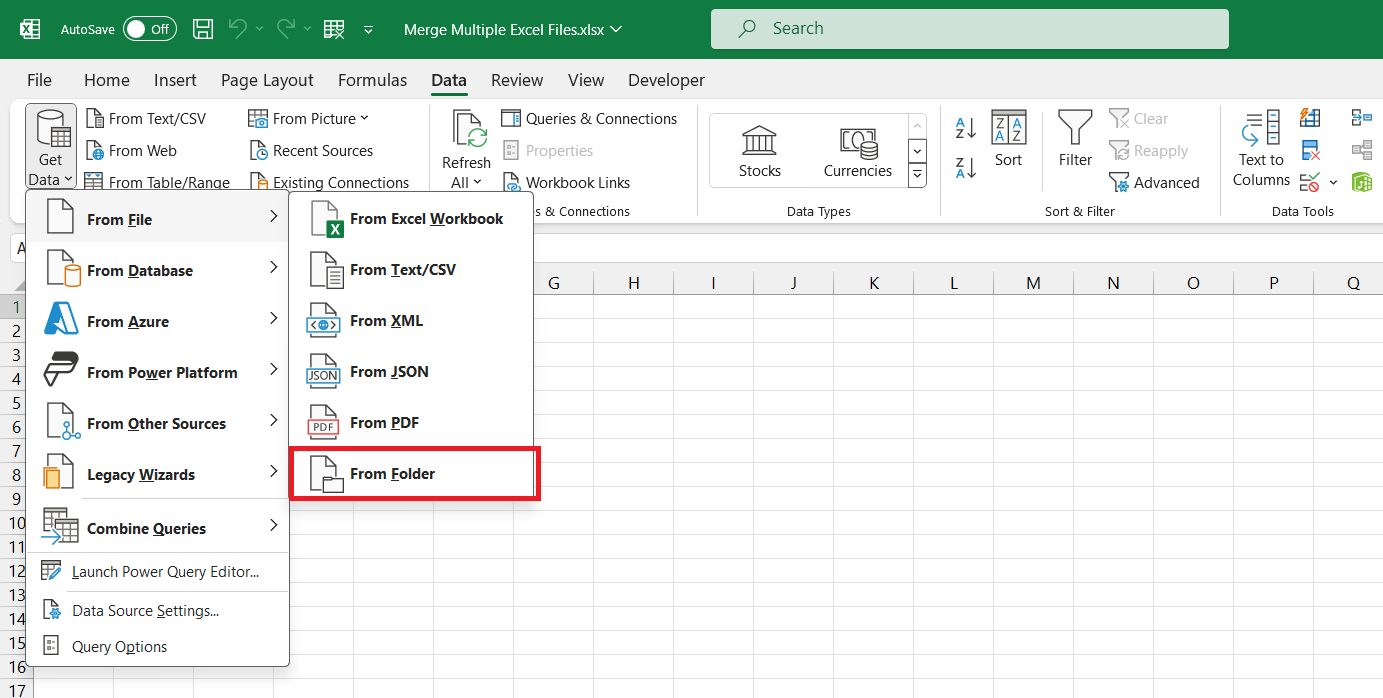
STEP 2: Open Excel and go to the ‘Data’ tab. In the ‘Get & Transform Data‘ group, click ‘Get Data’ > ‘From File’ > ‘From Folder.
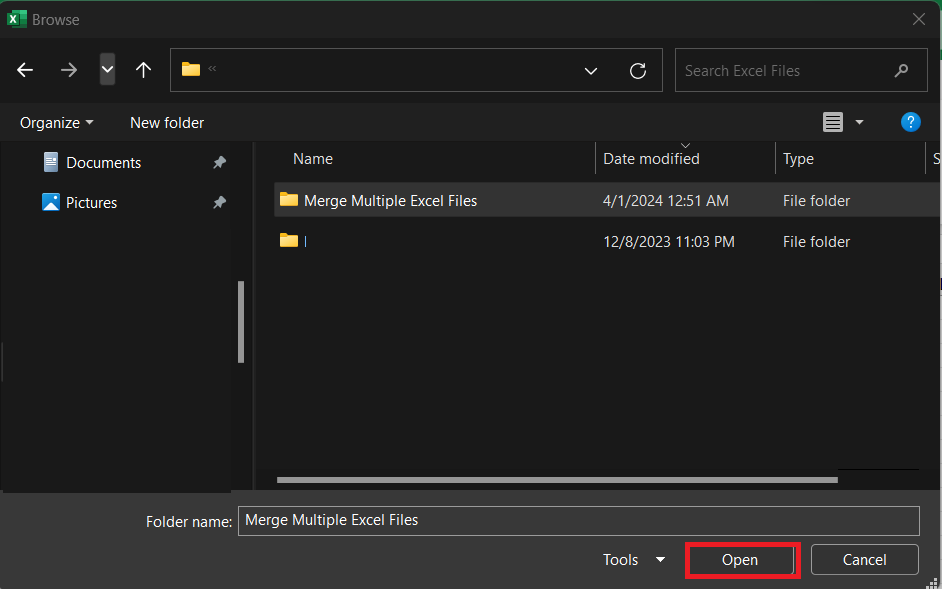
STEP 3: In the dialog box that appears, browse to the folder containing your CSV files and select ‘Open’.
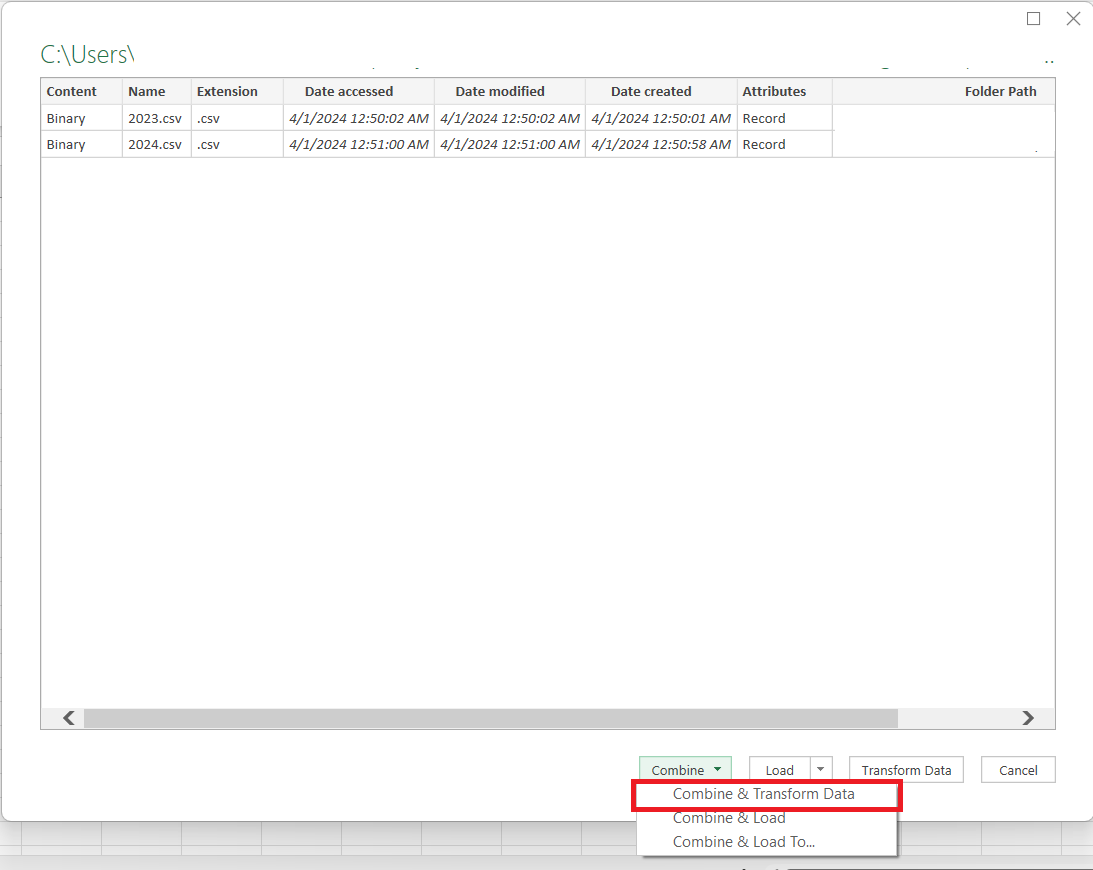
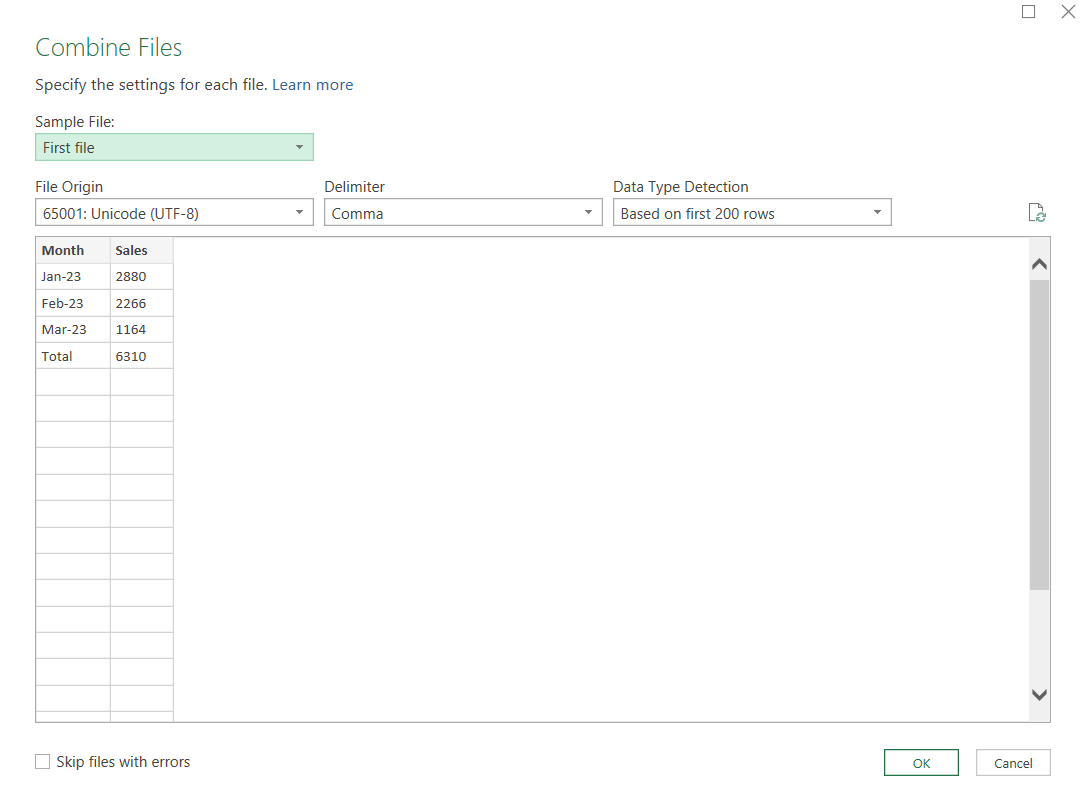
STEP 4: Excel will display a preview of the files in the folder. Click the ‘Combine’ button, and you will see options like ‘Combine & Transform Data’, ‘Combine & Load’, and ‘Combine & Load To…’. Select ‘Combine & Transform Data’ for full flexibility.
STEP 5: Click Okay.
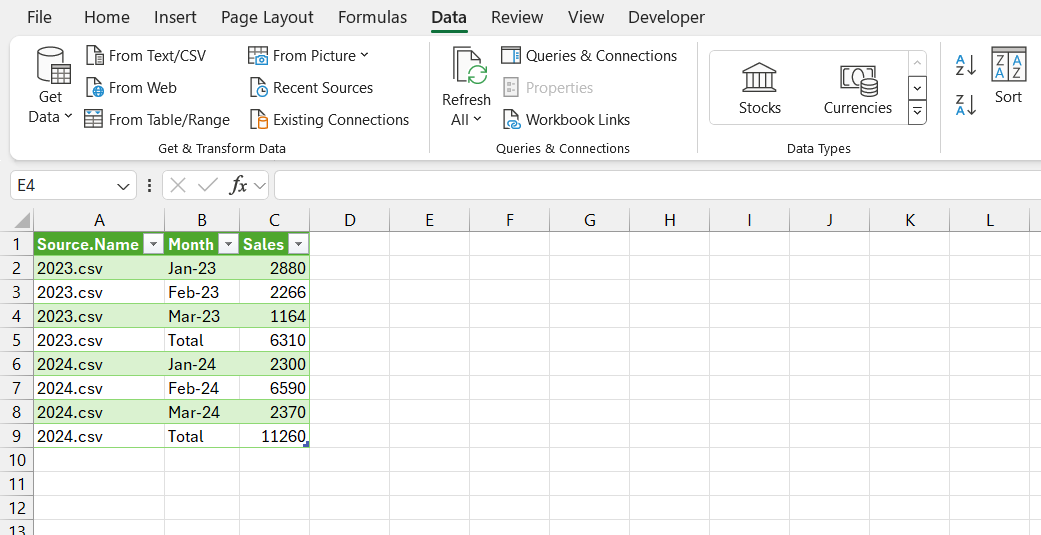
Once you’ve made your transformations, click ‘Close & Load’ to return to Excel, where your combined data will appear in a new worksheet.
Remember that using the ‘Combine & Load’ option is quicker but offers less control, while ‘Combine & Load To…’ allows you to choose the destination and format of the combined data. Choose the one that best fits your needs.
Merging with Power Query is ideal for users who require a robust method for merging datasets without extensive knowledge of VBA scripts.
Mastering VBA Macros for Custom Merges
For those comfortable with programming, Visual Basic for Applications (VBA) macros offer unparalleled versatility and control over the Excel file merging process. By writing a custom script, you can automate the entire consolidation workflow, including opening files, copying relevant data, and saving the combined file.
Implementing a MergeExcelFiles macro can turn a lengthy task into a quick and easy process. Here’s a basic walkthrough to get started:
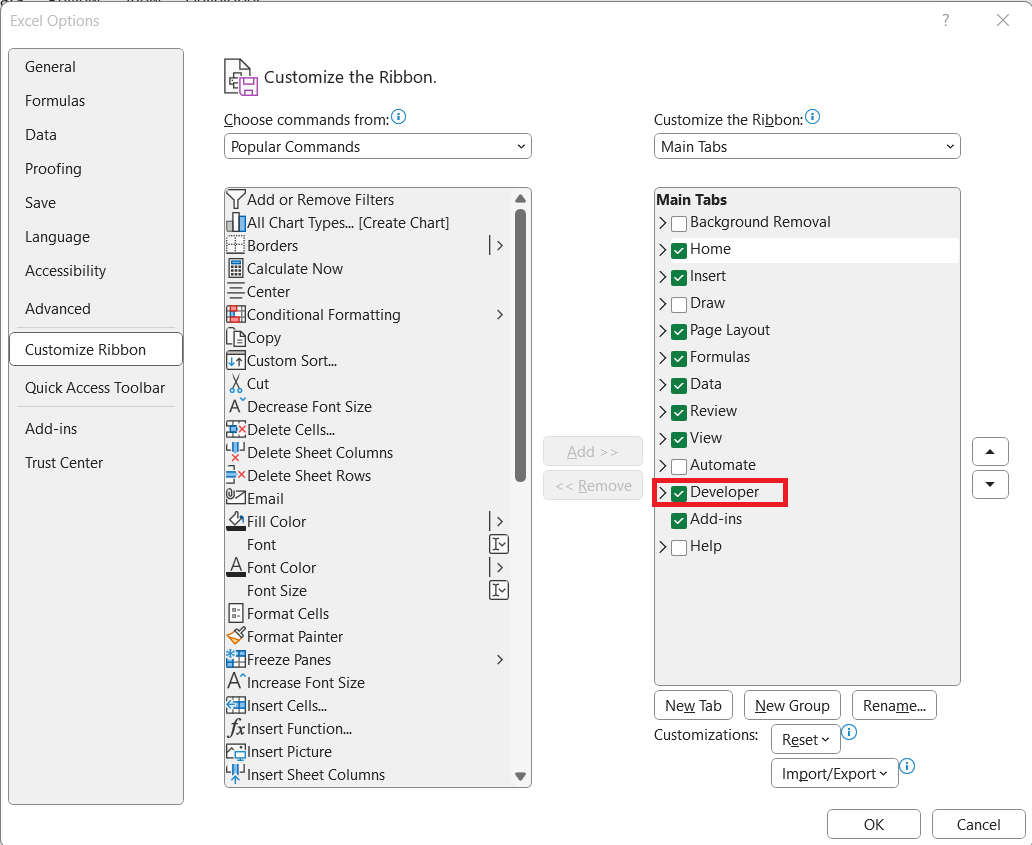
STEP 1: Enable Developer Tab: To access the macro features, you need to have the Developer tab enabled. You can activate this by going to Excel Options → Customize Ribbon → Check the Developer box.
STEP 2: Open Visual Basic for Applications (VBA): Click on the Developer tab, then choose ‘Visual Basic’, or press Alt + F11 to open the VBA editor.
STEP 3: Insert a New Module: Once the VBA editor is open, right-click on any existing sheets under ‘VBAProject’ and choose ‘Insert’ → ‘Module’.
STEP 4: Copy the Macro Code: Copy the provided VBA code for merging Excel files into the newly created module.
Sub mergeFiles()
' This code merges all selected workbooks into a single workbook.
Dim numberOfFilesSelected, i As Integer
Dim filePickerDialog As FileDialog
Dim mainWorkbook As Workbook, sourceWorkbook As Workbook
Dim targetWorksheet As Worksheet
Set mainWorkbook = Application.ActiveWorkbook
Set filePickerDialog = Application.FileDialog(msoFileDialogFilePicker)
With filePickerDialog
.AllowMultiSelect = True
numberOfFilesSelected = .Show
If numberOfFilesSelected <> 0 Then
For i = 1 To .SelectedItems.Count
Set sourceWorkbook = Workbooks.Open(.SelectedItems(i))
For Each targetWorksheet In sourceWorkbook.Worksheets
targetWorksheet.Copy After:=mainWorkbook.Sheets(mainWorkbook.Worksheets.Count)
Next targetWorksheet
sourceWorkbook.Close False
Next i
End If
End With
End Sub
STEP 5: Run the Macro: After copying the code into the module, close the editor, go back to Excel, and press Alt + F8 to open the ‘Macro’ dialog box. Select the mergefiles macro and click ‘Run’.
STEP 6: Select Workbooks to Merge: A file explorer window will appear, allowing you to select multiple Excel workbooks to merge. You can select several by holding down the Ctrl key while clicking on each file. Once you’ve selected the desired files, click ‘Open’ to initiate the macro.
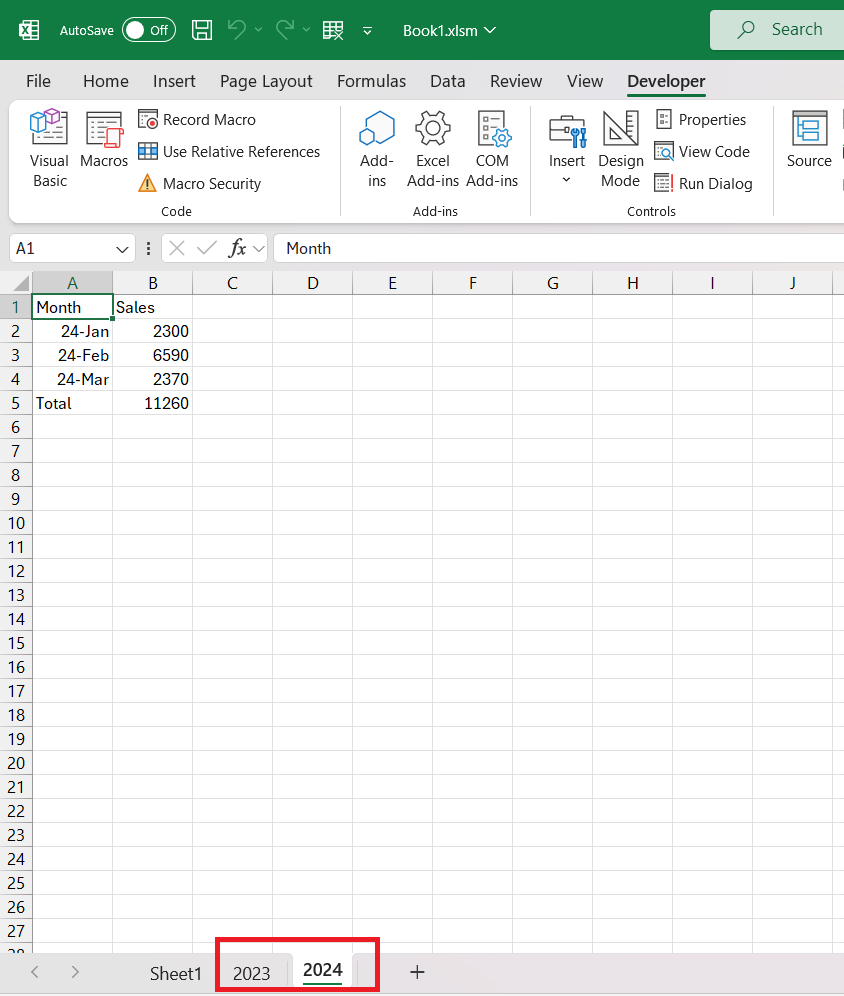
The script will consolidate all worksheets from the selected workbooks into the active workbook.
Keep in mind that the macro will copy all worksheets—so if your workbooks have multiple sheets, they’ll all be merged into your current workbook. Be sure that the macro handles the sheets as you expect, combining only the necessary data.
Remember, while a macro can significantly speed up the process, always back up your data beforehand to prevent any potential data loss. It’s also crucial that the files you want to merge are closed during this process.
By utilizing a macro, you ease the process of combining multiple files, saving timeand reducing the risk of manual errors that can occur with copy-pasting or other manual methods.
Troubleshooting Common Merge Issues
Dealing with Data Inconsistencies
When merging Excel files, you might encounter data inconsistencies, which can result in errors or misaligned information. To effectively manage these inconsistencies:
- Ensure Uniformity: Before merging, confirm that all spreadsheets have a consistent layout, with matching headers and data formats across files.
- Use Find and Replace: To streamline data, use the ‘Find and Replace‘ feature to correct discrepancies in categories or naming conventions.
- Leverage Filters: Filters can help you spot irregularities or outliers in your data that might indicate inconsistency.
- Validate Data: Excel’s Data Validation tool can restrict the type of data entered into a cell, helping to maintain consistency across datasets.
- Regular Audits: Conduct frequent checks of your data to identify and address inconsistencies proactively.
These strategies can drastically reduce the time spent troubleshooting post-merge and ensure more accurate data consolidation.
Overcoming Merge Limitations in Excel
Excel does come with certain limitations when merging multiple files, including size constraints and performance issues with large datasets. To overcome these challenges:
- Split Large Files: If you’re dealing with hefty files that cause Excel to slow down, consider splitting them into smaller chunks before merging.
- Use 64-bit Excel: The 64-bit version of Excel supports larger datasets, so make sure you’re using the correct version for your needs.
- Leverage Power Query: For more complex merges, Power Query is more efficient than the traditional combine features and can handle larger amounts of data with advanced capabilities for handling discrepancies.
- Optimize Excel Settings: Adjust your Excel settings for optimal performance during the merging process, like disabling automatic calculations or graphics enhancements.
- Analyze and Clean Data First: Remove any unnecessary data or formatting to streamline the merging process and prevent slowdowns.
Remember, while Excel is a powerful tool, it’s not always the best choice for extremely large data sets or databases that require more intricate merging capabilities.
FAQs: Expert Answers to Your Merge Queries
How do I combine Excel worksheets into one sheet?
To combine Excel worksheets into one sheet, use Power Query:
- Place all Excel worksheets in a single folder.
- Go to ‘Data’, then ‘Get Data’, ‘From File’, and select ‘From Folder’.
- Choose the folder with the worksheets and click ‘Combine & Load’.
- Adjust the data if necessary in Power Query Editor.
- Load the data to a single new worksheet.
What Are the Most Efficient Ways to Merge Large Excel Files?
For merging large Excel files, consider:
- Power Query – For its ability to handle substantial data volumes and automate repetitive tasks.
- VBA Macros – If you possess coding skills, a VBA script can merge data tailored to your specific requirements.
- 64-bit Excel – It processes larger datasets more efficiently than the 32-bit version.
Can I Merge Excel Files with Different Structures?
Merging Excel files with different structures requires careful preparation to align data correctly. Consider using Power Query’s transformation features to match columns and data types before consolidating. VBA macros can also be customized to accommodate varied structures when merging.
How Do I Prevent Data Loss During the Merge Process?
To prevent data loss during merging:
- Backup original files.
- Use ‘Merge & Transform’ in Power Query to preview changes without altering source files.
Is It Possible to Merge Excel Files Without Opening Them?
Yes, you can merge Excel files without opening them by using Power Query or VBA macros. These methods automate the process, allowing files to be combined in the background, maintaining efficiency and saving time.
John Michaloudis is a former accountant and finance analyst at General Electric, a Microsoft MVP since 2020, an Amazon #1 bestselling author of 4 Microsoft Excel books and teacher of Microsoft Excel & Office over at his flagship Academy Online Course.


