Download our 141 Free Excel Templates and Spreadsheets.
Key Takeaways
- To access the Admin Center in Microsoft Teams, sign in using your admin account, click on the “Teams admin” icon in the left-hand menu within the Teams application, or alternatively, go directly to admin.teams.microsoft.com in a web browser.
- Customize and streamline your navigation within the Admin Center by adding frequently used applications and dashboards for quick and easy access to essential tools and information.
- For enhanced ease of use, consider saving the Admin Center web page in your browser favorites, and ensure you have the necessary administrative privileges to perform admin tasks in Microsoft Teams.
Unlocking the Power of Administrative Control
The Microsoft Teams Admin Center provides administrators with powerful controls that are essential for maintaining the integrity and efficiency of corporate communications. Within this hub, administrators hold the keys to a wide range of configurations, from user access to security settings.
Through comprehensive dashboards, admins gain visibility into user behavior and system performance. This grants them the ability to react swiftly to evolving needs within the organization, adapting settings and policies to best support team dynamics and business processes. The Teams Admin Center is geared towards enabling administrators to guide their teams toward optimal collaboration and productivity, fitting the puzzle pieces together in a way that unlocks the full potential of Microsoft’s teamwork platform.
Table of Contents
Step-by-Step Access Guide
Starting Your Journey: Logging into Teams
To begin harnessing the capabilities of the Microsoft Teams Admin Center, it’s imperative to first gain entry into your Microsoft Teams account. Here is a condensed guide for a swift login process:
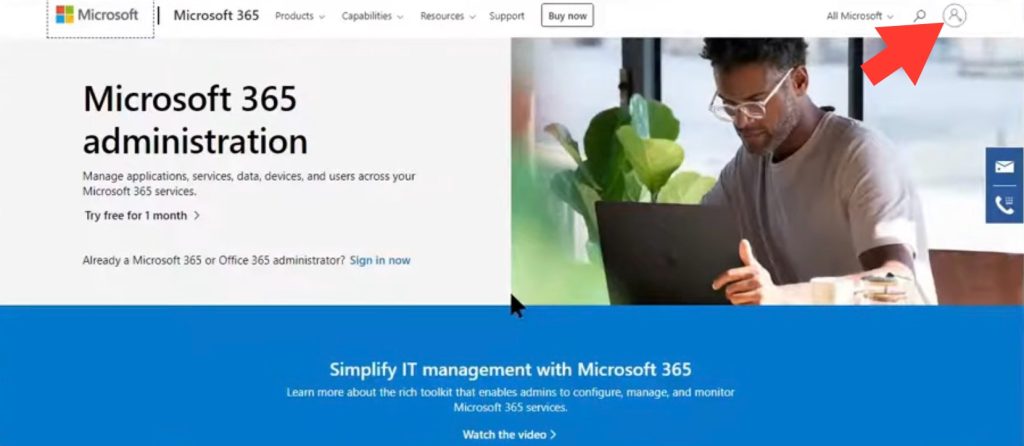
STEP 1: Head over to the Microsoft Teams official website.
STEP 2: Click the “Sign In” button located at the top right corner of the page.
STEP 3: Enter your registered email or phone number into the designated fields.
STEP 4: Type in your password and press the “Sign In” button again to access your account.
It is essential to note that organizations are increasingly focused on digital security, and as such, enabling two-factor authentication for your Teams account is highly recommended. This significantly diminishes the risk of unauthorized access and ensures that your team can collaborate in a secure digital environment.
Once logged in, you are ready to dive into the administrative functionalities that will help you streamline and optimize your team’s Microsoft Teams experience.
Navigating to the Admin Center
Getting to the heart of your administrative powers is a matter of a few simple clicks within the Microsoft Teams interface. Here’s how you navigate to the Admin Center:
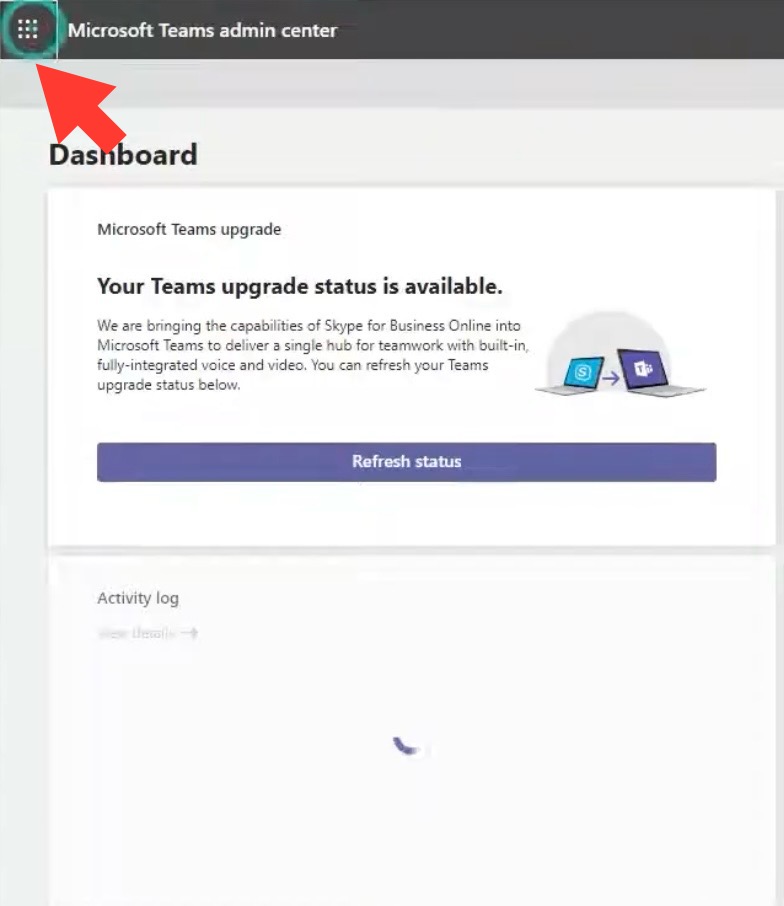
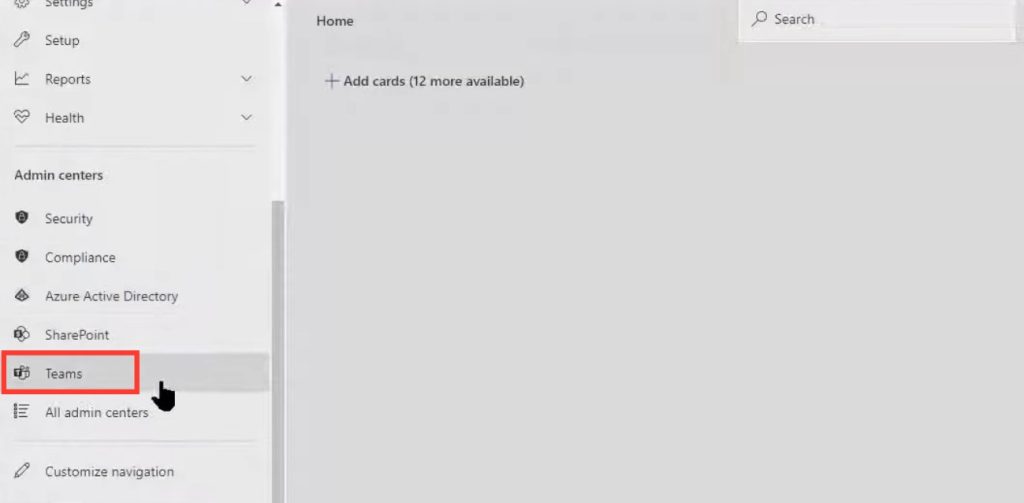
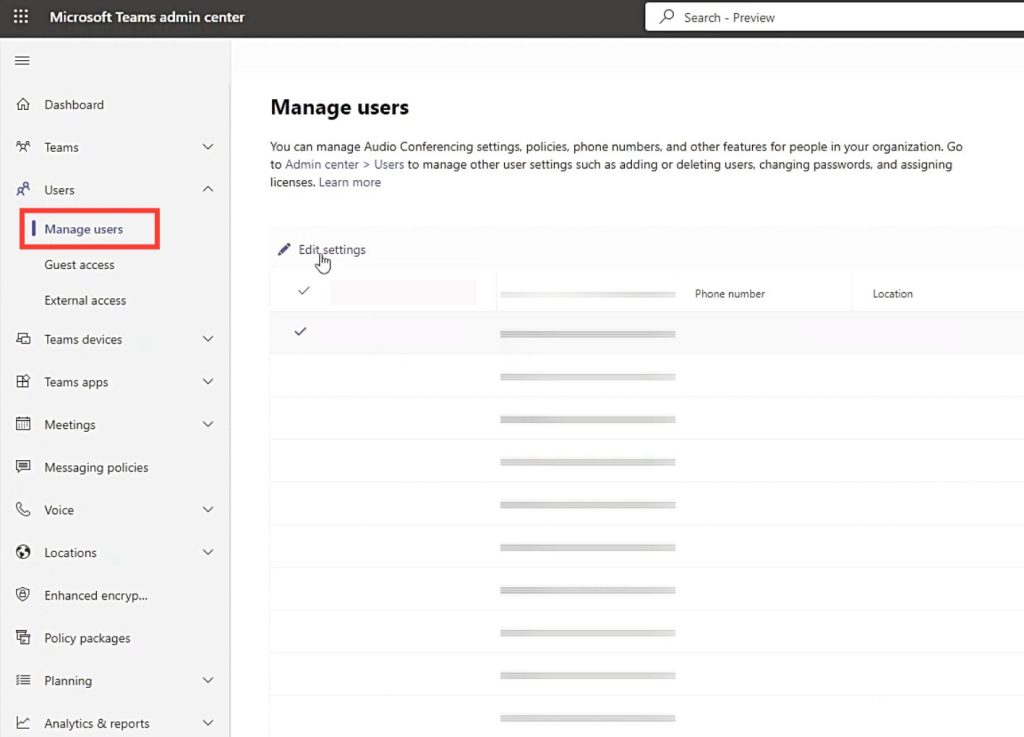
STEP 1: Once logged into Microsoft Teams, locate and click on the “Teams admin center” option typically found in the left-hand side menu. This option is visible only if you have administrative privileges.
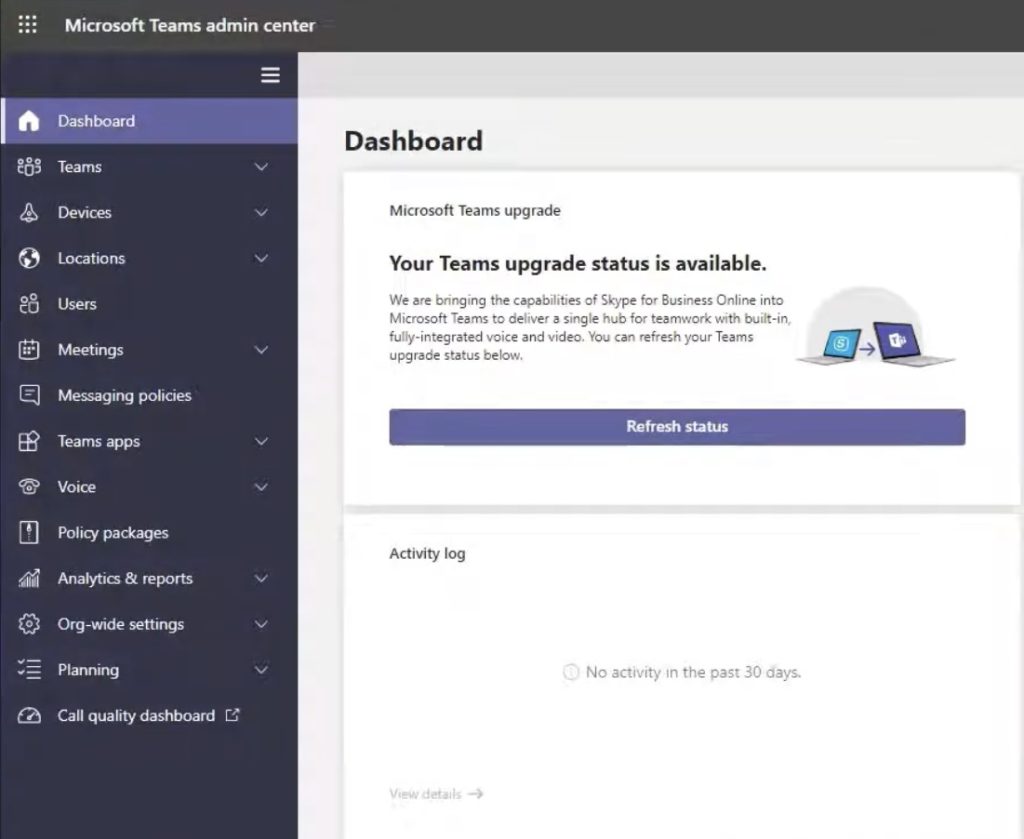
STEP 2: The interface will redirect you automatically to the Microsoft Teams Admin Center, where you have a bird’s-eye view of your Teams environment.
STEP 3: Alternatively, if you prefer direct access or can’t locate the Teams admin center from the Teams app, open your web browser and type in the URL admin.teams.microsoft.com. This will take you right to the login page for direct access.
It is worth mentioning that navigating through the Admin Center is intuitive. The left-hand menu is your roadmap to the diverse sections requiring your attention, such as user accounts, teams’ policies, and app management. Familiarizing yourself with these sections early on is valuable for efficient navigation and management.
Remember the direct URL or bookmark it for future reference to bypass the primary Teams interface when you want immediate entry into the Admin Center.
Tailoring Your Teams Experience
Managing User Roles and Permissions
A critical aspect of managing the Microsoft Teams environment is ensuring that access controls match the organizational structure and responsibilities. Here is how you can effectively manage user roles and permissions in Microsoft Teams Admin Center:
- Review User Roles Regularly: Make it a routine to review user roles within your organization. Verify that each role aligns with the individual’s job duties, adjusting as necessary to accommodate changes.
- Adjust Permissions as Needed: The Teams Admin Center allows for granular permission settings. This entails updating permissions when there are changes in job roles, projects, or team structures. It’s vital to maintain the principle of least privilege – giving users the minimum level of access they need to perform their jobs.
- Revoke Unnecessary Access: Quickly remove or adjust access for users who no longer require it. This step is crucial in minimizing the risk of unauthorized access or data exposure.
- Document Changes: Keep a log or record of any changes to roles or permissions. This documentation can be invaluable for auditing purposes and can help trace back any issues that may arise from changes made.
- Use Access Reviews and Audits: Microsoft provides tools for periodic access reviews and audits. Employ these features to discover any discrepancies, redundant roles, or vulnerabilities that might be present within your system.
- Train Users on Their Roles and Permissions: Ensure that your users understand their roles, responsibilities, and the permissions they’ve been granted. This can help in the proper utilization of the Teams platform and prevent accidental data breaches.
For detailed information on managing user roles and permissions, you can refer to the resources and documentation provided by Microsoft on their official website or directly within the Teams Admin Center. Implementing these strategies not only helps maintain a secure and orderly environment but also aligns with the best practices that Microsoft has observed to reduce security incidents significantly.
Customizing Team Settings for Enhanced Security
In today’s world of cyber threats and data breaches, enhancing security within communication platforms like Microsoft Teams is not just an option but a priority. The Microsoft Teams Admin Center empowers administrators to strengthen this line of defense by allowing the customization of team settings. Here’s how you can tackle it:
- Set Team Privacy Levels: Decide whether a team should be public or private. This determination affects who can join and see the team’s content. During team creation or by editing an existing team, you can adjust these settings to ensure appropriate levels of disclosure.
- Configure Member Permissions: Customize member permissions to control who can add or remove members, create channels, tabs, or apps. This is critical in maintaining high-security standards, since the ability to add or modify components within Teams can impact data integrity.
- Limit Use of External Apps and Connectors: By adjusting the settings to limit or disable the ability for team members to add external apps and connectors, you reduce the risk of data leakage or malicious software intrusion.
- Enforce Guest Access Boundaries: Guests often need access to a team, but to maintain security, it is imperative to define strict boundaries for their interaction with team resources. This can include permissions to add or delete content, or joining channels.
- Implement ‘Fun’ Settings Responsibly: Teams allows for the use of GIFs, stickers, memes, and custom memes—understanding the culture and mood of your organization, these settings can be enabled or disabled accordingly. However, too much freedom can lead to distractions or inappropriate content sharing; hence, setting guidelines for their use is beneficial.
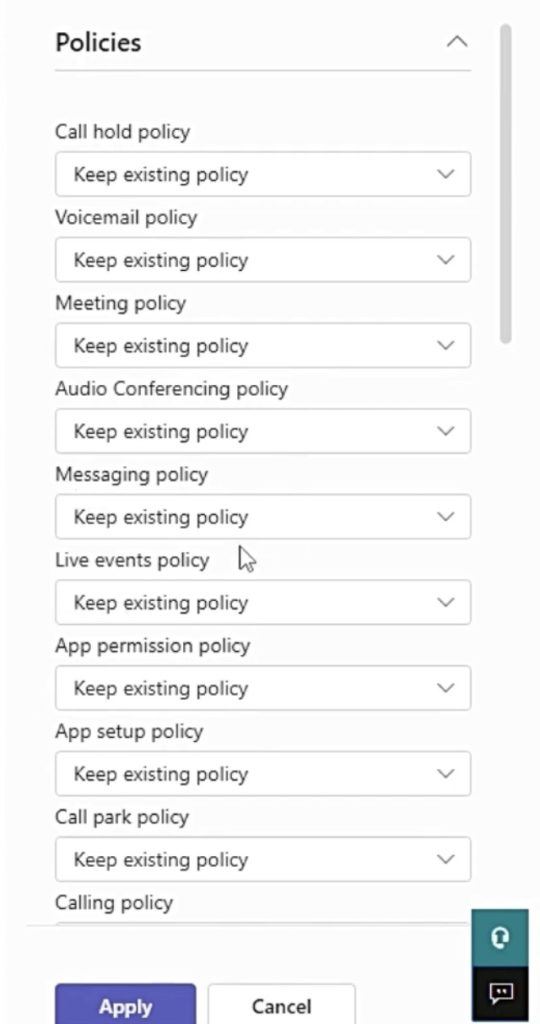
- Optimize Messaging Policies: Messaging policies in Teams allow you to control what features users no longer have to work with—decide whether users can edit or delete sent messages, use chat, or even mention other teams and channels in their messages.
To manage these settings effectively, navigate to the “Teams” section within the Admin Center, and look for the “Manage teams” tab. This will provide you with an overview of all the teams in your organization, along with the ability to modify team settings individually or in bulk.
By customizing these settings, you can ensure your team is operating in a secure environment aligned with organizational policies. Careful management of these options results in a balance between user autonomy and administrative control, ensuring that Teams remains a productive and secure platform for all your collaboration needs.
Optimizing Team Collaboration
Streamlining App Management and Deployment
Efficient app management and deployment are crucial for maintaining productivity and ensuring that the right tools are available to your workforce. With the Microsoft Teams Admin Center, administrators can streamline this process:
- Evaluate and Approve Apps: Admins have the ability to evaluate and approve third-party apps before they’re made available to the organization. This ensures that only secure and necessary apps are utilized, maintaining a streamlined and focused app inventory.
- Auto-Install Priority Apps: For apps that are deemed essential for certain departments or teams, utilize the auto-install features to ensure that these apps are available to users upon their first login or as soon as they become relevant.
- Manage App Setup Policies: By customizing app setup policies, admins can determine which apps appear by default and which are pinned on the Microsoft Teams sidebar, ensuring high visibility and easy access for users.
- Use Teams Admin Center for Bulk Operations: Deploy apps in bulk, configure permissions, and manage updates centrally through the Teams Admin Center, thereby reducing manual effort and the potential for error.
- Monitor App Usage and Performance: Regularly check the analytics around app usage within the Teams admin dashboard. This data can inform decisions about which apps to retain, update, or remove based on their value to the team’s workflow.
- Provide Convenience Without Compromising Control: While prioritizing ease of access for end-users, ensure the administrative strategy remains aligned with IT and security requirements concerning app permissions and data protection.
Streamlining the app management and deployment process allows organizations to provide their users with necessary tools without overwhelming them with options, thereby ensuring that each user has a customized and efficient work interface.
Securing Communication with Policy Configuration
One of the most impactful ways to ensure secured communication within Microsoft Teams is through the judicious configuration of messaging policies. Such configurations can significantly influence how team members interact and safeguard sensitive information. Here’s a breakdown of key steps you can take:
- Define Messaging Policies: Messaging policies control what features are available to users within Microsoft Teams. Use these policies to manage capabilities like message editing and deletion, chat, user tagging, and the use of emojis, GIFs, and stickers.
- Customize for Different User Groups: Not every group in your organization will have the same communication needs. Customize policies to cater to the specific needs of different departments, project teams, or user levels (e.g., staff versus executives).
- Implement Data Loss Prevention (DLP): Create DLP policies to prevent sensitive information from being shared inappropriately within chats and channel messages. Such policies can be aligned with overall organizational compliance standards.
- Enable End-to-End Encryption: For highly sensitive communications, consider enabling end-to-end encryption for 1:1 Teams calls to ensure that only the communicating users can access the contents of their conversation.
- Audit Regularly and Update: Monitor the use of communication features and adjust policies as necessary. Organizations evolve, and policies should be reviewed and updated regularly to reflect current requirements and best practices.
- Educate Users: Educating users about the communication policies in place is as important as the policies themselves. Employees should be aware of what is allowed, what is not, and the rationale behind these rules.
To manage messaging policies, navigate to the “Messaging policies” section in the Teams Admin Center, where you can create and assign policies to users or groups. Thoroughly exploring and configuring these options ensures that communications within Microsoft Teams remain secure, compliant with regulations, and optimized for effective collaboration.
Troubleshooting Common Access Issues
Resolving Login Complications
Encountering login complications can be a significant hindrance when administering Microsoft Teams. Here are some steps to resolve common login issues:
- Verify Credentials: Ensure that the username and password entered are accurate. Remember that passwords are case sensitive. If you are unsure of the credentials, consider resetting the password with the appropriate process within your organization.
- Check License Assignment: Confirm that the user account has an appropriate Microsoft Teams license assigned. Without a valid license, access to Teams Admin Center will be denied.
- Browser or App Issues: Sometimes technical glitches or cache problems in the browser or Teams app can prevent successful logins. Try clearing the browser’s cache or restarting the Teams app.
- Use InPrivate or Incognito Mode: Open your browser’s InPrivate or Incognito mode to attempt a clean login without any cache or cookies involved, which can sometimes solve unexpected login issues.
- Inspect User Access Policies: Administrators should verify that the user’s account isn’t restricted by an access policy or conditional access settings that could impede the login process.
- Examine Network Settings: Network settings could potentially block access to Teams services. Confirm that your network complies with Microsoft’s networking requirements and isn’t inadvertently blocking the Teams service.
- Check for Service Outages: Occasionally, Microsoft Teams service itself may be experiencing an outage. Check the Office 365 Service Health Dashboard to see if there are any known issues that might impact the ability to log in.
- Contact Support: If the steps above do not resolve the issue, contact your organization’s helpdesk or Microsoft Support for further assistance.
By systematically addressing these common complications, you can often resolve login issues quickly and restore access to the Microsoft Teams Admin Center, ensuring minimal disruption to administrative tasks and team operations.
Addressing Inactive Changes and Error Messages
When managing Microsoft Teams, administrators might face situations where changes seem inactive or encounter error messages. Such scenarios can significantly affect administrative work and team collaboration. To address these challenges effectively, here are some strategies:
- Patiently Monitor for Propagation: Some changes in Microsoft Teams, especially those related to policies or permissions, might take time to propagate. Allow up to 24 hours for changes to take effect before taking further action.
- Verify Change Confirmation: After making a change, ensure you receive confirmation within the Admin Center that the change has been saved. If there are any issues in saving the change, it won’t be applied.
- Cross-Check Dependencies: If changes don’t take effect, it’s possible they have dependencies or prerequisites that haven’t been met. Verify if other related settings or features need to be adjusted first.
- Evaluate Your Permissions: Ensure that you have adequate administrative privileges to make the intended changes. Some changes may require higher-level permissions, such as Global Admin rights.
- Revisit Error Messages: When presented with an error message, carefully read the text for clues on the nature of the issue. Use official documentation or community forums to understand common error codes.
- Inspect the Audit Log: The Microsoft 365 compliance center provides an audit log search that can help trace what changes were made, by whom, and what might have gone wrong. This is invaluable for troubleshooting.
- Consult Official Documentation: Microsoft provides comprehensive documentation which can be a crucial reference for understanding error messages and the reasons behind their occurrence.
- Reach Out to the Community: Leverage the Microsoft Tech Community or other professional networks, where many common problems have already been addressed by other users or Microsoft support staff.
- Contact Microsoft Support: If the issue persists and you are unable to resolve it through available resources, don’t hesitate to contact Microsoft Support for professional assistance.
By taking a methodical approach to troubleshoot inactive changes and error messages, you can often determine the root cause and resolve the issue, ensuring your Teams environment runs smoothly.
The Admin’s Toolbox
Exploring Built-in Management Tools and Features
Navigating through the Microsoft Teams Admin Center unveils a suite of built-in management tools and features designed to streamline administrative tasks and enhance user experiences. As an administrator, exploring and understanding these offerings is crucial:
- User Management: Control user access and settings, handle onboardings and offboardings, and edit individual or bulk user profiles seamlessly within the admin center.
- Teams and Channels Management: Create and manage teams and channels, including membership settings, privacy options, and classification labels to keep everything organized.
- Meetings and Conferences: Configure meeting settings, set up conference bridges, manage meeting policies, and oversee live event settings to ensure productive virtual gatherings.
- Policies and Compliance: Implement and manage policies across messaging, meetings, app usage, and more, ensuring compliance with corporate standards and regulatory requirements.
- Security and Privacy: Utilize advanced security settings, including conditional access policies, secure guest access, and data loss prevention, to protect organizational data.
- Telephony: Manage phone system settings, such as call queues, auto attendants, and direct routing configurations, to integrate traditional telephony with modern collaboration.
- Reporting: Access detailed reports on usage, user activity, and service health to keep track of how Teams is being used and perform necessary adjustments.
- App Management: Approve, deploy, or block third-party apps and manage organization-wide app settings and permissions with fine-grained control.
- Endpoint Management: Oversee devices using Teams, including IP phones and Teams Rooms devices, ensuring they are up to date and functioning optimally.
By thoroughly investigating these native tools and features, administrators can capitalize on their potential to maintain an efficient, secure, and well-organized Microsoft Teams environment.
Automating Processes for Efficient Teams Administration
In an ever-changing digital work environment, automation is key to maintaining efficient operations. The Microsoft Teams Admin Center supports such efficiency through various automation processes. Here’s how to leverage automation for effective Teams administration:
- PowerShell for Teams: Microsoft offers a dedicated PowerShell module for Teams, which allows for scripting and automating tasks such as creating teams, adding members, and configuring policies.
- Microsoft Graph API: Utilize the Microsoft Graph API to automate complex workflows, like user provisioning and data analytics. It provides RESTful web requests to interact with the data in Microsoft 365 services.
- Workflow Automation with Power Automate: Integrate Teams with Power Automate to create custom workflows that can do everything from streamlining approvals to orchestrating complex business processes with automated actions in Teams.
- Use Teams Templates: Use templates when creating new teams to automate the set-up process, applying predefined channels, tabs, apps, and settings based on the scenario or department.
- Scheduled Reporting: Automate the delivery of Teams usage reports by scheduling them to be exported regularly, giving admins consistent insights without manual effort.
- Bots and Apps: Develop or integrate bots and apps that can automate responses to common queries, help schedule meetings, or manage simple tasks directly within the Teams environment.
Implementing these automation techniques reduces manual intervention, cuts down on error rates, and frees up IT resources to focus on more strategic initiatives. By embracing automation, Teams administrators can allow software to handle mundane tasks while they attend to the nuances of team collaboration and strategic IT management.
Advanced Insights and Analytics
Utilize Reporting Features for Strategic Oversight
For administrators seeking to gain a strategic overview of their organization’s use of Microsoft Teams, leveraging the platform’s reporting features is essential. The Microsoft Teams Admin Center offers various reports that provide data-driven insights:
- Usage Reports: Review overall usage statistics to see how your organization communicates and collaborates within Teams, including metrics on active users, messaging, and meeting frequency.
- User Activity Reports: Analyze individual user engagement and behavior patterns to assess adoption rates and pinpoint areas where users may need more training or support.
- Device Usage Reports: Track what types of devices are being used to access Teams. This can inform IT support, training, and procurement strategies.
- Teams Live Event Reports: Gather detailed information on live events conducted within your organization, understanding audience reach and engagement levels.
- Call Quality Dashboard (CQD): Monitor call quality within your organization, troubleshooting issues and ensuring a positive user experience on audio and video calls.
- Exporting and Sharing Reports: Export reports in various formats such as CSV, PDF, HTML, or XLSX for further analysis or share them with stakeholders to provide insights into Teams usage and performance.
- Scheduling Reports: Set up scheduled reports to be automatically generated and sent via email, providing consistent, timely data to those who need to act on it.
By regularly reviewing these reports and analyzing the data provided, Teams administrators can make informed decisions, target resources effectively, and continue to refine their collaboration strategies to align with the organization’s goals and user needs.
Enhancing Call Quality Monitoring
The Call Quality Dashboard (CQD) available in the Microsoft Teams Admin Center is an indispensable tool for administrators focused on enhancing call quality across their organization. Here’s how to make the most of the CQD’s capabilities:
- Accessing the Dashboard: Navigate to “Analytics & Reports” in the Teams Admin Center; from there, select the “Call quality dashboard” or visit https://cqd.teams.microsoft.com/ directly.
- Monitoring Metrics: Examine metrics on overall call quality, server-client streams, client-client streams, and voice quality Service Level Agreements (SLAs) to get a comprehensive view of call performance.
- Identifying Trends and Patterns: Use the dashboard to spot trends over time or recurring problems in specific locations or among certain user groups.
- Isolating Issues: Filter data by building, endpoint, or network segment to identify and troubleshoot problems. If necessary, upload building or endpoint data to CQD for more granular insights.
- Streamlining Problem Resolution: Engage network engineers and support teams by sharing actionable data from CQD, ensuring that everyone is working with consistent and relevant call quality information.
- Real-Time Data: Although CQD provides near real-time data, there might be a slight delay. Use this data as a proactive resource rather than a real-time troubleshooting tool.
- User Feedback Analysis: Combine quantitative data from CQD with qualitative feedback from users to gain a comprehensive understanding of user experiences.
By regularly reviewing and acting on the insights provided by the Call Quality Dashboard, Teams administrators can improve network performance and end-user experiences, ensuring that calls run smoothly and productively across the organization.
FAQ: Microsoft Teams Admin Center
How can I control guest access in Microsoft Teams?
Controlling guest access in Microsoft Teams is a vital aspect of administration, allowing you to extend collaboration to individuals outside your organization while safeguarding your data and resources. Here’s how to manage it:
- Regulate Guest Access in the Teams Admin Center: Navigate to “Org-wide settings” in the Admin Center, where you’ll find “Guest access”. Adjust the toggle to ‘On’ or ‘Off’ depending on whether you want to allow guests to join your teams.
- Adjust Guest Permissions: After enabling guest access, fine-tune what guests can do within Teams. You can control a wide array of capabilities, including making private calls, participating in meetings, creating, updating, or deleting channels, and much more.
- Domain Management: Control which domains your organization allows for guest access. You can block or allow domains by adding the respective domain names to the ‘Allow’ or ‘Block’ list in the “External access” section of the Teams Admin Center.
- Use Sensitivity Labels: Leverage sensitivity labels to manage the guest access at a team level. Assign labels when creating a team or modify an existing one to determine the level of access appropriate for its content sensitivity.
- Educate Your Team: Once you’ve established guest access—and its boundaries—communicate these guidelines to your team. Ensure that all members understand the protocols for inviting external users and the scope of their activities within the team.
- Audit and Review: Regularly review guest user activities and access levels to ensure they align with current collaboration needs and compliance standards of your organization.
By taking these steps, administrators can offer secure and controlled guest access within Microsoft Teams, thus facilitating external collaboration without compromising the integrity and security of the organization’s data and communications.
What to do if settings are not applying to Users in Teams?
If settings are not applying to users in Microsoft Teams, it may be due to various reasons, and different approaches can help to troubleshoot the problem:
- Check for Propagation Delays: Remember that some policy changes in Teams can take time to become active, ranging from a few minutes to up to 24 hours. Allow sufficient time for changes to propagate before investigating further.
- Verify User Assignment: Ensure that users are correctly assigned to the policy that you have modified or created. Check individual user settings within the Teams Admin Center to confirm that the correct policies are taking effect.
- Look for Conflicting Policies: Policies at different levels (e.g., global, user, group) might conflict with each other. Review the hierarchy of policies to resolve any conflicts and ensure the intended policy is prioritized.
- Check Compliance Features: Ensure that there are no compliance features (like holds or retention policies) that might override or conflict with the settings you are trying to apply.
- Review Endpoint Configurations: If settings related to devices are not applying, verify that endpoint configurations, such as those for Teams Rooms or IP phones, are correct.
- Inspect Logs: Use the audit logs in the Microsoft 365 compliance center to check for any errors or failed attempts when policies or settings were applied.
- Update Teams: Make sure that the Teams client software is updated to the latest version, as some settings may not apply to older versions of the client.
- Consult Documentation and Support: If the issue persists, review Microsoft’s official documentation for any known issues or troubleshooting guidelines. You can also reach out to Microsoft Support for additional help.
- Utilize the Microsoft Teams Community: The Teams community forums can be a helpful resource where you can find advice from other Teams administrators who may have encountered similar issues.
When settings are not applying correctly, it’s important to approach the situation methodically, investigating all possible causes step by step to identify and resolve the underlying issue.
What is the URL for Teams Admin?
The URL for the Microsoft Teams Admin Center is https://admin.teams.microsoft.com/. This direct link takes administrators to the login page where they can sign in with their administrative credentials to access the dashboard for managing Microsoft Teams settings, users, policies, and other administrative tasks.
Always make sure to have the proper administrative privileges to access the Teams Admin Center before attempting to log in. If you’re unable to access the admin center, it’s recommended to check with your IT department to verify your permissions and access rights.
How can I automate elements of Teams management?
Automating elements of Teams management can save time and reduce the potential for human error. Microsoft provides several tools and platforms that can assist with automation within Microsoft Teams:
- PowerShell: Use the Microsoft Teams PowerShell module to automate a wide variety of Teams management tasks. Write scripts to create teams, set up channels, configure settings, manage users, and apply policies in bulk.
- Microsoft Graph API: The Graph API allows for programmatic access to Microsoft Teams and other services within the Microsoft 365 ecosystem. Develop applications or scripts that can automatically manage Teams at scale, such as provisioning teams based on templates, updating settings, or integrating with other systems for data retrieval and updates.
- Power Automate: This service within the Microsoft Power Platform enables non-developers to automate workflow processes. Use Power Automate to create custom flows that trigger actions in Teams, such as posting messages in channels when certain events occur or automating approval processes.
- Bots: Implement bots within Teams using the Microsoft Bot Framework to automate responses to queries, provide information from integrated systems, or assist users with routine tasks directly within the chat interface.
- Templates: When creating new teams, use team templates to speed up the process. Templates can come pre-loaded with channels, apps, and settings tailored to specific business needs or project types.
- Scheduling Tools: Use built-in scheduling features within the Teams Admin Center or Power Automate to automate report generation and distribution for administrative oversight.
- Azure Automation and Logic Apps: For more complex automation needs, consider utilizing Azure Automation runbooks or Azure Logic Apps to connect services, pass data, and trigger actions that help manage Teams.
Implementing these tools for automation requires careful planning and a good understanding of scripting or workflow design. However, once set up, they can greatly improve the efficiency and consistency of Microsoft Teams management across an organization.
John Michaloudis is a former accountant and finance analyst at General Electric, a Microsoft MVP since 2020, an Amazon #1 bestselling author of 4 Microsoft Excel books and teacher of Microsoft Excel & Office over at his flagship Academy Online Course.
