In today’s data-centric world, safeguarding your Microsoft Excel spreadsheets is paramount. Just as you wouldn’t leave valuables unattended, protecting your sensitive data ensures its integrity and compliance with legal regulations. Excel offers robust built-in security features like password protection and encryption, serving as your virtual vault against unauthorized access and tampering.
Key Takeaways:
- Password Protection Essentials: Excel’s password protection features act as the first line of defense, securing access to both workbooks and individual worksheets.
- Structuring Workbook Security: Protecting the workbook’s structure prevents unauthorized rearrangement of sheets, maintains organization and prevents accidental data loss.
- Fine-Tuning Worksheet Permissions: Granular control over editing permissions allows you to designate who can modify specific cell ranges, fostering collaboration while safeguarding data integrity.
- Understanding Encryption: Encryption adds an extra layer of security by scrambling data into an unreadable format, ensuring confidentiality even if unauthorized users gain access to the file.
Table of Contents
Introduction to Excel Spreadsheet Security
The importance of protecting your data
You know what they say—data is the new gold. But just like buried treasure, it’s no good to you if pirates can snatch it away. In many businesses, Excel spreadsheets are treasure maps laden with important coordinates, from financial forecasts to client information.
Keeping this data under lock and key isn’t just best practice; for many, it’s a legal necessity to prevent unauthorized viewing or tampering. Think HIPAA for healthcare data or client confidentiality in legal realms. Remember, protected data maintains integrity, upholds your reputation, and conforms to privacy laws—crucial aspects for trusting relationships with clients and partners.
Overview of password protection in Excel
Excel offers you a virtual vault with its built-in password protection features—which is kind of like having a security guard for your data. Whether you’re looking to keep prying eyes away from your fiscal forecasts or to bar unwanted edits to your burgeoning budget, Excel has got you covered.
It allows you to set passwords in a few different ways: you can require a password to open the workbook, modify its content, or both. Plus, you can protect individual worksheets, preventing editing or just limiting changes to certain cells.
Step-by-Step Guide on Password Protecting Your Spreadsheets
Setting a password for opening the Workbook
Empowering workbook security is akin to installing a sturdy front door lock; it’s the first line of defense against unwelcome guests. Decide who gets a key by setting a password that must be punched in before the workbook even springs open.
This is how you go about it:
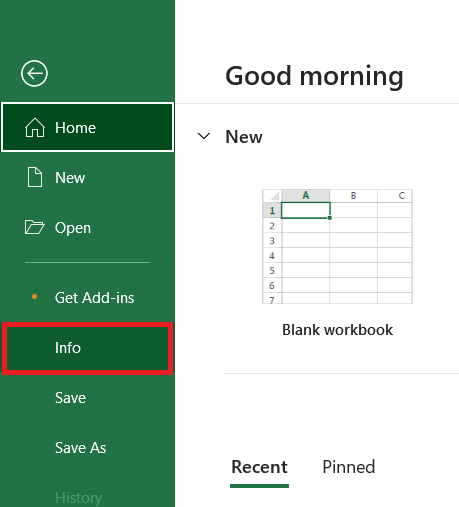
STEP 1: Click “File” and then head over to “Info”.
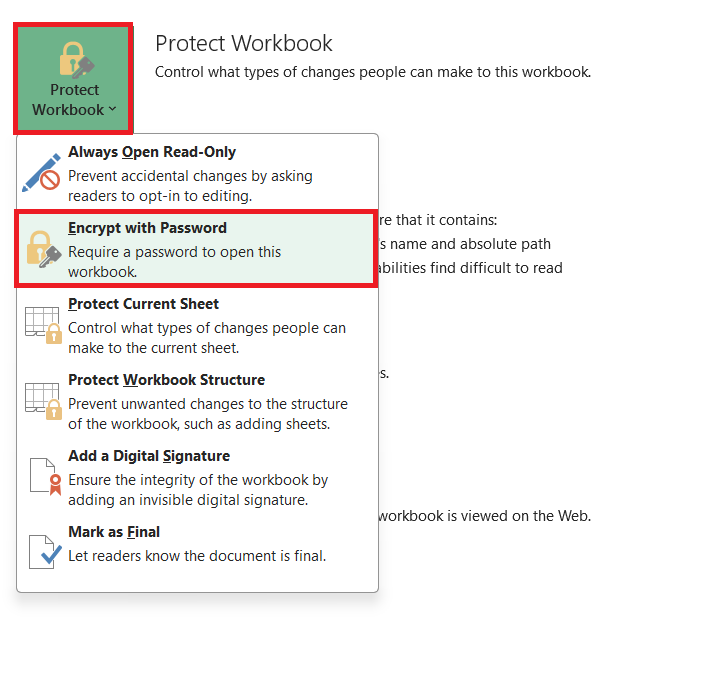
STEP 2: Tap on “Protect Workbook” and click on “Encrypt with Password”.
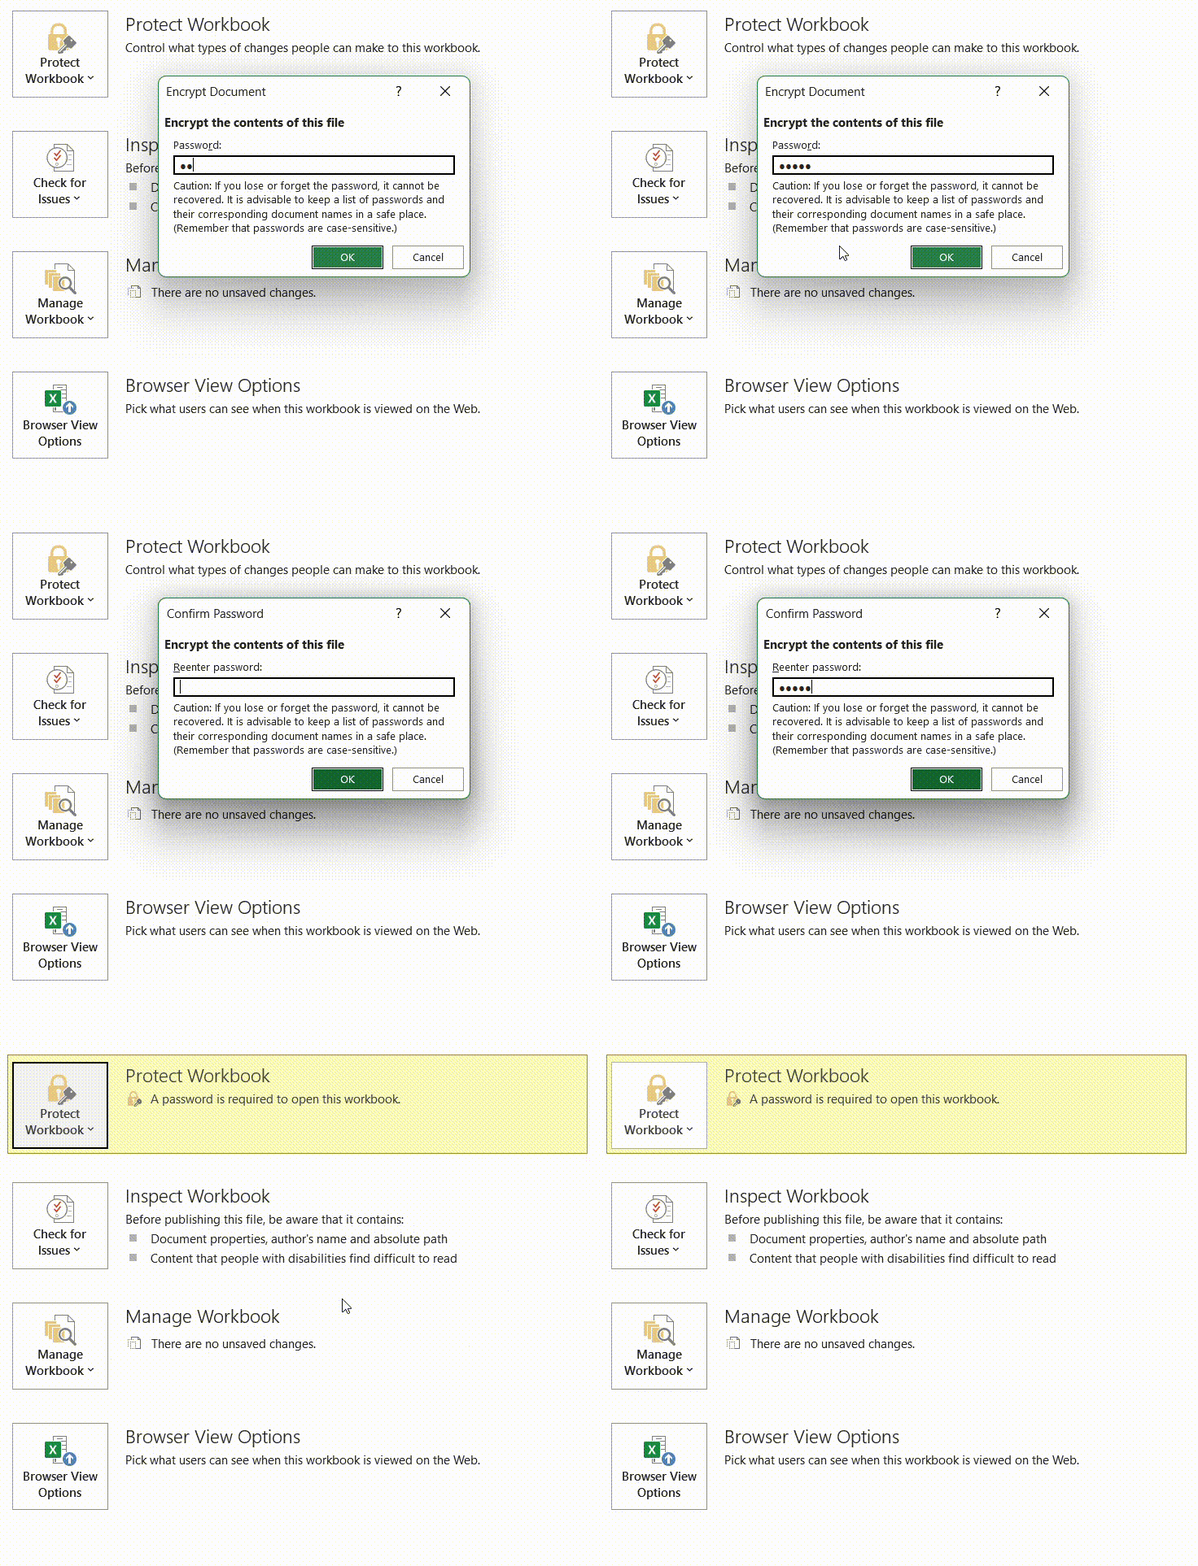
STEP 3: Type in your secret code (a.k.a. password), hit “OK”, and confirm it just to be sure.
Tip: Always go for a password that’s a tough nut to crack—mix in letters, numerals, symbols, and avoid the all-too-guessable like “password” or “123456”.
Establishing a password to modify Worksheet content
To take control of who can alter the spreadsheet’s contents, setting a modification password is like assigning a gatekeeper for your data. It keeps the unwanted edits at bay while permitting certain individuals to make necessary changes.
Here’s the step-by-step on how to plant this gatekeeper:
STEP 1: Activate the worksheet you want to secure.
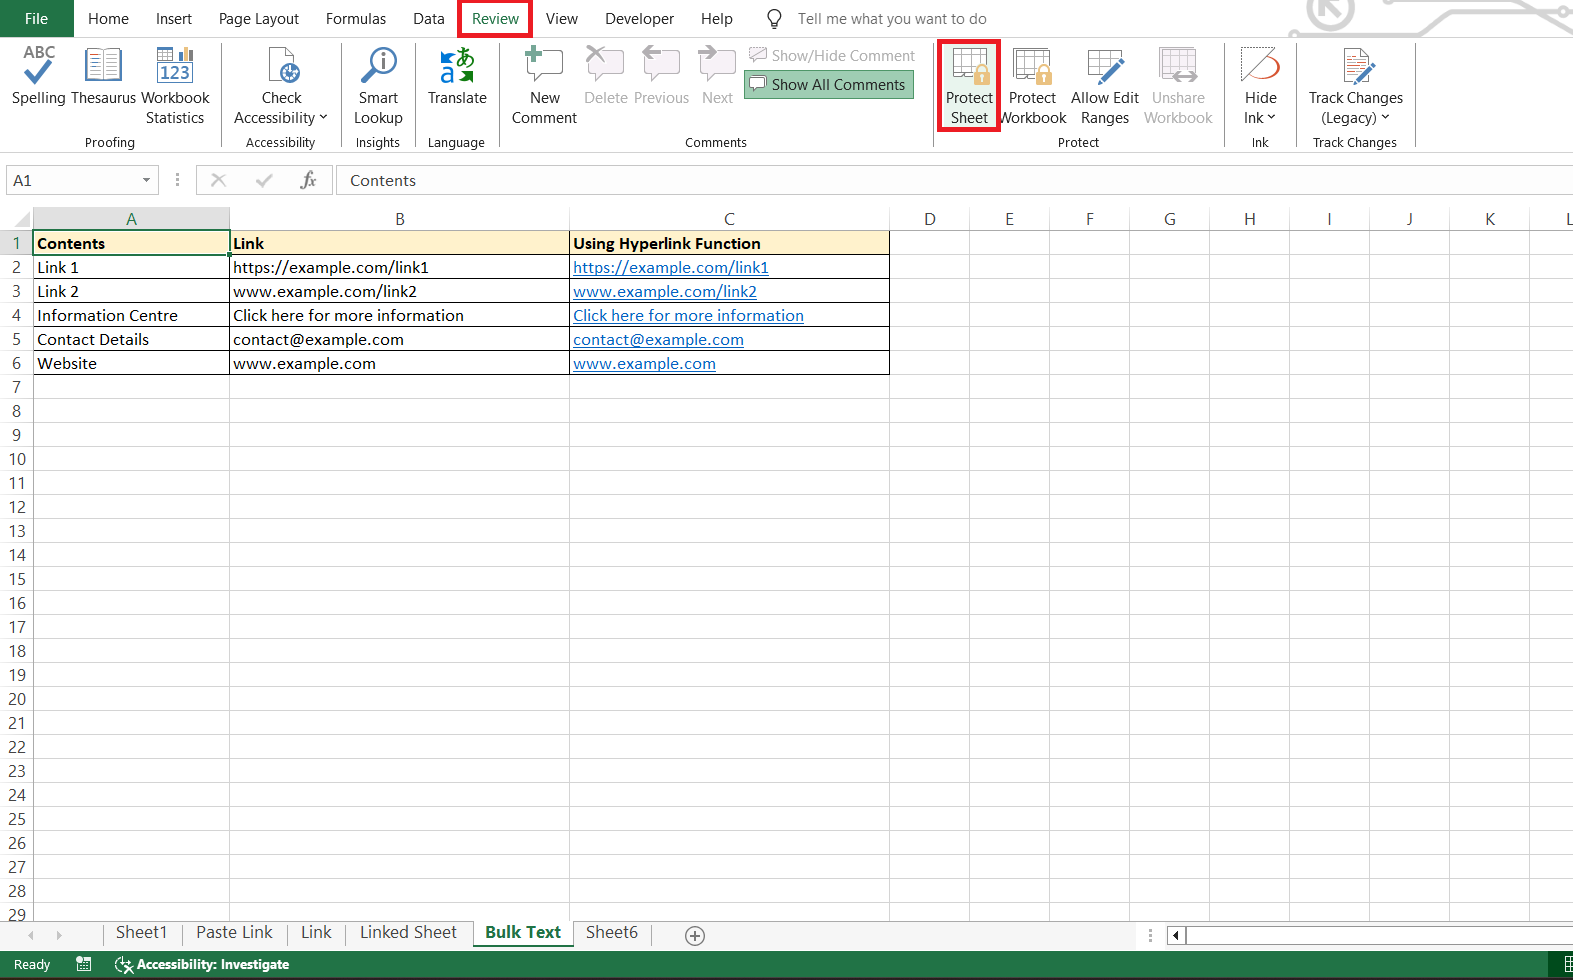
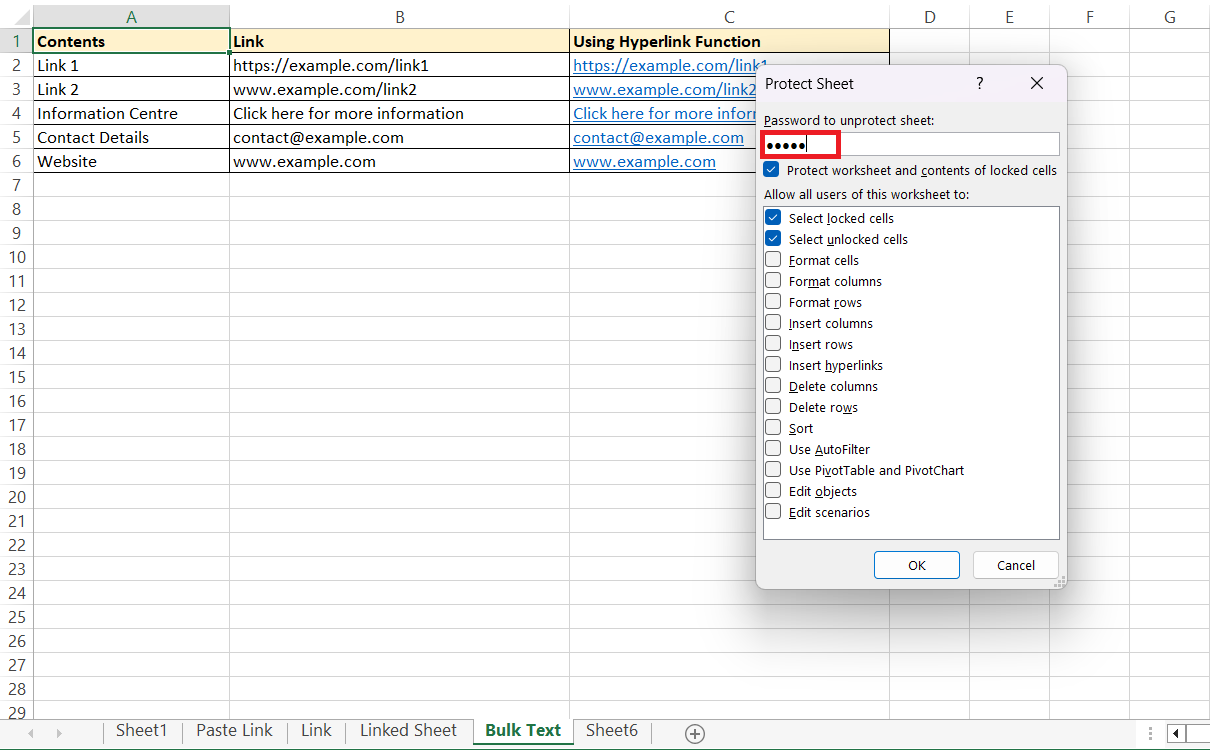
STEP 2: Dive into the “Review” tab and select “Protect Worksheet”.
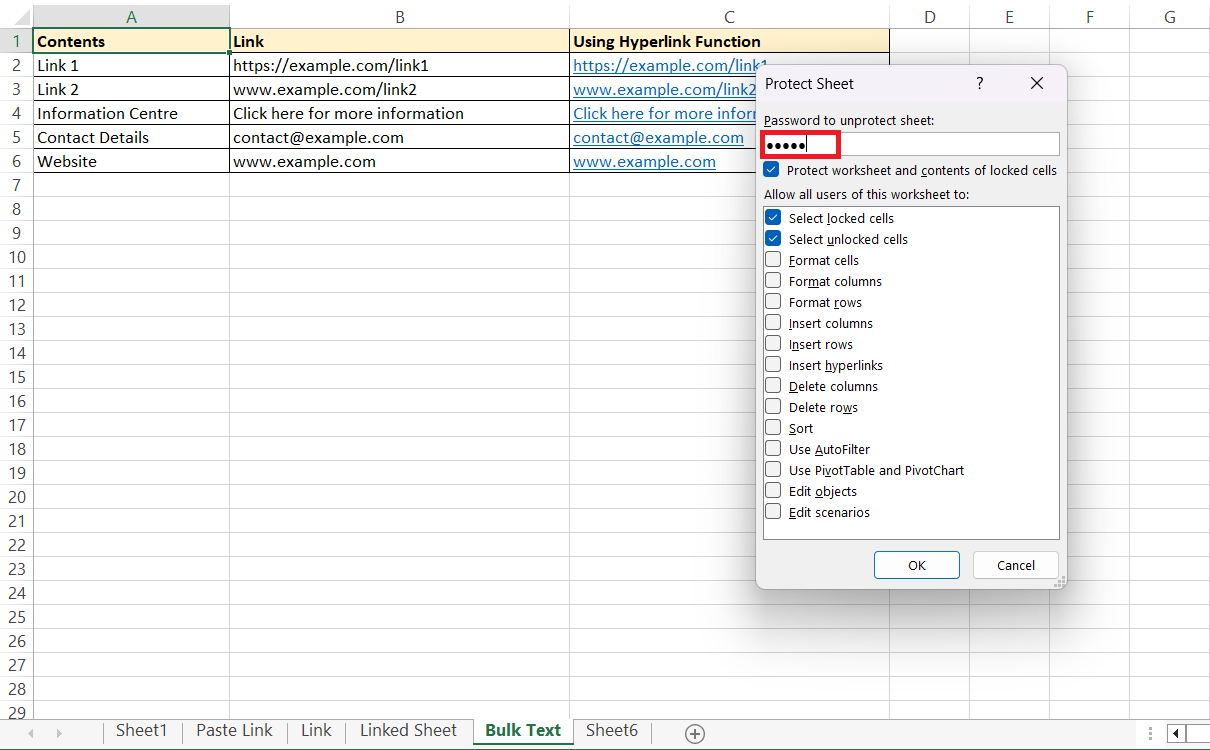
STEP 3: Conjure up your spell of choice—no, not “Wingardium Leviosa”—we mean your password.
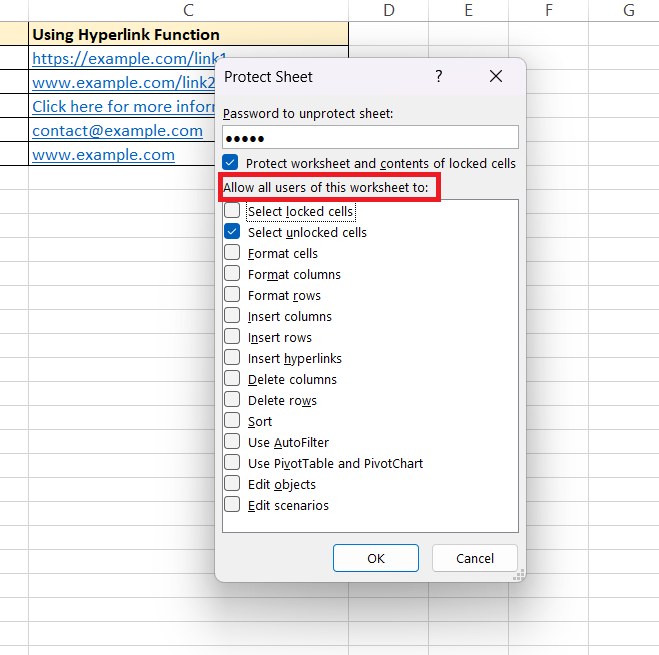
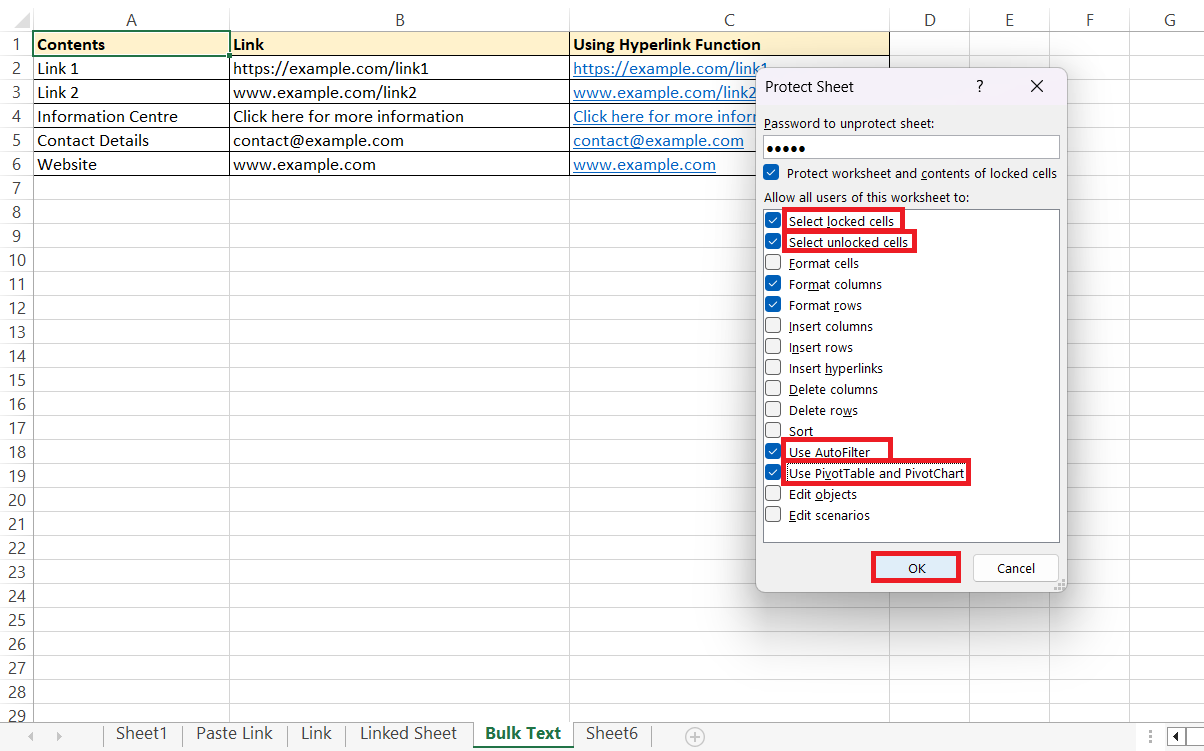
STEP 4: Decide the powers you aim to grant—will they be able to format cells, insert columns, or sort data? Check the boxes accordingly.
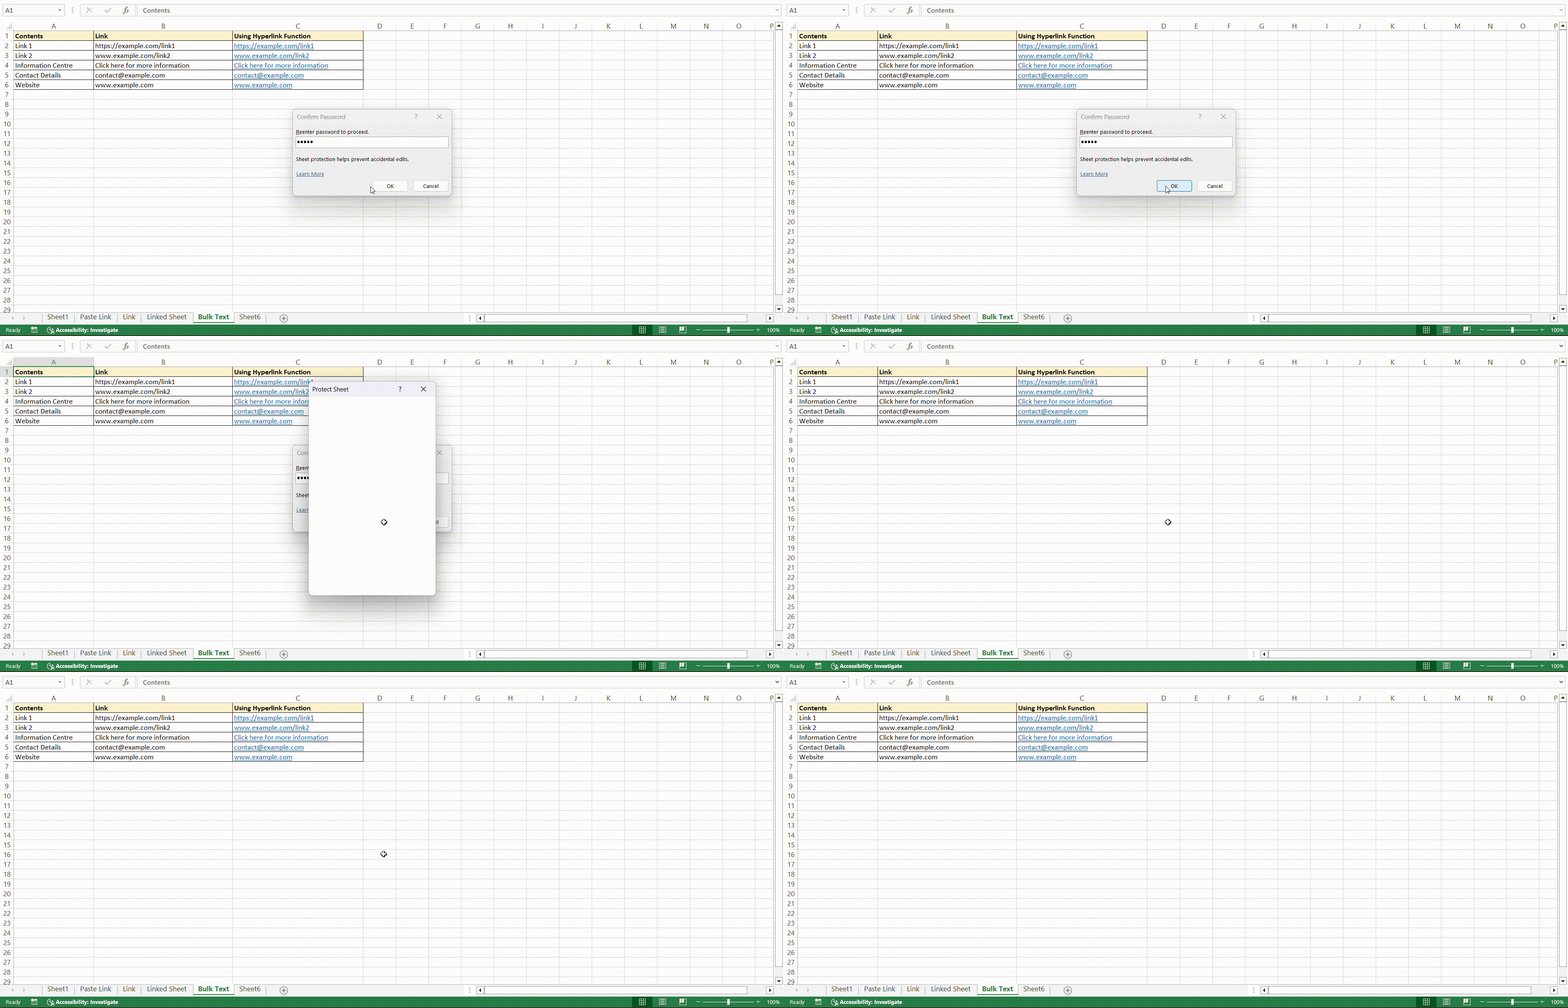
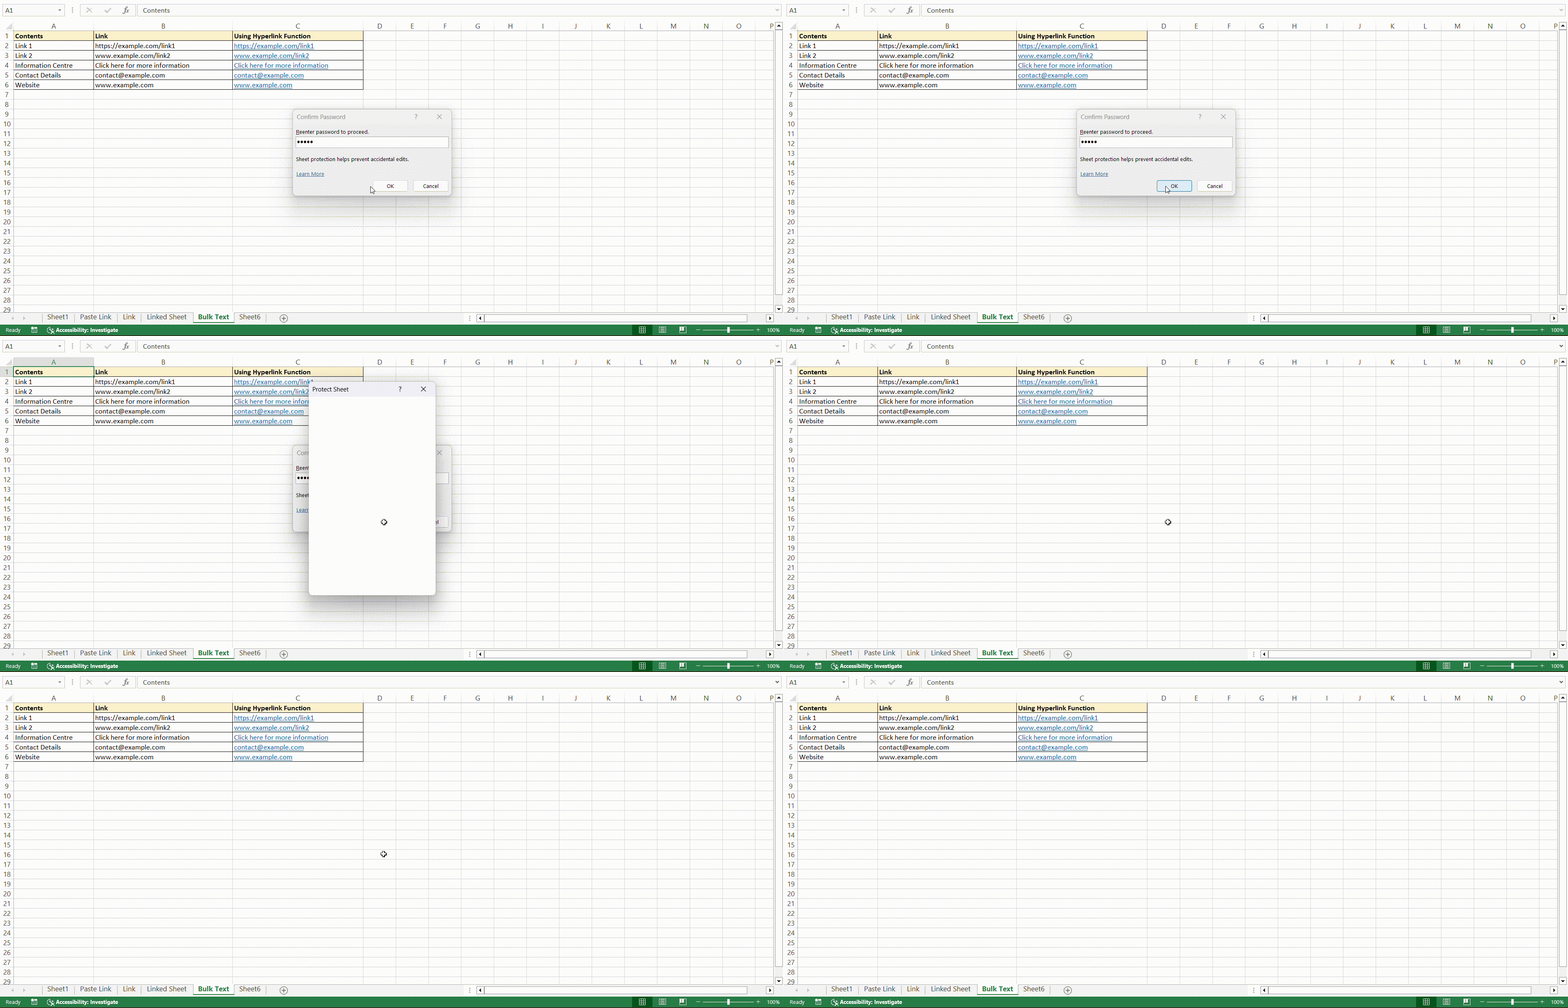
STEP 5: Click “OK”, fetch your password into the pop-up once again to cement it.
Different Levels of Protection in Excel
Workbook Structure Security
Imagine your Excel workbook as a filing cabinet—protecting its structure is like ensuring no one can shuffle your files around. Workbook structure security stops anyone from adding, removing, or renaming your Excel sheets without permission, maintaining your organized setup just as you like it.
Here’s how to stand guard over your workbook’s structure:
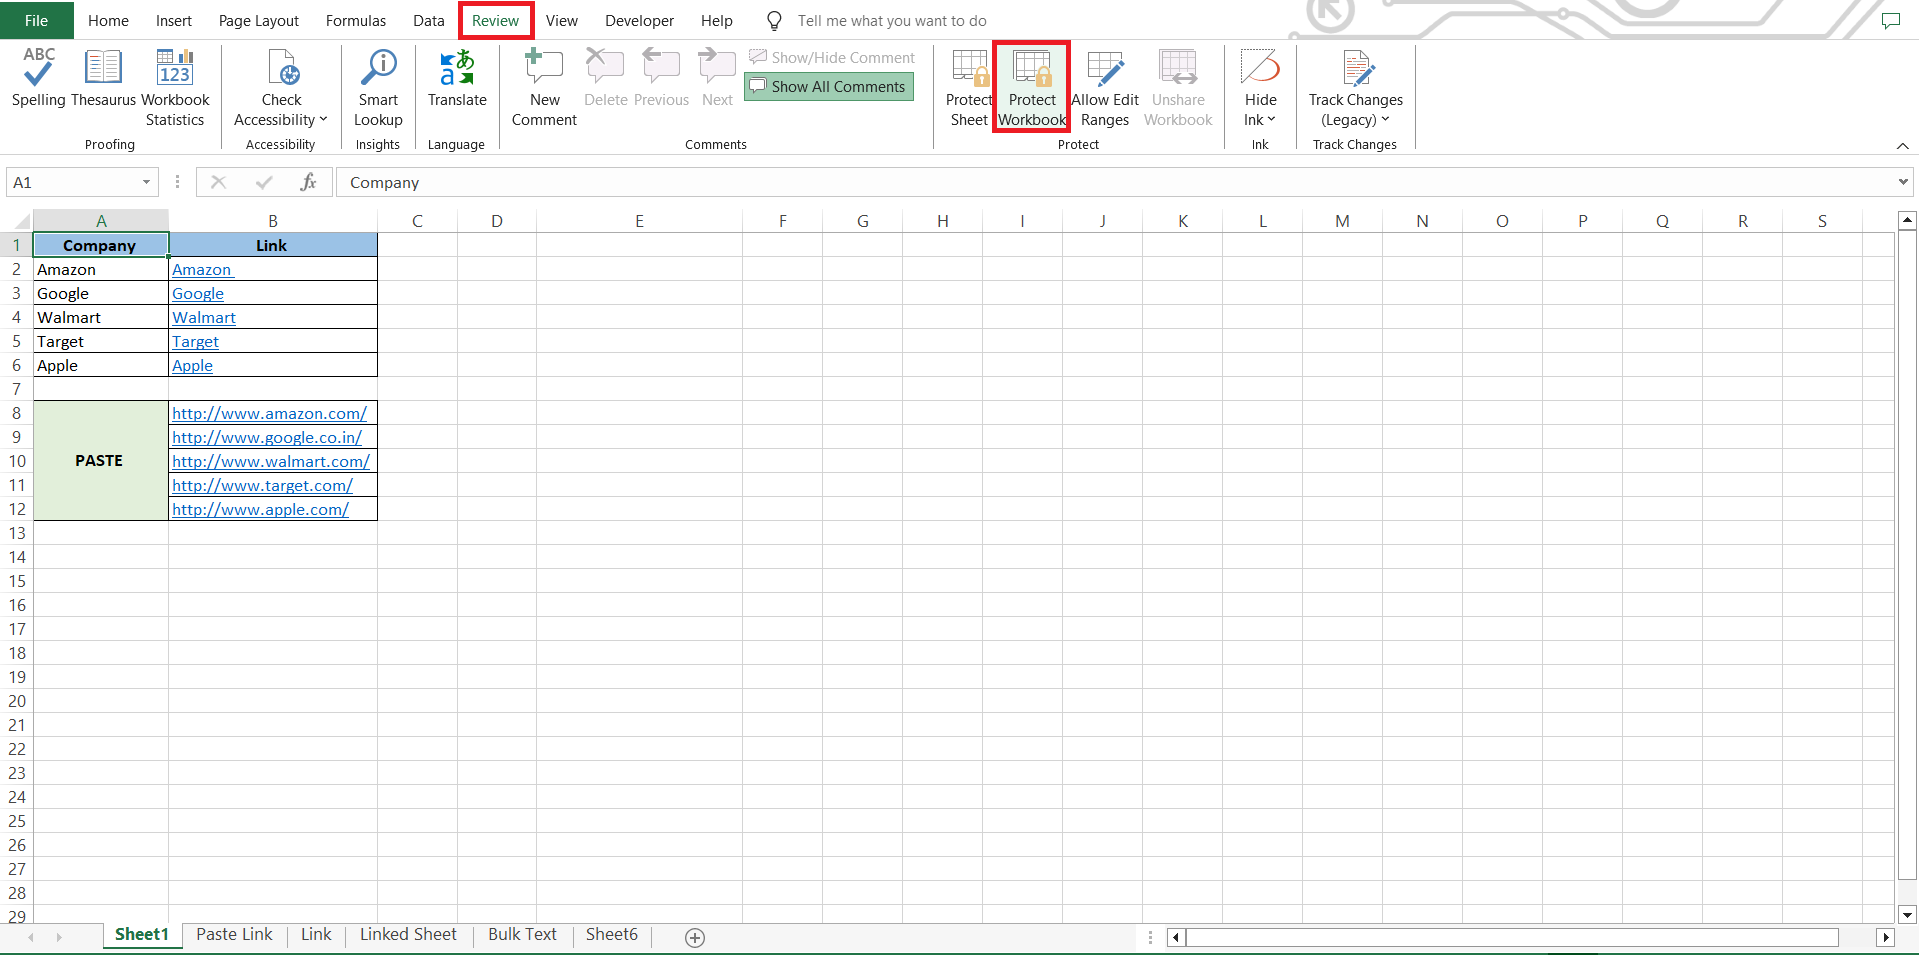
STEP 1: Jump to the “Review” menu and click on “Protect Workbook.”
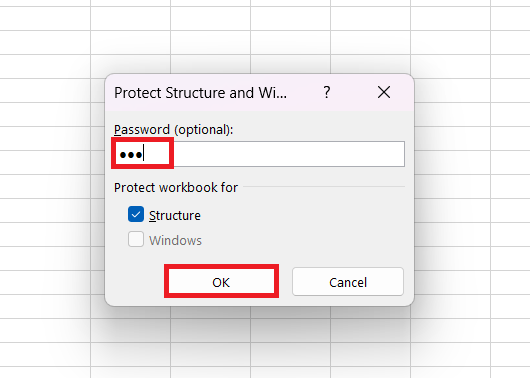
STEP 2: Enter your password in the prompt window and hit “OK.”
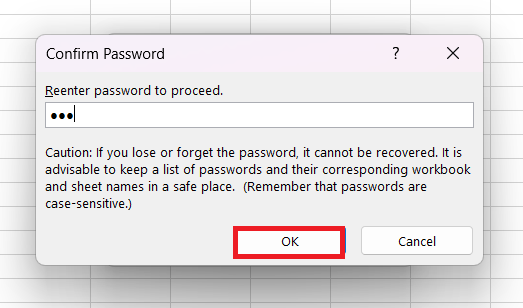
STEP 3: Re-enter for confirmation, and just like that, the structure is secured.
Worksheet Editing Permissions
Fine-tuning editing permissions is like organizing your toolbox—it ensures everyone has just the right tools they need, and nothing more. By setting permissions on individual worksheets within your Excel workbook, you handpick who gets to wield which tools. This keeps your data precise and prevents unauthorized renovations.
Let’s play the permission game:
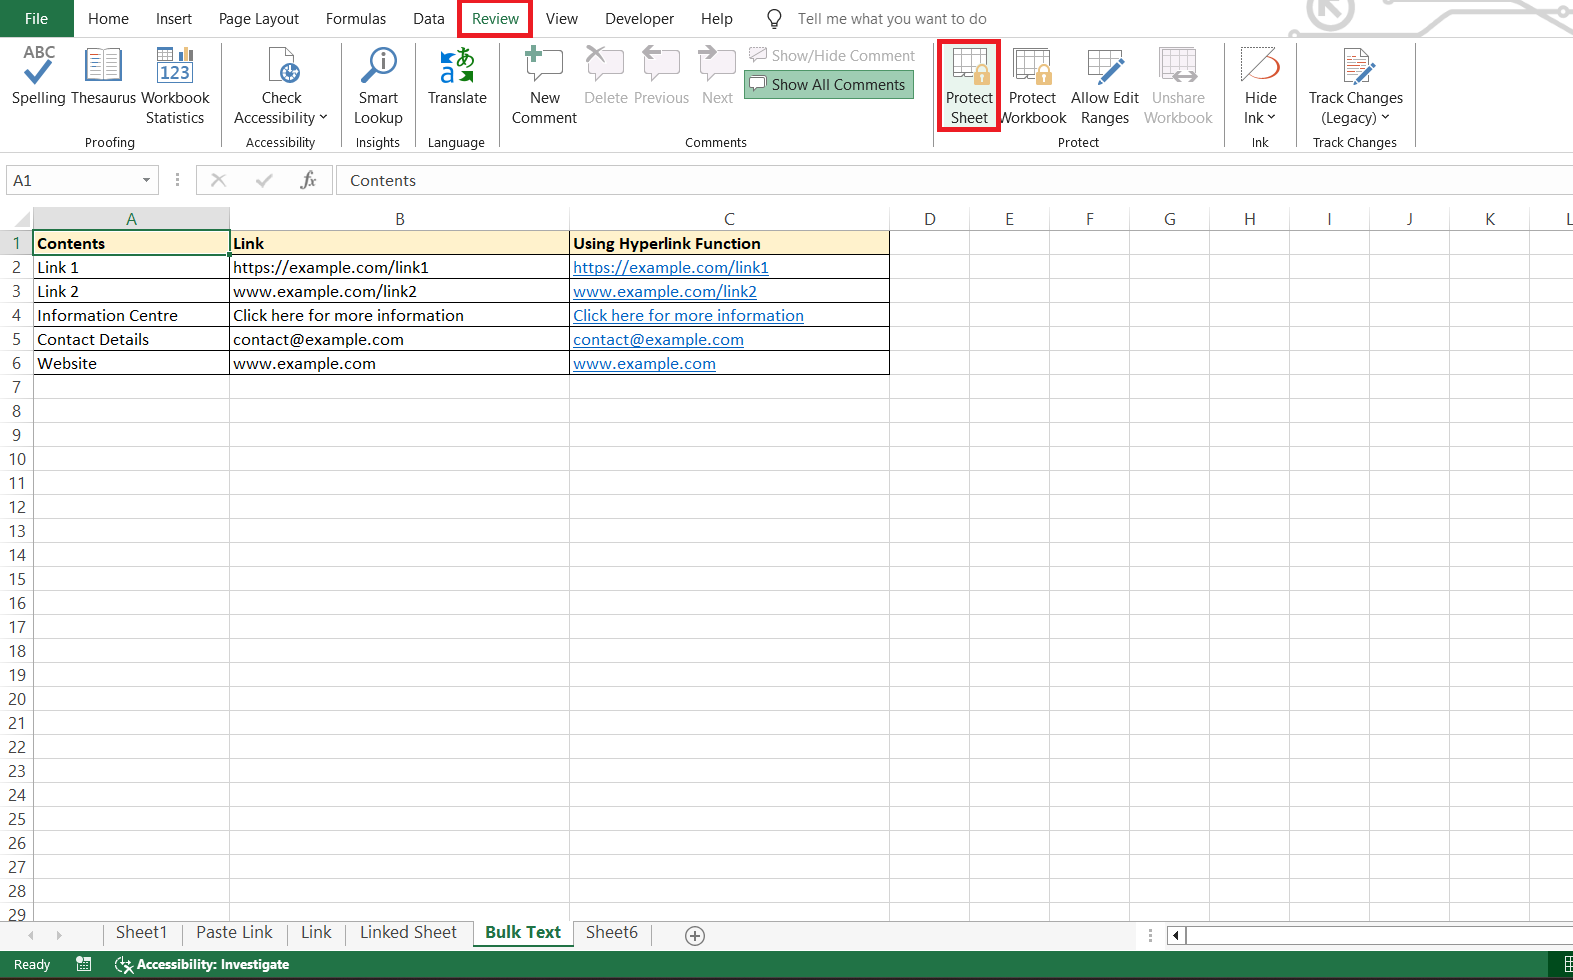
STEP 1: Click “Review,” then cozy up to “Protect Sheet.”
STEP 2: As if casting a spell, enter a password that only the chosen ones will know.
STEP 3: Now, let’s delegate the tools: Will they format, insert, or use autofilters? Check the corresponding boxes to assign these abilities.
STEP 4: Confirm with “OK,” and re-affirm your password.
Only those with the password can change specific cell ranges—ideal for team environments where different members manage distinct aspects of a project. With everyone restricted to their areas of expertise, there’s less chance of data mishaps, and more chance of a slick, uninterrupted workflow.
Encryption vs. Password Protection
Understanding File Encryption in Excel
Encryption is your spreadsheet’s secret service—working behind the scenes, it shields your data with a cloak of invisibility that only the right encryption key can unveil. In Excel, when you encrypt a file, you’re scrambling the contents into gibberish for any would-be intruders without the correct password. It’s like turning your sensitive data into a cryptic puzzle that only select individuals can piece together.
Here’s how encryption operates in Excel:
- When you apply encryption, Excel utilizes the Advanced Encryption Standard (AES) with a 256-bit key—top-of-the-line stuff we’re talking here. It’s a sophisticated algorithm that’s near-impenetrable to brute-force attacks.
- Only upon entering the correct password can the contents be decoded and the file made usable.
How password protection complements encryption
Password protection and encryption are the dynamic duo of Excel security, each with its own superpower to guard your data. Consider password protection as a security checkpoint; it deters easy access. Encryption, on the other hand, is the armored transport—it makes sure that even if someone bypasses the checkpoint, your data is impenetrable.
Together, they create a formidable barrier:
- Password protection ensures that only those with the correct password can even attempt to open or edit the file.
- Encryption adds another layer of complexity, transforming your data into a secret code that can only be deciphered with the right key.
Best Practices for Managing Excel Passwords
Creating strong passwords for Excel files
Creating a strong password for your Excel files is essential—it’s the difference between leaving your valuables under a welcome mat or behind a bank vault door. A stout password acts as a formidable gatekeeper, making it an uphill battle for intruders to gain access.
Keep these pointers in mind to forge an ironclad password:
- Aim for a mix of upper and lower case letters, numbers, and special characters. The more unpredictable, the better.
- Steer clear of personal info like birthdays or pet names—think more along the lines of random word combos and keyboard patterns.
- Length matters: longer passwords are tougher to decode. Stretch them out like sunrays—warm and far-reaching.
Keeping track of your passwords securely
When it comes to safekeeping your passwords, think of it like storing a master key; you wouldn’t just tape it under the desk. In the digital realm, secure management is paramount to preserve the sanctity of your spreadsheets.
Here’s how to keep tabs on those passwords securely:
- Use a Password Manager: These are the Swiss Army knives of digital security. They’ll not only store but also generate complex passwords, and even autofill them for you.
- Two-Factor Authentication (2FA): Consider adding 2FA where possible. It’s like having a double-locked door—you need both the key and the right fingerprint to get in.
- Regular Updates: Change your passwords periodically, like shedding leaves with the seasons. Fresh passwords mean renewed security.
- Secure Backups: Keep a backup of your passwords, preferably in a different but equally secure location. Think of it like an emergency fund—crucial when needed.
FAQ: Frequently Asked Questions
Can you password-protect Excel cells?
Yes, you can password-protect specific cells in Excel. First, choose the cells you wish to remain editable, right-click and select ‘Format Cells.’ Under the ‘Protection’ tab, uncheck ‘Locked,’ then use ‘Protect Sheet’ under the ‘Review’ tab to set a password. Only the unlocked cells can be edited thereafter.
How do I set or change the password for an Excel file?
To set a password, go to ‘File,’ click ‘Info,’ choose ‘Protect Workbook,’ select ‘Encrypt with Password,’ type a new password, and confirm it. To change an existing password, you must first remove it using the old password, then set a new one following the same steps.
Can Microsoft help me recover a lost Excel password?
No, Microsoft cannot assist in recovering lost Excel passwords. The passwords do not get stored by Excel or Microsoft, hence, they cannot retrieve them. It’s recommended to keep passwords stored securely elsewhere.
Is it sufficient to only password-protect my Excel spreadsheet?
Password-protecting an Excel spreadsheet can deter unauthorized access, but for sensitive data, it’s often not enough. Utilize additional measures such as file encryption and secure backup practices for comprehensive protection.
How do I restrict access to an Excel File?
To restrict access to an Excel file, password protect it for opening and modifying via ‘File’ -> ‘Info’ -> ‘Protect Workbook.’ Use read-only recommendations and worksheet protections to further control usage.
What happens if I forget or lose my passwords?
If you forget or lose your Excel passwords, Microsoft can’t retrieve them. You may need to use third-party recovery tools or services, but there’s no guarantee of success. Always keep backups of your passwords in a secure place.
John Michaloudis is a former accountant and finance analyst at General Electric, a Microsoft MVP since 2020, an Amazon #1 bestselling author of 4 Microsoft Excel books and teacher of Microsoft Excel & Office over at his flagship Academy Online Course.
