By tapping into the Outline Feature, they streamline their thoughts and arguments. This paves the way for presentations that communicate efficiently, ensuring that the central themes and ideas are unmistakable and easily absorbed by any audience.
Learn about Excel with our Free Microsoft Excel Online Course!
Key Takeaways
- To print PowerPoint outlines, open your presentation, click on the “File” tab, select “Print,” then choose your desired printer from the ‘Printer’ drop-down menu.
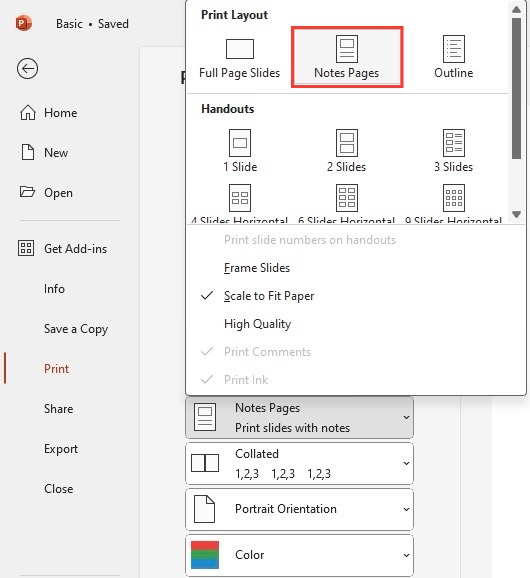
- Under ‘Settings’ in the Print menu, select the specific slides you want to print, such as ‘All Slides’, ‘Current Slide’, or enter a custom range, then choose your preferred print layout, like ‘Notes Page’ to include slide notes.
- Before printing, adjust additional settings such as orientation (Portrait or Landscape) or print color (Color or Grayscale), then review your settings in the preview pane and click “Print” to produce your physical copy.
Saving Time and Paper with Effective Outline Printing
Effective outline printing is a fantastic strategy for anyone looking to save time and reduce their environmental footprint. By choosing to print just the outline of a PowerPoint presentation, they minimize the use of ink and paper, since this method skips over the graphics and images that typically adorn full slides. It’s a sensible choice for handouts in meetings or classrooms where the detailed content from the slides is what matters most.
Furthermore, they’re also simplifying the note-taking process for their audience. An outline presents information cleanly and concisely, aiding in better comprehension and retention. It’s a true win-win, both for the one preparing the material and for those receiving it. Simple, cost-effective, and eco-friendly – outline printing checks all the boxes.
Table of Contents
Step-by-Step Guide to Print Your PowerPoint Outline
Accessing Outline View for Optimal Print Settings
Accessing Outline View in PowerPoint is a breeze, and it’s a crucial step to ensure your printouts are tailored for text. Here’s how you can dive right into it:
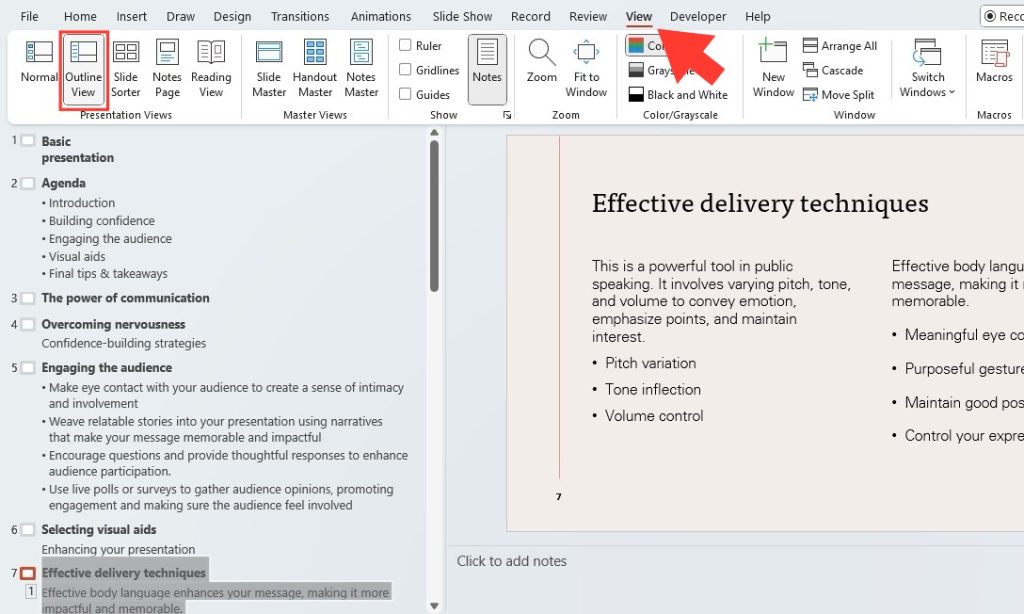
STEP 1: Open the presentation and head to the ‘View’ tab.
STEP 2: Choose ‘Outline View’ from the available options.
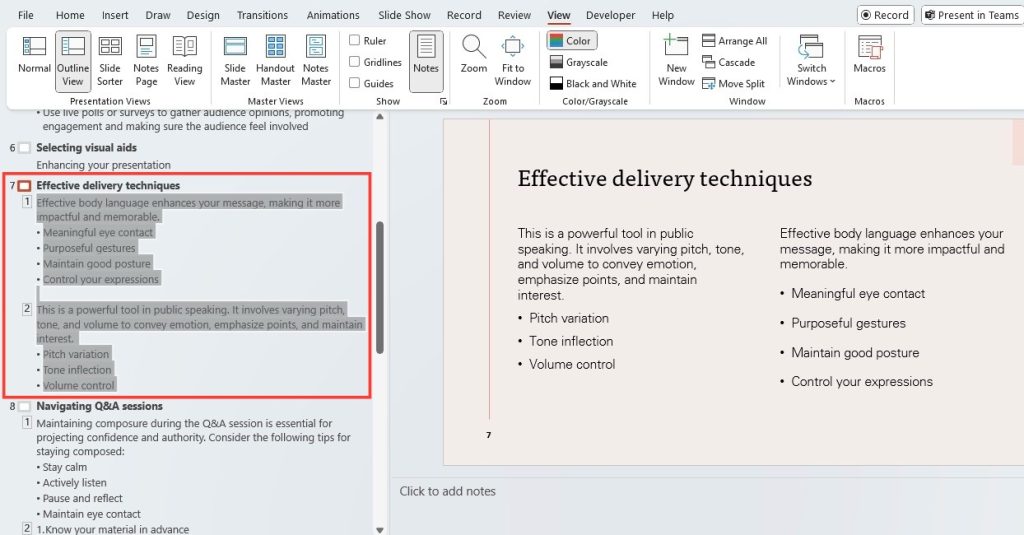
STEP 3: Witness the transformation as your content reorganizes itself into a neat, hierarchical text structure. No more distracting visuals—just your points, loud and clear.
When the time comes to turn this digital clarity into a physical copy, just remember a few clicks will get you there:
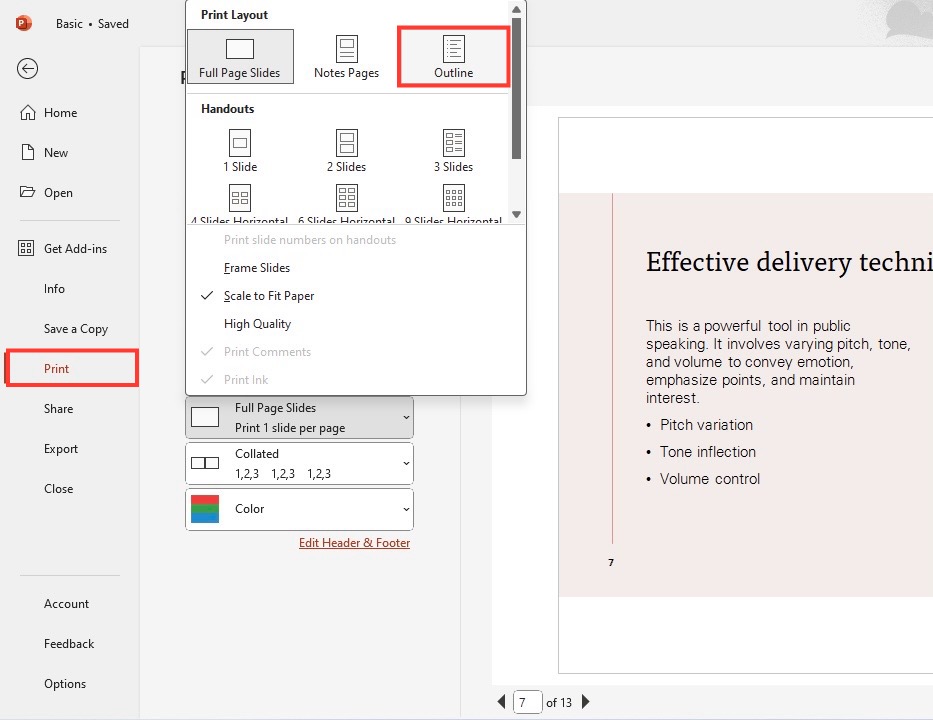
STEP 1: Click ‘File’ and then ‘Print’ to reach the printing options.
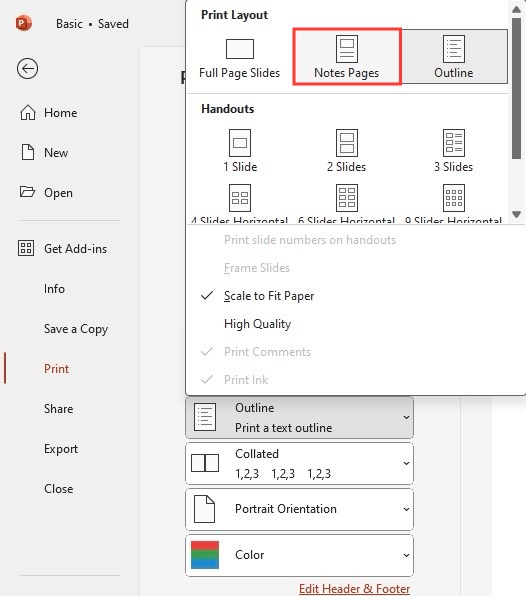
STEP 2: In the ‘Settings’ section, open the drop-down that typically shows ‘Full Page Slides’ by default.
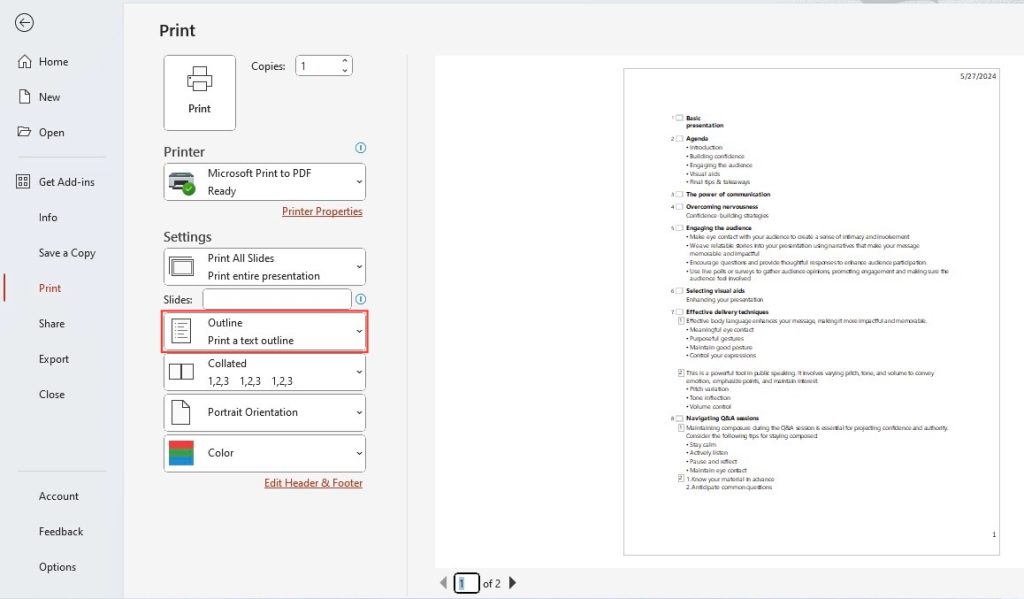
STEP 3: Select ‘Outline.’ You’re now set to print the distilled essence of your presentation.
By embracing the Outline View for printing settings, they set the stage for a printout that’s optimal for both the presenter and the audience, ensuring that everyone can focus on what truly matters—the content.
Customizing Your Outline for the Perfect Handout
To elevate your outline from good to great, a touch of customization can go a long way. Here’s how you can polish it to perfection:
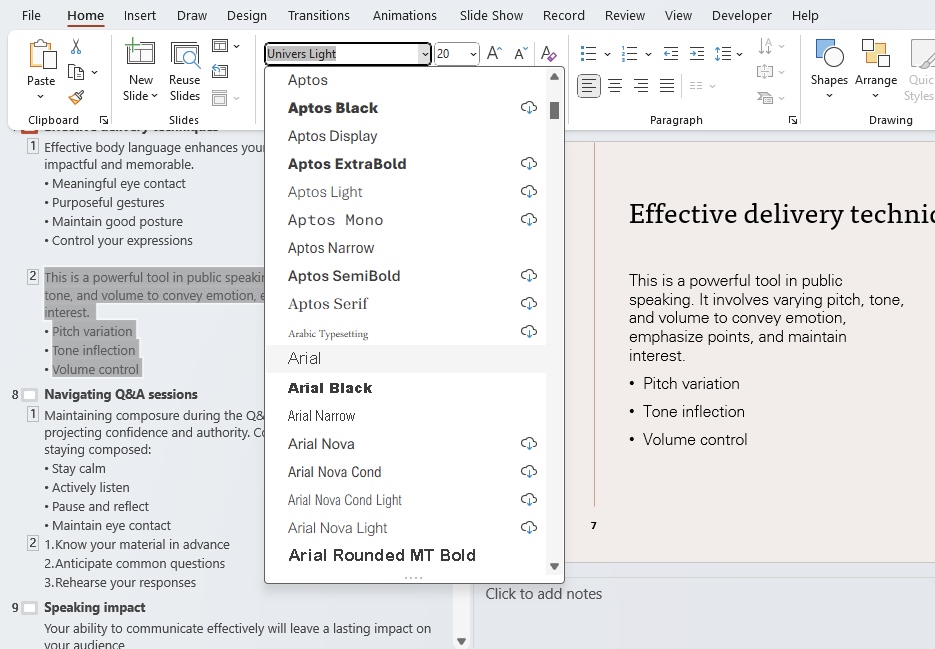
STEP 1: Refine the font size and style in Outline View to enhance readability and match the tone of your presentation.
STEP 2: Adjust bullet points and indents to emphasize the hierarchy and flow of your content.
STEP 3: Simplify the language for a handout format, knowing that your verbal presentation will fill in the nuances.
Every detail you tweak in the Outline View translates to a more digestible and useful handout. They enhance the structure and legibility of your content by selectively bolding keywords and ensuring that the arrangement on the page guides the audience through your points logically.
With these modifications, your outline is no longer just a printout; it becomes a valuable companion to your spoken words, helping your audience to track, understand, and remember your presentation long after it has concluded.
Benefits of Printing an Outline over Full Slides
Enhanced Focus on Key Points for Your Audience
Printing an outline can do wonders for your audience’s focus. By trimming away the extra ‘fluff’ that full page slides often have, the attendees are served the meat of your presentation without any distractions. This leads them to zero in on the key points and arguments you’re advancing.
Moreover, outlines encourage note-taking and active engagement. Your audience can quickly jot down notes beside the printed points, facilitating a deeper processing of the information you’re delivering. This can be particularly impactful in educational settings, where comprehension and retention are crucial.
Easy Transportation and Environmentally Friendly Option
Printing an outline is not only convenient but also kind to the planet. Since outlines typically contain only text, they use significantly less ink compared to full-page slides that often include images and colored backgrounds. This means fewer cartridges end up in landfills, and fewer resources are consumed in manufacturing.
Moreover, they’re lightweight and easy to transport. Whether they’re presenting at a meeting across town or at a conference overseas, carrying stacks of paper is less cumbersome when it’s just the outlines. They can bring just enough for their needs without the bulk.
Besides the practical benefits, being mindful of the environment enhances their brand or personal image as a conscientious and responsible presenter, aligning with the growing global emphasis on sustainability.
Tips and Tricks for a Professional-Looking Outline
Selective Text Editing Before Printing
Before hitting that print button, taking a moment to selectively edit the text in your outline can have a big impact on the final product. Be on the lookout for any redundancies or overly technical language that might muddy the waters for your audience. They should strive for clarity and conciseness.
It also helps to tailor the text to the anticipated level of understanding of your audience. Will they be familiar with the jargon, or should it be simplified? Aim for language that includes everyone in the conversation.
After all, a printed outline is more than just a document—it’s a communication tool, and like all tools, its effectiveness depends on how well it’s crafted. With a bit of selective editing, your outline will not jut communicate, but it will resonate.
Adjusting Format and Layout for Readability
The format and layout of your outline can either pave the way for a seamless reading experience or lead to confusion. To ensure the former, consider the following steps:
- Choose a legible font that is easy on the eyes; think Arial or Calibri, not just for aesthetics but also for inclusivity.
- Opt for font sizes that are readable when printed. Typically, anything below size 10 might strain the eyes.
- Utilize white space wisely. Generous spacing between points can aid in distinguishing between major ideas and details.
Lastly, if color is necessary for differentiation or emphasis, use it sparingly and with high contrast. This not only helps with readability but also ensures that the document is more accessible for those with color vision deficiencies.
Troubleshooting Common Issues When Printing Outlines
Dealing with Missing Content in Printouts
If you find that the printed outline is lacking certain content from the slides, it might be due to invisible shapes or text boxes that didn’t translate onto paper. Here’s how to resolve this:
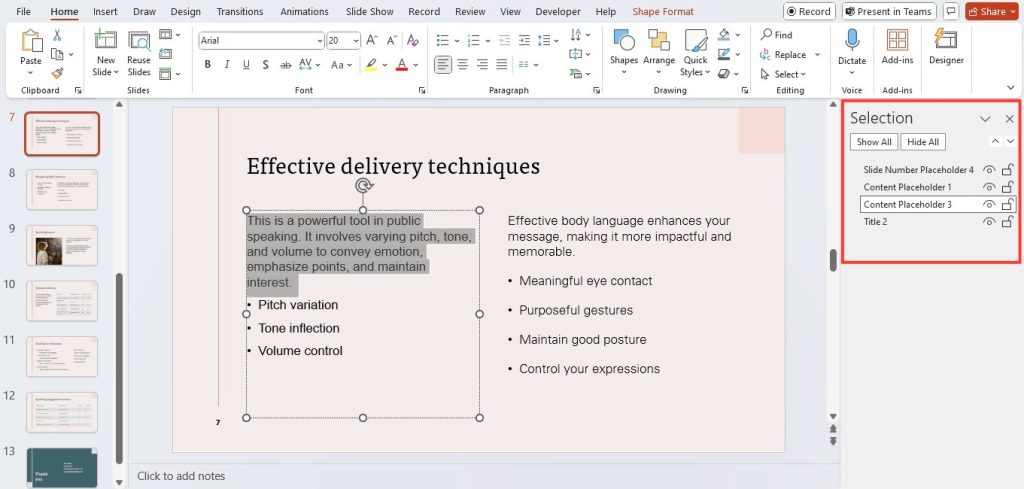
- Revisit your PowerPoint file and toggle the selection pane to identify all elements.
- Look for any text that is in a hidden shape or formatted to be invisible on the screen.
- Ensure that all relevant content is within the slide’s title or text placeholders as these are included in the outline view.
These small fixes can make a big difference. By ensuring all content is accounted for, they prevent those puzzling moments for the audience and allow for a comprehensive understanding of the presentation’s content.
Solving Formatting Glitches Pre-Print
Encountering formatting glitches before printing can be quite a hassle, but with some foresight, they can iron these issues out smoothly. Here’s what they should keep in eye out for and how to fix them:
- Check for inconsistencies in font type and size across different slides which might not translate well in the outline.
- Ensure that the color settings for print are matching with what they see on the screen by reviewing ‘Color/Grayscale’ settings.
- Confirm that bullet points and numbering are carried over correctly by previewing the outline in the ‘Print’ menu.
If they are dealing with a slide that refuses to conform, a simple copy-paste of the content into a fresh, default slide format is often the trick. It resets the erratic formatting and gives them a clean slate to work with.
FAQ: Frequently Asked Questions
Can You Print Both Notes and Outline Together in PowerPoint?
No, in PowerPoint, they cannot print both the notes and the outline together directly. They need to choose either the ‘Notes Pages’ option to print slides with notes or the ‘Outline’ option to print just the text outline. However, for a comprehensive handout, they can manually combine the notes and outline by copying the text from the Notes pane into a word processor document, formatting it as desired, and printing from there.
How do I export a PowerPoint presentation as an outline?
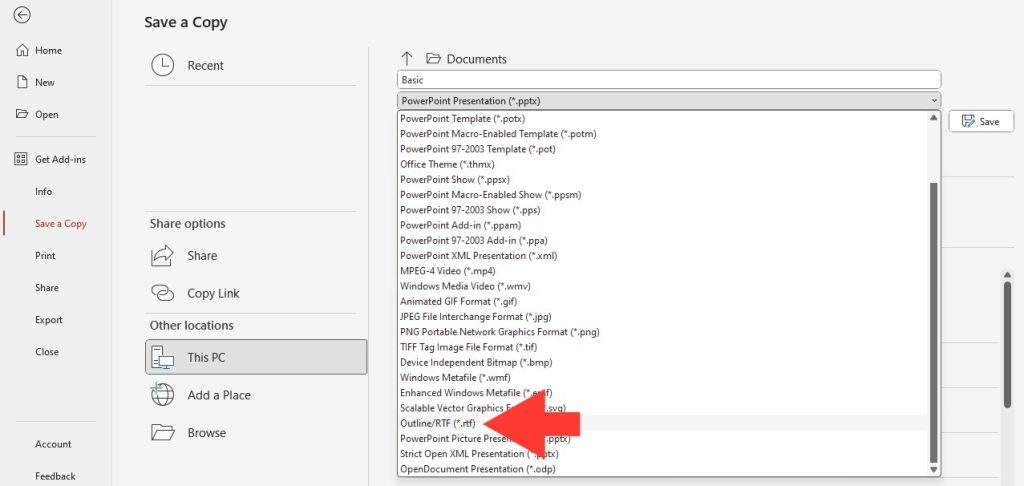
To export a PowerPoint presentation as an outline, they need to use the ‘Save As’ feature:
STEP 1: With the presentation open, go to ‘File’ and then ‘Save As.’
STEP 2: Choose the location for the file, then click on the ‘Save as type’ dropdown menu.
STEP 3: Select ‘Outline/RTF(*.rtf)’ from the list.
STEP 4: Click ‘Save,’ and they’ll have a text-only outline of the presentation, which can be opened in a word processor for further editing or printing.
How do I print a PowerPoint presentation with lines?
To print a PowerPoint presentation with lines, one typically uses the Notes Pages print option, which provides lines for note-taking. Here’s how:
STEP 1: Go to ‘File’ and then ‘Print’.
STEP 2: Under ‘Settings’, use the second drop-down menu to choose ‘Notes Pages’.
STEP 3: Adjust any other settings as needed and hit ‘Print’.
Unfortunately, lines aren’t available with the Outline view, but they can customize their own by copying the outline into a word processor and adding lines before printing.
How Do You Ensure that All Text from Slides is Included in the Outline?
To ensure all text from the slides is included in the PowerPoint outline:
- Insert all text into the Title or Body Text placeholders as these are recognized by the Outline View.
- Avoid using non-placeholder text boxes, which may not show up in the outline.
- Check the ‘Selection Pane’ to make sure no text is hidden or set behind other objects.
- Lastly, review the Outline View before printing to confirm all content is visible.
John Michaloudis is a former accountant and finance analyst at General Electric, a Microsoft MVP since 2020, an Amazon #1 bestselling author of 4 Microsoft Excel books and teacher of Microsoft Excel & Office over at his flagship Academy Online Course.
