Download our 141 Free Excel Templates and Spreadsheets!
Key Takeaways
- To enable read receipts for all outgoing emails in Outlook, access Options via the FILE tab, select Mail in the dialog window, then check both ‘Delivery receipt’ and ‘Read receipt’ boxes in the Tracking area and click OK.
- For individual emails, use the Options tab in a new message, select the Read Receipt checkbox in the tracking section, and send your email; you can later check if it was opened by reviewing the sent item and clicking the Tracking button.
- Outlook users can leverage third-party tools like Mailtrack for unlimited free tracking with real-time notifications (but with a signature), and Boomerang for features like schedule send emails and meeting scheduling, despite it being somewhat outdated.
Email Etiquette and Read Receipts
When it comes to read receipts, there’s a fine line between being thorough and being overbearing. It’s critical to use them judiciously. While it’s tempting to monitor every message sent, doing so can seem pushy to the receiver. Imagine if everyone required a receipt for every email you got – you’d be swamped in notifications! Instead, save those read requests for the emails that really matter: the ones where the stake is high, a prompt response is essential, or a gentle nudge is needed to keep things moving. And remember, if you’re looking for a simple acknowledgment, sometimes a friendly line in the email asking for a quick confirmation works wonders.
Table of Contents
Setting Up Read Receipts in Outlook
How to Request a Read Receipt for a Single Email
Requesting a read receipt for an individual email in Outlook is a breeze. Here’s what you’ll need to do:
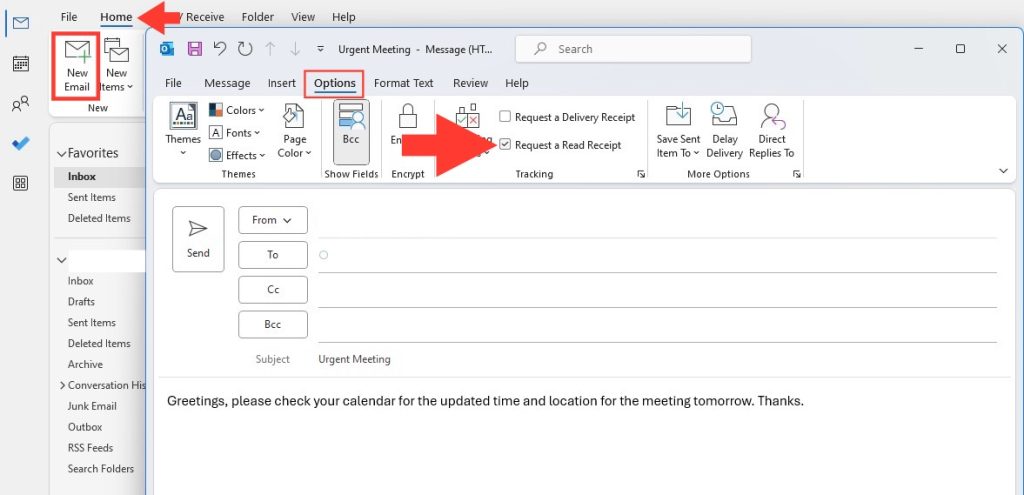
STEP 1: Open and compose your new email in Outlook > “Options” > “Tracking”. Tick the box for “Request a Read Receipt”.
STEP 2: Now, go ahead and click “Send”.
That’s it! If the recipient agrees to send a read receipt, you’ll get your notification when they open your email. Just keep in mind, it’s a courtesy to the recipient to comply with the request, not a requirement, so you might not get a confirmation every time.
Automating Read Receipts for Every Email You Send
If you’re someone who regularly needs confirmation that your messages have been received, automating read receipts for every email can be a game-changer. With Outlook, you can actually set yourself up to receive these notifications every time without having to tick a box manually:
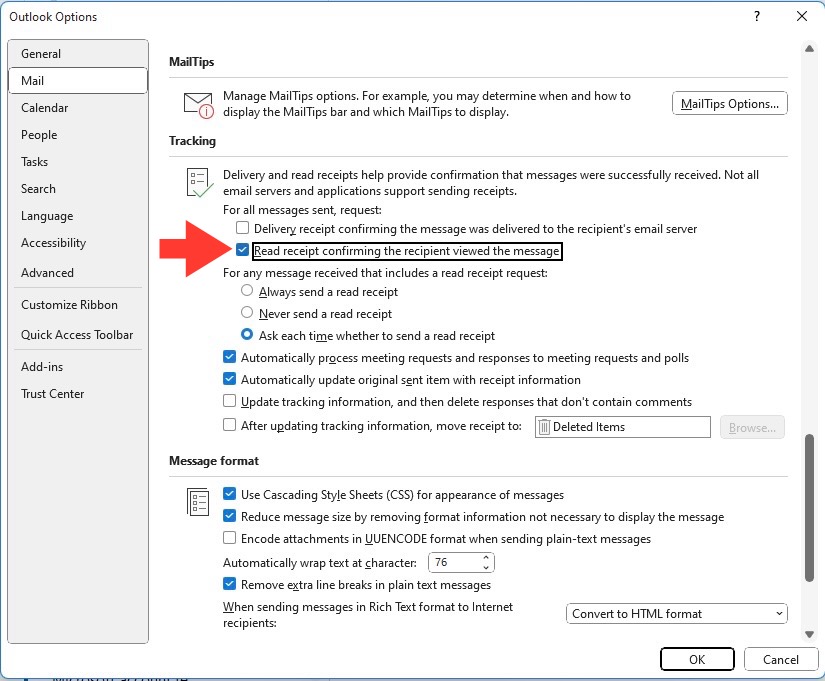
STEP 1: Click on ‘File’, then select ‘Options’.
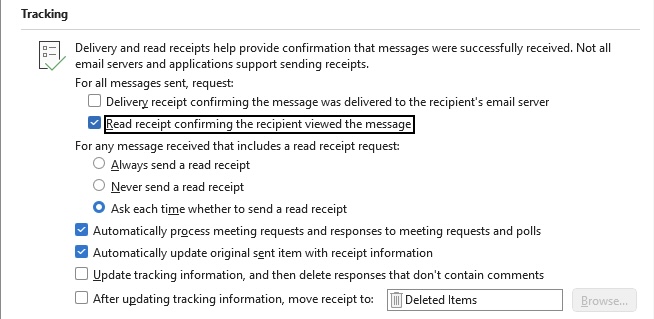
STEP 2: Click on ‘Tracking’ in the ‘Mail’ category > “Read receipt confirming the recipient viewed the message”.
STEP 3: Check this box, and you’re all set.
Remember that even with automation, recipients can still choose not to send a read receipt. So while this can be a time-saver for you, it’s also good to pair it with thoughtful consideration of when a read receipt is truly necessary.
Monitoring Your Sent Messages
Understanding Delivery vs. Read Receipts
To master email tracking, it’s important to differentiate between delivery and read receipts. A delivery receipt tells you that the email has successfully landed in the recipient’s email server. It means the journey from your outbox to their server is complete, but it doesn’t ensure the recipient has actually seen the email. Your message might have taken a detour to the spam folder or be sitting unread in an overflowing inbox.
A read receipt, on the other hand, is like a virtual “yup, I’ve seen it” from the recipient, indicating that the email was not only delivered but also opened. However, remember that the recipient can decide whether or not to send this receipt, and not all email clients support this feature. Also, automatically sending read receipts may not be enabled by the recipient’s email server or program settings.
Tracking the Results: When Emails Are Opened
Once you’ve got the process down for requesting read receipts, tracking the results is what comes next. In Outlook, this can become a powerful means to monitor which emails are getting attention and which ones may need a follow-up. If you’ve enabled read receipts on a message, Outlook will notify you when that email is first opened by the recipient. Sometimes, you might even see how often it was opened, which can be useful to gauge interest or urgency.
For a more in-depth look, Outlook allows you to manage tracked emails effectively:
- Navigate to the Boomerang manage page.
- Here, you can view a list of your tracked messages and detailed information such as timestamps for the first and last open or link clicks.
- If necessary, you can archive messages to clean up your list and keep your tracking overview organized.
With these insights, you can tailor your communication strategy to be more effective, knowing which conversations need nurturing and which ones are progressing smoothly.
The Pros and Cons of Using Read Receipts
Enhancing Communication or Infringing on Privacy?
The debate surrounding read receipts often revolves around their impact: do they enhance communication or infringe on privacy? On one hand, read receipts can streamline communication, providing assurance that a message has been received and attended to. This can be particularly advantageous in fast-paced business environments where timely responses are invaluable.
However, on the flip side, read receipts can sometimes feel intrusive, as if one’s digital space is being monitored. It places an unspoken expectation on the recipient to respond hurriedly, which can be stressful. Plus, it can lead to misunderstandings – someone might read an email but need time to think or gather information before responding.
Understanding this balance is key. When used thoughtfully and sparingly, read receipts can be a tool for effective communication. However, it is vital to respect the recipient’s right to privacy and allow them time to respond at their own pace.
Should You Use Read Receipts for All Your Emails?
Should you use read receipts for every email you send out? Well, consider this: Not all emails are created equal. Some might be informal check-ins or low-priority updates that don’t necessitate confirmation of receipt. Flooding recipients with read receipt requests for every single email can be overkill and might even backfire – think of it as the boy who cried wolf.
Best practice advises against it. Reserve read receipts for those situations where it’s crucial to know your message has been seen – like for time-sensitive issues, critical updates, or when you’re coordinating on an important project. For everyday communications, trust in the natural flow of conversation. After all, if a response is needed, odds are you’ll get one without the nudge of a read receipt.
Respecting Recipient Preferences
How to Respond to Read Receipt Requests
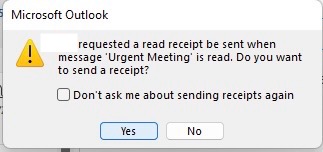
When you’re on the receiving end of a read receipt request, it’s your turn to make a call. If you value transparency and want to acknowledge that you’ve seen the message, go ahead and send that read receipt back. Outlook typically prompts you with the option to send the receipt when you open the email, so it’s just a click away.
But, if you’re not ready to send a response or if you prefer to keep your email reading habits private, you’ve got the freedom to decline. Outlook won’t notify the sender until you send a response, so take your time. Your inbox, your rules.
It’s all about balance and boundaries. Reciprocate with read receipts when it feels appropriate, and don’t be afraid to opt out when you need space to process the information or if it’s a matter of principle for you.
Tips for When to Accept or Decline Sending Receipts
Here’s a little guide for the email tightrope you might find yourself walking from time to time. If an email comes from a colleague or superior and it relates to vital work matters, it’s generally a good call to accept and send the read receipt. It keeps things transparent and shows you’re on top of your emails.
When the situation is less formal, or if sending a receipt could lead to unnecessary pressure on you, feel free to decline. Remember, the control is in your hands, and you have valid reasons for wanting to manage your own timing and email responses.
And if you frequently interact with someone who sends read receipts, consider a quick chat about it. You might find a mutual preference that respects both your communication styles and privacy concerns.
Troubleshooting Common Issues
Preventing Outlook from Automatically Sending Receipts
When you’re eager to carve out a slice of privacy in your digital communications, knowing how to stop Outlook from automatically dishing out read receipts is crucial. To prevent your Outlook from doing this, simply hit up the Options menu:
STEP 1: Begin by clicking on the ‘File’ tab and choosing ‘Options’.
STEP 2: Under the ‘Mail’ category, you’ll find the ‘Tracking’ section.
STEP 3: Here, clear the checkbox for “Read receipt confirming the recipient viewed the message”.
STEP 4: Click ‘OK’ to save your preferences.
By applying these steps, you ensure that your email interactions stay under your control, keeping them confidential and away from prying eyes.
Handling Missing or Unconfirmed Receipts
If you’re scratching your head over missing or unconfirmed receipts, don’t worry – there’s a method to this madness. There could be several reasons why a read receipt hasn’t made its way back to you, such as the recipient choosing not to send one, their email client doesn’t support this feature, or your email might have slipped into the spam folder.
Now, if you’re awaiting something critical, a polite follow-up email could be the key. It’s not just about pushing for that receipt, but also to clarify if the email was received and to gently prompt a response. If there’s still radio silence, considering a direct call or message might be appropriate to ensure your message was not lost in cyberspace.
Remember, while technology is here to make life easier, sometimes good ole human communication trumps an automatic notification.
FAQ: Mastering Read Receipts in Outlook
Can I Set Up Read Receipts in Both Outlook Desktop and Web Versions?
Absolutely, you can set up read receipts in both the Outlook desktop app and the web version, keeping your email game strong across the board. While the desktop version offers more in-depth options, the web version allows you to request read receipts on a per-email basis. Just keep in mind that Outlook.com, the free webmail service, doesn’t support this functionality – it’s available only for those with an active Microsoft 365 or Exchange Online plan.
If you toggle these settings on desktop, be aware they’ll only apply to emails sent from the Outlook application, keeping your web usage independent, which can be quite handy for managing professional versus personal communications.
Is It Possible to Request a Read Receipt Without the Recipient Knowing?
No, in Outlook, it’s not possible to go incognito with read receipt requests. The recipient will always be notified and prompted to send a read receipt back to you. They have the autonomy to decide whether to share the read confirmation or not. This transparency ensures that both parties are aware of the tracking request, respecting the recipient’s privacy and consent.
What Should I Do If I’m Not Receiving Read Receipt Confirmations?
If you’re not getting those read receipt confirmations as expected, don’t fret. Consider these steps:
- Check your sent items to confirm the read receipt request was included.
- Look in your junk or spam folder for misrouted confirmations.
- Contact the recipient to ensure they’ve received the email and haven’t overlooked the receipt request.
- Review your Outlook settings to make sure the read receipt replies aren’t being handled in an unexpected way or automatically moved to a specific folder.
Persistence is key, but patience is equally important. If it’s crucial, a respectful follow-up can clear the air without causing email tension.
John Michaloudis is a former accountant and finance analyst at General Electric, a Microsoft MVP since 2020, an Amazon #1 bestselling author of 4 Microsoft Excel books and teacher of Microsoft Excel & Office over at his flagship Academy Online Course.


