Unlock the power of collaboration in Microsoft Excel with the Track Changes feature. This essential tool allows teams to work seamlessly on the same file, tracking every edit for transparency and efficiency.
Key Takeaways:
- Transparency and Accountability: Track Changes ensures clear visibility into who made what changes, fostering accountability and minimizing errors.
- Enabling Track Changes: Activate Track Changes by accessing the Review tab, highlighting changes, and customizing tracking options.
- Reviewing Changes: Navigate through changes easily by accepting or rejecting modifications, ensuring thorough review and data integrity.
- Comments vs. Change Tracking: Understand when to use comments for feedback and when to utilize change tracking for detailed edit logs.
- Maximizing Efficiency: Boost productivity with shortcuts and best practices, speeding up the review process and optimizing collaboration.
Table of Contents
Introduction to Track Changes in Excel
The Essentials of Collaboration in Excel
Collaboration in Excel can elevate your team’s efficiency and minimize errors by allowing multiple users to work on the same file while tracking individual contributions. Imagine you could follow every edit, knowing exactly who made what change and when. That’s the power of the Track Changes feature in Excel – a real-time, built-in audit trail that ensures transparency and coordination among team members.
Why Tracking Changes Matters
Tracking changes in Excel is pivotal when you’re juggling multiple edits from different team members. It provides a clear overview of who did what, helping you to avoid conflicts, misunderstandings, and errors. Knowing the edit history can be a lifesaver, especially when you need to backtrack and understand the reasoning behind certain data inputs. Not only does it increase accountability, but it also bolsters the decision-making process by providing insights into the progression of edits made to a document.
Enabling and Disabling Track Changes
Steps to Activate the Track Changes Function
To bring Excel’s Track Changes to life, you’ll have to dive into the Review tab and do a little setup. Here’s how to get started:
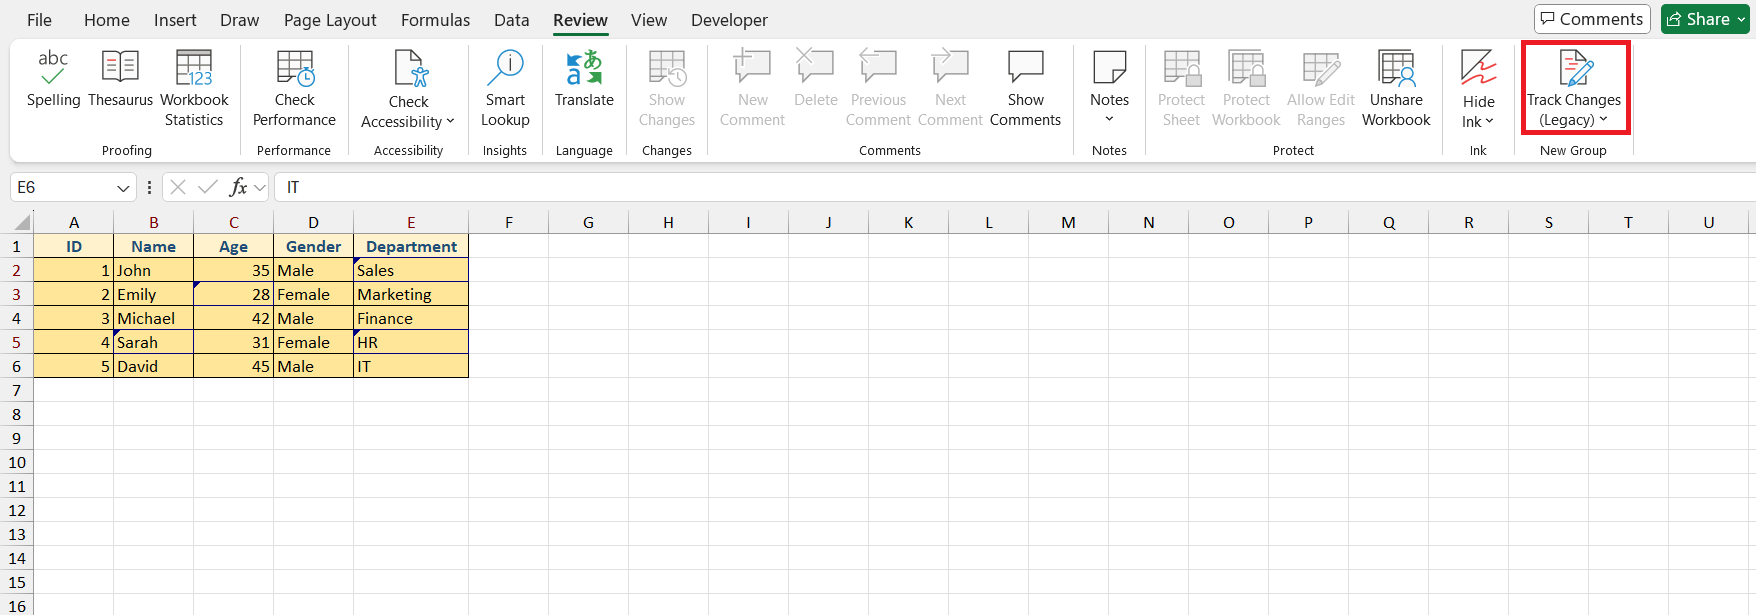
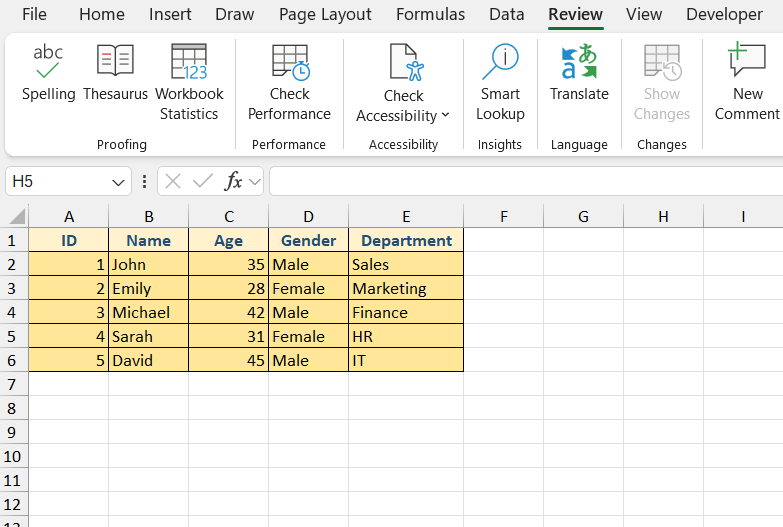
STEP 1: Open your workbook and select the Review tab.
STEP 2: Within the Track Changes group, find and click on the Track Changes option.
STEP 3: From the dropdown, choose Highlight Changes.
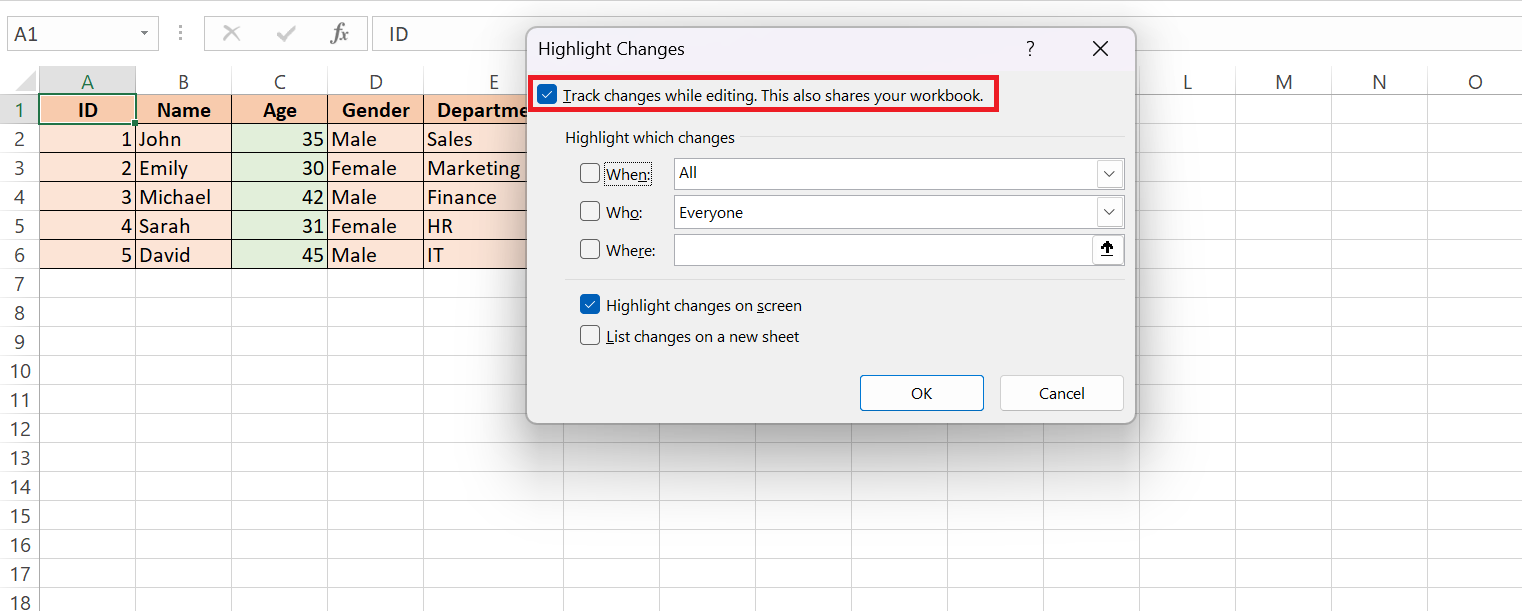
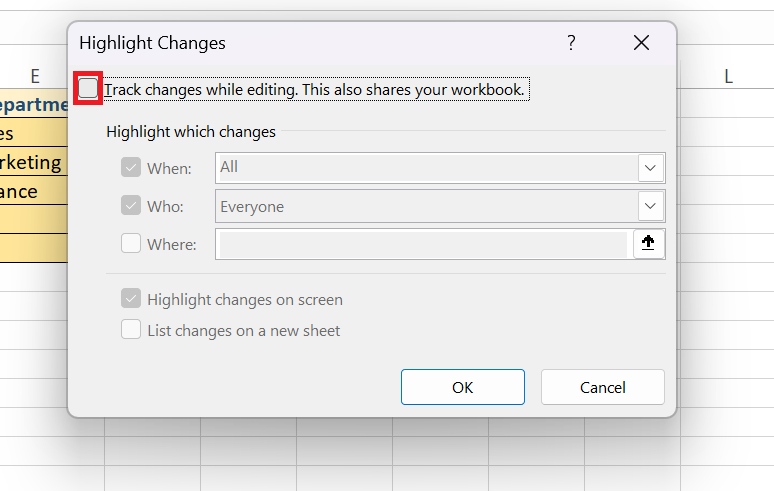
STEP 4: In the dialog box that pops up, tick the ‘Track changes while editing’ checkbox. This step shares your workbook as well.
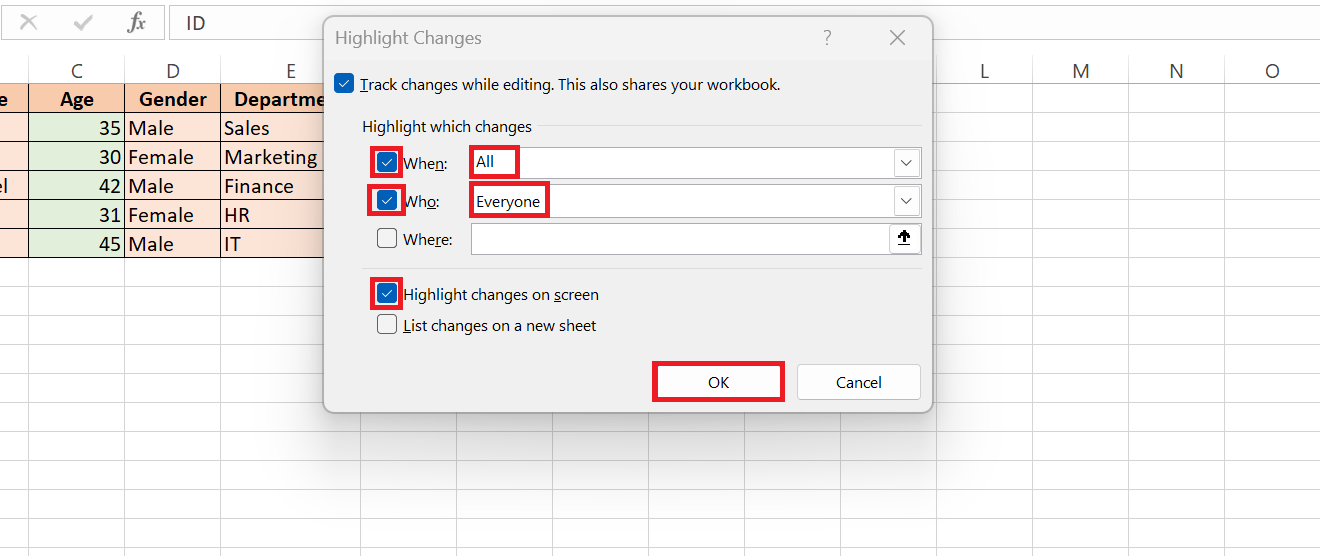
STEP 5: If necessary, define the ‘When’, ‘Who’, and ‘Where’ for changes you want to track. Lastly, Click OK.
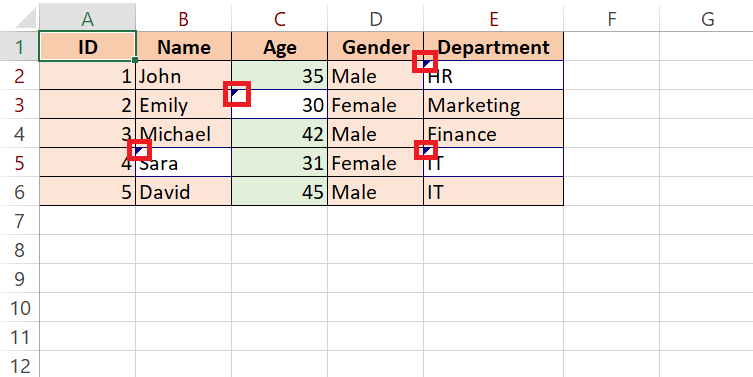
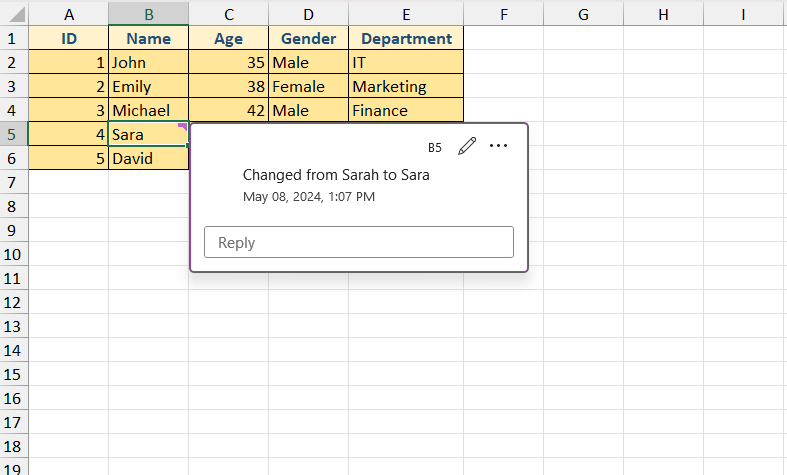
STEP 6: You’ve successfully activated Track Changes and can see a small blue triangle appearing on the cells in which the values have been changed and can be tracked through this function.
How to Turn off Track Changes for Good Housekeeping
To ensure your Excel workbook remains pristine at the project’s end, you’ll want to disable Track Changes. Doing so removes the visual reminders of edits and is essential for finalizing documents. Here’s a straightforward method to tidy up:
STEP 1: Click on the Review tab and hover over to the Changes group.
STEP 2: Select ‘Track Changes’ and then click ‘Highlight Changes’.
STEP 3: In the dialog box, uncheck the ‘Track changes while editing’ option. Remember, deselecting will stop sharing your workbook too.
STEP 4: Confirm your choice by clicking OK, and voilà, the blue highlighting and share feature end.
Remember, this action cannot be undone, and the change history will be permanently deleted. If you wish to archive the change history, consider listing the changes on a new sheet before turning off Track Changes.
Navigating the Review Process
How to Accept or Reject Modifications
Accepting or rejecting modifications in Excel is intuitive, yet a critical part of the review process. Here’s how you can manage these changes:
STEP 1: Navigate to the Review tab and click on ‘Track Changes’.
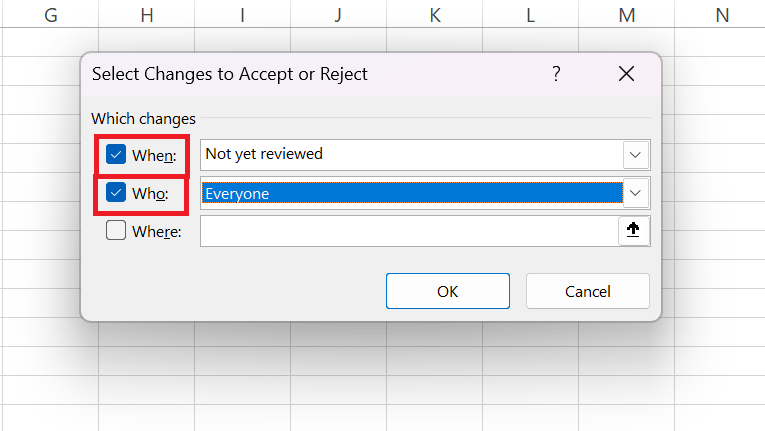
STEP 2: Select ‘Accept/Reject Changes’, and a dialog box will appear. Set your criteria for ‘When’, ‘Who’, and ‘Where’.
STEP 3: Press OK, and Excel will guide you through each change chronologically. For every edit, use the Accept or Reject button to decide its fate in your workbook.
It’s worth noting that you can also handle all alterations in one go by clicking ‘Accept All’ or ‘Reject All’. However, it’s often wiser to review each change individually to ensure no critical data is overlooked.
Differences Between Comments and Change Tracking
When to Use Comments Over Change Tracking
Choosing between comments and change tracking in Excel depends on the context of your review. Use comments when you want to provide feedback, ask a question, or offer a suggestion without altering the actual data. Comments are the digital equivalent of jotting a note in the margin—a visible conversation about the content that doesn’t interfere with the raw numbers or formulas.
On the flip side, enable change tracking when your priority is accountability and maintain a detailed log of every tweak in the data. It’s especially handy when multiple reviewers are involved, and you need to manage edits closely. Change tracking is the go-to for an audit trail, ensuring that no change goes unnoticed.
Viewing Comments versus Tracking Changes Side by Side
When it comes to viewing comments and tracking changes side by side, both provide unique perspectives on the data:
Comments: They hover next to cells, visible when you select or hover over a cell with a small red triangle. A perfect tool when you aim for specific, targeted feedback without altering the cell’s content. You can sift through comments sequentially using the Review tab’s ‘Next’ and ‘Previous’ options, tackling them one by one or opting to show or hide all comments at once.
Track Changes: This is more of a behind-the-scenes feature, automatically recording every alteration once activated. To view these changes, you’ll head back to the Track Changes dropdown and select ‘Highlight Changes’ to customize which edits to display. Changes are typically marked by a colored border or highlighting, depending on your settings.
Together, comments and track changes provide a powerful dual system for capturing feedback and maintaining data integrity. You get the flexibility to integrate subjective insights with objective data revisions.
Tips for Effective Change Management in Excel
Best Practices for Highlighting and Reviewing Changes
Highlighting and reviewing changes in Excel needn’t be a chore if you adhere to a few best practices:
- Turn On Highlighting: Before sharing the workbook, ensure the ‘Highlight changes on screen’ option is active. This visually marks all changes, making them easier to spot on review.
- Set Clear Change Parameters: Define the ‘Who’, ‘When’, and ‘Where’ for changes to avoid clutter. A narrower focus means a smoother review process.
- Establish Review Rhythms: Schedule regular review sessions. This helps manage revisions incrementally rather than dealing with overwhelming backlogs.
- Communicate with Your Team: Discuss and agree on how to use Track Changes and comments. Uniform usage across the team prevents confusion.
Remember, the undo function doesn’t work for changes once you’ve accepted them. So take care when reviewing and make sure everyone on the team is aware of this.
Troubleshooting Common Issues with Track Changes
Solving Problems with Missing Track Changes
If you’re facing the conundrum of missing Track Changes, don’t fret—there are solutions to this hiccup:
- First, ensure Track Changes is turned on. It’s easy to overlook, but double-checking this can save you from a needless headache.
- Check whether the workbook is shared. Track Changes can disappear if workbook sharing is turned off. To re-enable, go to the Review tab and click ‘Share Workbook’.
- Review your filtering options. Incorrect settings might be hiding the changes you’re looking for.
- If the History worksheet isn’t showing the changes, it might need a refresh. Save your workbook, re-access the Track Changes options, and update as necessary.
Also, keep in mind the limitations of Excel’s Track Changes. For instance, it won’t track changes to formulas or charts, and there’s a cap on how many changes it can store.
Preventing Inadvertent Loss of Change History
To safeguard against the accidental loss of your precious change history, you’ll want to be proactive:
- Adjust Duration of Change History: By default, Excel keeps the change history for 30 days. To extend this period, access the ‘Share Workbook’ dialog and specify your preferred number of days to retain the change history.
- Regular Backups: Create regular backups of your workbook. This can be done manually or by setting up an automated system, ensuring you always have a fallback option.
- Control Permissions: Be selective with who can approve or reject changes. This adds a layer of protection, making sure changes are vetted properly.
- Documentation: Document your change management process. Educate your team on the significance of this feature and the steps to follow, reducing the risk of mishandled change history.
- Use Version Control Tools: Consider third-party version control tools designed for Excel, providing more robust options for managing and archiving your workbook’s evolution over time.
Remember, once the history is lost, there’s no magic button to bring it back. So, take these preventive measures seriously.
Maximizing Productivity with Excel’s Track Changes
Shortcuts to Speed Up the Review Process
Maximizing efficiency during your review is all about knowing the right shortcuts:
- Shift to Next or Previous Change: Instead of manually searching for changes, use
Shift + F5to jump to the next edit orShift + F4to go back. This keyboard shortcut saves you from the hassle of scrolling. - Quick Access to Track Changes: Instead of going through the ribbon each time, add the Track Changes commands to the Quick Access Toolbar. Right-click on the ‘Track Changes’ button and select ‘Add to Quick Access Toolbar’. Now, regardless of the tab you’re on, one click is all it takes.
By incorporating these shortcuts into your routine, you’ll breeze through the review process, giving you more time to analyze the data itself rather than how it’s being manipulated.
FAQs about Track Changes in Excel
Is there a way to track changes in Excel?
Absolutely, Excel offers a built-in Track Changes feature. To use it, go to the Review tab, click ‘Track Changes’, and then ‘Highlight Changes’. You can set it to record changes and even display them on a separate History worksheet. This feature is a game-changer for collaborative work and auditing edits in your spreadsheets.
How Can I Make Sure All Changes Are Tracked in Excel?
To ensure all changes are tracked in Excel, activate the ‘Track Changes‘ feature by going to the Review tab and clicking on ‘Highlight Changes’. Choose to track all changes, define ‘Who’ and ‘Where’ to monitor, and opt to list changes on a new sheet. Save your document frequently to maintain an up-to-date change history.
Can Track Changes Be Used Concurrently by Multiple Users?
Yes, Excel’s Track Changes can be used by multiple users concurrently. When you enable Track Changes, the workbook is shared, allowing different users to edit the file simultaneously. Each user’s changes are documented, ensuring transparency in collaboration. However, keep in mind the potential for conflicts or performance issues with many users editing at once.
Why are track changes not available in Excel?
Track Changes may not be available in Excel due to specific workbook features such as tables or XML maps which are incompatible with shared workbooks. To fix this, convert tables to ranges and remove XML maps. Other reasons include use of VBA, presence of Excel Tables, or because the workbook isn’t shared. Additionally, Microsoft has labeled this function as “legacy” and now promotes co-authoring instead.
How do you see edit history in Excel?
To see edit history in Excel, you need to have Track Changes turned on. Once it’s active, select ‘Highlight Changes’ from the ‘Track Changes’ options under the Review tab. You can then opt to list the changes on a new sheet, which Excel calls the History worksheet, where you can comfortably view and filter all edits.
John Michaloudis is a former accountant and finance analyst at General Electric, a Microsoft MVP since 2020, an Amazon #1 bestselling author of 4 Microsoft Excel books and teacher of Microsoft Excel & Office over at his flagship Academy Online Course.


